Step-by-step Office 365 Backup process
The software helps users to backup their Office 365 mailboxes and Exchange data into PST format. It is useful for both end users and administrators to backup their single as well as multiple mailboxes in PST format.
- Backup a single Office 365/Exchange mailbox to PST.
- Backup multiple Office 365/Exchange mailboxes to PST.
Backup a single Office 365/Exchange mailbox to PST
This tool allows you to backup a single Office 365/Exchange mailbox to PST. Follow the below steps to backup the single mailbox:
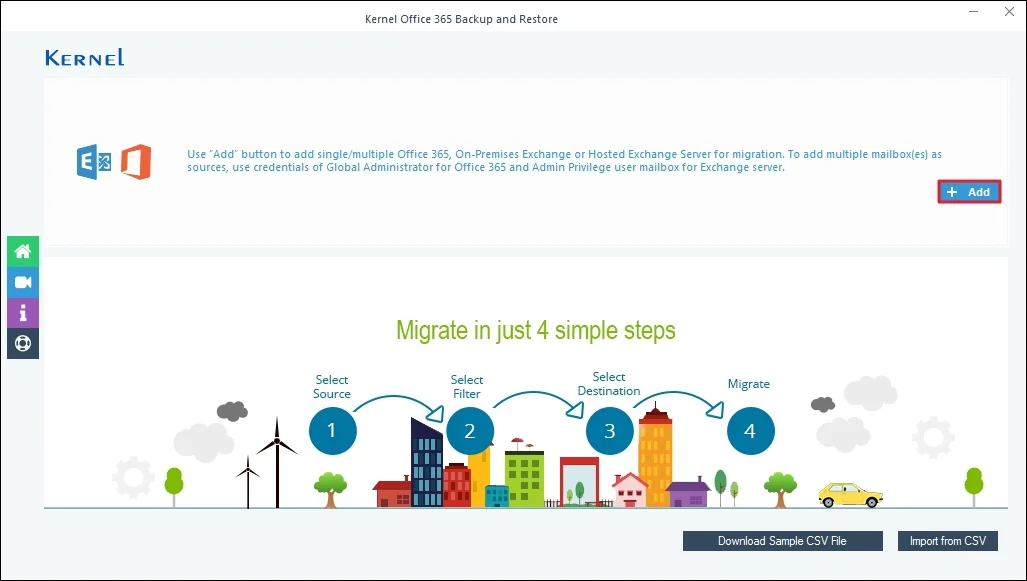
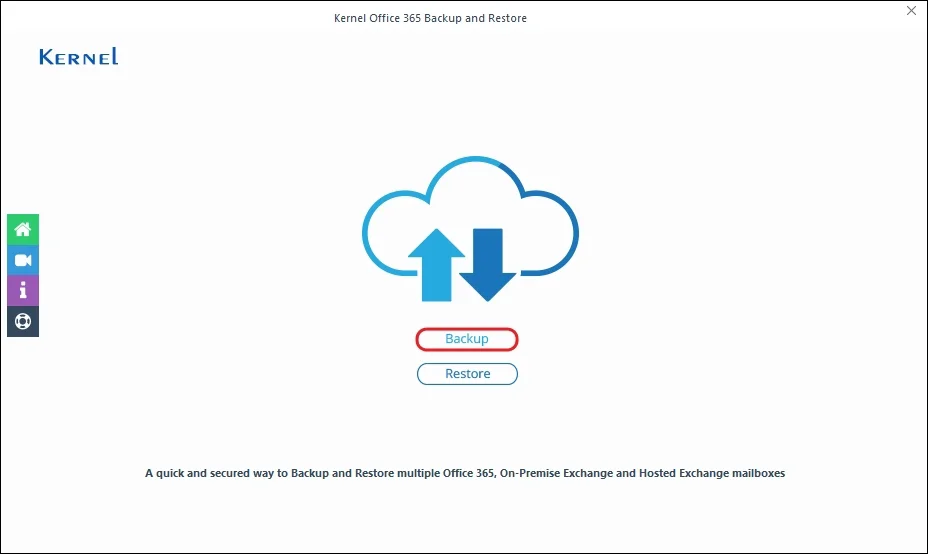
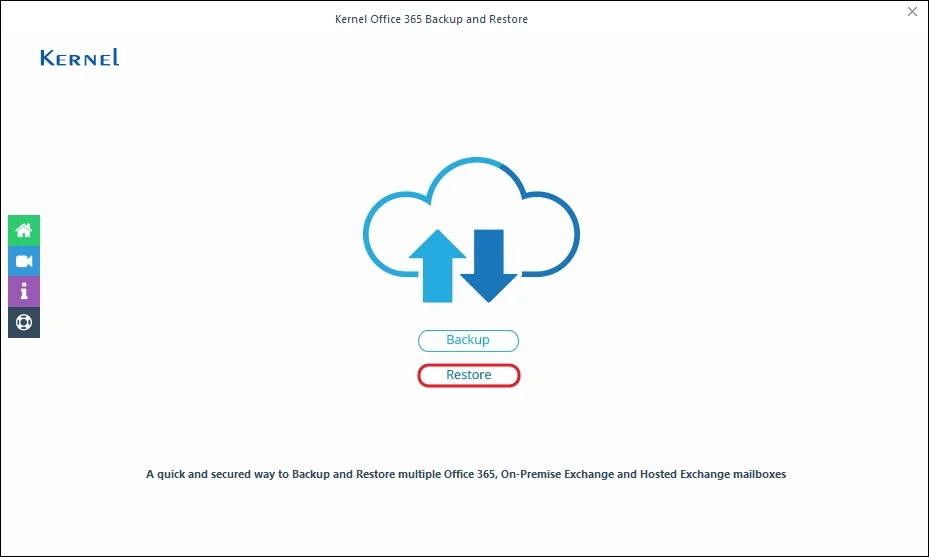
Step 1: Launch the Kernel Office 365 Backup and click Backup.

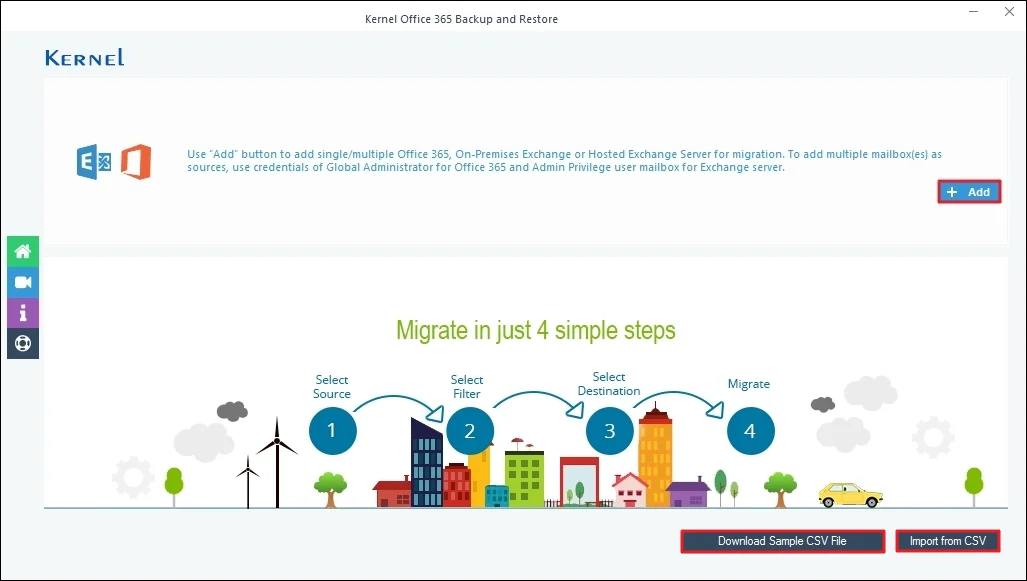
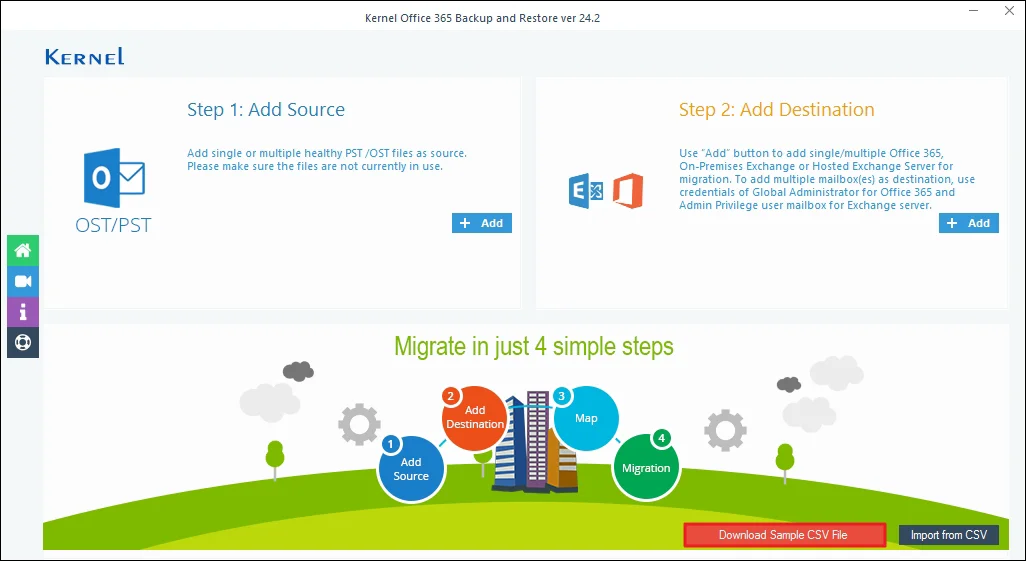
Step 2: To add a source Exchange Server/Office 365 mailbox for backup, click the Add button.
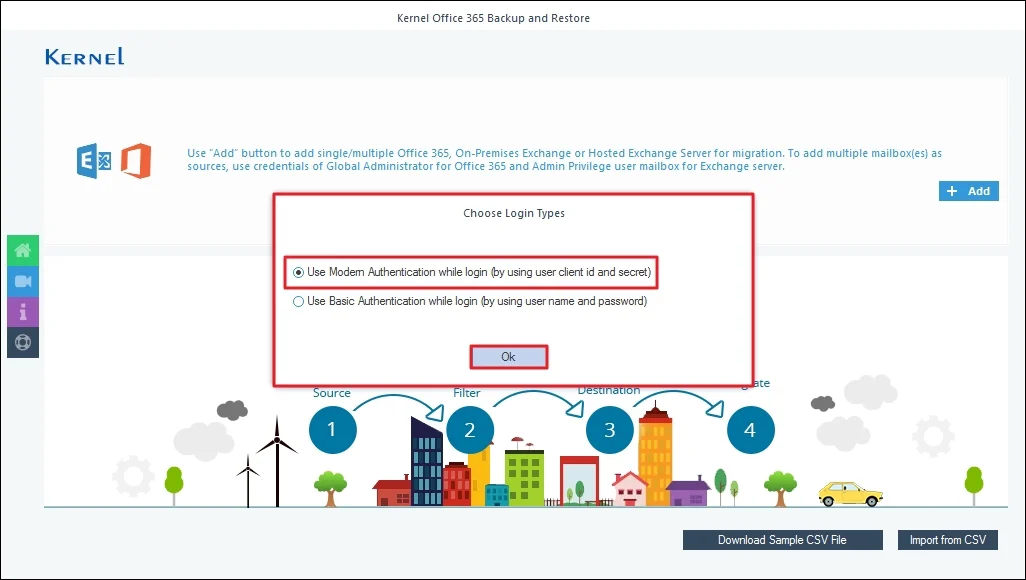
Step 3: Click on Use Modern Authentication while login (by using user client id and secret) and tap on OK.
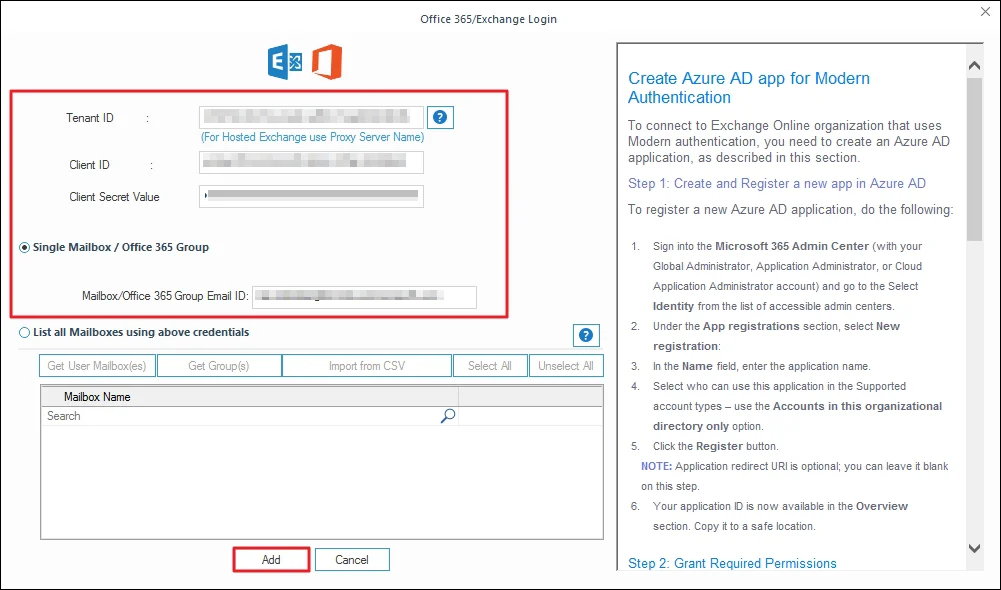
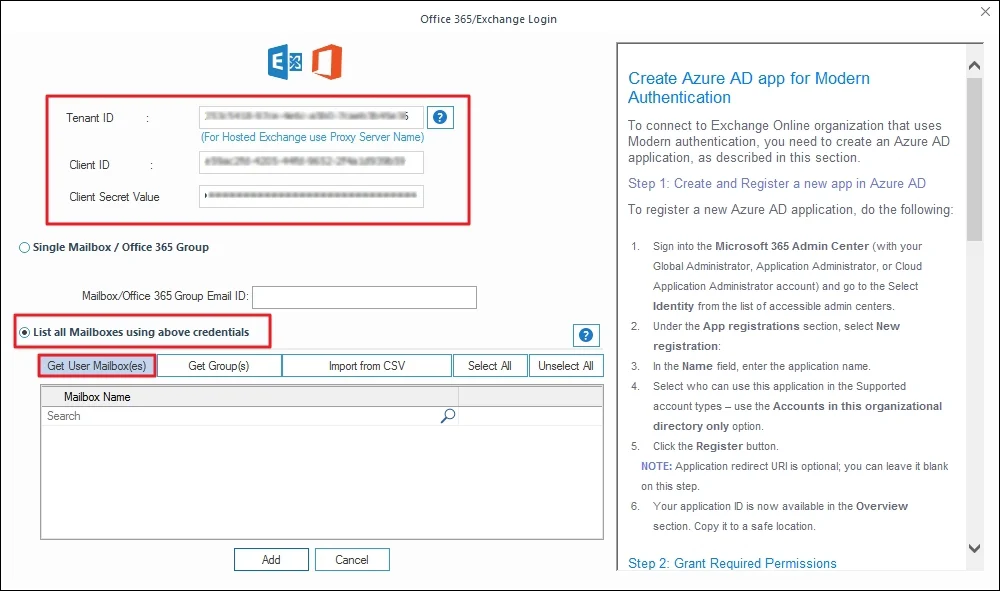
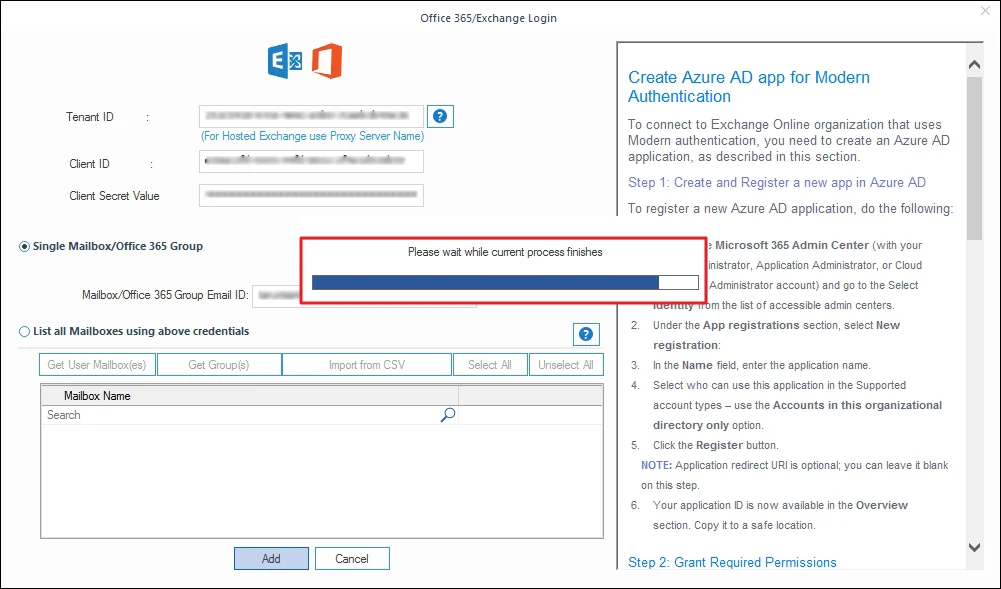
Step 4: In the Office 365/Exchange Login page, provide the source credentials such as Tenant ID, Client ID, and Client Secret Value. Choose Single Mailbox/ Office 365 Group, enter Mailbox/ Office 365 Group Email ID, and click Add.
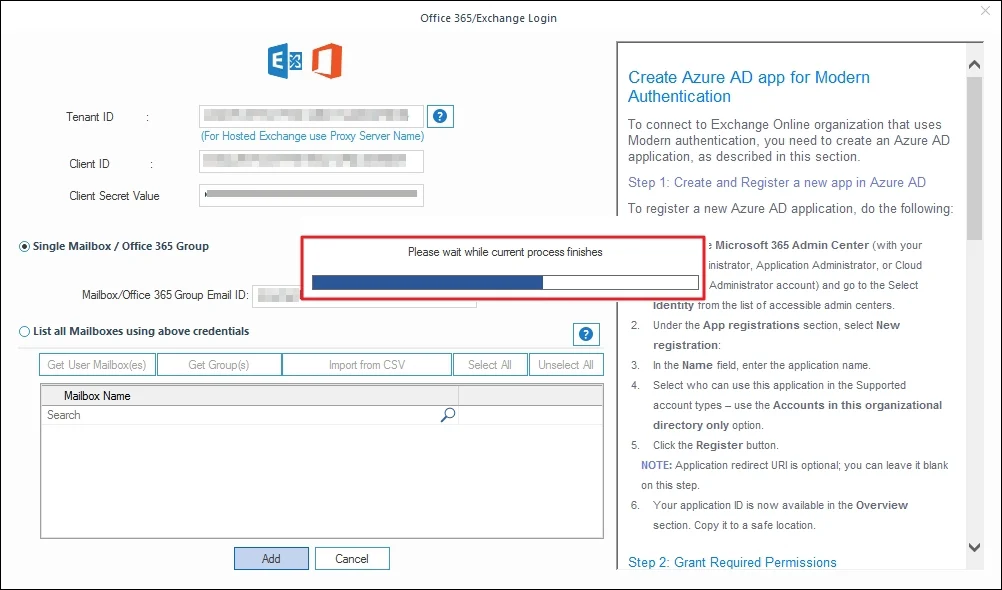
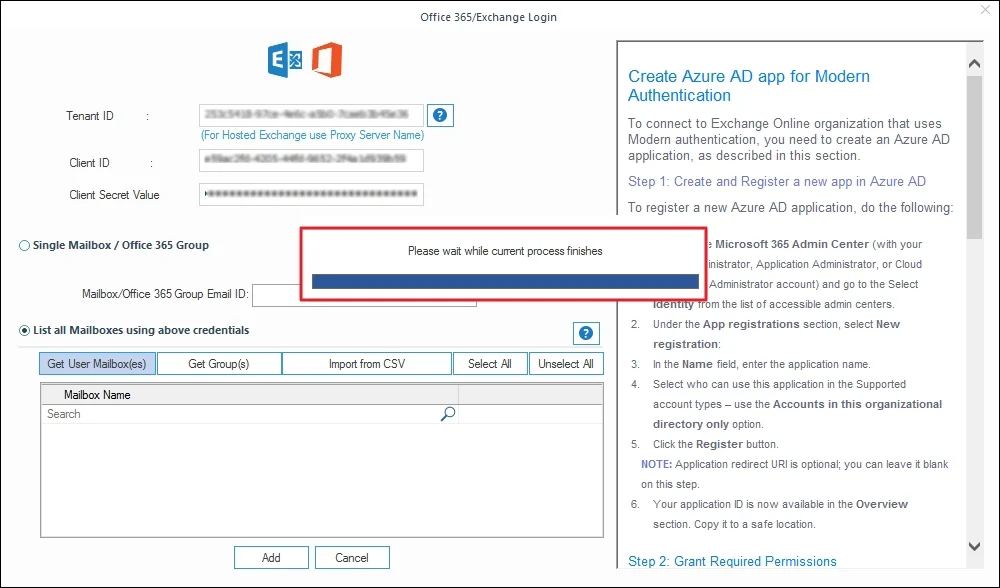
Step 5: The software will display Please wait while current process finishes.
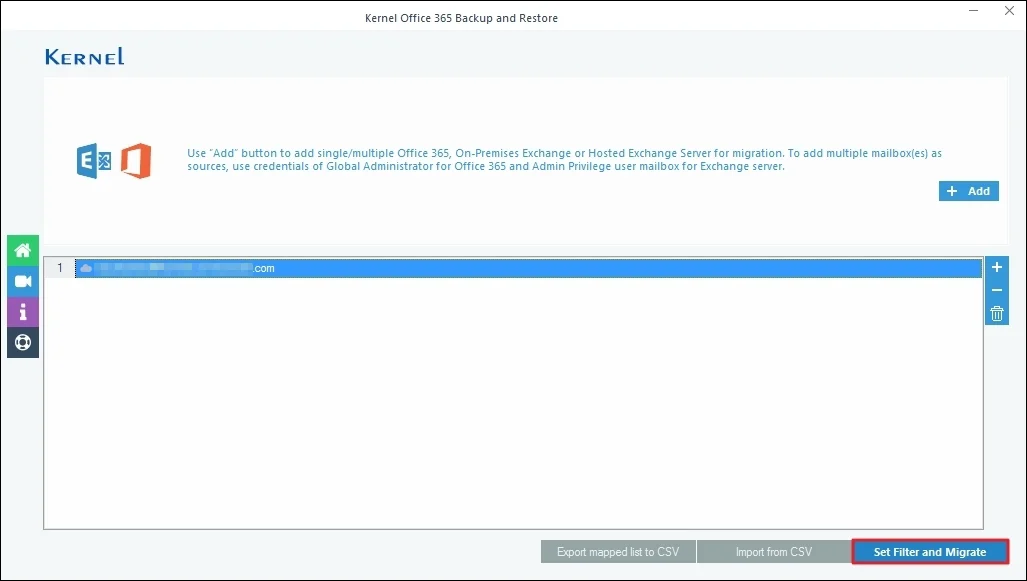
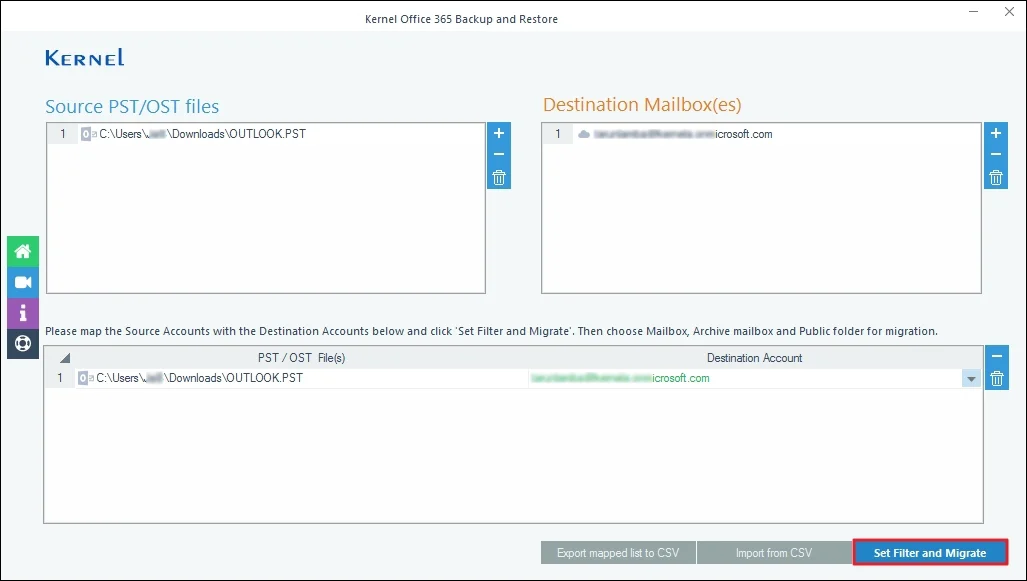
Step 6: Verify the selected mailbox, click Set Filter and Migrate.
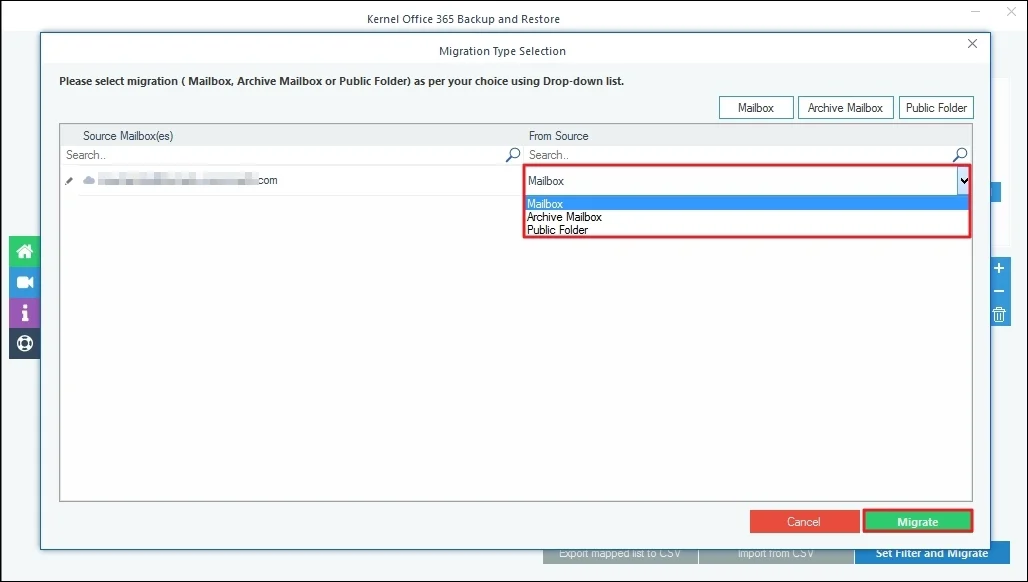
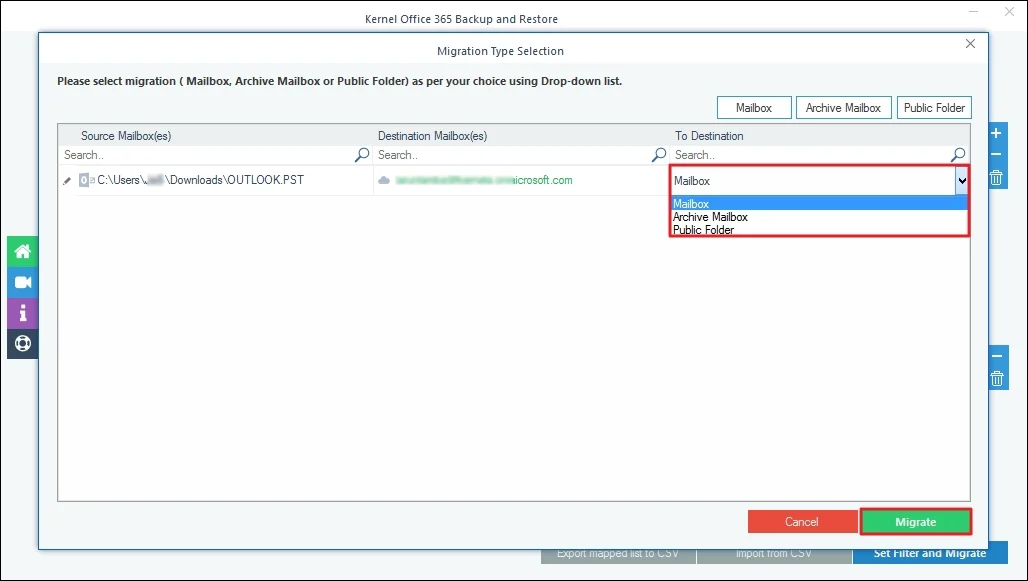
Step 7: In From Source, select Mailbox, Archive Mailbox, and Public Folder accordingly. After that, click on Migrate.
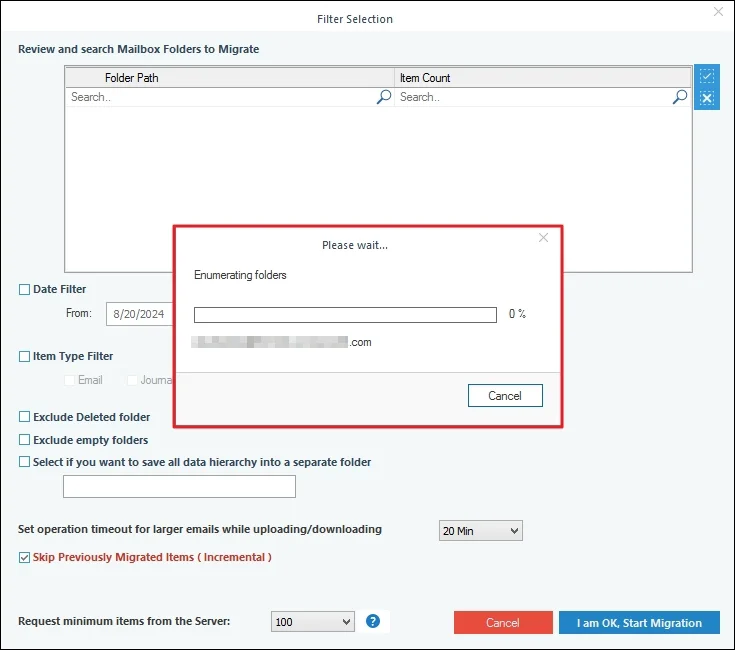
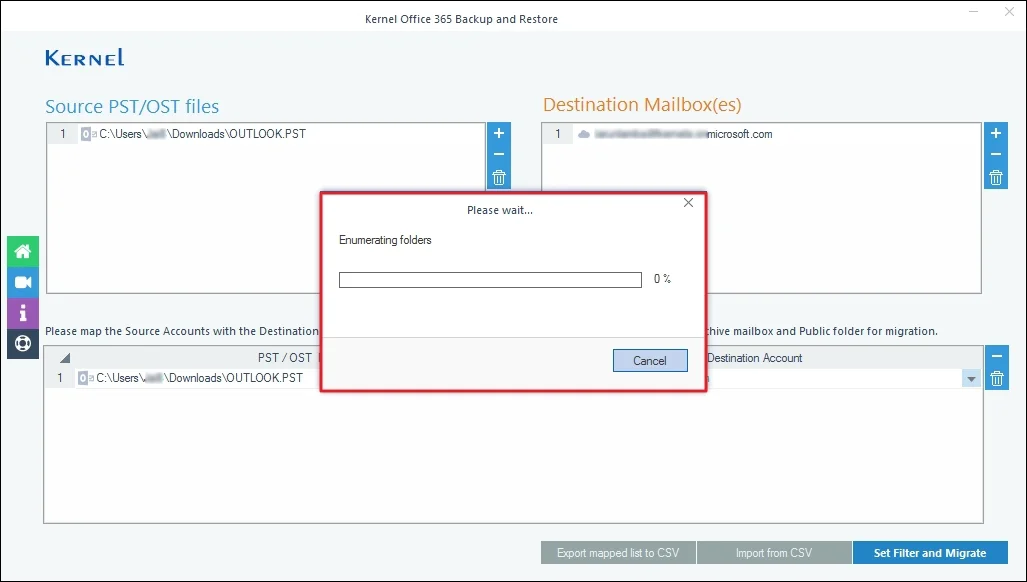
Step 8: The software will start Enumerating folders from your selected mailbox.
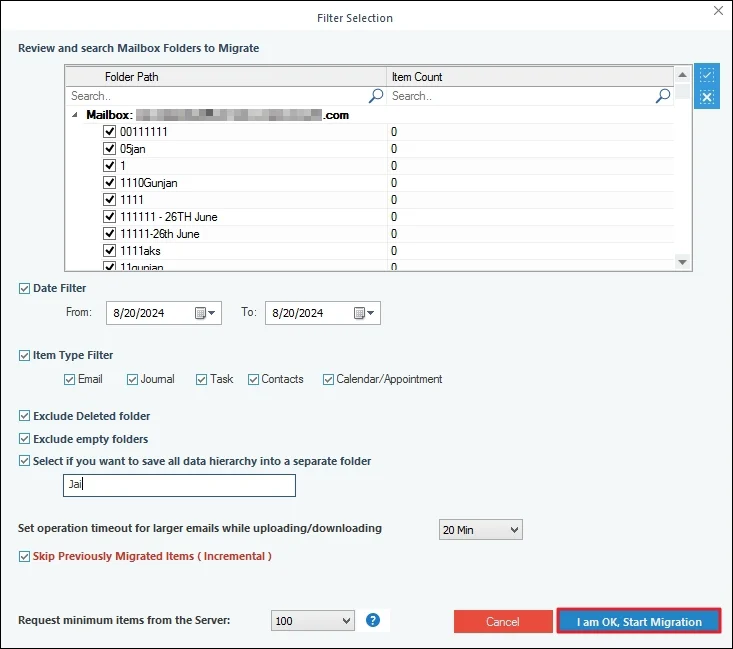
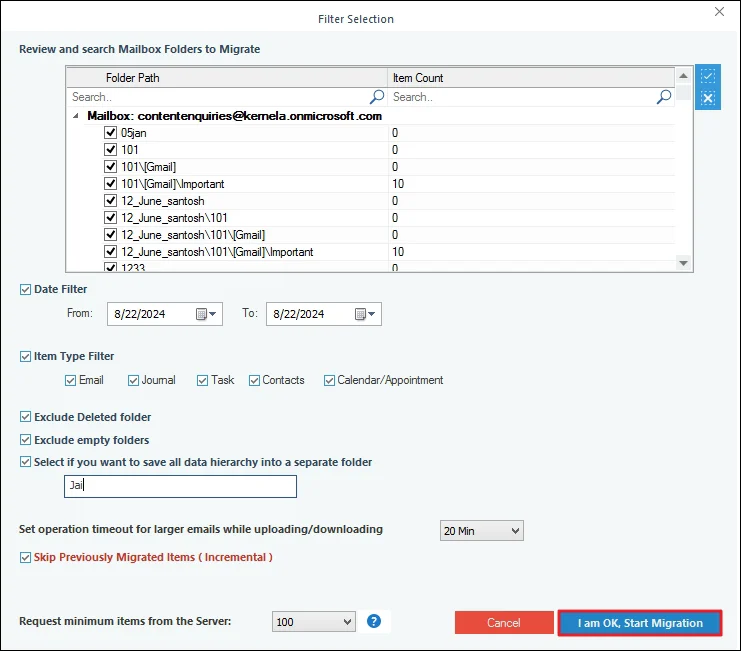
Step 9: In the Filter Selection window, choose the filtering options as required:
- Review and search Mailbox Folders to Migrate: Select the folders to migrate.
- Date Filter: Provide a date range to filter items.
- Item Type Filter: Select Email, Journal, Task, Contacts, and Contacts/Appointment accordingly.
- Exclude Deleted folder: Select to skip deleted items folder from migration.
- Exclude empty folders: Exclude empty folders from the migration.
- Select if you want to save all data hierarchy into a separate folder: Provide a folder name (to save the data inside a folder.)
- Set operation timeout for larger emails while uploading/downloading: Select an upper time limit for backup (the backup will be rejected if it exceeds the limit).
- Skip Previously Migrated Items (Incremental): Check the box to exclude the already migrated data and migrate only the additional data.
- Request minimum items from the Server: The software will request server to retrieve files from the mailbox.
Finally click I am OK, Start Migration.
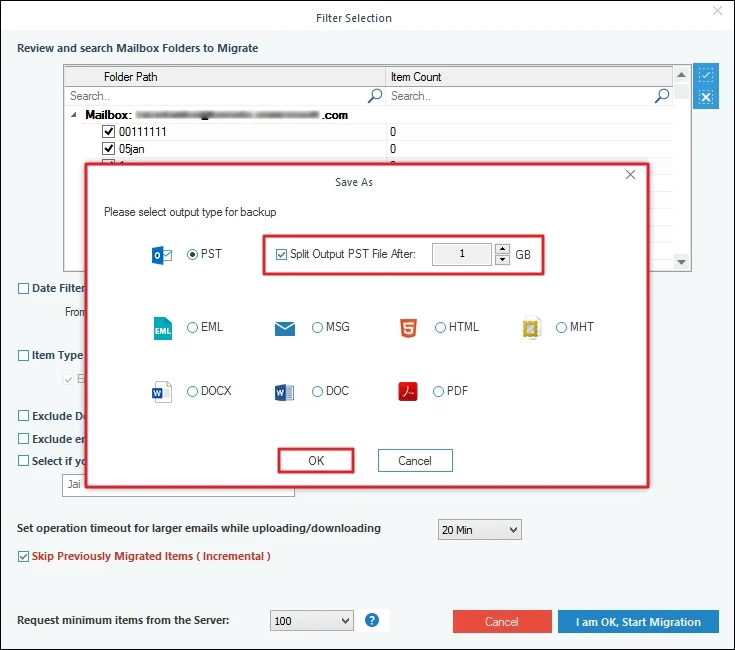
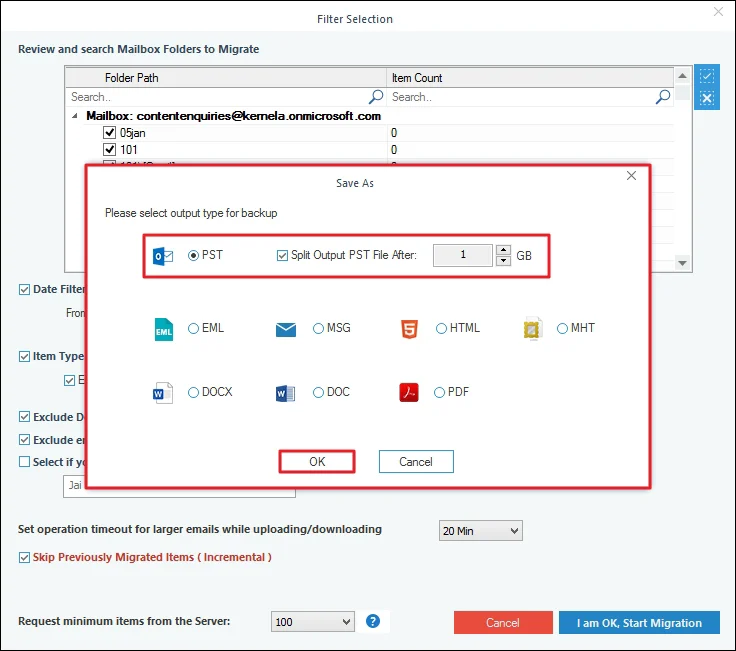
Step 10: In Save As wizard, select PST format and tick Split Outlook PST File After to create multiple PST files accordingly and click OK.
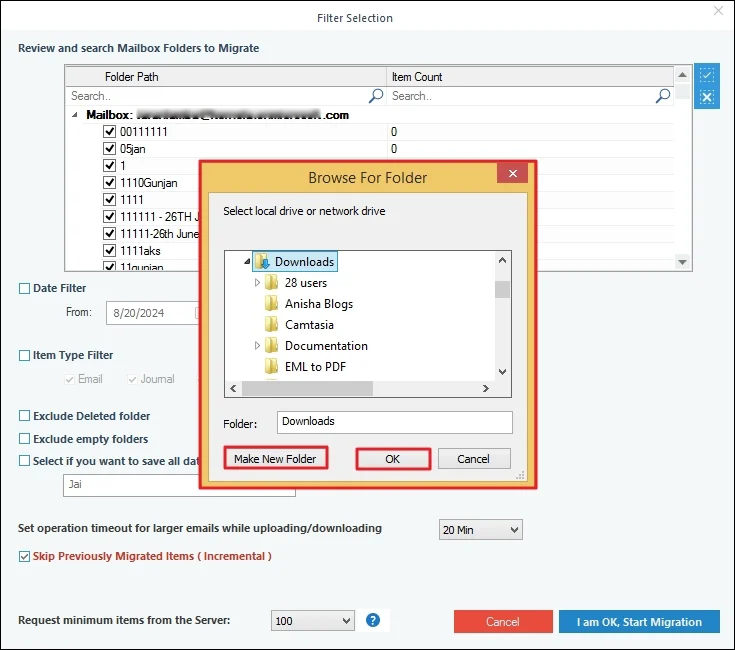
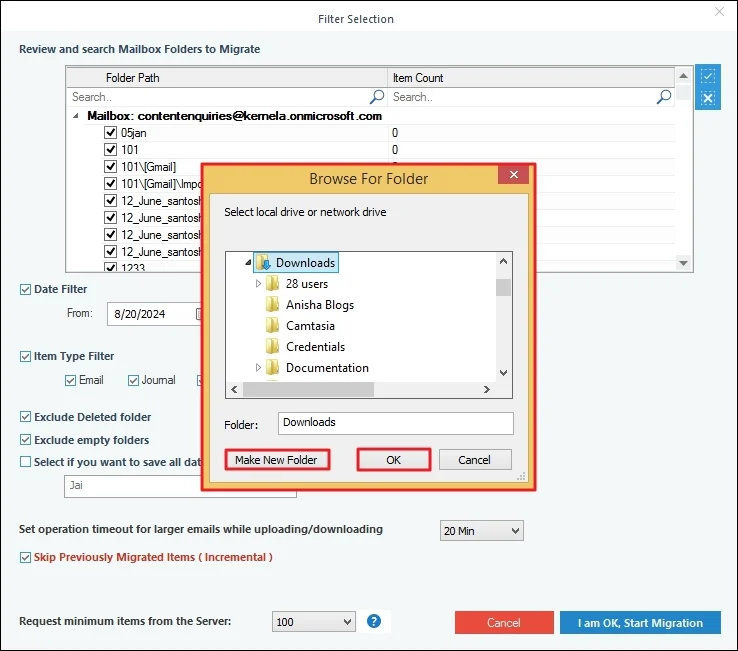
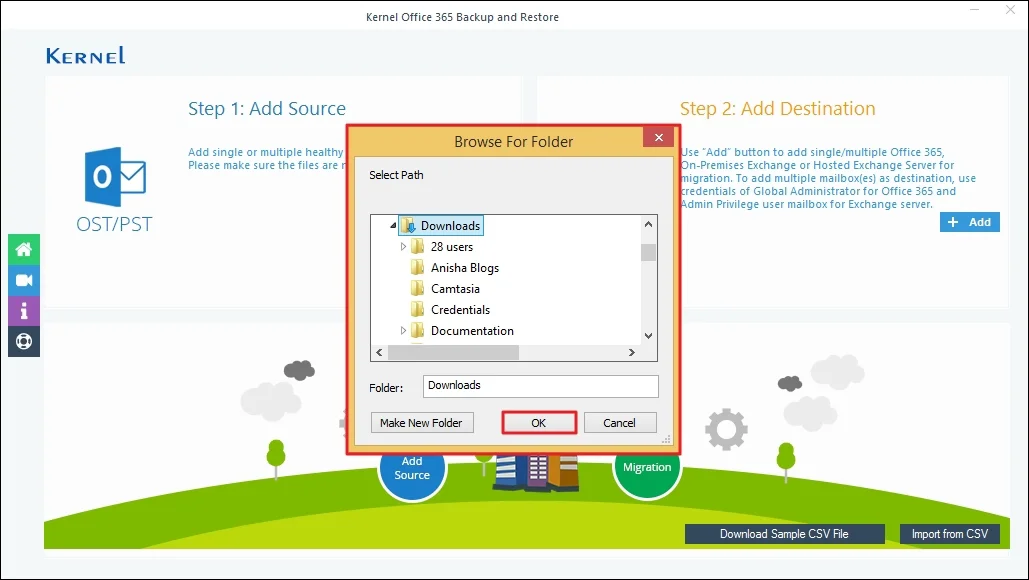
Step 11: Browse and select a specific folder to save PST files. Also, you can click Make New Folder and click OK.
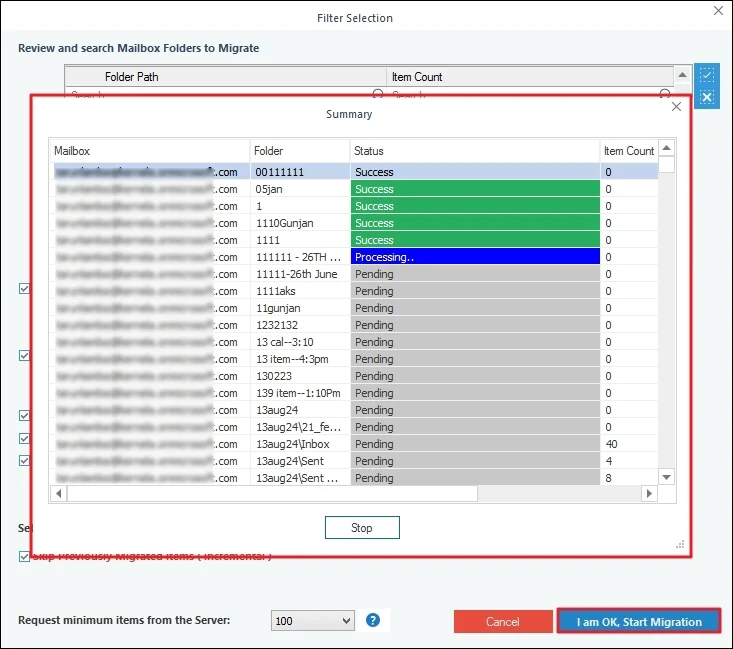
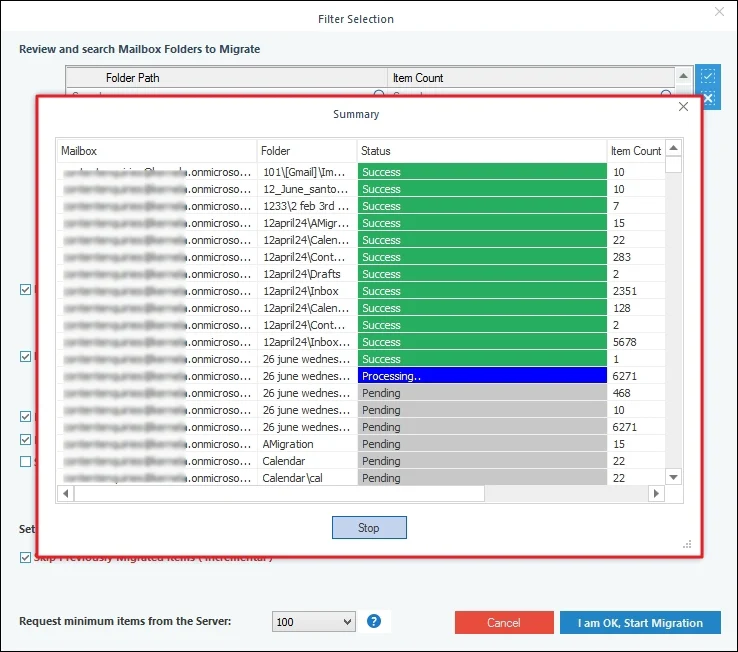
Step 12: The software will start and show you the live migration process.
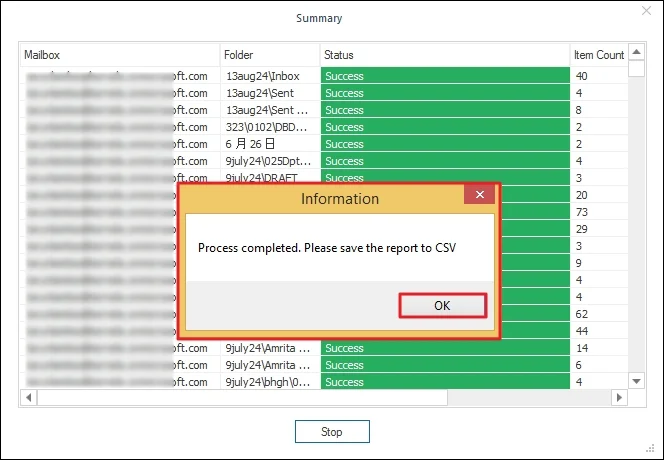
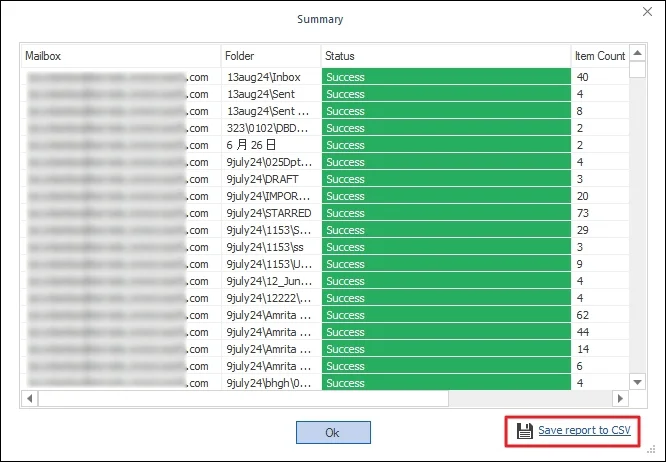
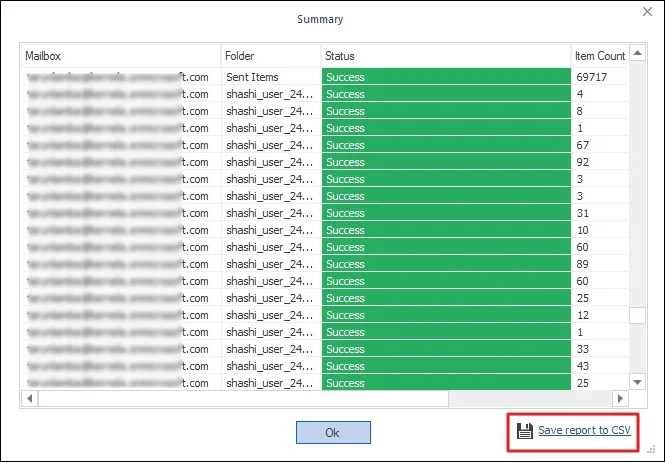
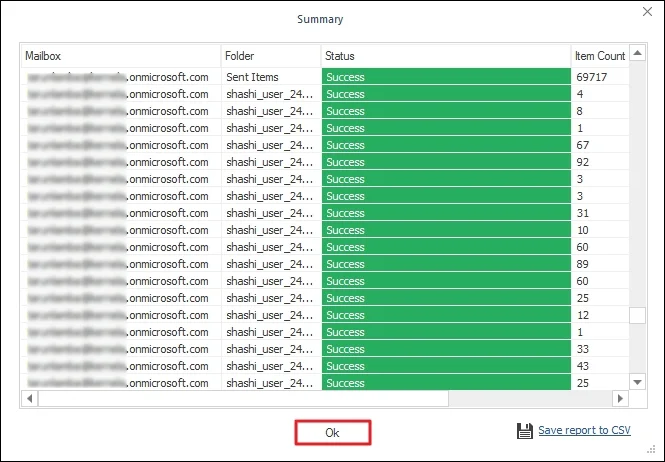
Step 13: Once the migration process is completed, software will pop up Process completed. Please save the report to CSV and click on OK.
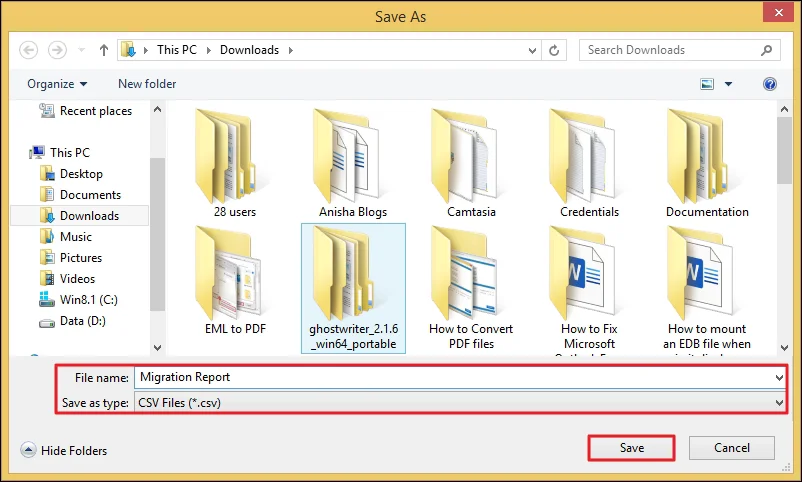
Step 14: Download detailed migration report by clicking Save report to CSV.
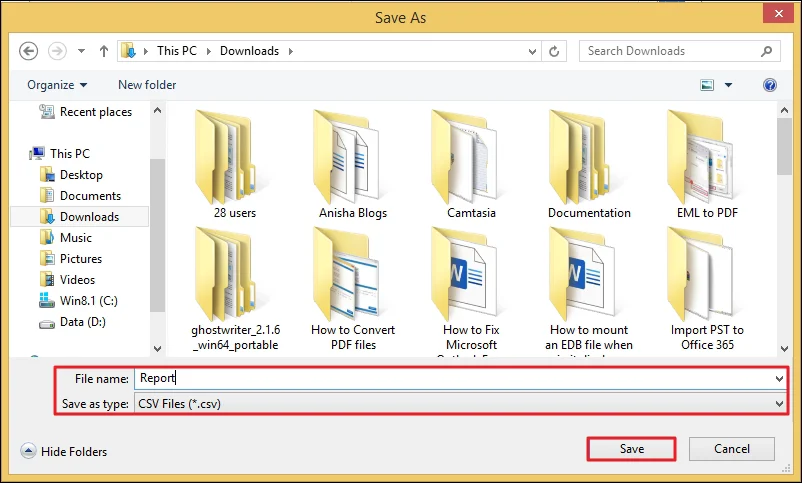
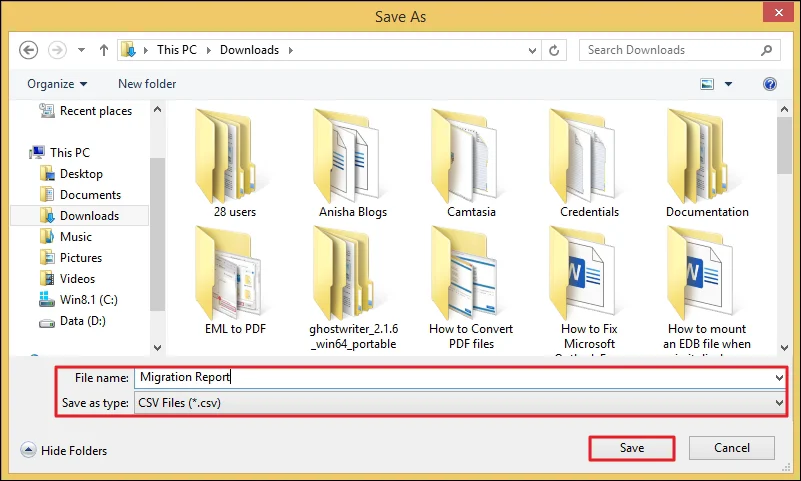
Step 15: Select a preferred location, enter the file name, and click on Save.
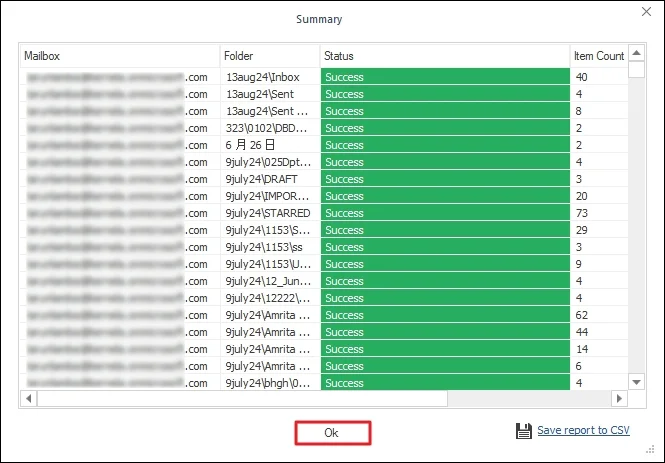
Step 16: Click on OK to end the process.
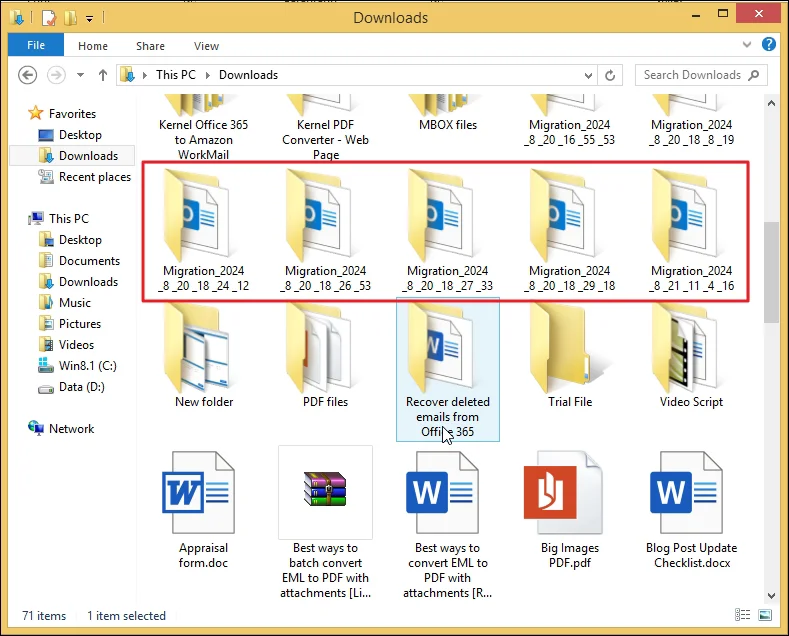
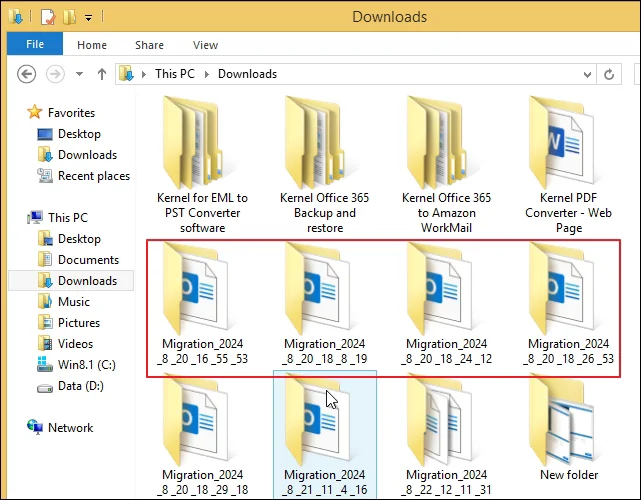
Step 17: Finally, access your migrated files at saving location.
Backup multiple Office 365/Exchange mailboxes to PST
To backup multiple Office 365/Exchange mailboxes, you need to have an Office 365 account with administrative privileges.
Step 1: Launch the application and click the Backup button.
Step 2: Click on Add to map Exchange Server/Office 365 account with the software.
Step 3: Select Use Modern Authentication while login (by using user client id and secret) in Choose Login Types and click OK.

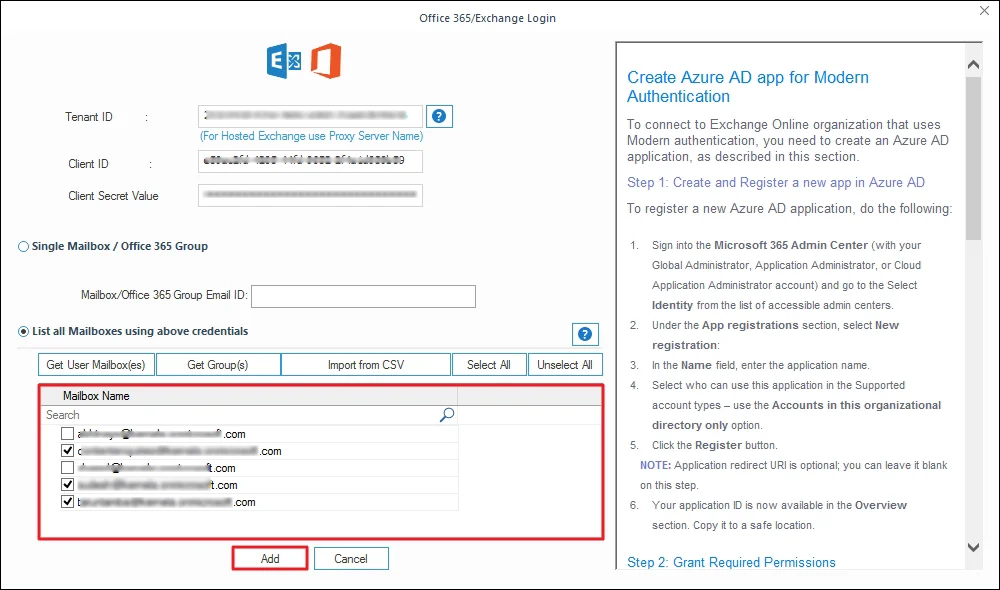
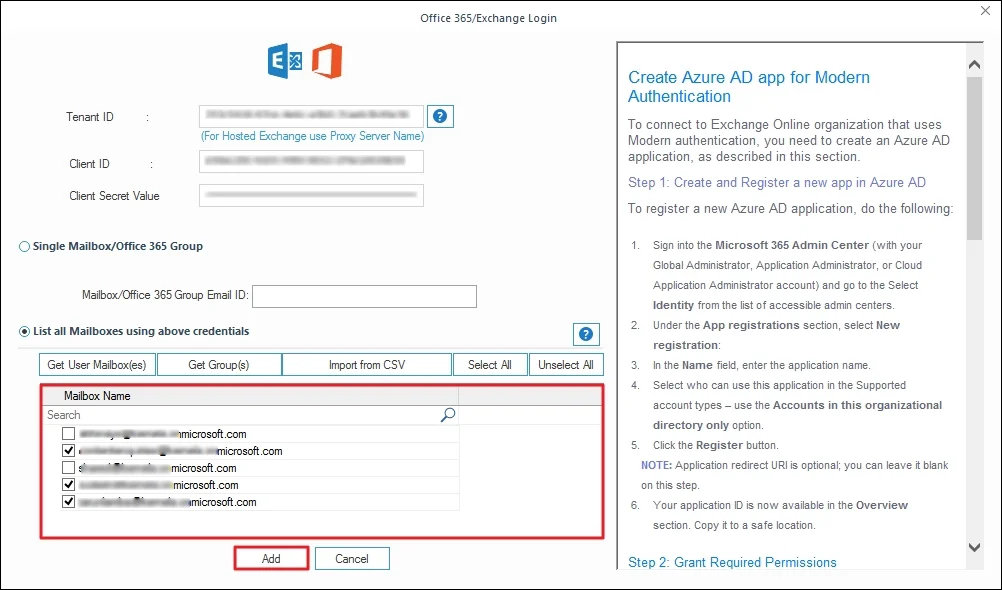
Step 4: Enter Exchange/Office 365 mailbox credentials such as Tenant ID, Client ID, and Client Secret Value. Select List all Mailbox using above credentials and Get User Mailbox(es).
Step 5: The software will start retrieving all mailboxes associated with the Office 365/Exchange Login account. The software will pop up Please wait while current process finishes.
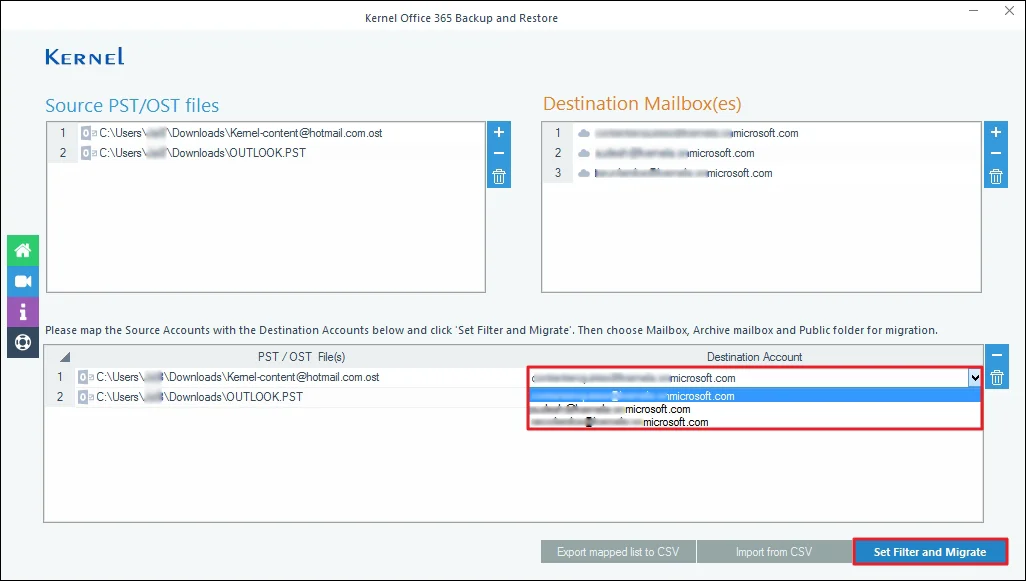
Step 6: The software will show all the mailboxes associated with your account. Select necessary mailboxes accordingly and click on Add.
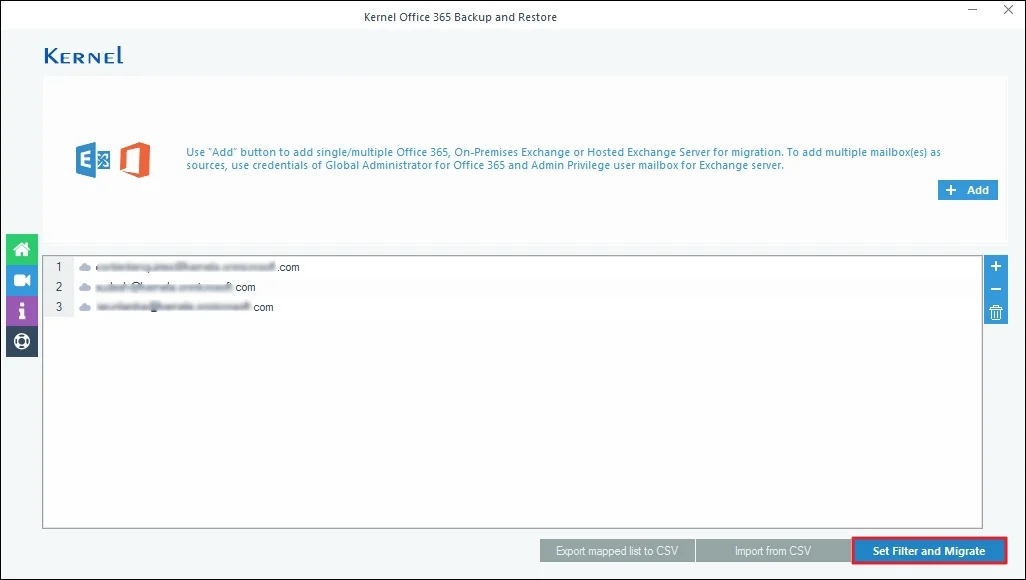
Step 7: Verify all the selected mailboxes and click on Set Filter and Migrate.
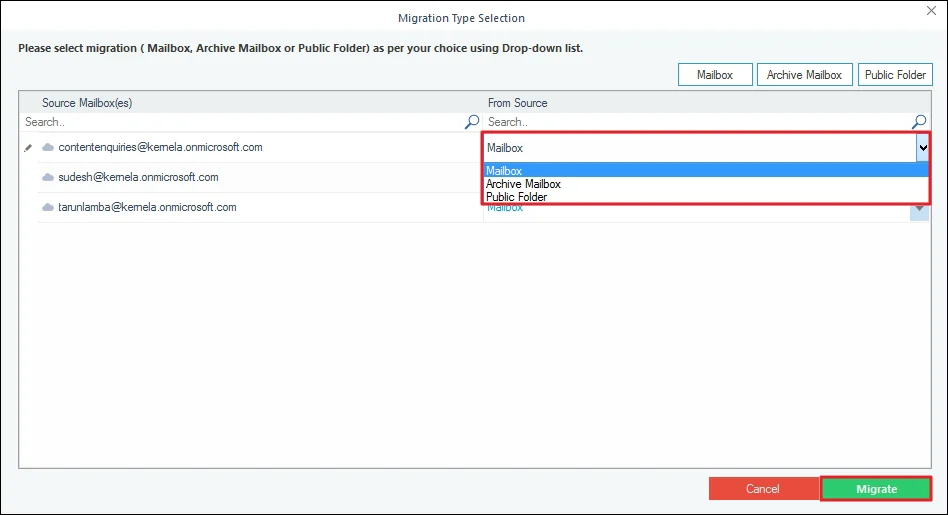
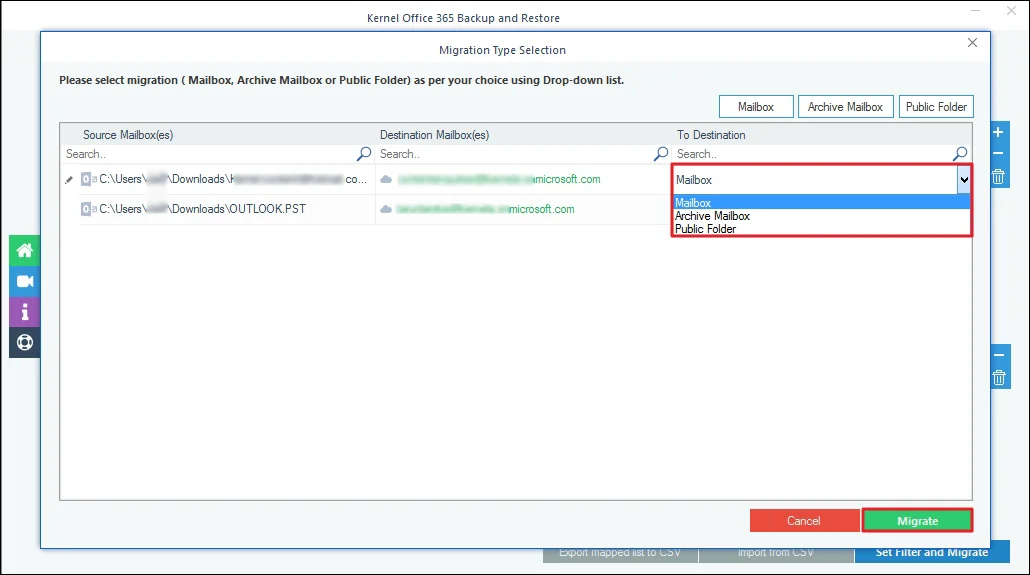
Step 8: Select the source options from Mailbox, Archive Mailbox, or Public Folder for migration and click Migrate.
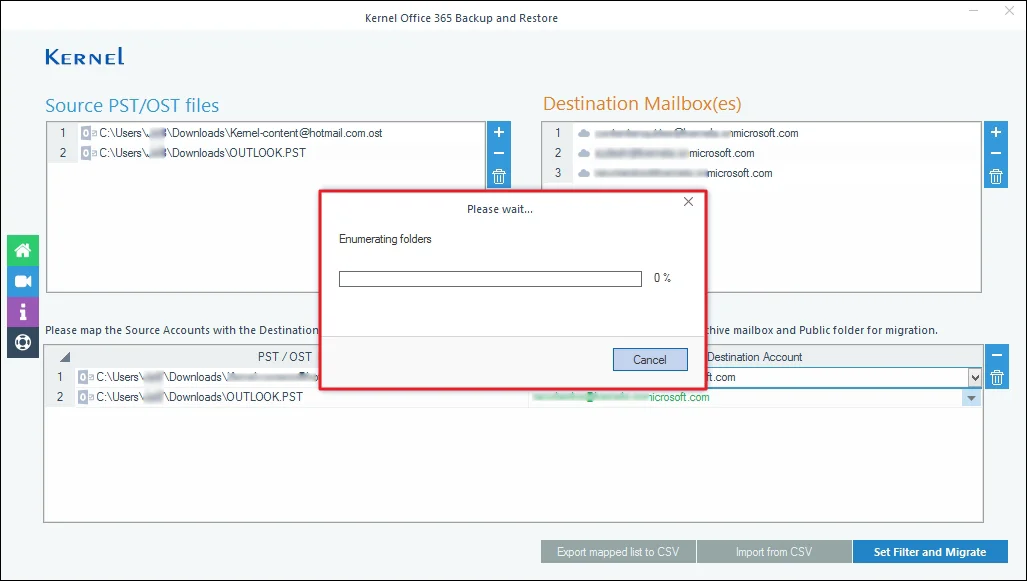
Step 9: The software will start Enumerating folders from the Office 365 account.
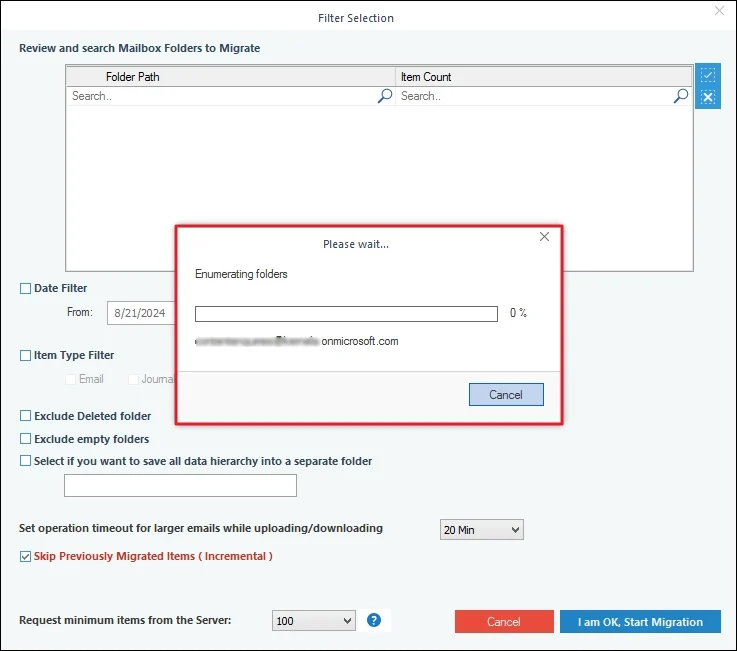
Step 10: In the Filter Selection window, choose the filtering options as required:
- Review and search Mailbox Folders to Migrate: Select the folders to migrate.
- Date Filter: Provide a date range to filter items.
- Item Type Filter: Select Email, Journal, Task, Contacts, and Contacts/Appointment accordingly.
- Exclude Deleted folder: Select to skip deleted items folder from migration.
- Exclude empty folders: Exclude empty folders from the migration.
- Select if you want to save all data hierarchy into a separate folder: Provide a folder name (to save the data inside a folder.)
- Set operation timeout for larger emails while uploading/downloading: Select an upper time limit for backup (the backup will be rejected if it exceeds the limit).
- Skip Previously Migrated Items (Incremental): Check the box to exclude the already migrated data and migrate only the additional data.
- Request minimum items from the Server: The software will request server to retrieve files from the mailbox.
Finally click I am OK, Start Migration.
Step 11: In the Save As dialogue box, select the PST file, tick Split Output PST File After to create multiple PST files, and click OK.
Step 12: Provide a destination to save PST file. Also, you can Make New Folder to save all your backed-up files by clicking OK.
Step 13: The software will start the backup process and show the live backup process in the following wizard.
Step 14: Once the process is completed, software will pop up Process completed. Please save the report to CSV and click OK.

Step 15: To download a detailed migration report, click on Save report to CSV.
Step 16: Select preferred location and enter the CSV file name to Save migration report.
Step 17: After all, click OK to end the backup process.
Step 18: Access all your backed PST files in the designated location.
Step-by-step process to restore Office 365 data
Kernel Office 365 Backup and restore tool helps you to import PST files to Office 365, and Exchange (both on-premises & hosted). The tool allows you to import PST files to single/multiple Exchange or Office 365 mailboxes simultaneously.
- Import PST files to a single Office 365/Exchange mailbox
- Import PST files to multiple Office 365/Exchange mailboxes
- Import PST files to multiple Office 365/Exchange mailboxes (CSV-based)
- Import PST to Office 365 Accounts Easily
Importing PST files to a single Office 365/Exchange mailbox
Import PST or OST files of Office 365/Exchange account with this method.
Step 1: Launch the Kernel Office 365 Backup & Restore software.

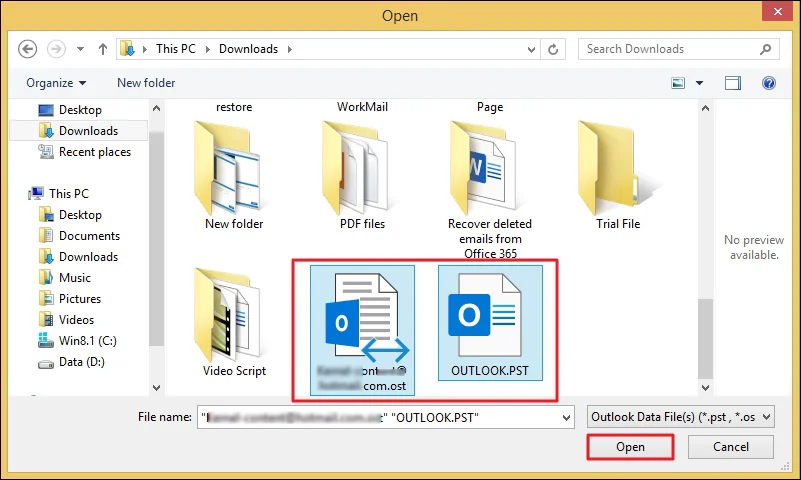
Step 2: Click on Add option in the Add Source section.
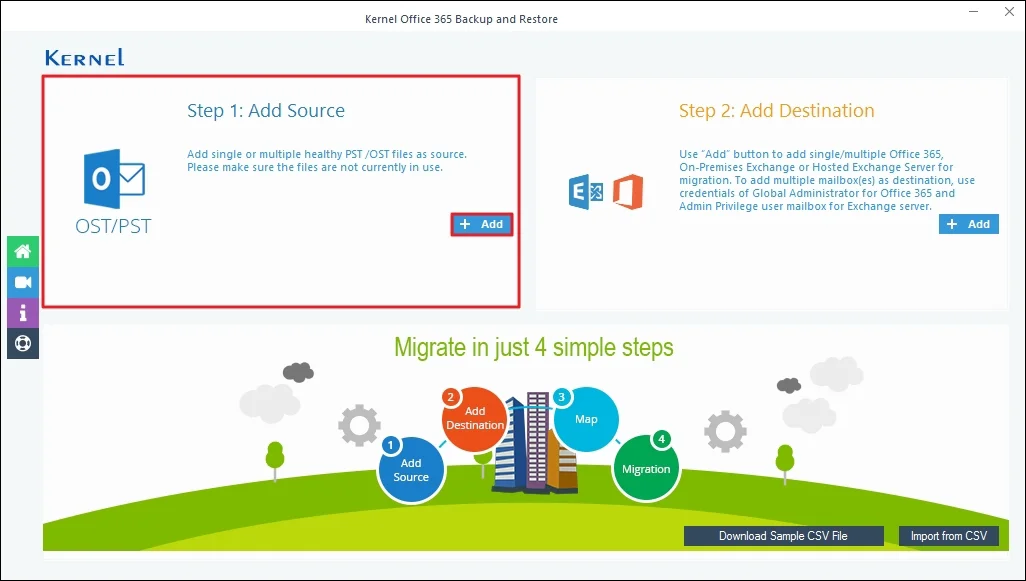
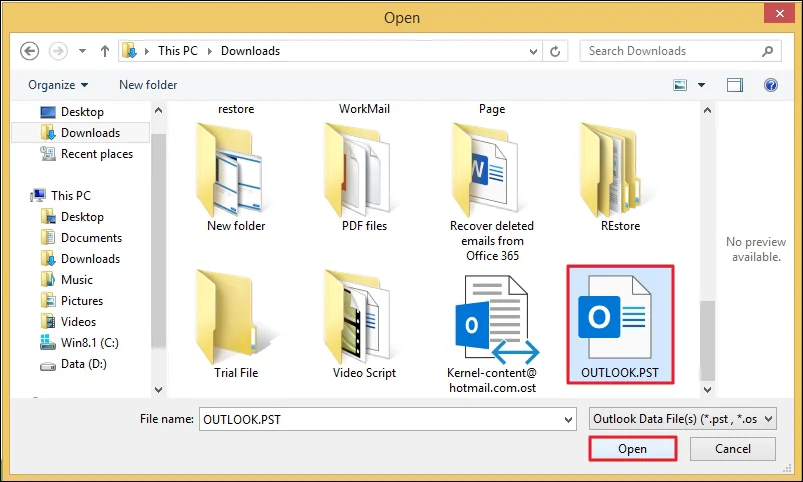
Step 3: Browse and select the PST files, then click Open.
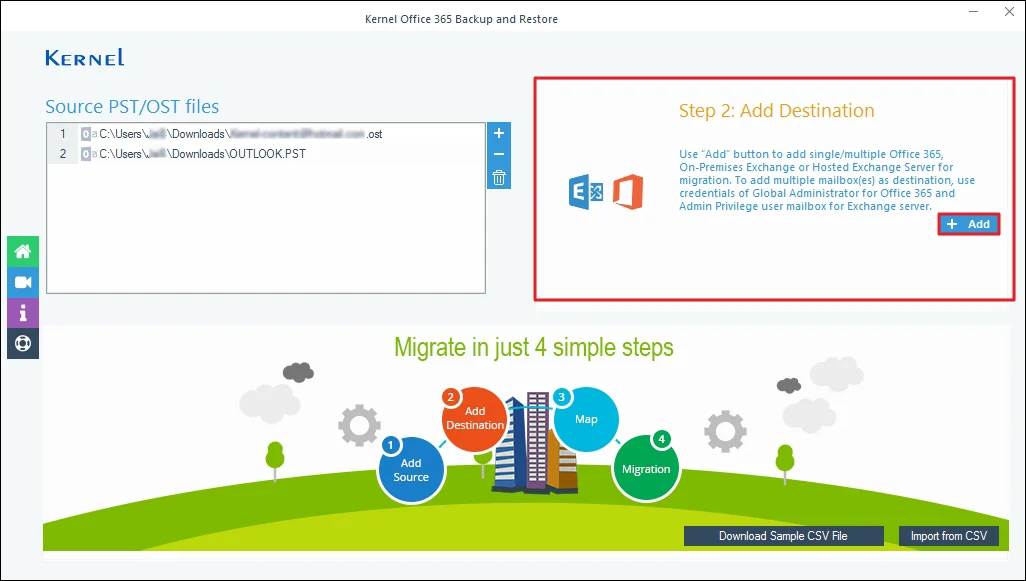
Step 4: In Add Destination section, click on Add to map Office 365/Exchange mailbox.

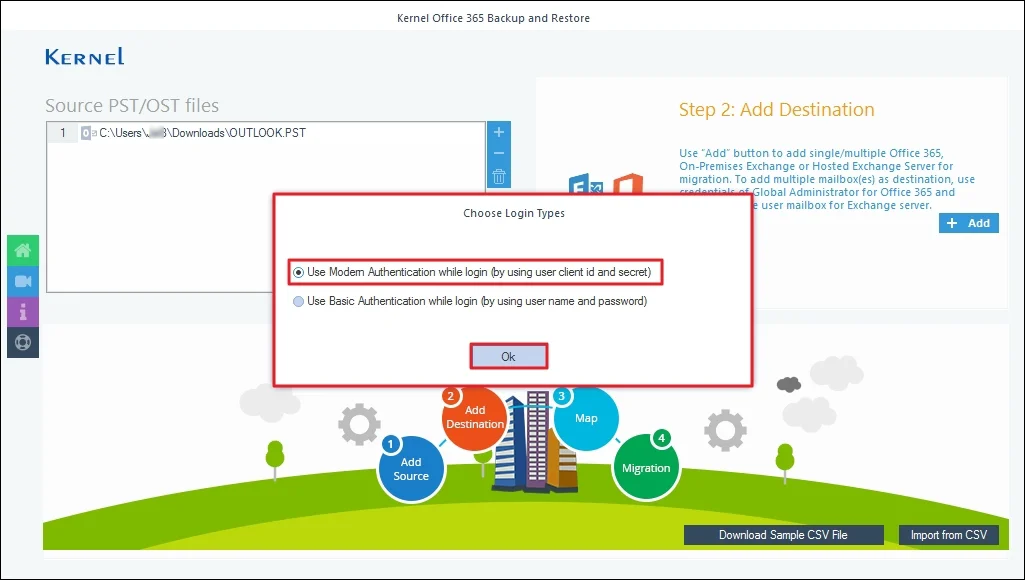
Step 5: In Choose Login Types section, select Use Modern Authentication while login (by using user client id and secret) and click OK.
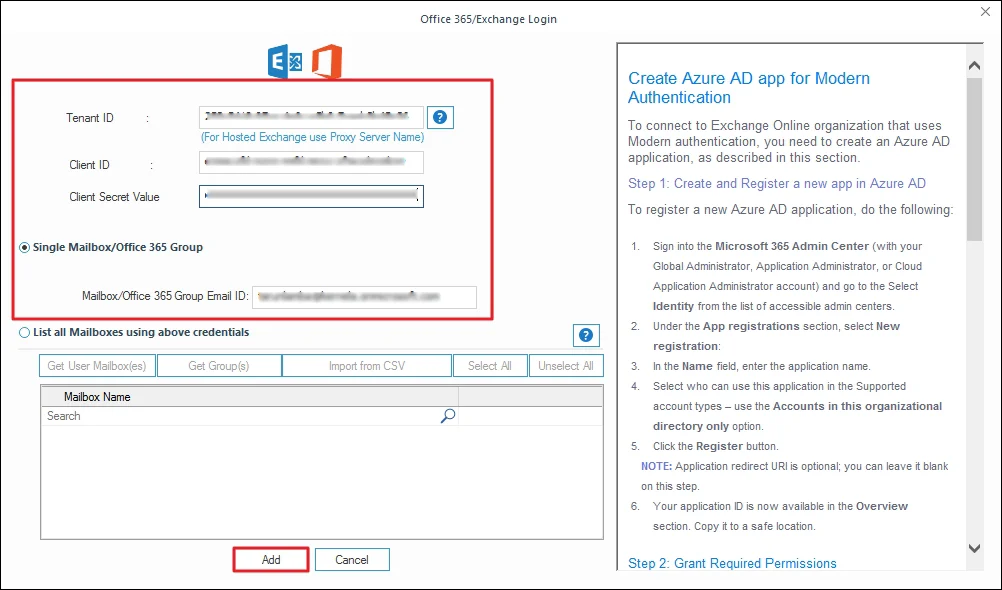
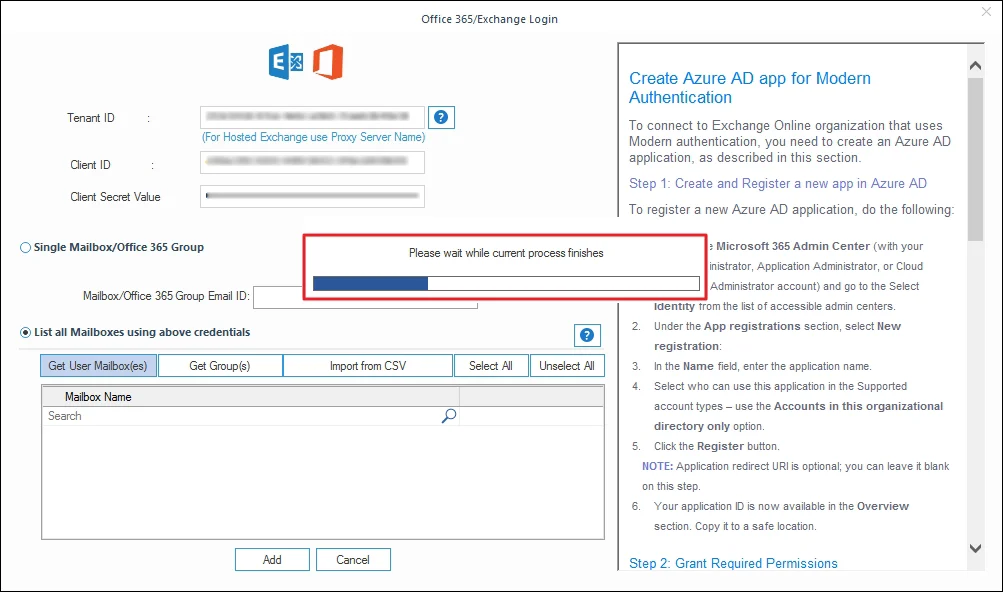
Step 6: In Office 365/Exchange Login wizard, enter the Tenant ID, Client ID, and Client Secret Value. Tick Single Mailbox/Office 365 Group, enter Mailbox/Office 365 Group Email ID, and click Add.
Step 7: The software will start fetching mailboxes associated with the credentials and shows you Please wait while current process finishes message.
Step 8: Verify the PST file and destination mailbox. Click on Set Filters and Migrate.
Step 9: In Migration Type Selection, select Mailbox, Archive Mailbox, and Public Folder according to your need, then proceed to Migrate.
Step 10: The software will start Enumerating folders of the PST files.
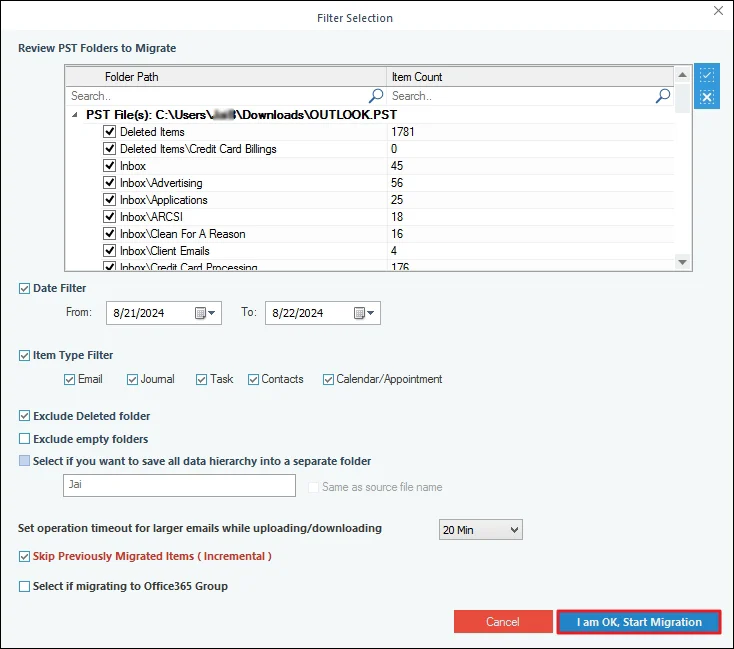
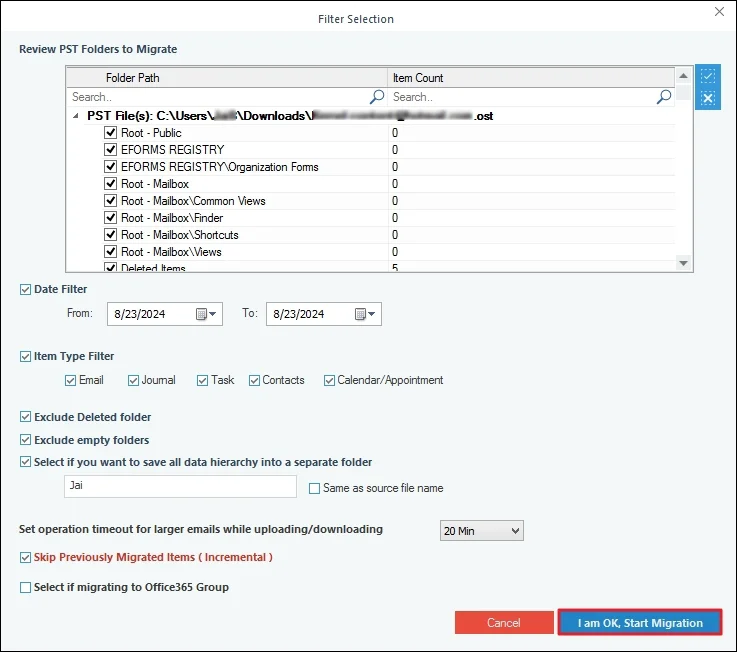
Step 11: In the Filter Selection section, select the filtering options as required:
- Review PST Folders to Migrate: Select the folders to migrate.
- Date Filter: Provide a date range to filter items.
- Item Type Filter: Select Email, Journal, Task, Contacts, and Calendar/Appointment accordingly.
- Exclude Deleted folder: Select to skip deleted items folder from the migration.
- Exclude empty folders: Exclude empty folders from the migration.
- Select if you want to save all data hierarchy into a separate folder: Provide a folder name (to save the data with hierarchy inside a mailbox folder)
- Set Operation Timeout for larger emails while uploading/downloading: Select an upper time limit for migration (the migration will be rejected if it exceeds this time limit).
- Skip Previously Migrated Items (Incremental): Check the box to exclude the already imported data.
- Select if migrating to Office 365 Group: Select the checkbox if you are moving PST to the Office 365 group.
Finally click I am OK, Start Migration.
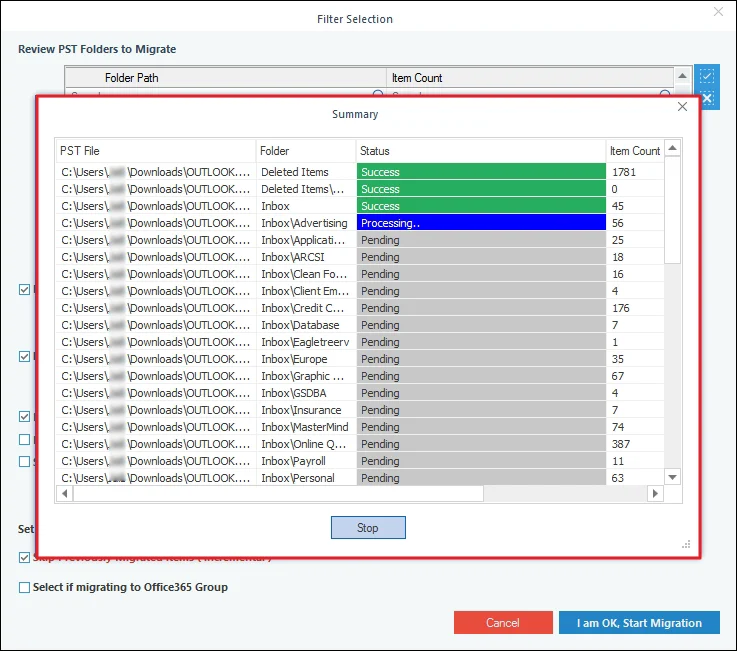
Step 12: The software will show the live migration status in the toolbar.
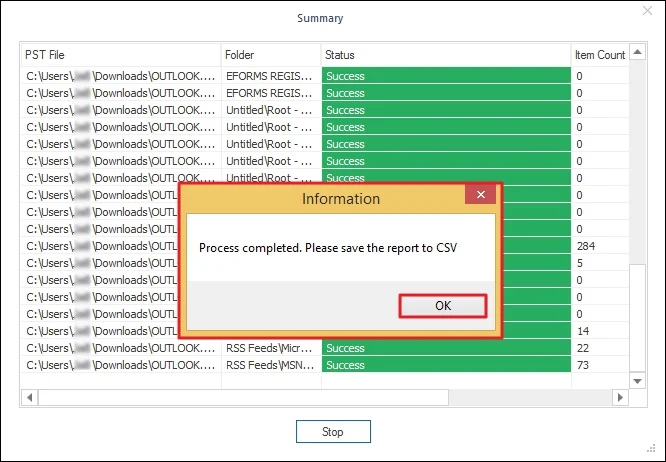
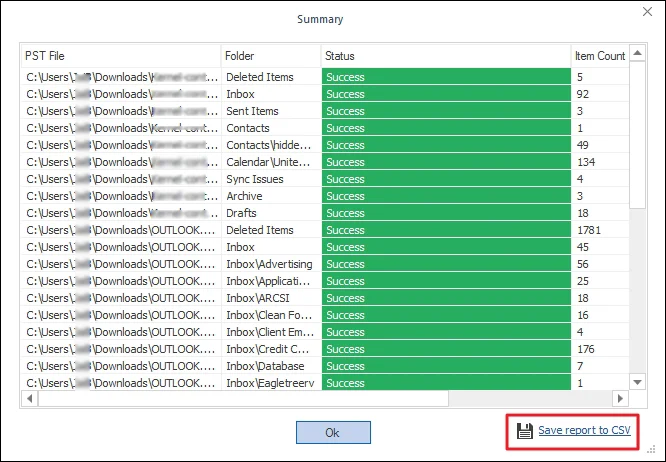
Step 13: Once the process is completed, the tool will pop up Process completed. Please save the report to CSV and click OK.
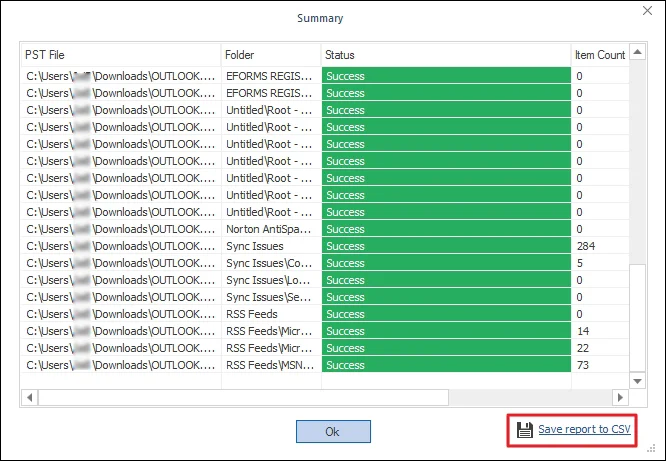
Step 14: Click on Save report to CSV to generate a migration report in CSV format.
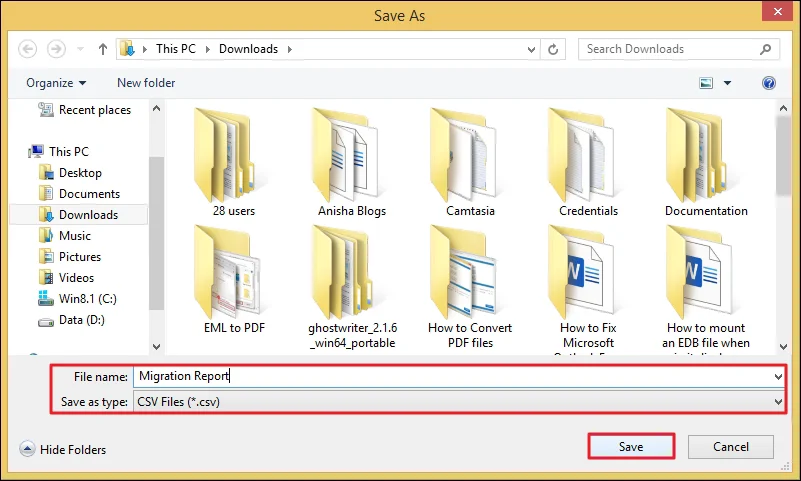
Step 15: Select preferred location, enter the specific name, and click on Save.
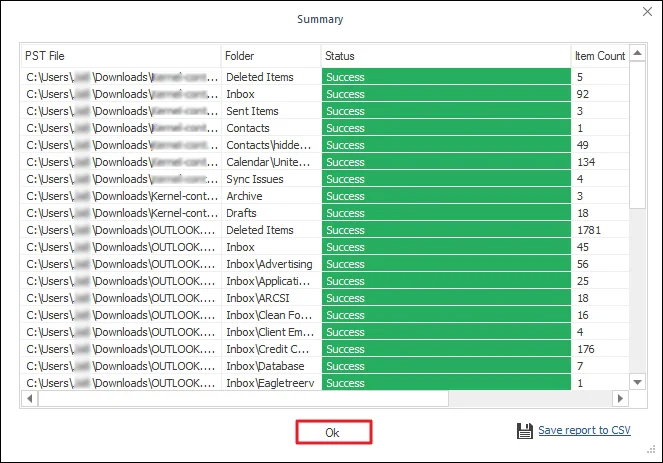
Step 16: Click on OK to end the migration process.

Importing PST files to multiple Office 365/Exchange mailboxes
Import single or multiple PST files into multiple Office 365 mailboxes using an Office 365/Exchange account with Global administrator credentials.
Step 1: Launch the software and click on Restore.

Step 2: Click on Add in the Add Source section.

Step 3: Browse and select PST files and proceed to Open.
Step 4: Click on Add in the Add Destination section.
Step 5: In Choose Login Types, select Use Modern Authentication while login (by using user client id and secret).

Step 6: Enter Tenant ID, Client ID, Client Secret Value, and Mailbox/Office 365 Group Email ID on the Office 365/Exchange Login page. Click on List all Mailboxes using above credentials and select Get User Mailbox(es).

Step 7: The software will start fetching all the mailboxes associated with given credentials and show Please wait while current process finishes in the toolbar.
Step 8: The tool will preview all the mailboxes, select your preferred mailbox, and click Add.
Step 9: Select your Destination Account and click Set Filter and Migrate.
Step 10: In Migration Type Selection page, select Mailbox, Archive Mailbox, and Public Folder according to your need. Click on Migrate.
Step 11: The software will start Enumerating folders from the selected PST files.
Step 12: In the Filter Selection section, select the filtering options as required:
- Review PST Folders to Migrate: Select the folders to migrate.
- Date Filter: Provide a date range to filter items.
- Item Type Filter: Select Email, Journal, Task, Contacts, and Calendar/Appointment accordingly.
- Exclude Deleted folder: Select to skip deleted items folder from the migration.
- Exclude empty folders: Exclude empty folders from the migration.
- Select if you want to save all data hierarchy into a separate folder: Provide a folder name (to save the data with hierarchy inside a mailbox folder).
- Set Operation Timeout for larger emails while uploading/downloading: Select an upper time limit for migration (the migration will be rejected if it exceeds this time limit).
- Skip Previously Migrated Items (Incremental): Check the box to exclude the already imported data.
- Select if migrating to Office 365 Group: Select the checkbox if you are moving PST to the Office 365 group.
Finally click I am OK, Start Migration.
Step 13: The software will show the live migration process.

Step 14: Once the restore process is completed, the software will show Process completed. Please save the report to CSV and click on Save.

Step 15: To download a detailed migration report, click Save report to CSV.
Step 16: The software will pop up a Save As prompt, select preferred location, enter the file name, and click Save.
Step 17: Finally, click on OK to close the migration process.
Importing PST files to multiple Office 365/Exchange mailboxes using CSV files.
Import PST files to multiple Office 365 mailboxes with the help of a CSV file.
Step 1: Launch the Kernel Office 365 Backup & Restore and click on Restore.
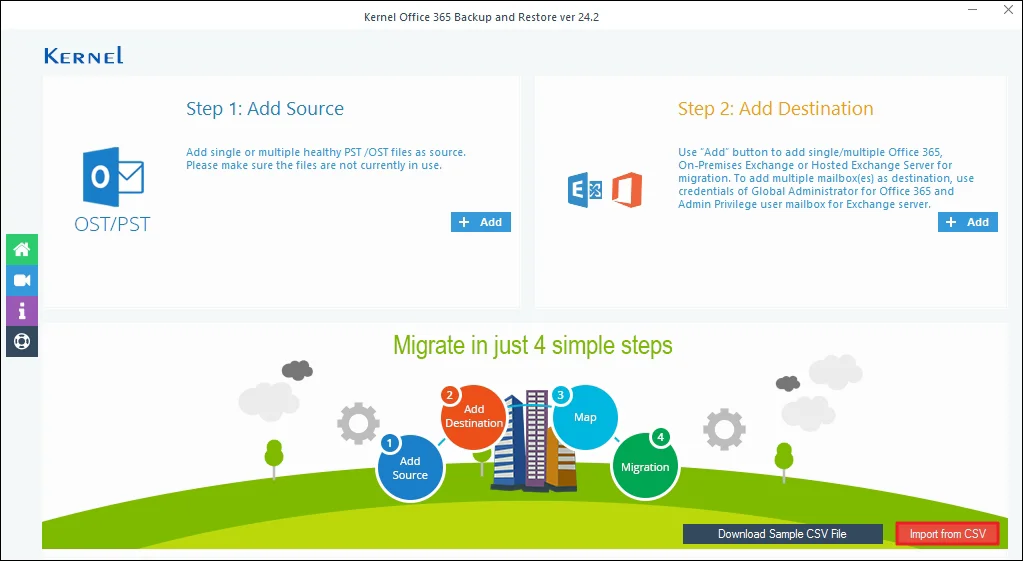
Step 2: Click on the Download Sample CSV File option.
Step 3: Browse and select the destination path and click OK to save the CSV report.
Step 4: Fill in the credentials on the CSV file.

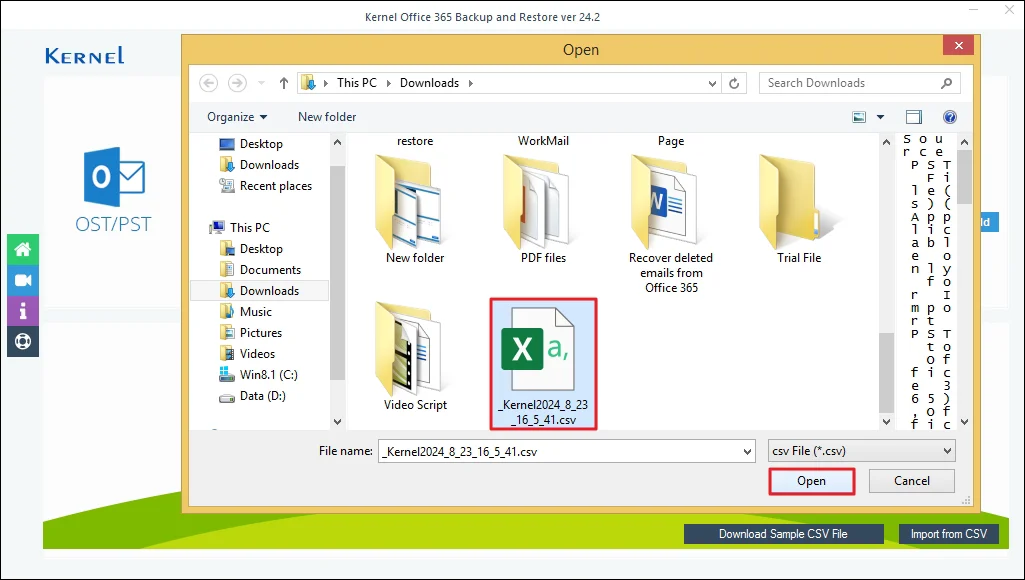
Step 5: Click on Import from CSV to Browse CSV file.
Step 6: Select the credential stored CSV file.
Step 7: Map the PST/OST file to the Office 365 mailbox and proceed (for this, go to step 9 of Importing PST files to a multiple Office 365/Exchange mailbox).