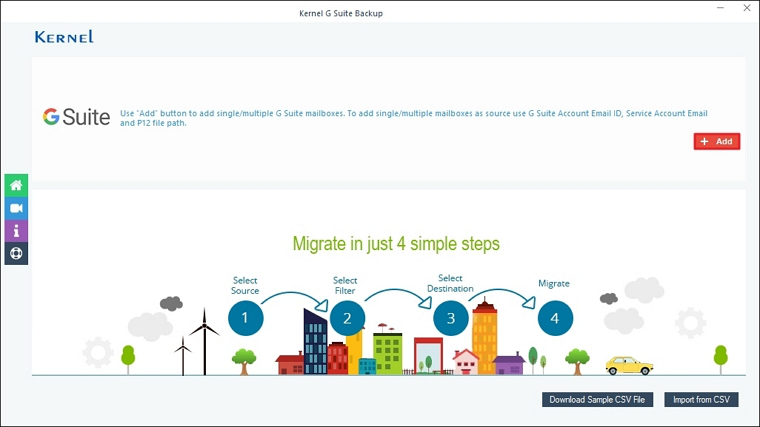
You can backup single or multiple mailboxes of G Suite using this Tool.
Backup a Single G Suite mailbox
To take a secure backup of G Suite data, follow the given steps below:
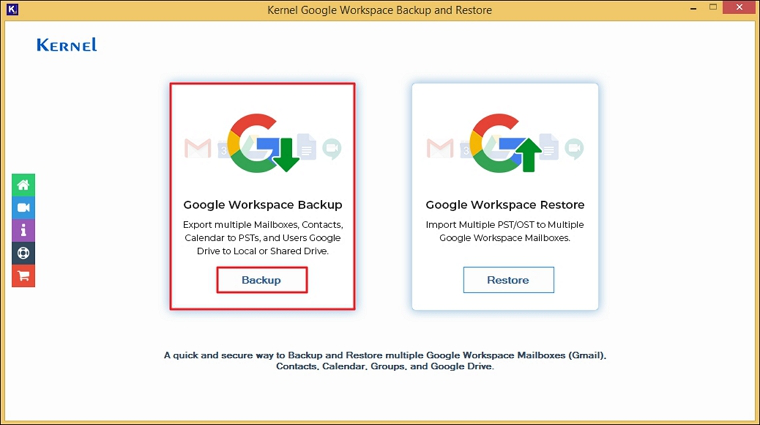
Step 1: On the software's home screen, click on Backup tile.
Step 2: Click the +Add button to add the G Suite account for backup.

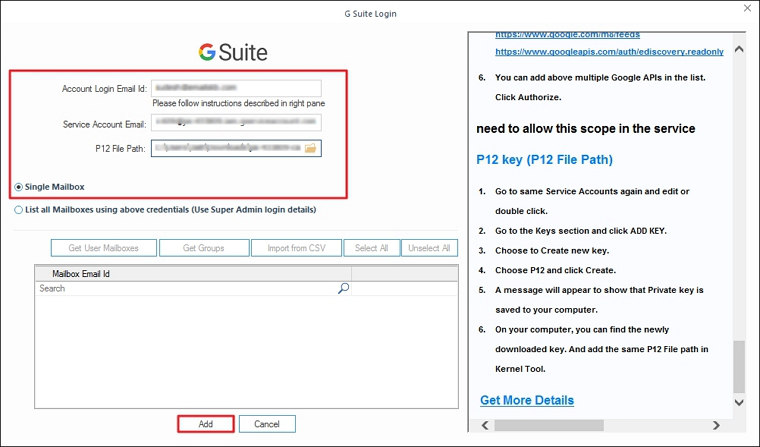
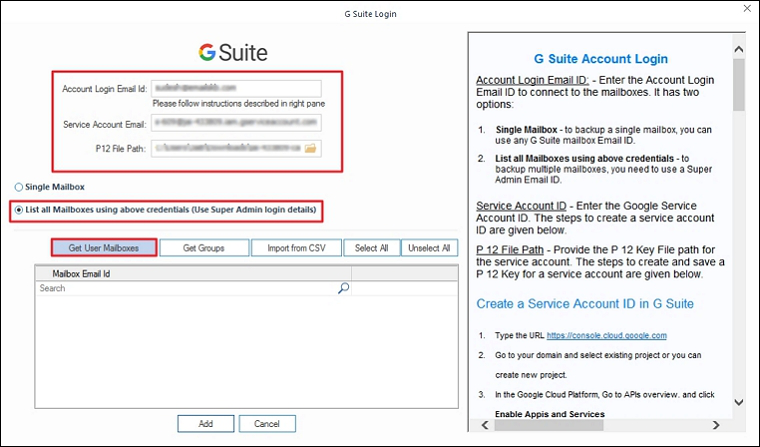
Step 3: In the G Suite Login page, enter the G Suite details like Account Login Email Id, Server Account Email, and P 12 File Path. After that, select Single Mailbox and click on Add.
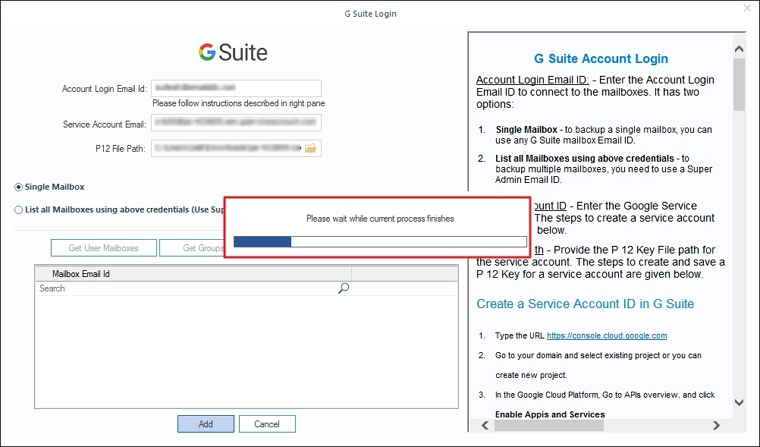
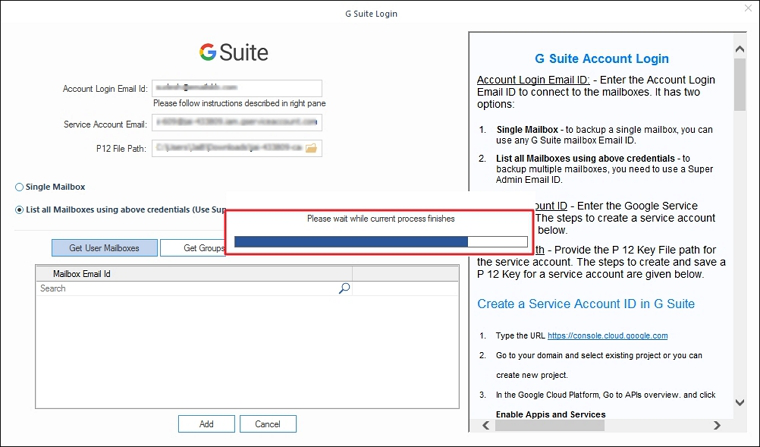
Step 4: The software will start fetching mailboxes from the selected G Suite and show a "Please wait while current process finishes" pop-up.
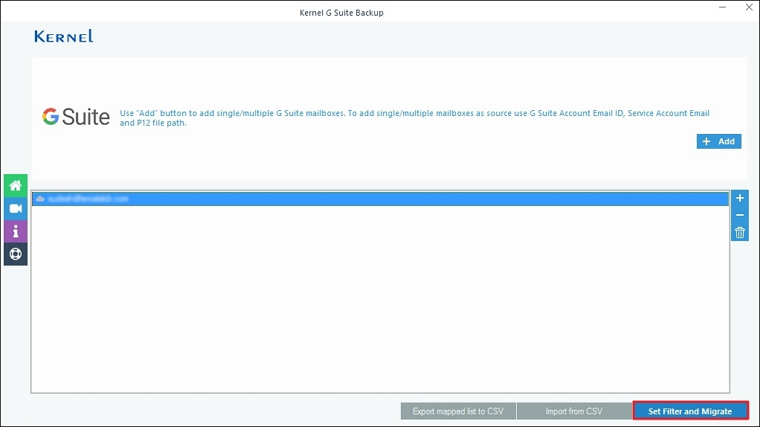
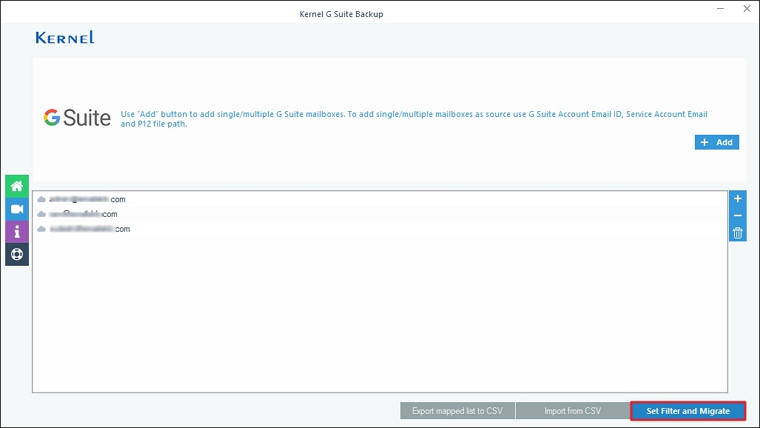
Step 5: Verify the G Suite account and click on Set Filter and Migrate.
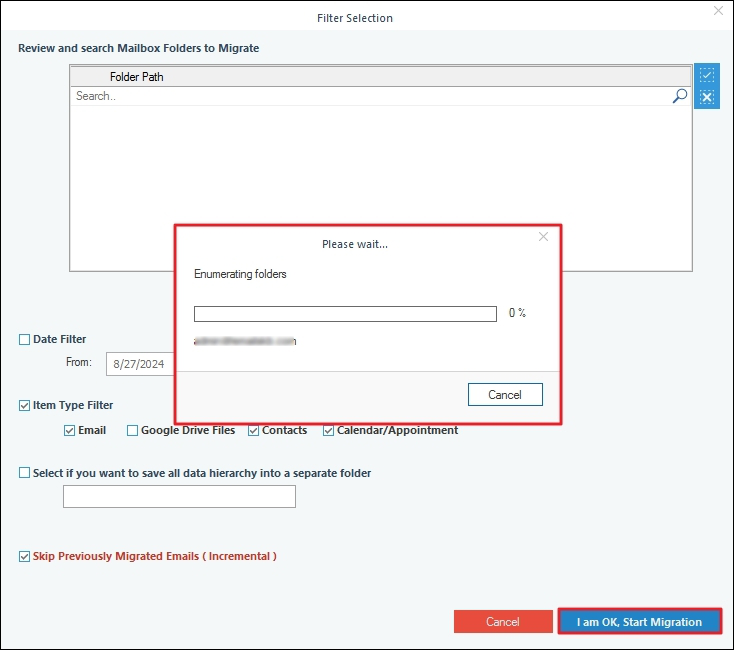
Step 6: The software will start "Enumerating folders" from the selected G Suite account.
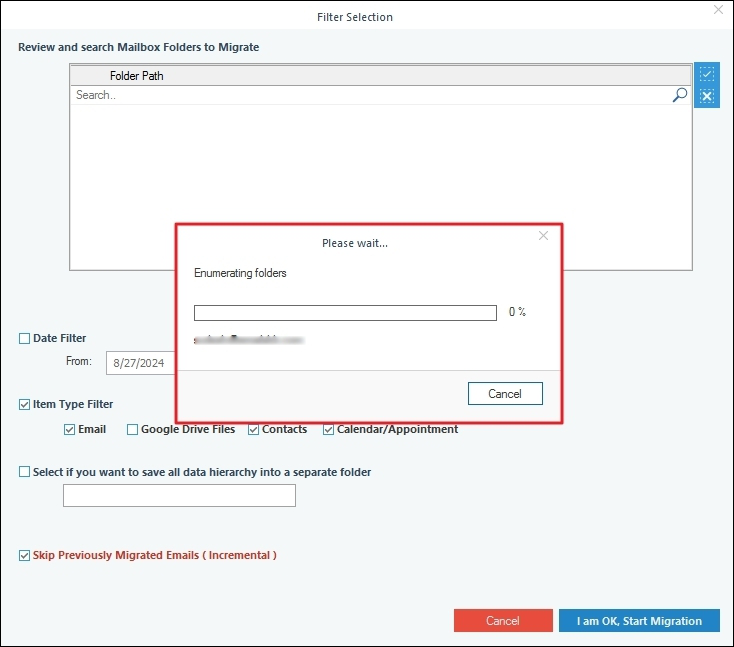
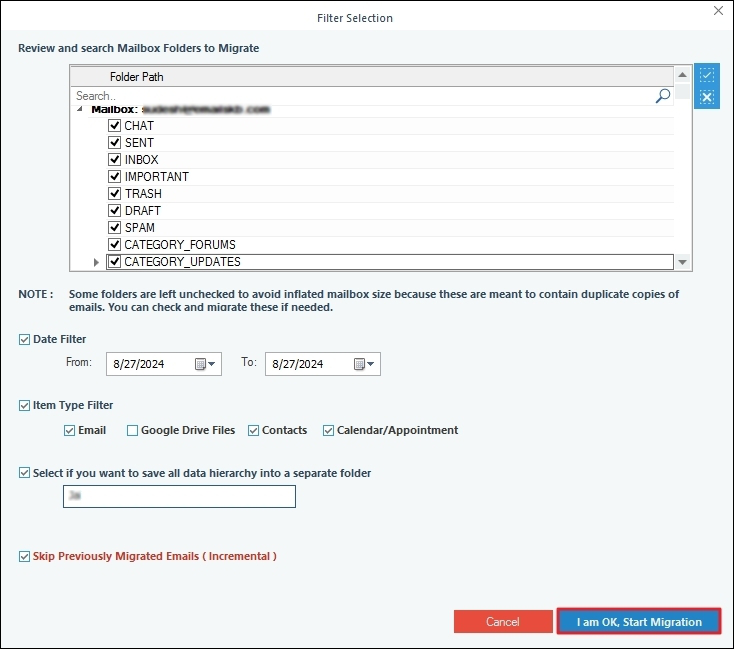
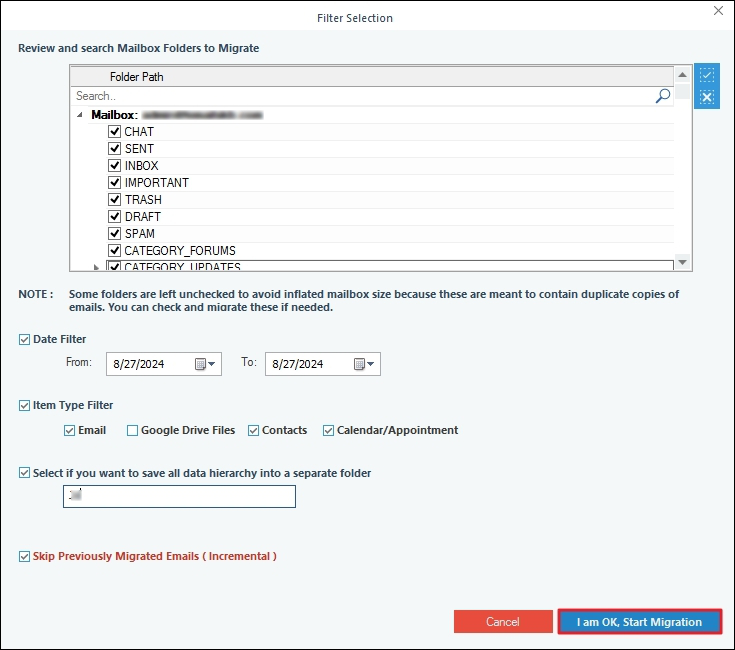
Step 7: In the Filter Selection page, select filters according to you:
- Review and search Mailbox Folders to Migrate: Select necessary folders you want to migrate.
Note: If you have any doubts regarding the G Suite account details, please see the description in the right panel.
- Date Filter: Backup data for the selected date range.
- Item Type Filter: Select Email, Google Drive Files, Contacts, Calendar/Appointments accordingly.
- Select if you want to save all data hierarchy into a separate folder: Enter a specific name, and the software will create a folder with that name and then transfer all the data to it.
- Skip Previously Migrated Emails (Incremental): Skip already migrated folders in regular backups.
After choosing the filters, click, I am OK, Start Migration.
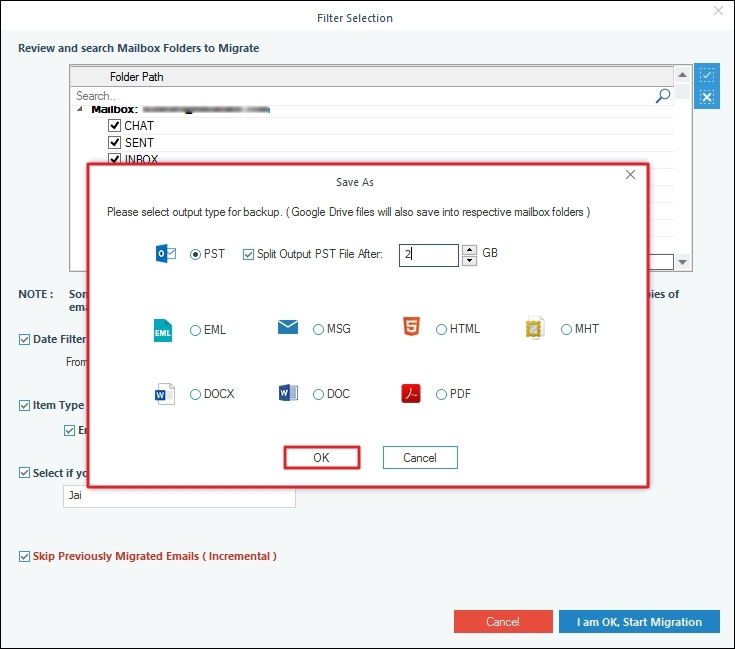
Step 8: The Save As window lists various output formats you can select easily. If you choose PST, there will be an additional option to Split Output PST File After that, it will help you create multiple PST files. Click OK.
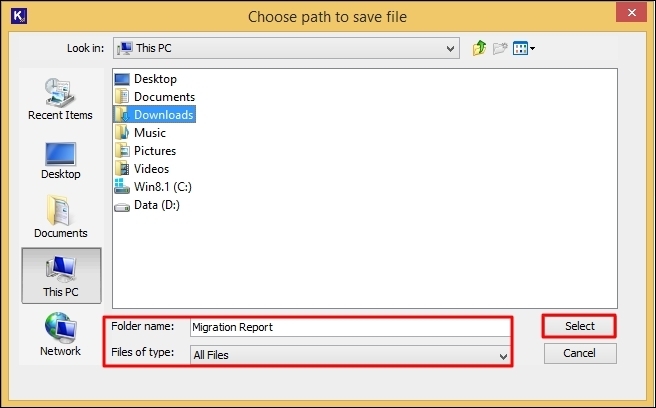
Step 9: Browse the location where you want to save the newly created backup and click OK. Also, you can create a new folder by clicking on Make New Folder and saving the backed-up file.

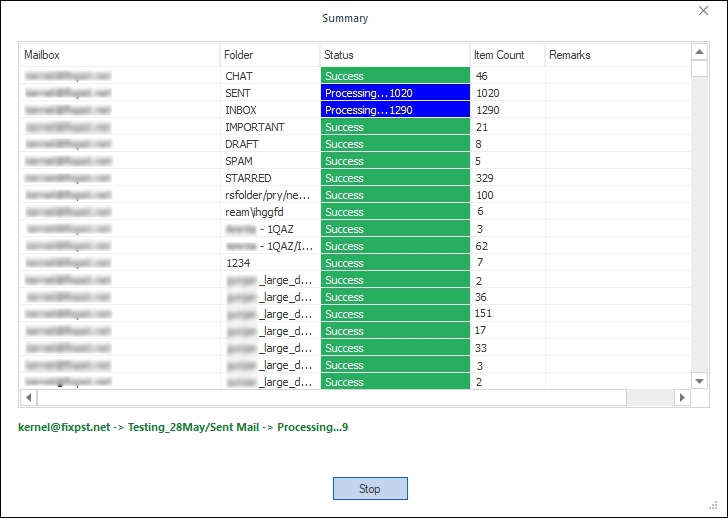
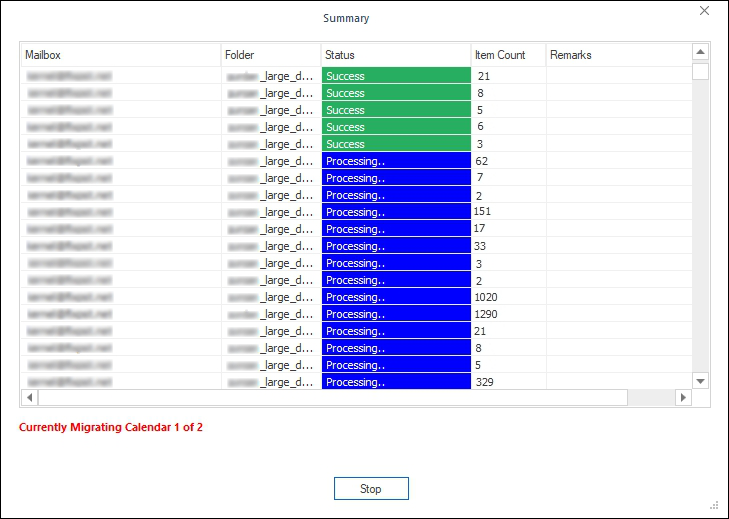
Step 10: The software will start the backup process and show you the live status of it.
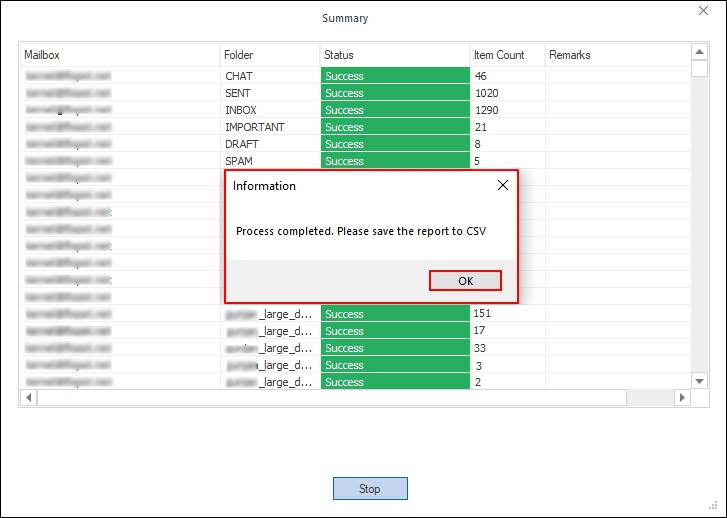
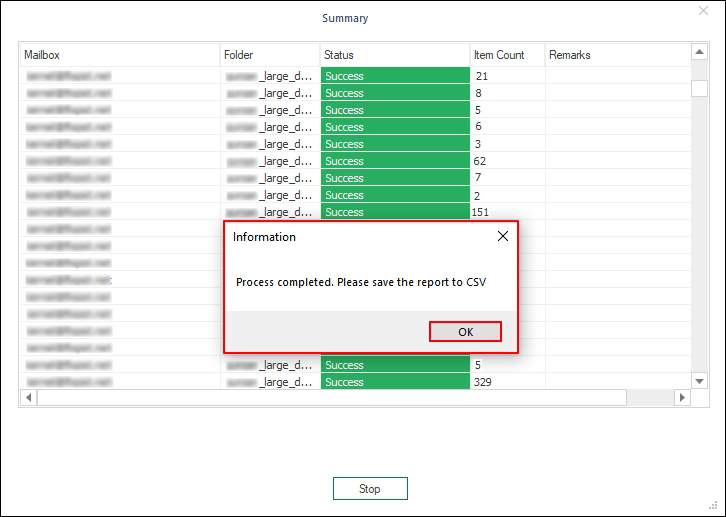
Step 11: After completing the backup, the software shows the message "Process completed. Please save the report to CSV" and click OK.
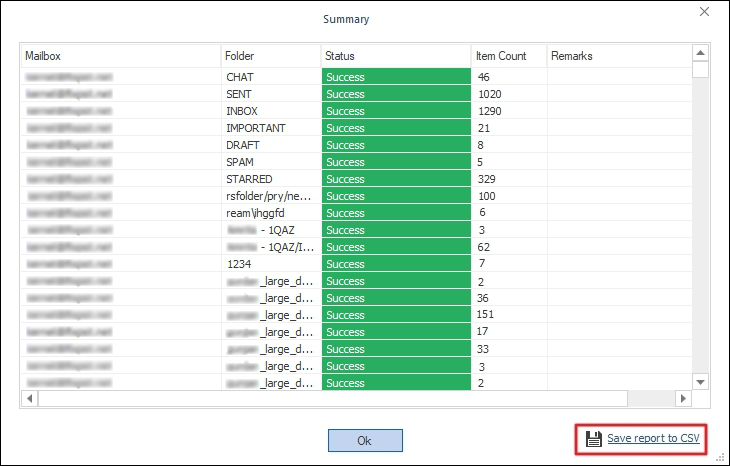
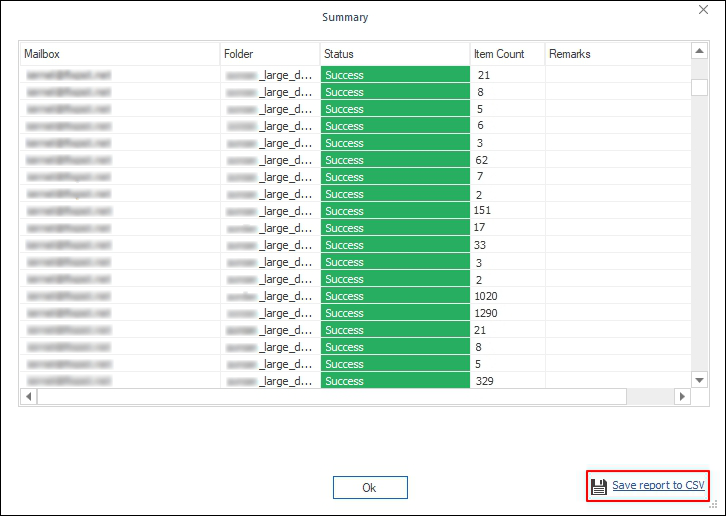
Step 12: Click on Save report to CSV to download a detailed backup report in CSV format.
Step 13: Browse and select a specific location to Save the CSV report.

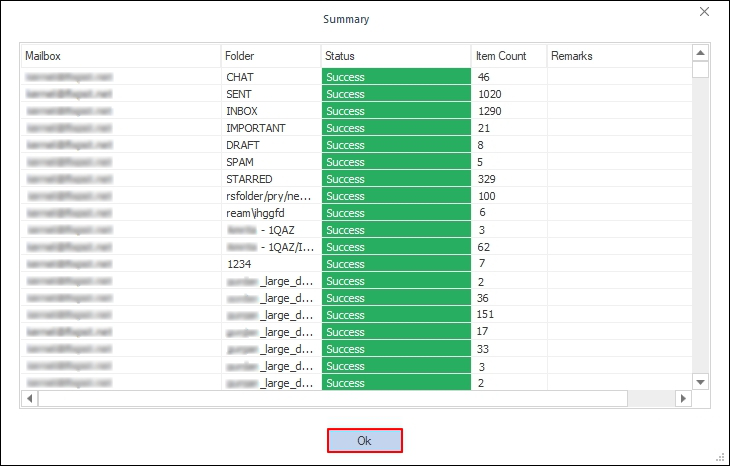
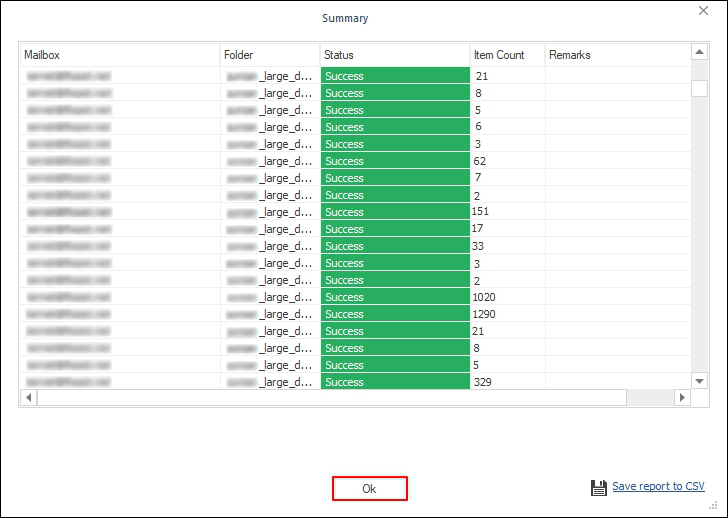
Step 14: Click OK to end the backup process.
Backup Multiple G Suite Mailboxes
To take the backup of multiple mailboxes, you need to have the email ID of the Super Administrator account, which has created other G Suite account. Here is the process:
Step 1: Launch the software and click on Backup Tile.

Step 2: Click Add to link a G Suite account in the tool.
Step 3: Enter the Account Login Email Id, Service Account Email, and P12 File Path on the G Suite Login page. Select List all Mailboxes using above credentials (Use Super Admin login details) and click on Get User Mailboxes.
Step 4: The software will retrieve multiple mailboxes from the selected G Suite account and show "Please wait while current process finishes" message.
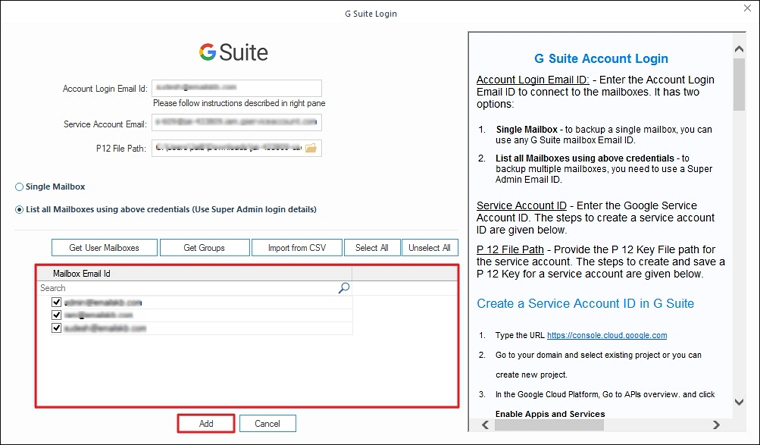
Step 5: The software will show all the mailboxes, tick the necessary mailboxes, and click Add.
Step 6: Verify the mailboxes and click on Set Filter and Migrate.
Step 7: The software will start Enumerating folders from the selected mailboxes.
Step 8: The backup process will start. After the completion of a successful migration, the tool will provide a message that the process is completed. Click OK.
- Review and search Mailbox Folders to Migrate: Select necessary folders you want to migrate.
Note: Some folders are left unchecked to avoid inflated mailbox size because these are meant to contain duplicate copies of emails. You can check and migrate these if needed.
- Date Filter: Backup data for the selected date range.
- Item Type Filter: Select Email, Google Drive Files, Contacts, Calendar/Appointments accordingly.
- Select if you want to save all data hierarchy into a separate folder: Enter a specific name, and the software will create a folder with that name and then transfer all the data to it.
- Skip Previously Migrated Emails (Incremental): Skip already migrated folders in regular backups.
After choosing the filters, click, I am OK, Start Migration.
Step 9: Choose the PST format for the backup, tick on Split Output PST File After option to create multiple PST files and click OK.
Step 10: Choose the location where you want to save the backup files and click OK. You can also Make New Folder to save all the backed-up files.

Step 11: The software will start backup process and show you the live backup process.
Step 12: Once the backup process is completed, the software will pop up Process completed. Please save the report to CSV message.
Step 13: To download a detailed backup report, click Save report to CSV.
Step 14: Browse and select a specific location to Save the CSV file.

Step 15: Finally, click OK to end the backup process.
Kernel Google Workspace Backup & Restore software can restore unlimited PST files to multiple Google Workspace accounts. It offers a user-friendly interface to access PST files, map them to Workspace accounts accurately, and filter the data from PST file’s mailboxes. We are providing the entire procedure in the following section:
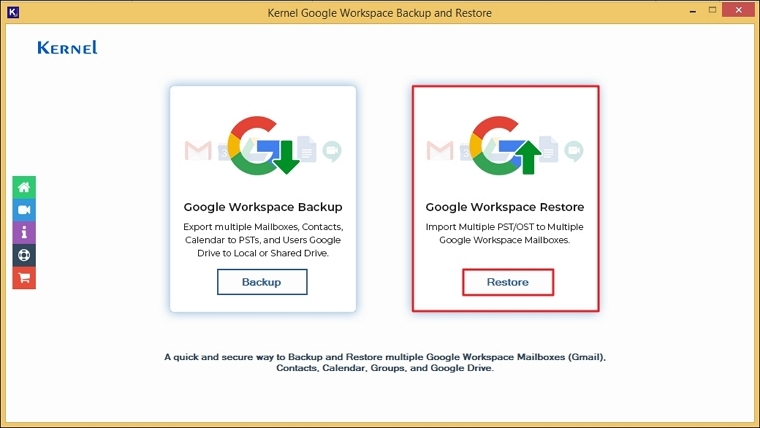
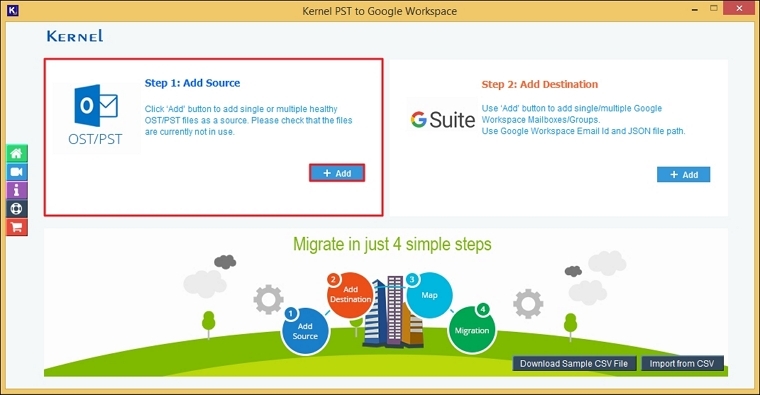
Step 1: Start the software and click on Google Workspace Restore button.
Step 2: In the Add Source section, click Add button.
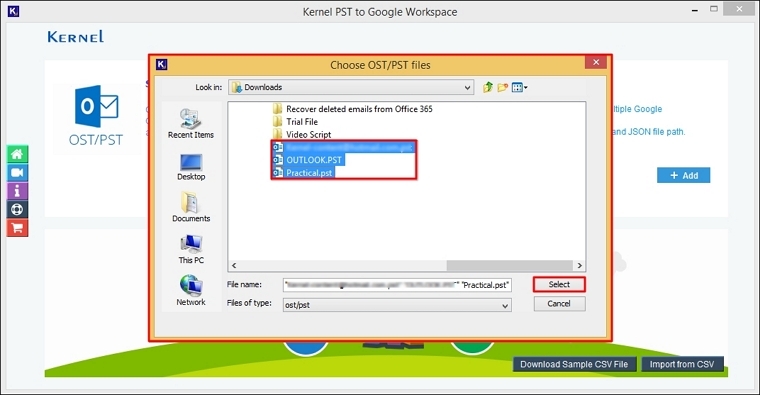
Step 3: Select the PST files from local storage of PC and click Select.
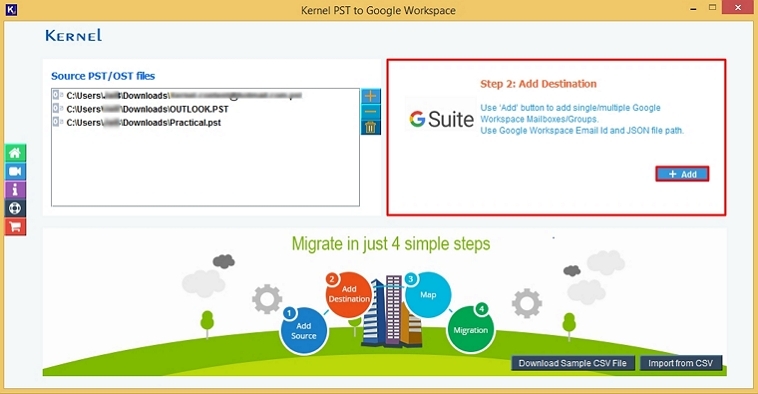
Step 4: The software has added the selected PST files. Now, click Add in Add Destination section.
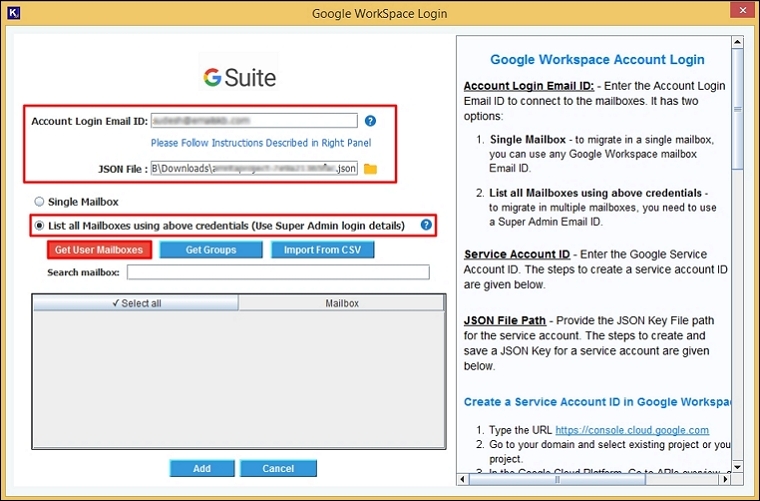
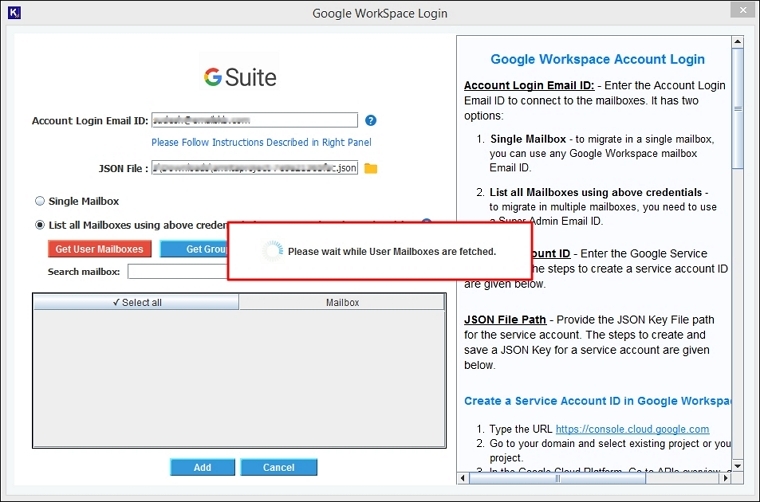
Step 5: In the Google Workspace Login page, enter the Account Login Email ID of a Global Administrator account for Google Workspace. Then, browse the JSON file of that selected account. After that, choose 'List all Mailboxes using above credentials (Use Super Admin login details).' Also, click Get User Mailboxes button.
Step 6: The software will start fetching mailboxes from the selected Google Workspace account and show "Please wait while User Mailboxes are fetched" message.
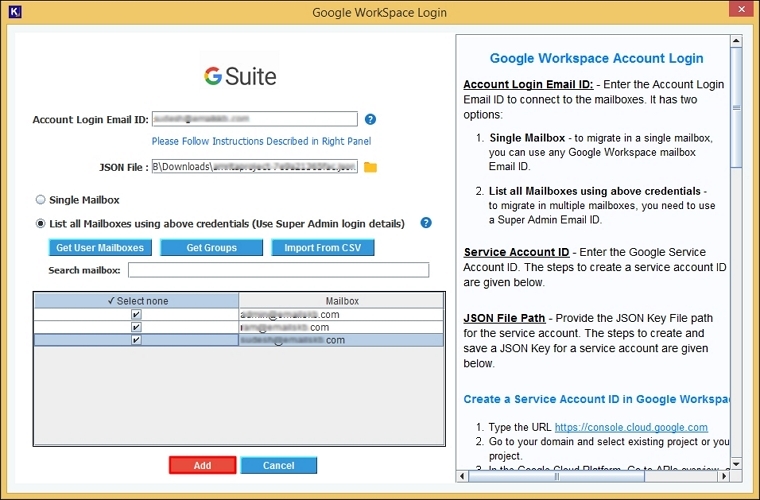
Step 7: The software will display all the mailboxes associated with the account. Select necessary ones and click Add.
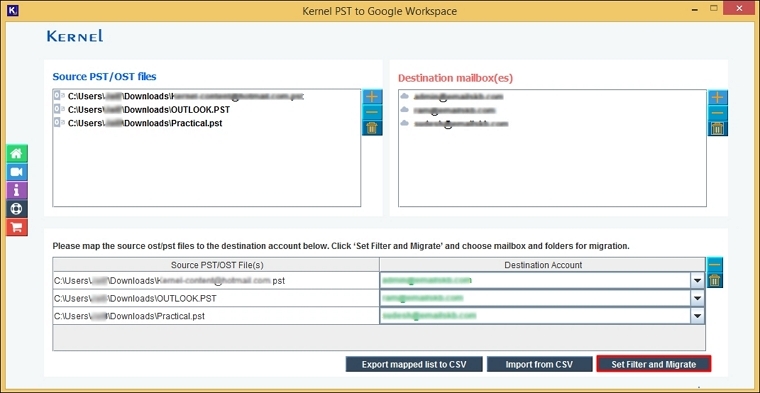
Step 8: Using the dropdown list, map the source PST file with the Workspace account. After mapping, click Set Filter and Migrate button.
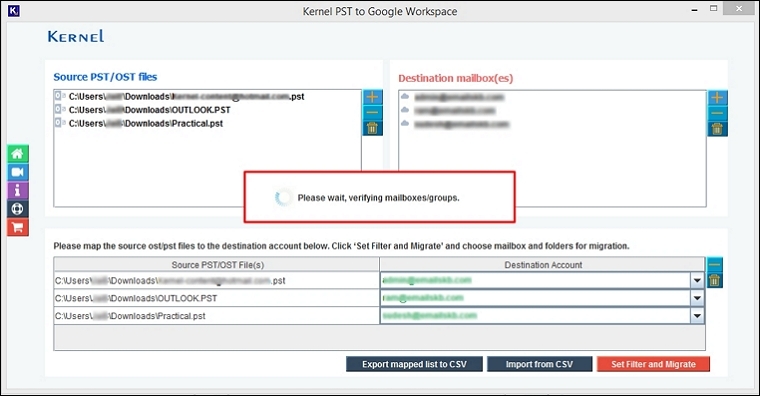
Step 9: The software will start verifying mailboxes and groups and show "Please wait, verifying mailboxes/groups" message.
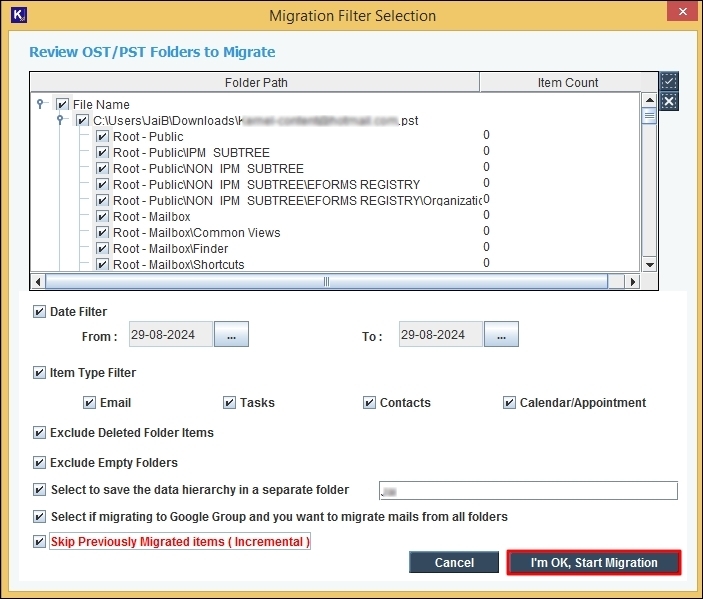
Step 10: In the Migration Filter Selection page, select filters from:
- Preview OST/PST Folders to Migrate: Select necessary folders you want to restore.
- Date Filter: Select the date ranges to import specific date-wise data.
- Item Type Filter: Select Email, Tasks, Contacts, and Calendar/Appointment accordingly.
- Excluded Deleted Folder Items: Skip deleted items from being imported into the Google Workspace account.
- Exclude Empty Folders: Skip migrating empty folders in Google Workspace account.
- Select to save the data hierarchy in a separate folder: with this feature, you can create a specific folder and save all your data in the original hierarchy.
- Select if migrating to Google Group and you want to migrate mails from all folders: Migrate all the PST file’s mails of all folders into selective Google Group.
- Skip Previously Migrated Items (Incremental): Skip files have already been migrated during the regular restoration process.
After applying the suitable filters, click I am OK, Start Migration.
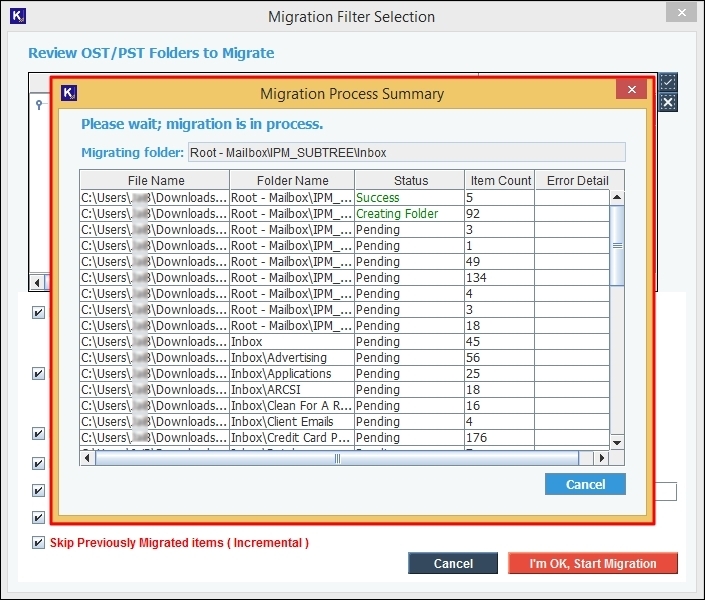
Step 11: The software will start restoration and show live progress in the taskbar.
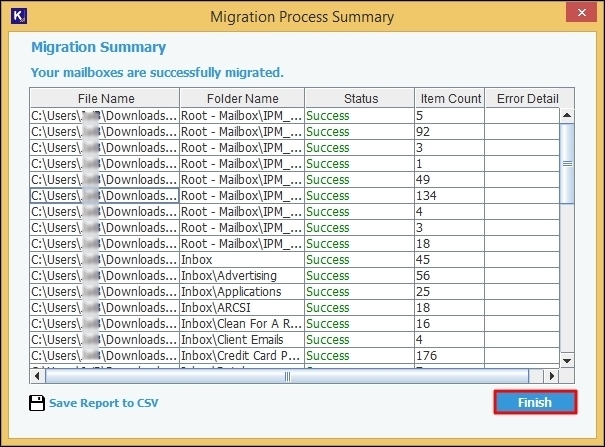
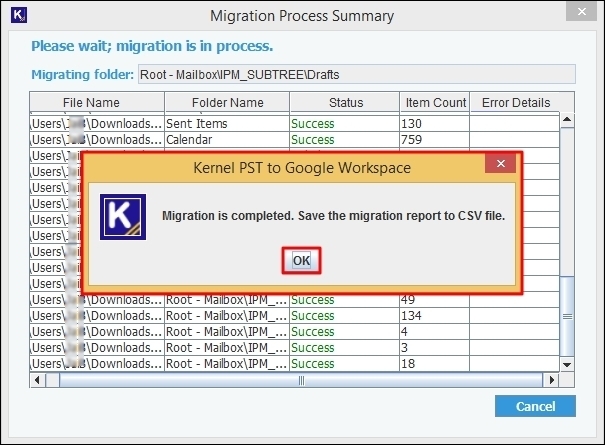
Step 12: Once the migration is complete, it shows that Migration is completed. Save the migration report to CSV file and click OK.
Step 13: Click on ‘Save report to CSV’ option to save the detailed restore report in CSV format.
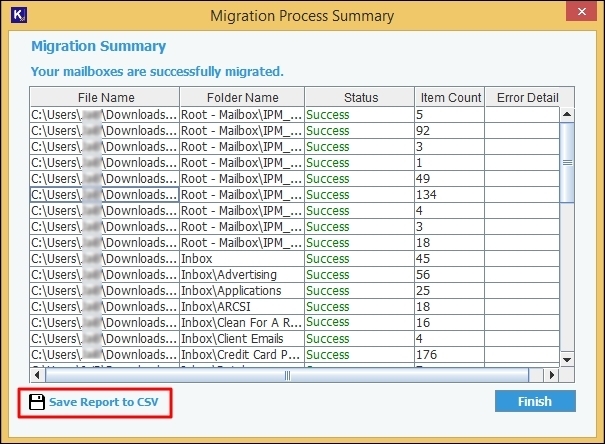
Step 14: Browse and Select a specific folder to save the CSV file.
Step 15: Finally, click Finish to end the restoration process.