Office 365 to Office 365 Migration – How To Use
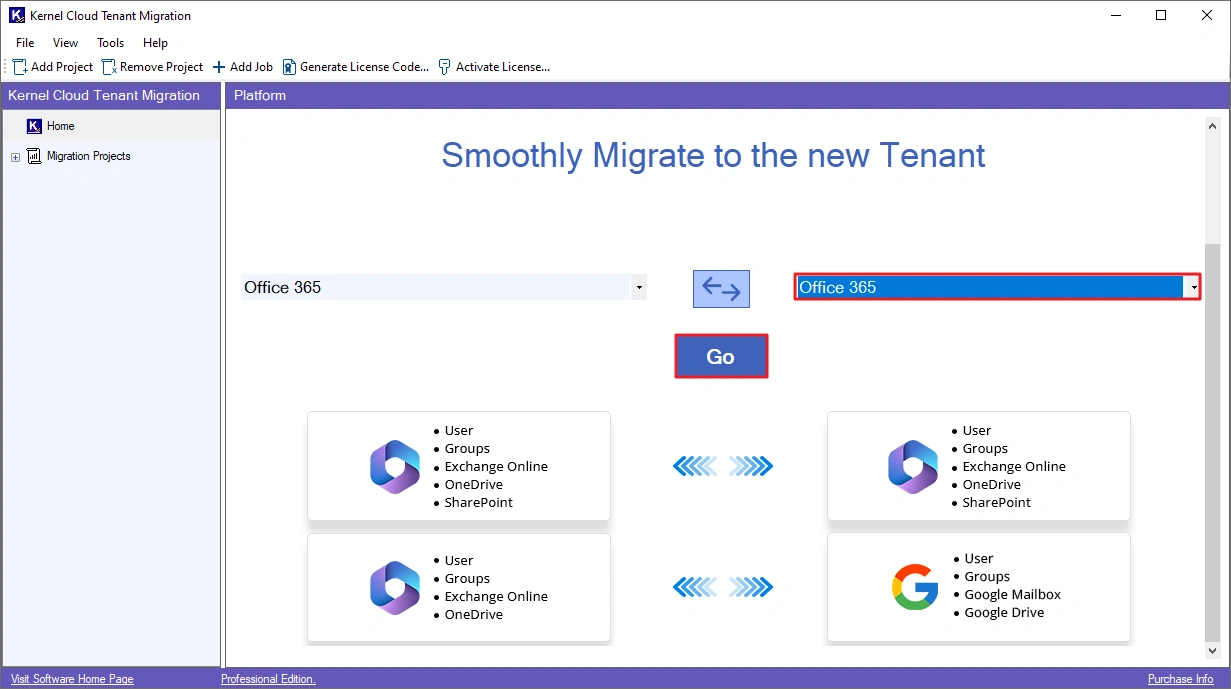
Step 1: Open the Cloud Tenant Migration tool and choose the destination (highlighted in red) as Office 365 using the dropdown. Then, click Go.
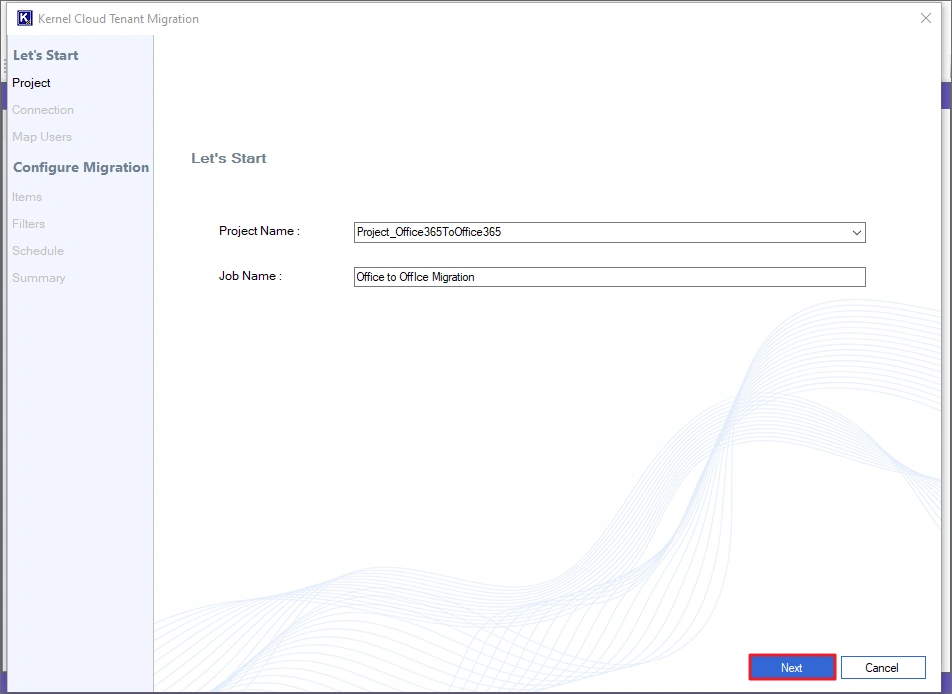
Step 2: Provide a suitable Job Name and click Next.
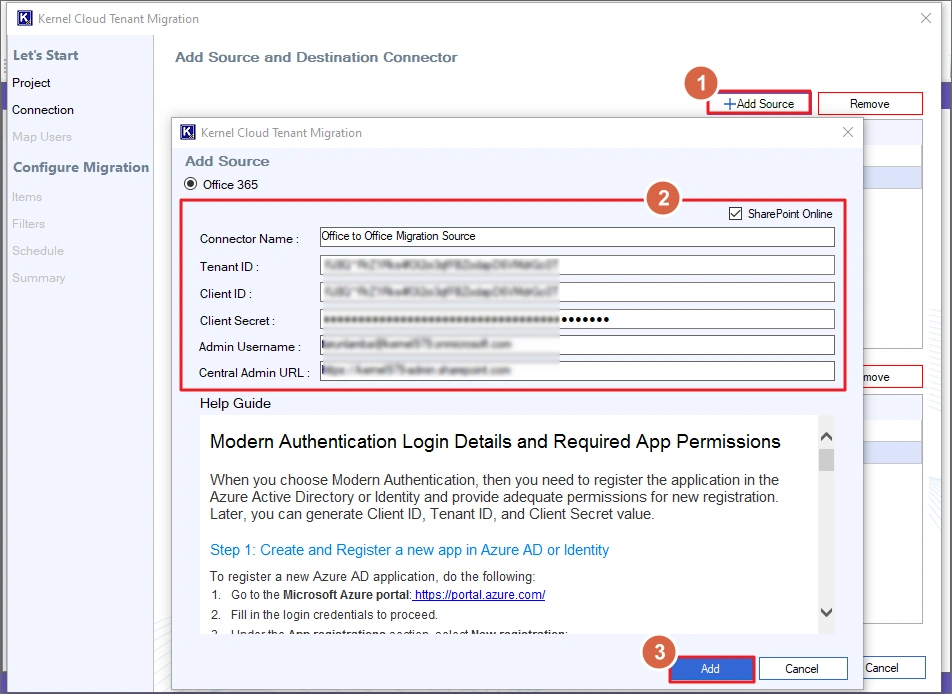
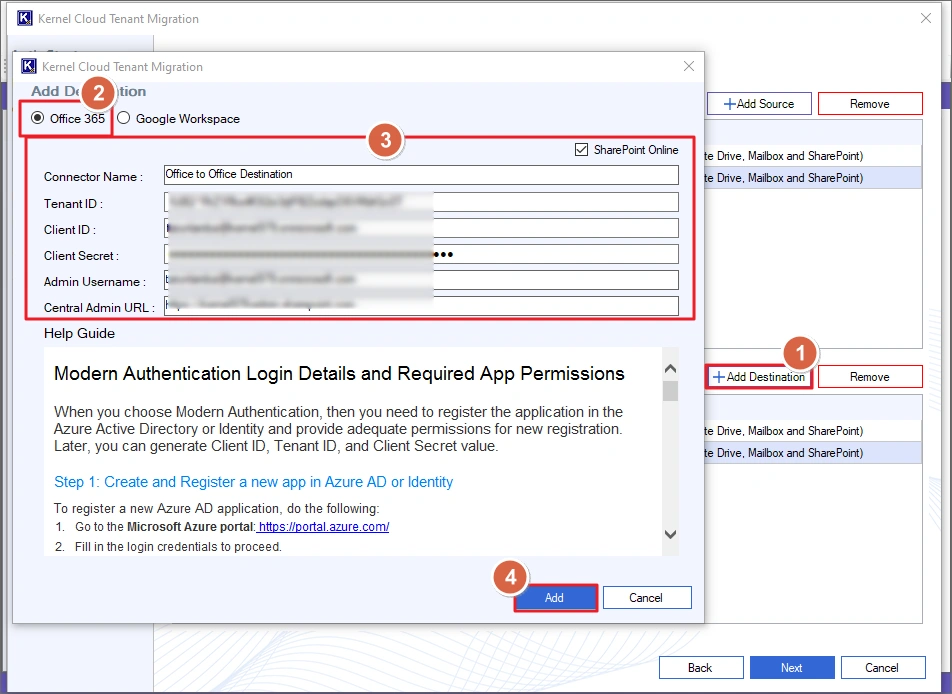
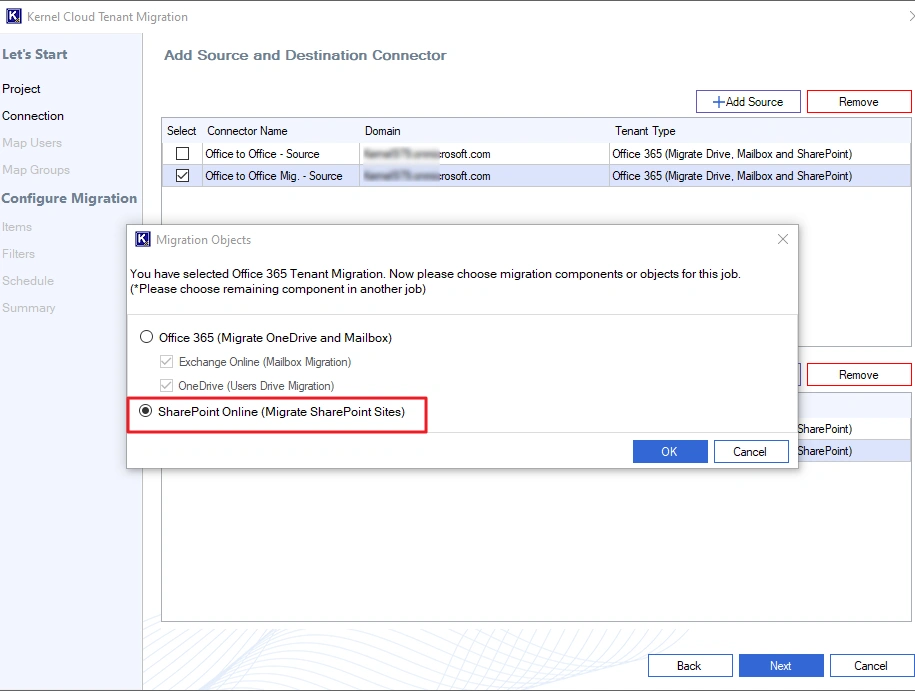
Step 3: Click +Add Source and provide the required details & the credentials for the source Office 365 account. If you also want to migrate SharePoint sites, make sure to check the SharePoint Online option.
For migrating only the Exchange mailbox and OneDrive data, you can skip the SharePoint Online option. Finally, click Add to connect and add the Office 365 account to the tool.
Note: If you don’t have the login credentials, create them using the Help Guide.
Step 4: Now, we will add the target Office 365 account. Click the +Add Destination button and choose Office 365 as your destination. Then, enter the required details and credentials for the Office 365 account. Then, click Add.
Note: Check the SharePoint Online checkbox if you are migrating SharePoint sites and provide required credentials.
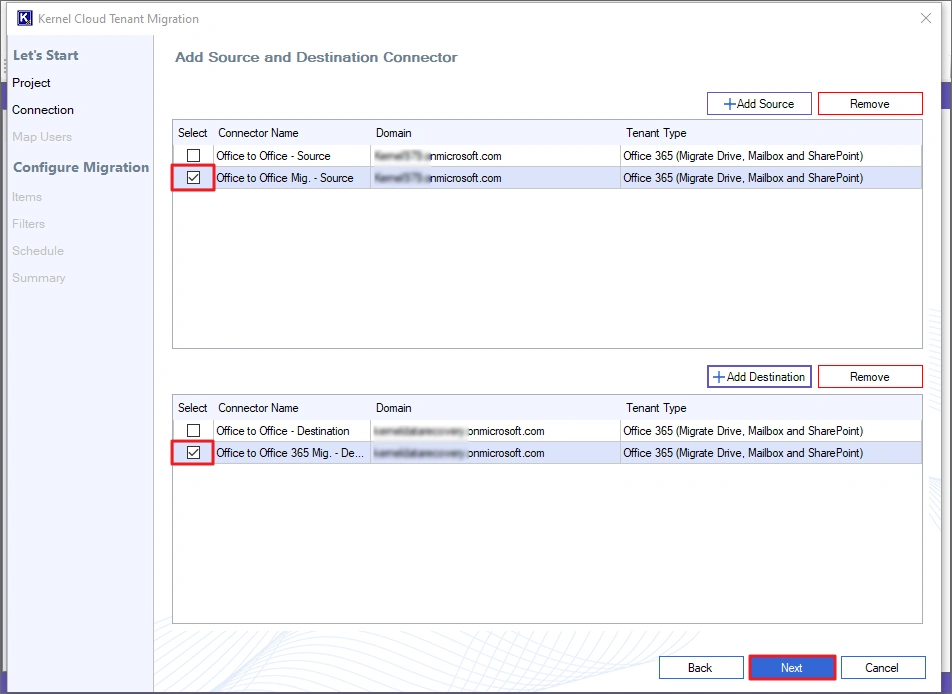
Step 5: Select the source and destination Office 365 account and click Next.
Note: Use the Remove button to remove any Office 365 account from the list.
Note: The Cloud Tenant Migration tool allows you to migrate mailboxes, OneDrive data, and SharePoint Sites. We will cover all 3 migrations individually. Choose the option according to your requirements and proceed.
Exchange Online to Exchange Online Mailbox Migration
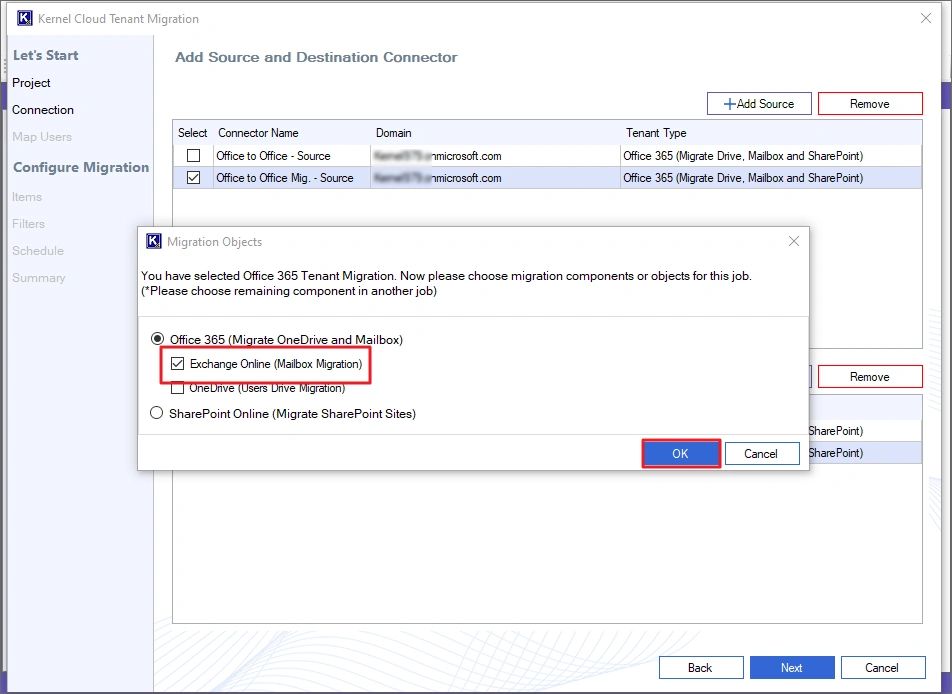
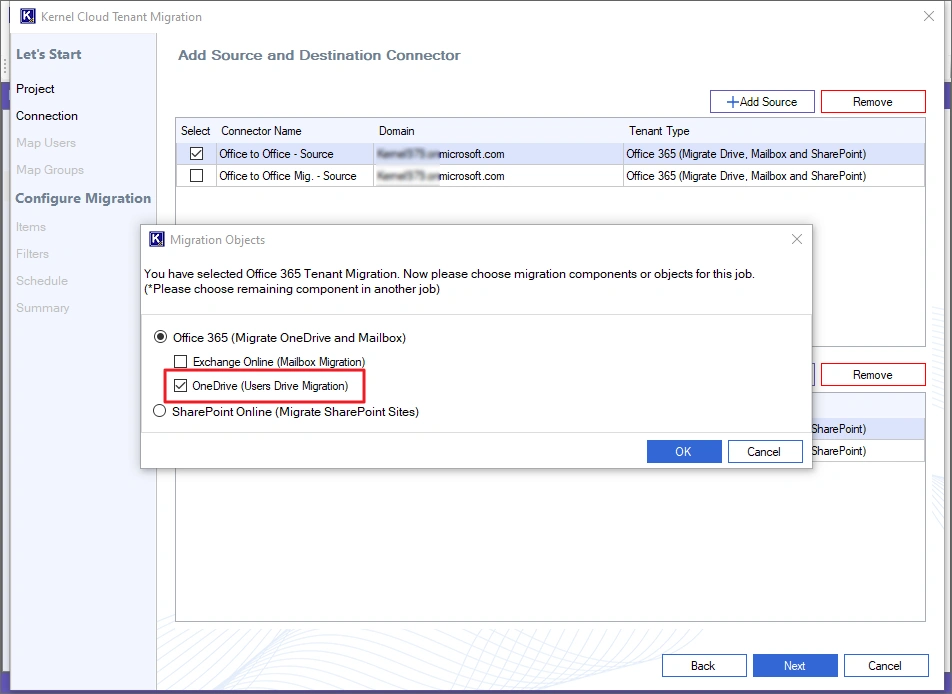
Step 6: Select the Exchange Online (Mailbox Migration) option and click OK.
Note: You can also select the OneDrive (Users Drive Migration) option if you want to migrate mailbox and OneDrive data together.
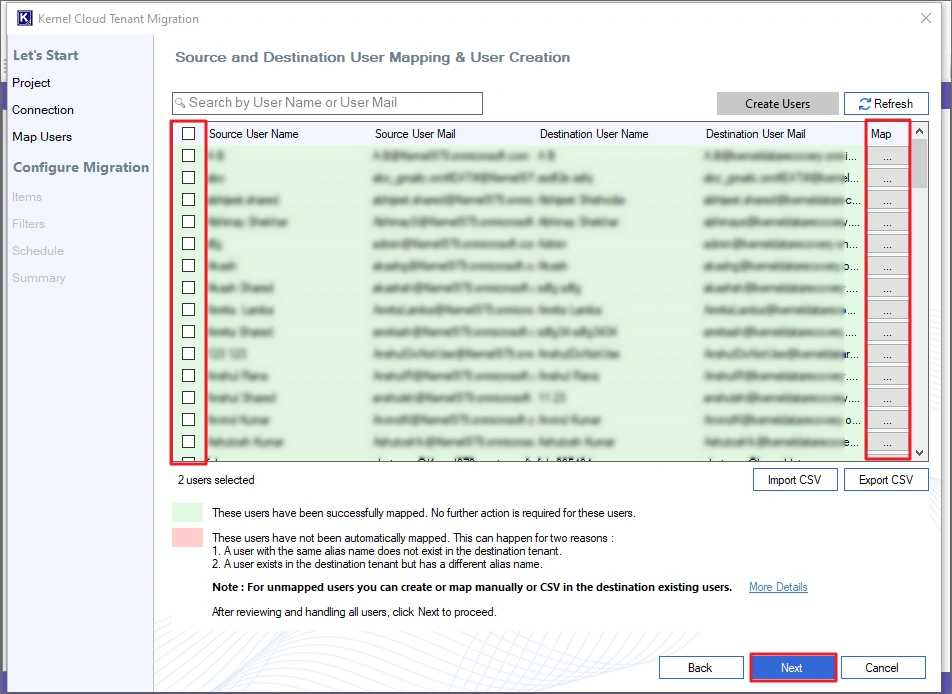
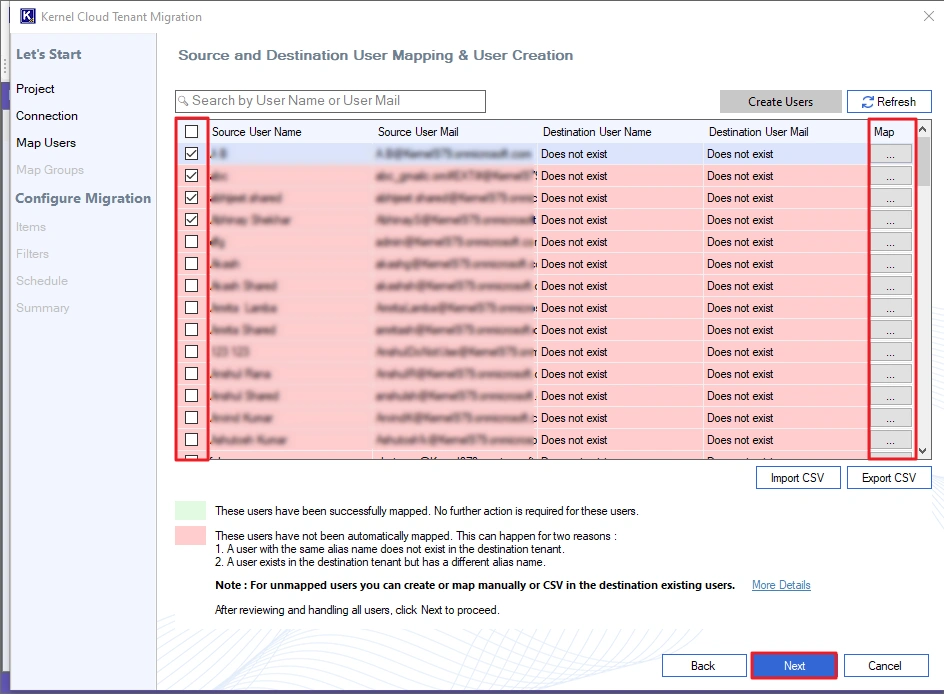
Step 7: The tool auto-maps the mailboxes and displays the mapped users in a green background and the unmapped users in a red background. You must manually map the unmapped users using the three-dot button under the Map column.
For quick user mapping, you can also import a CSV file containing mapping details. Select the mailboxes you want to migrate, map them (if not mapped automatically) and click Next.
Note: The destination mailbox you select must have an activated license to receive data.
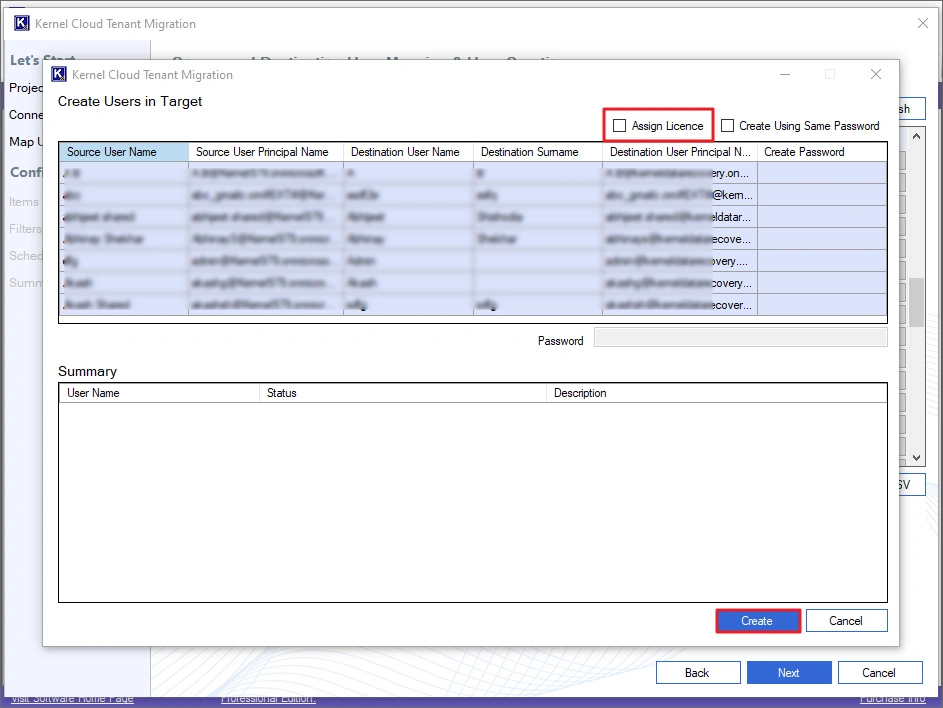
Note: To create new uses for mapping, click Create Users option and choose between Create Unmapped Users or Create Selected Users options. The tool will automatically create a username and a user principal name for destination users and will ask you to create passwords for all of them. Additionally, if you want the destination user to have the same license as the source user has, select the option Assign License. Finally, click Create.

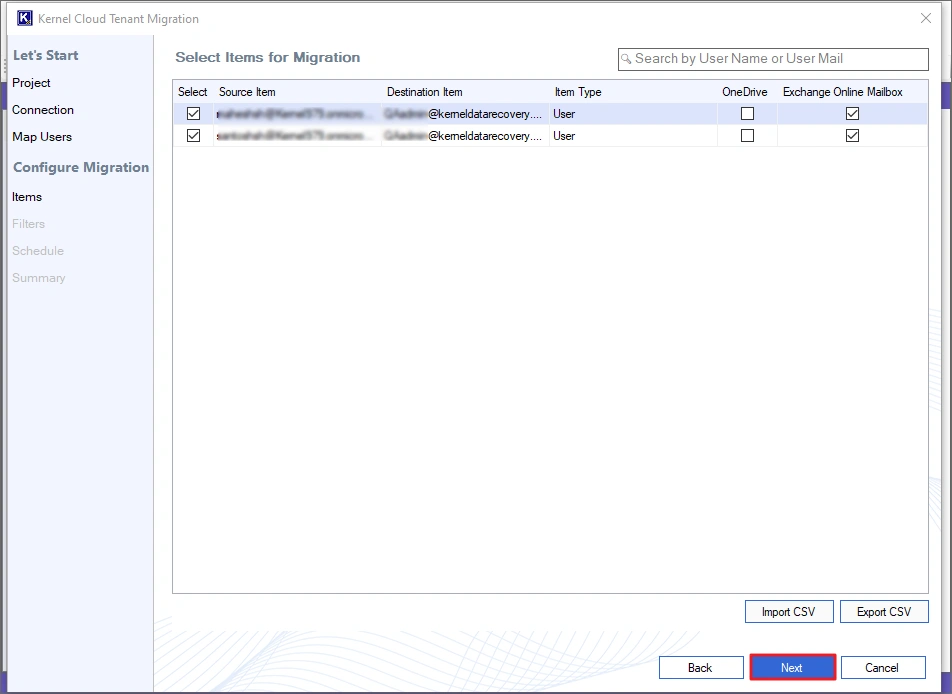
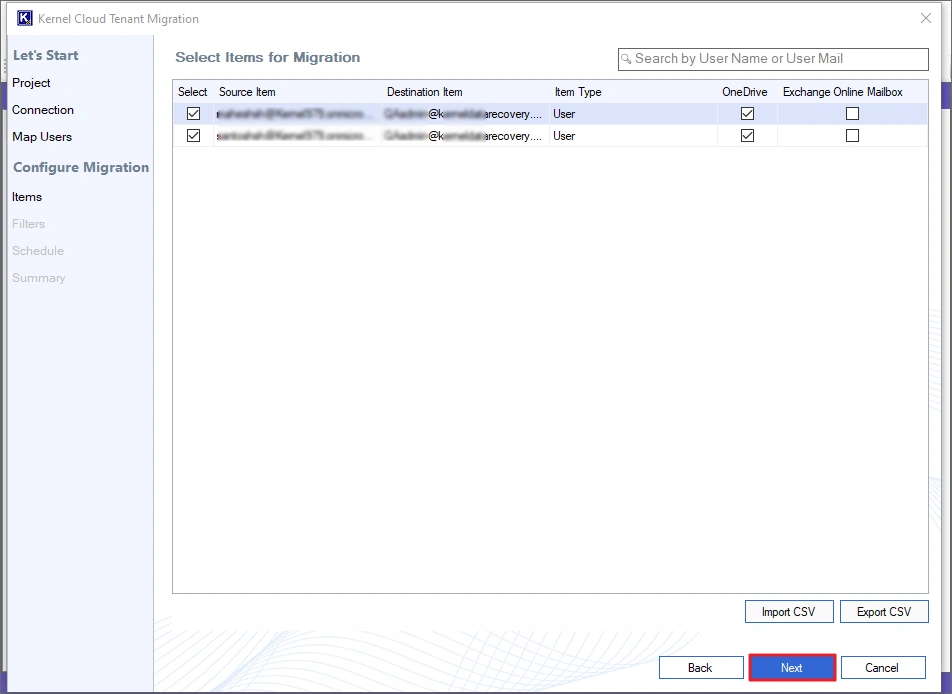
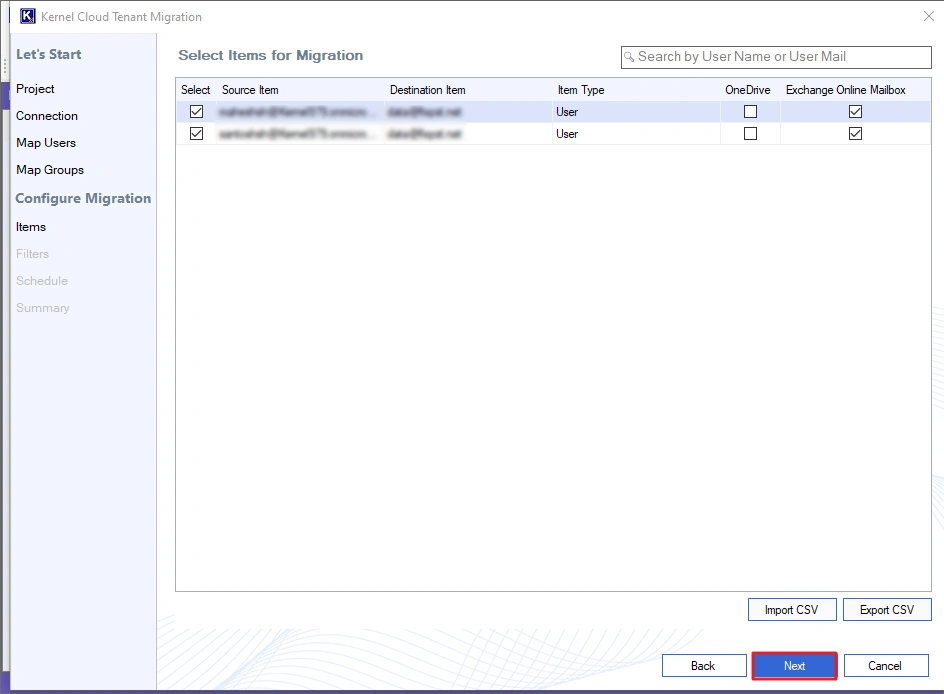
Step 8: In the Select Items for Migration window, make sure Exchange Online Mailbox checkbox is ticked for migration.
Note: You can also import a CSV file with details like source, destination and type of migration (mailbox or OneDrive) for fast bulk migration.
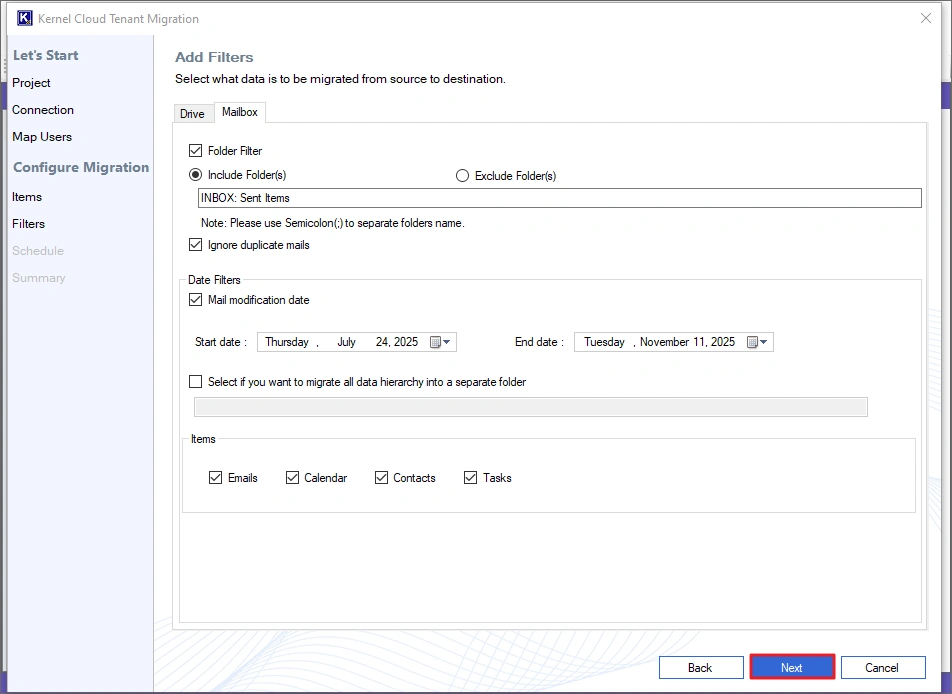
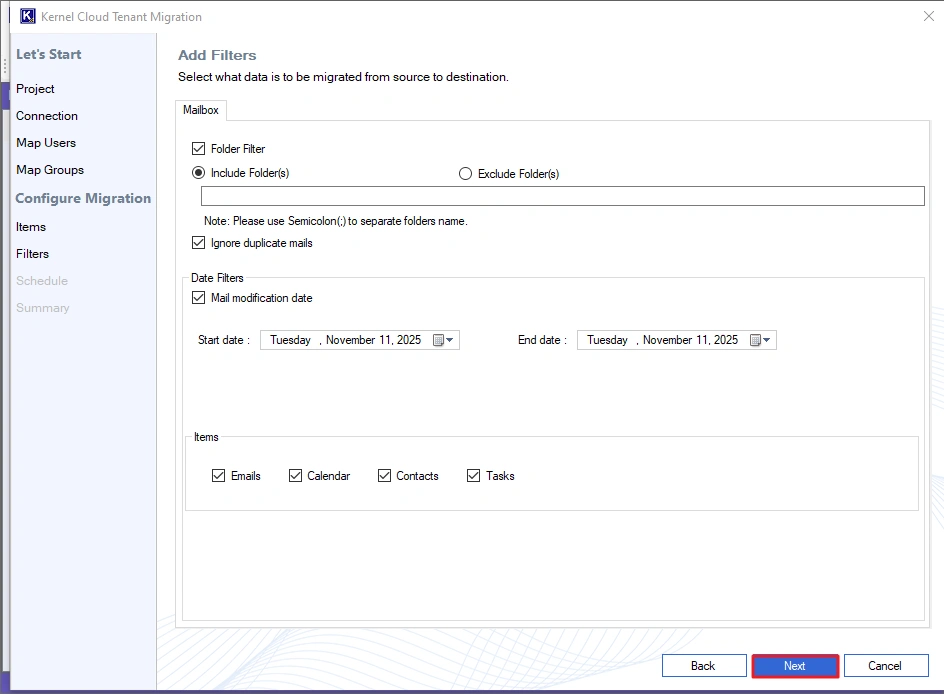
Step 9: Use Mailbox filters to migrate only the required data. The tool gives you the following filters:
- Folder Filter: Allows you to include/exclude specific folders from the migration.
- Ignore duplicate mails: Select it to skip the migration of duplicate emails.
- Date Filters: Specify a Start and End date to migrate only the data you send/receive between these dates.
- Items: Select different item types you want to transfer.
- The tool also allows you to create a new folder and transfer complete data into this new folder with the original structure.
After setting up all the filters, click Next.
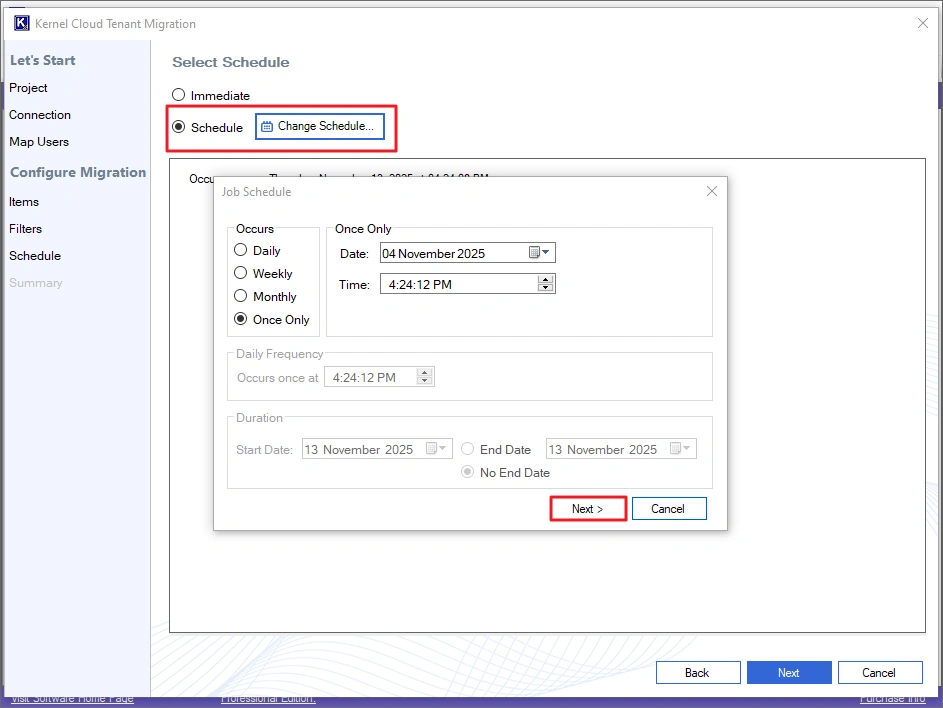
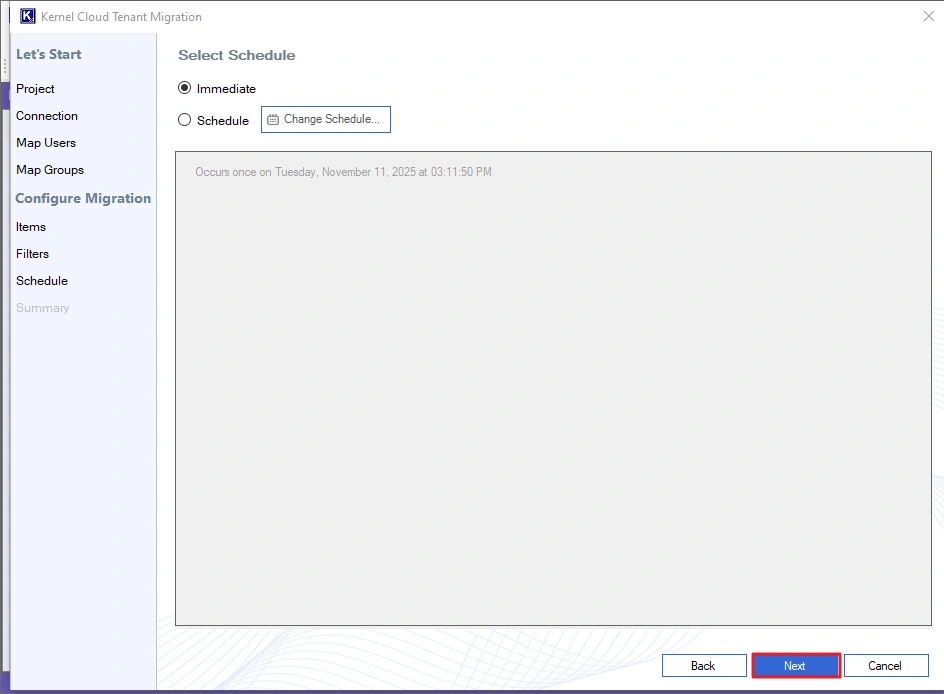
Step 10: Choose Immediate and click Next to start the data transfer immediately.

Note: To schedule the migration for a later time, choose the Schedule option. Click the Change Schedule button to define the time, date, and frequency of migration. Then, click Next to save the schedule.
Step 11: The tool will show you a summary describing the migration details. Click Create to add the job and begin the migration.
Note: If you find any mailbox missing or wrongly mapped, click Back and make the necessary changes.

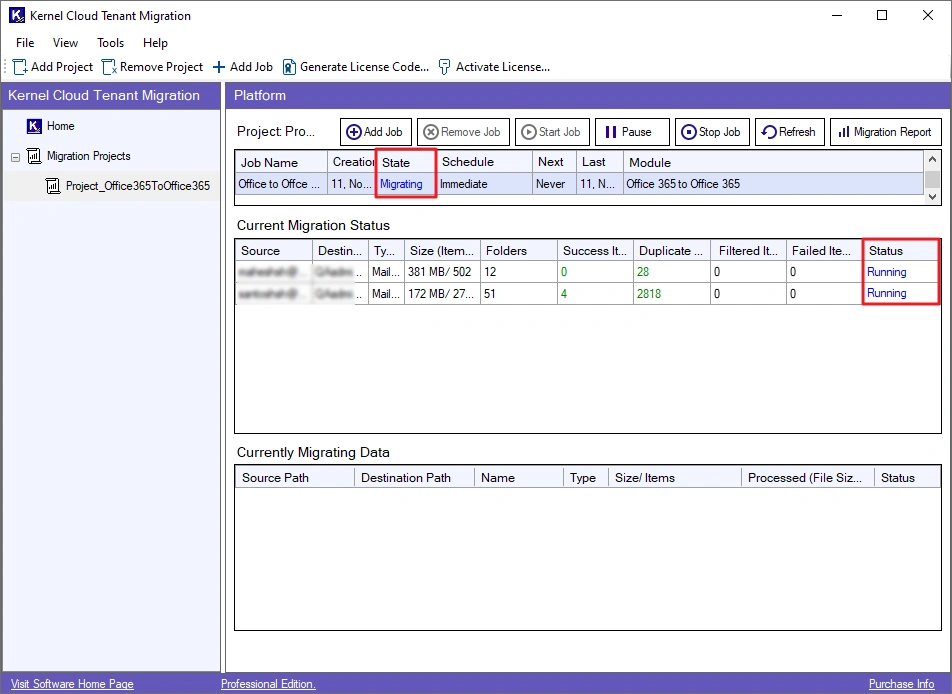
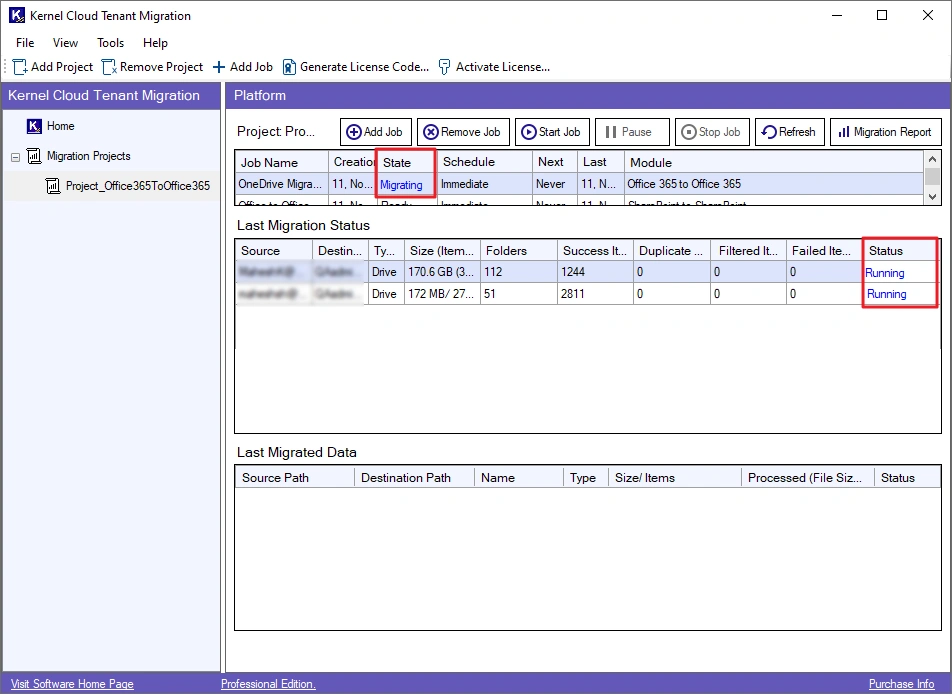
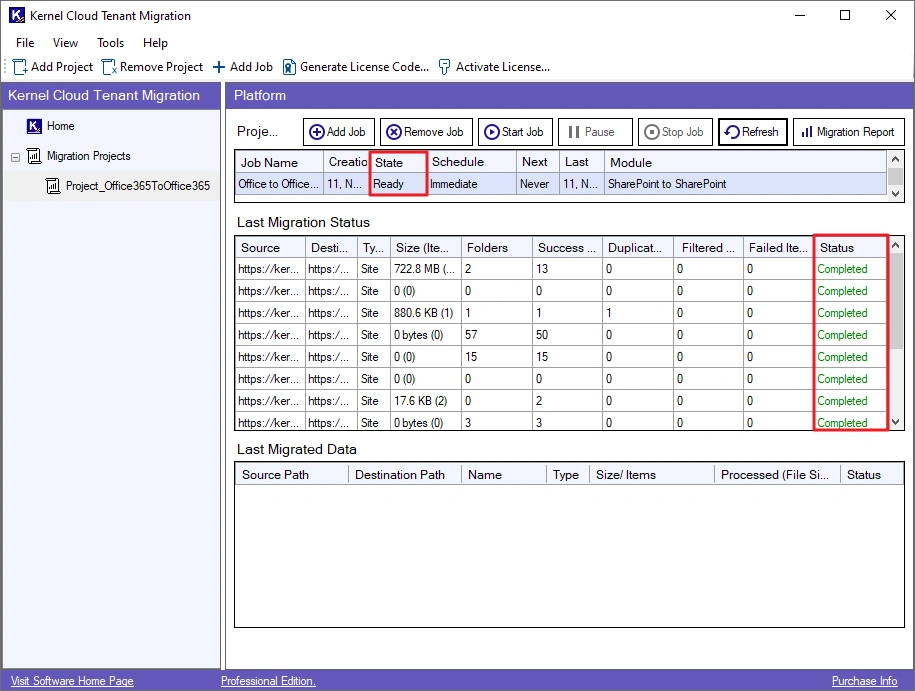
Step 12: The job will start and display the State as Migrating and mailbox Status as Running. You can check the live migration on Current Migration Status and Currently Migrating Data options.
You can control the ongoing job using these options:
- Add Job: Click it to create and add a new job.
- Remove Job: Use this to remove any completed or stopped job from the project.
- Start Job: Start any paused or stopped job again.
- Pause: Temporarily pause the job. You can resume it anytime.
- Stop Job: This button will terminate the migration job.
- Refresh: Use it to refresh the state of the migration.
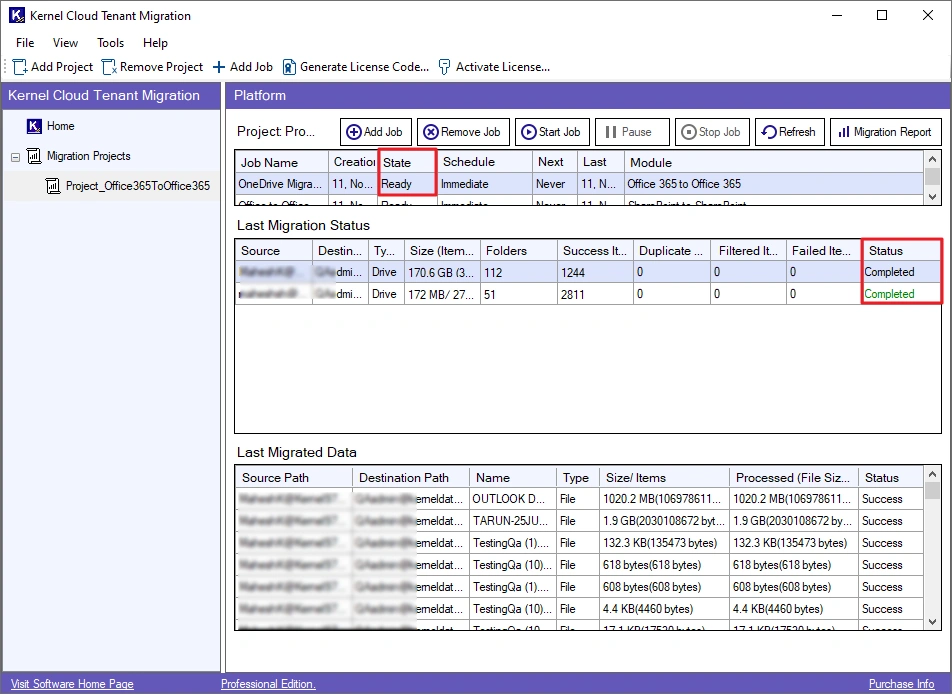
Step 13: After the migration is successful, the State will turn to Ready, and the mailbox transfer Status will turn to Completed.
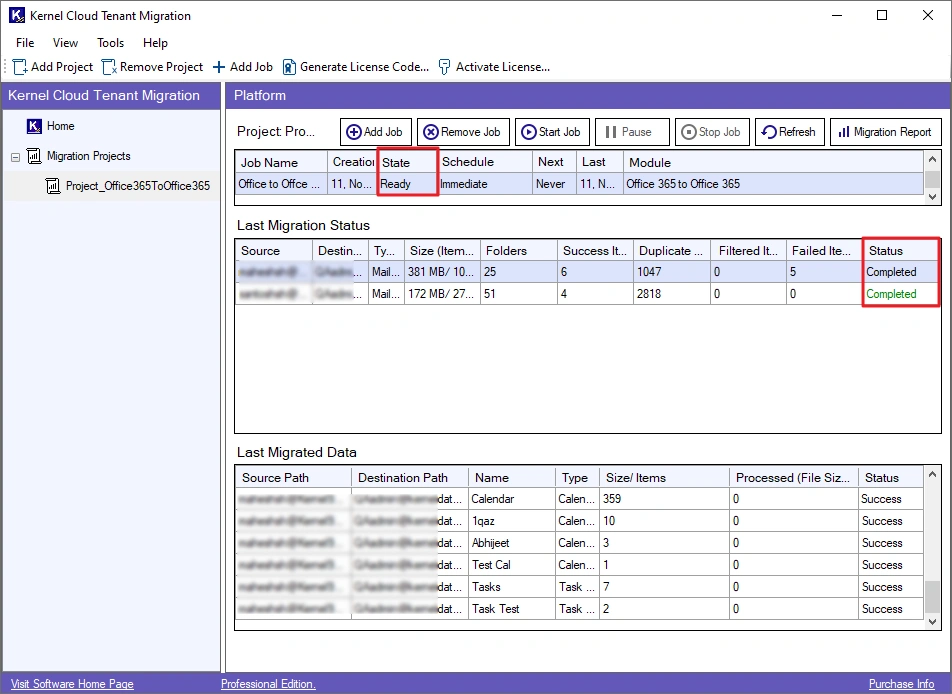
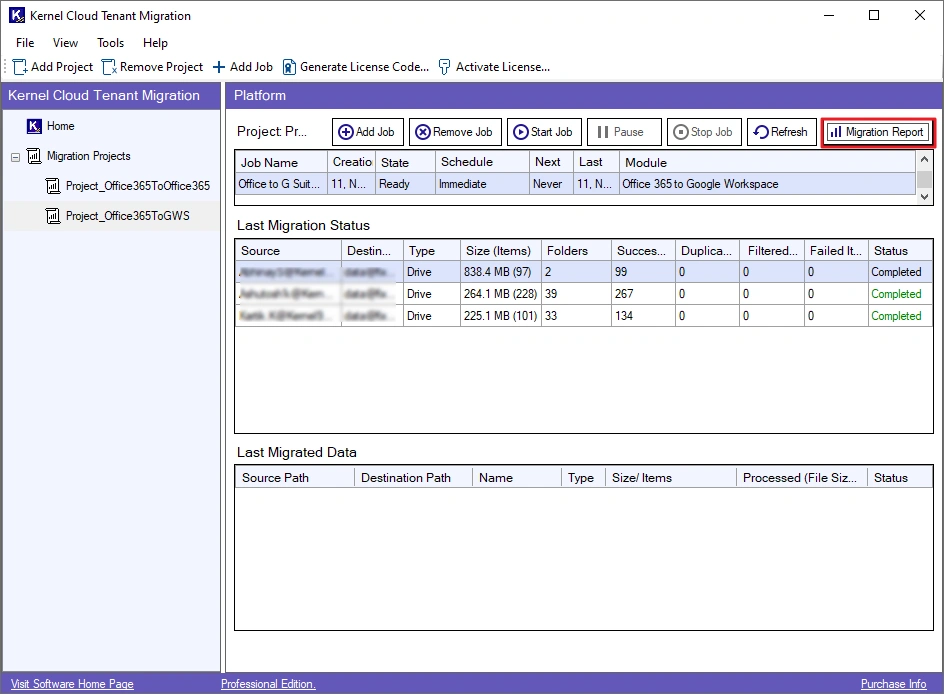
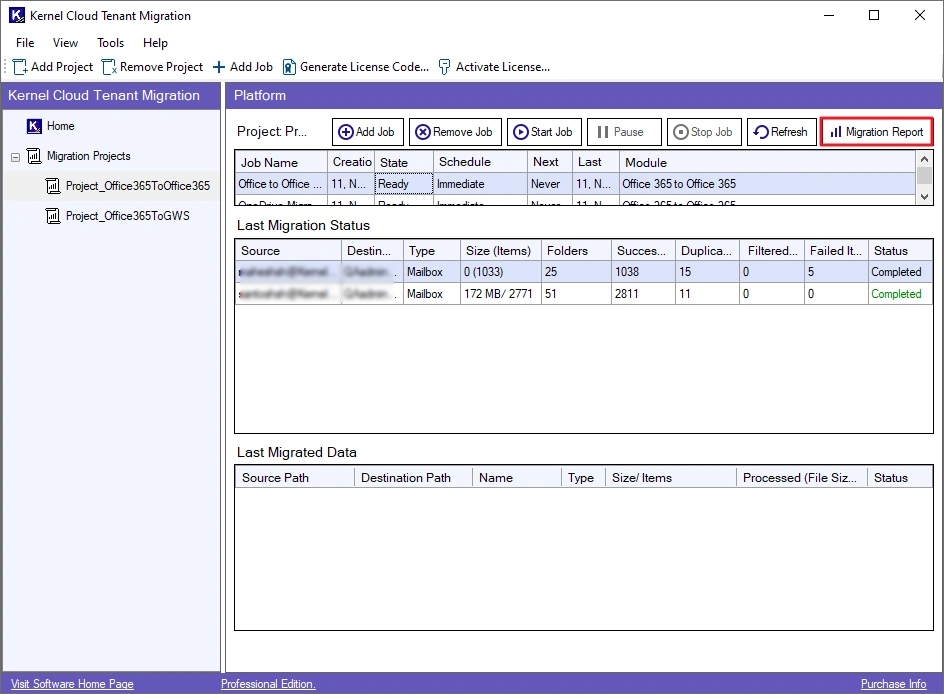
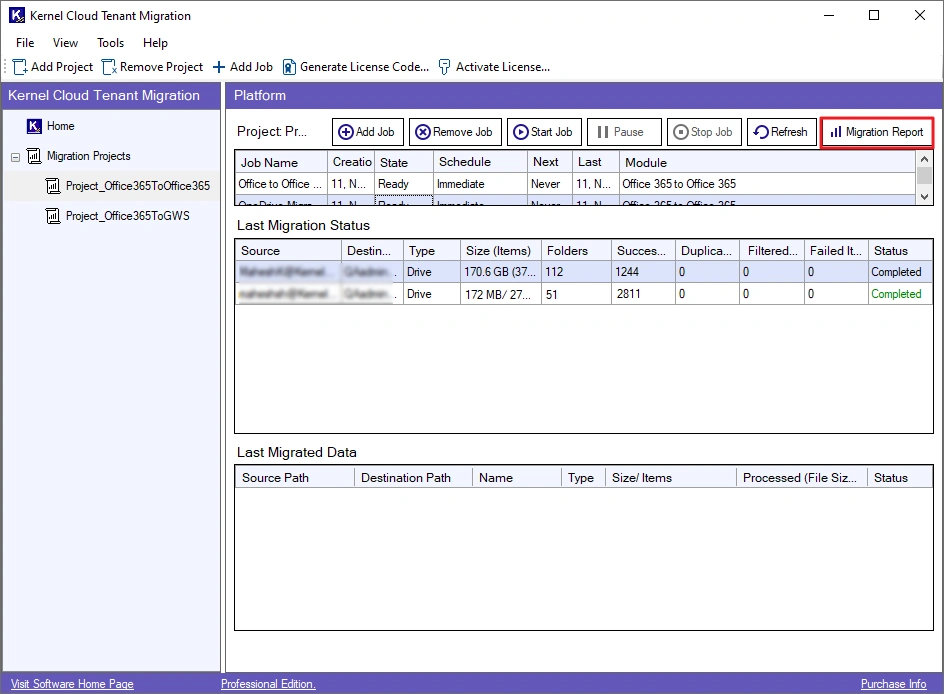
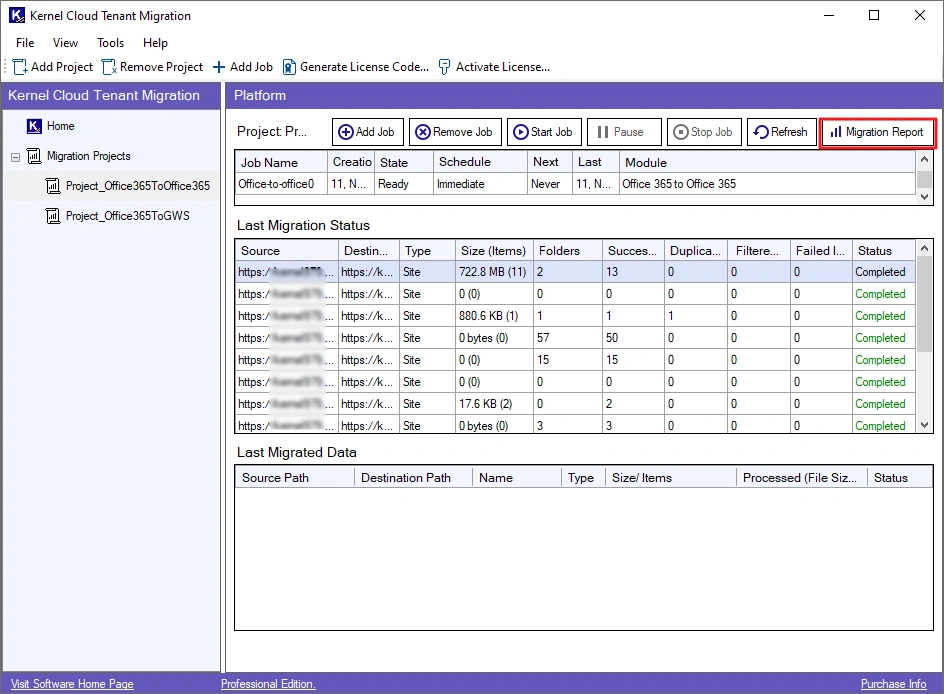
Step 14: Download a detailed migration report with the following steps:
- Select the job, and click the Migration Report button
- Choose a session and click the View Details
- Click Save Reports to CSV, browse a saving location and click Save.
OneDrive to OneDrive Migration
Step 6: Select OneDrive (Users Drive Migration) and click OK.
Note: You can also select the Exchange Online (Mailbox Migration) option if you want to migrate mailbox and OneDrive data together.
Step 7: For quick mapping, the tool auto-maps the users. Successfully mapped users are displayed with a green background color, and the unmapped users are displayed in a red background color. Map the unmapped users using the three-dot button under the Map column
For quick user mapping, you can also import a CSV file containing mapping details. Select the users you want to migrate, map them (if not mapped automatically) and click Next.
Note: The destination user you select must have an activated license to receive data.

Note: To create new users for mapping click Create Users option and choose between Create Unmapped Users or Create Selected Users options. The tool will automatically create a username and a user principal name for destination users and will ask you to create passwords for all of them. Additionally, if you want the destination user to have the same license as the source user has, select the option Assign License. Finally, click Create.
Step 8: In the Select Items for Migration window, make sure OneDrive checkbox is ticked for migration.
Note: You can also import a CSV file with details like source, destination and type of migration (mailbox or OneDrive) for fast bulk migration.
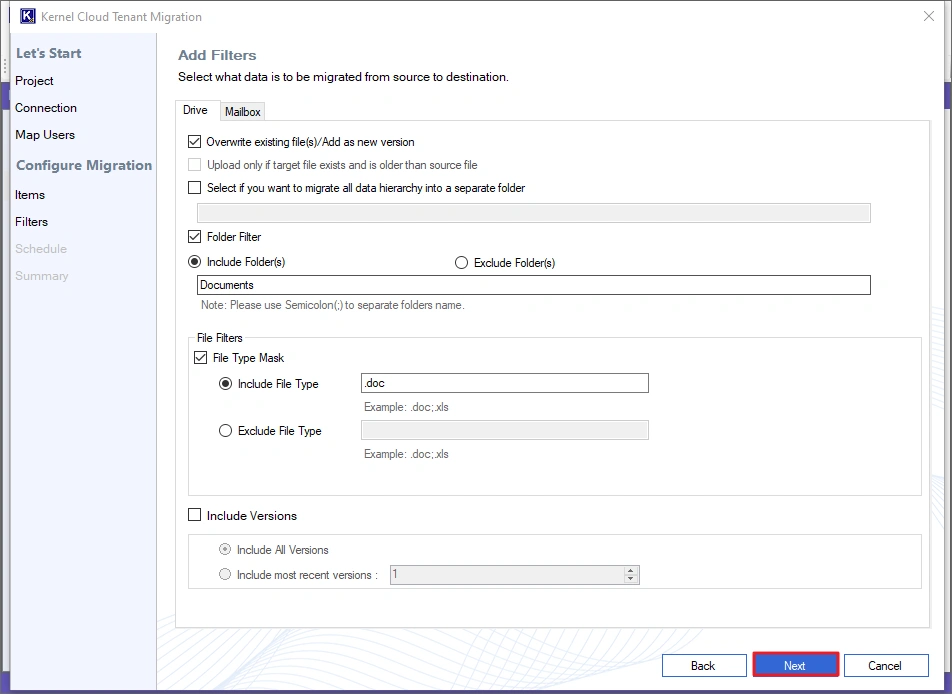
Step 9: Use Drive filters to migrate only the required data. The tool gives you the following filters:
- Folder Filter: Allows you to include/exclude specific folders.
- File Filters: To include/exclude individual file types from the migration.
- Include Versions: Select which file version you want to transfer. You can also choose to migrate all versions.
- Create a new folder and transfer complete data into this new folder with original structure.
- You can also choose to migrate all the files or only the modified ones.
After setting up all the filters, click Next.
Step 10: Choose Immediate and click Next to start the data transfer immediately.
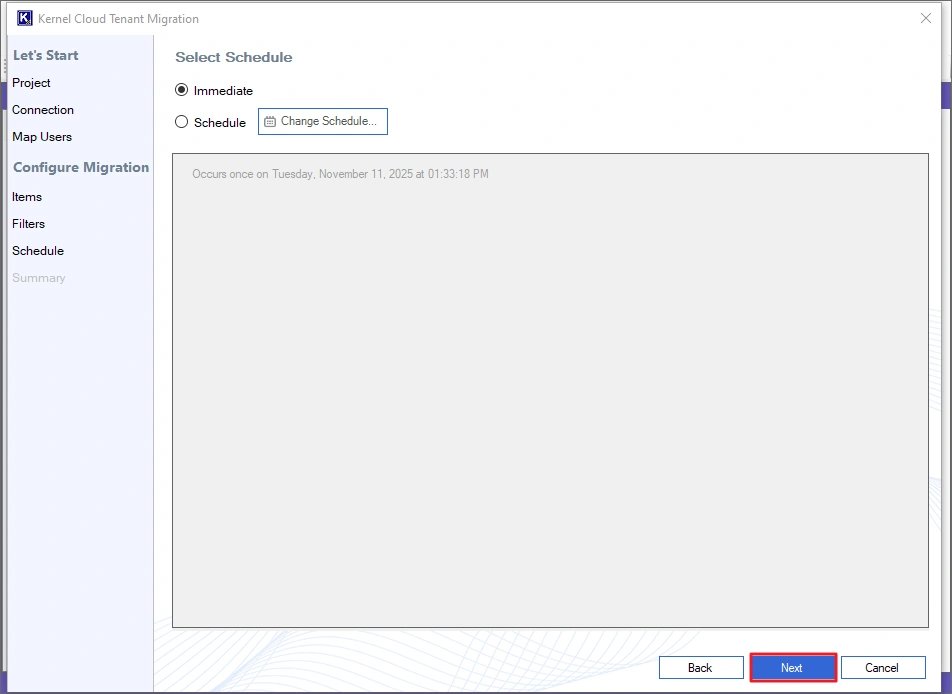
Note: To schedule the migration for a later time, choose the Schedule option. Click the Change Schedule button to define the time, date, and frequency of migration. Then, click Next to save the schedule.

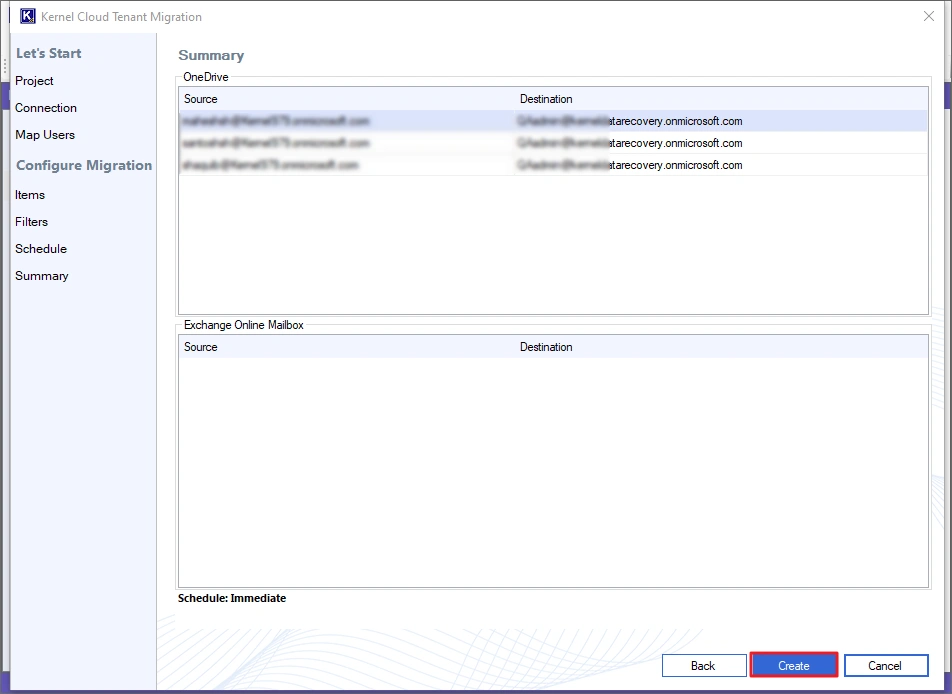
Step 11: The tool will show you a summary describing the migration details. Click Create to add the job and begin the migration.
Note: If you find any user missing or wrongly mapped, click Back and make the necessary changes.
Step 12: The job will start and display the State as Migrating and the OneDrive data transfer Status as Running. You can check the live migration on Current Migration Status and Currently Migrating Data options.
You can control the ongoing job using these options:
- Add Job: Click it to create and add a new job.
- Remove Job: Use this to remove any completed or stopped job from the project.
- Start Job: Start any paused or stopped job again.
Pause: Temporarily pause the job. You can resume it anytime. - Stop Job: This option will terminate the migration job.
- Refresh: Use it to refresh the state of the migration.
Step 13: After the migration is successful, the State will turn to Ready, and the OneDrive transfer Status will turn to Completed.
Step 14: Download a detailed migration report with the following steps:
- Select the job, and click the Migration Report button
- Choose a session and click the View Details
- Click Save Reports to CSV, browse a saving location and click Save.
SharePoint Online to SharePoint Online migration
Step 6: Select SharePoint Online (Migrate SharePoint Sites) option and click OK.
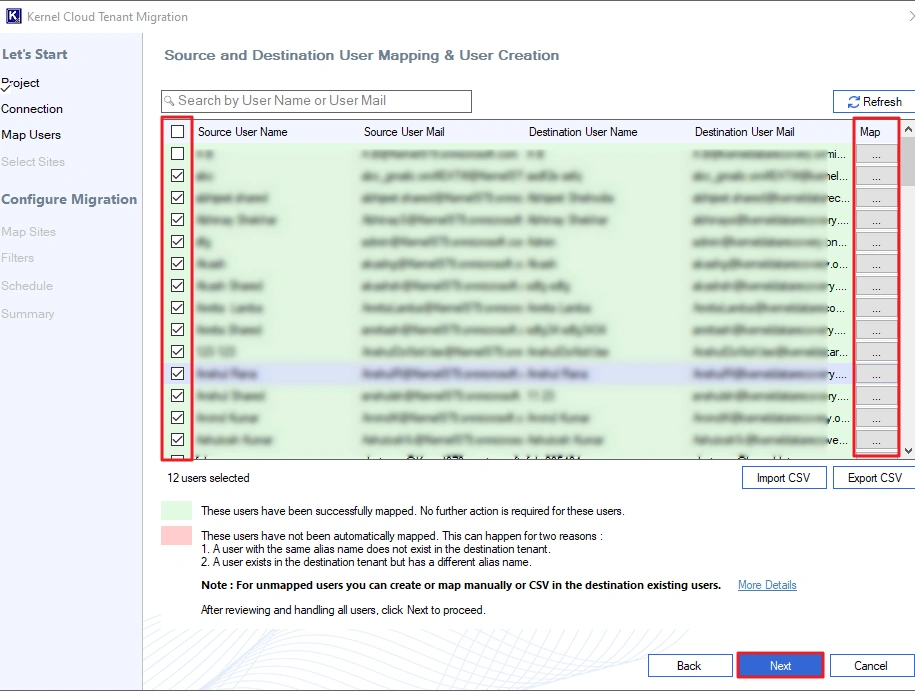
Step 7: Select and map the source users to destination users. The tool will automatically map users with the same alias in destination. Auto-mapped users are displayed in a green background, and unmapped users are displayed in a red background.
You can map them manually using the three-dot icon in the Map column. After mapping, click Next.
Note: For quick user mapping, you can also import a CSV file containing mapping details.
Step 8: Select the sites you want to migrate and click Next.
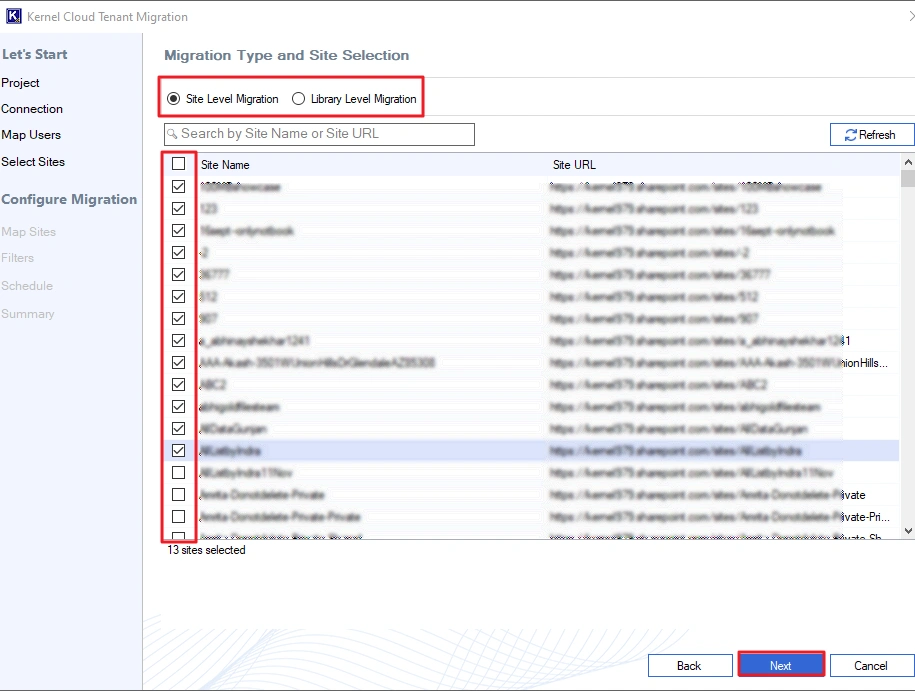
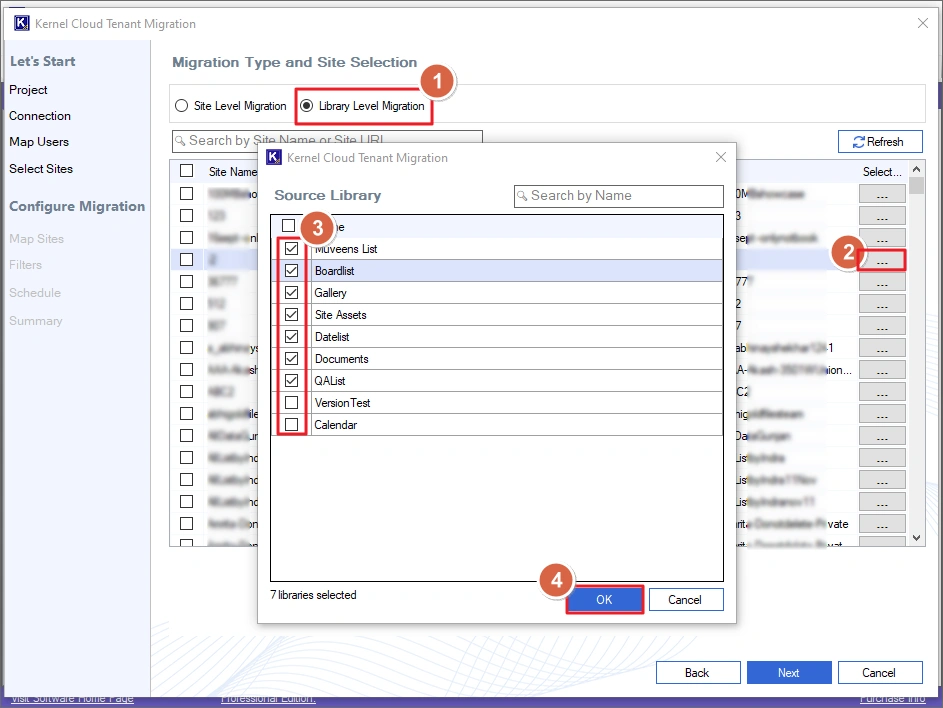
Note: To select/unselect site libraries, select the option Library Level Migration. Then, click on the 3-dot icon, select the libraries you want to migrate, and click OK.
Step 9: If source sites with similar names are present in the destination, they will be auto-mapped. Mapped sites are displayed with a green background and unmapped sites with a red background. Use the 3-dot icon to map any site manually. Click Next to continue.
Note: If you have a CSV file with mapping details, click Import CSV and upload it.
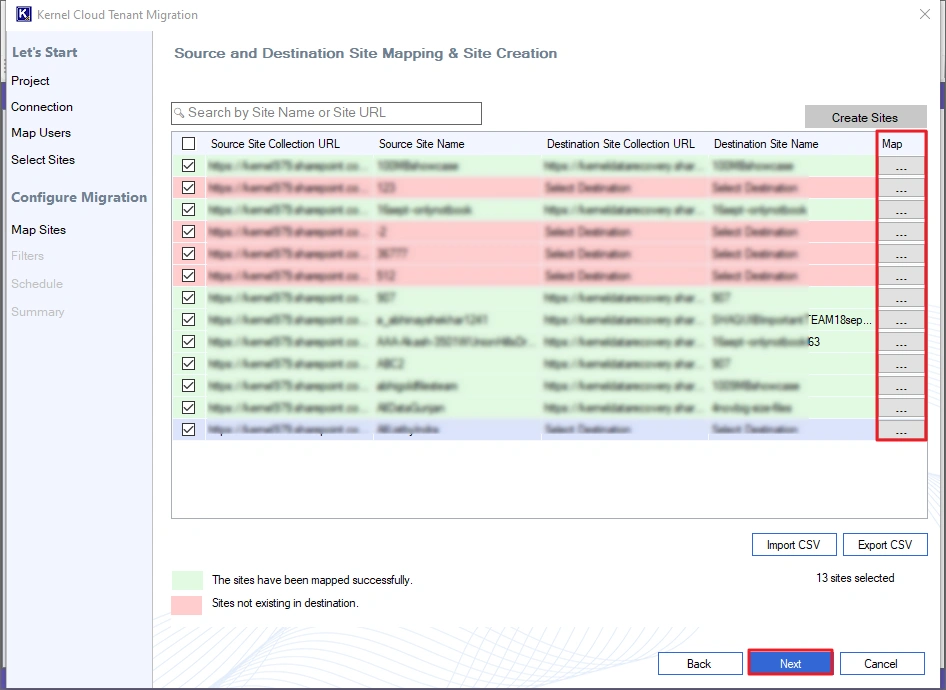
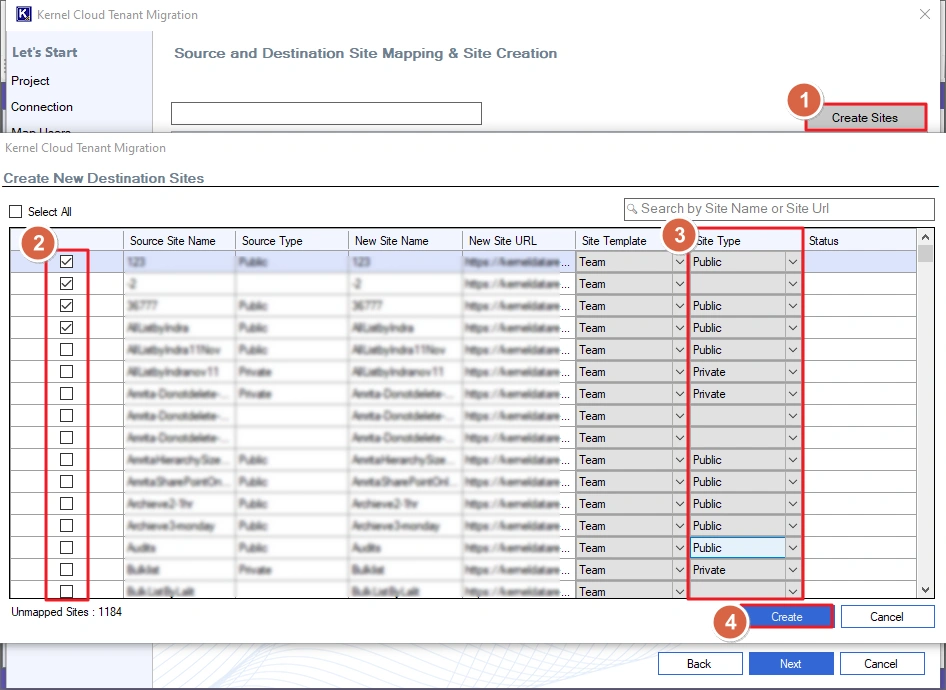
Note: To create new sites, click Create Sites. Select the sites you want to create in destination, define their type and click Create.
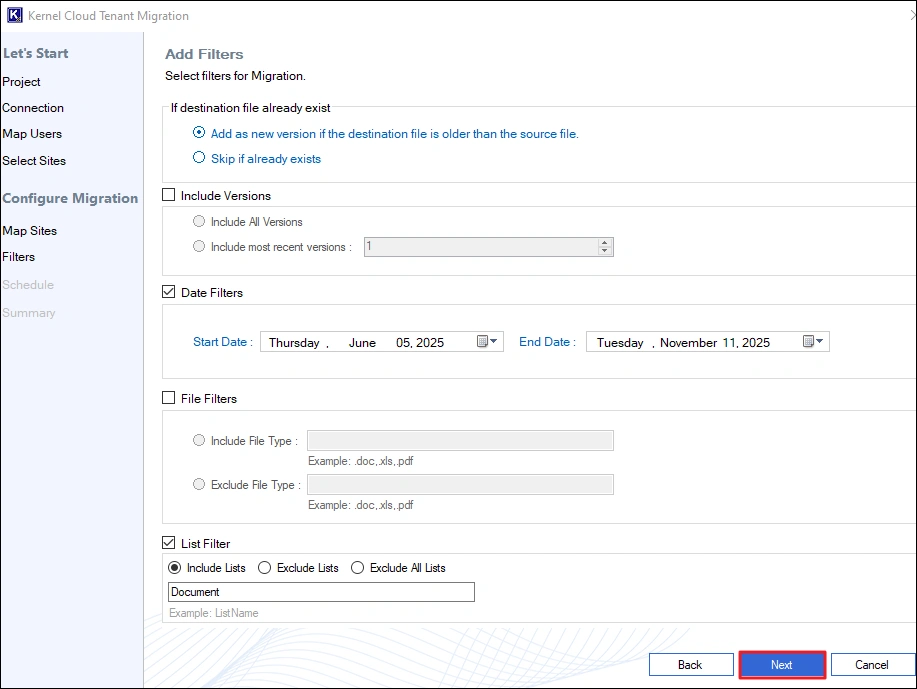
Step 10: Apply the filters according to your requirements. You can:
- Skip sites or replace the old site with a new updated version.
- Choose site version to migrate – All or a specific version.
- Apply date filters to transfer sites created between a specific start & end date.
- Use File Filters to choose to include/exclude different types of files.
- Choose to include/exclude lists from the migration.
Click Next to continue.
Step 11: Select Immediate and click Next to start the migration instantly.

Note: To schedule the migration for a later time, choose the Schedule option. Click the Change Schedule button to define the time, date, and frequency of migration. Then, click Next to save the schedule.

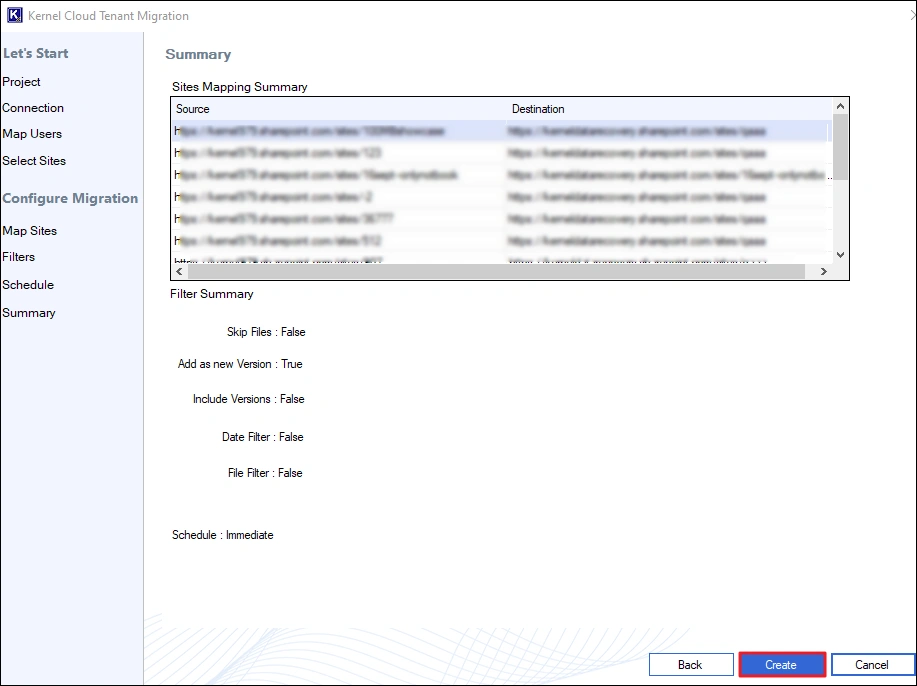
Step 12: The tool will show you a summary describing the migration details. Click Create to add the job and begin the migration.
Note: If you find any site missing or wrongly mapped, click Back and make the necessary changes.
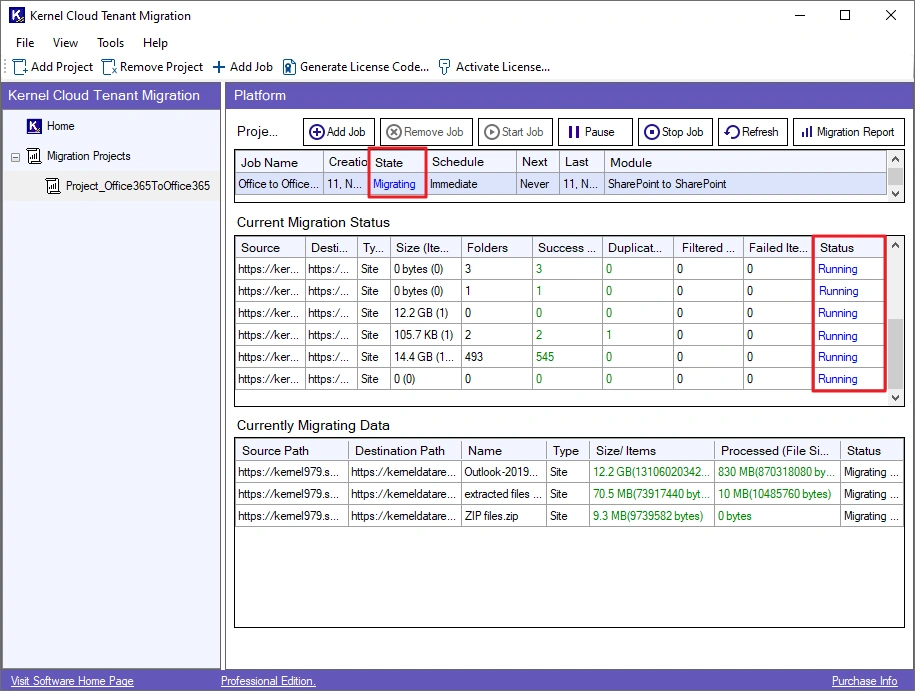
Step 13: The job will start and display the State as Migrating and site transfer Status as Running. You can check the live migration on Current Migration Status and Currently Migrating Data options.
You can control the ongoing job using these options:
- Add Job: Click it to create and add a new job.
- Remove Job: Use this to remove any completed or stopped job from the project.
- Start Job: Start any paused or stopped job again.
Pause: Temporarily pause the job. You can resume it anytime. - Stop Job: This option will terminate the migration job.
- Refresh: Use it to refresh the state of the migration.
Step 14: After the migration is successful, the State will turn to Ready, and the site transfer Status will turn to Completed.
Step 15: Download a detailed migration report with the following steps:
- Select the job, and click the Migration Report button
- Choose a session and click the View Details
- Click Save Reports to CSV, browse a saving location and click Save.
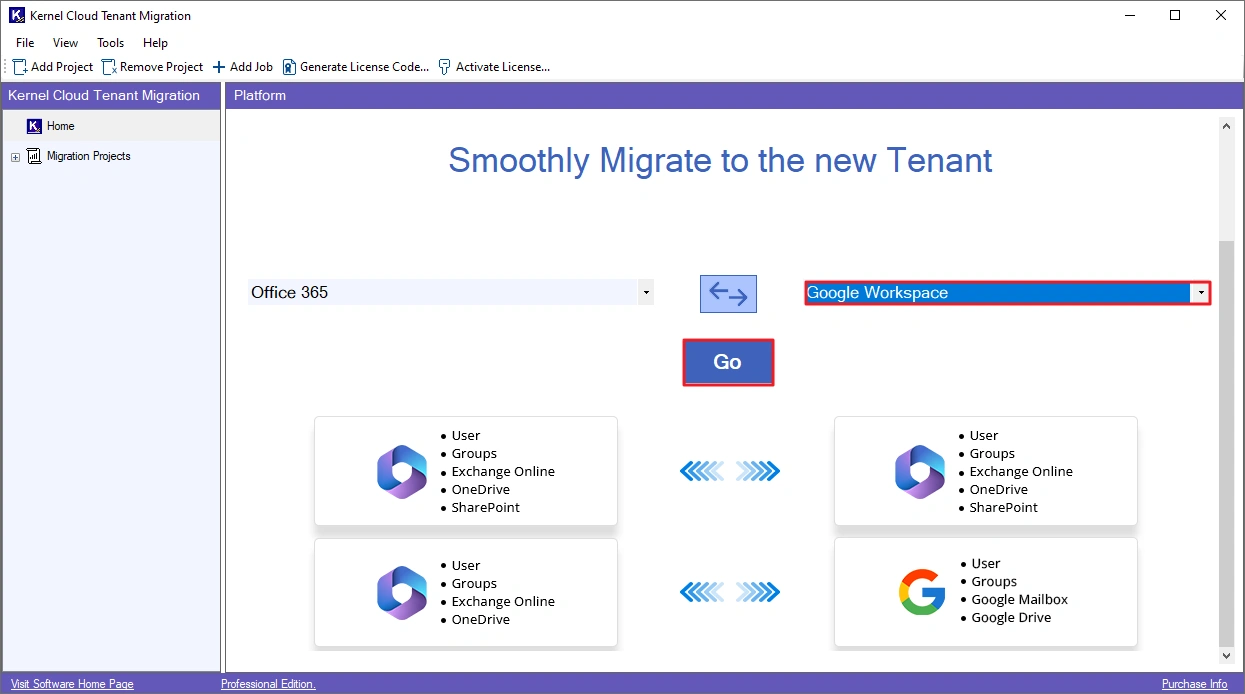
Office 365 to Google Workspace Migration – How To Use
Follow these steps to easily migrate your Office 365 application data to Google Workspace:
Step 1: Open the Cloud Tenant Migration tool and choose Google Workspace as destination using the dropdown. Then, click Go.
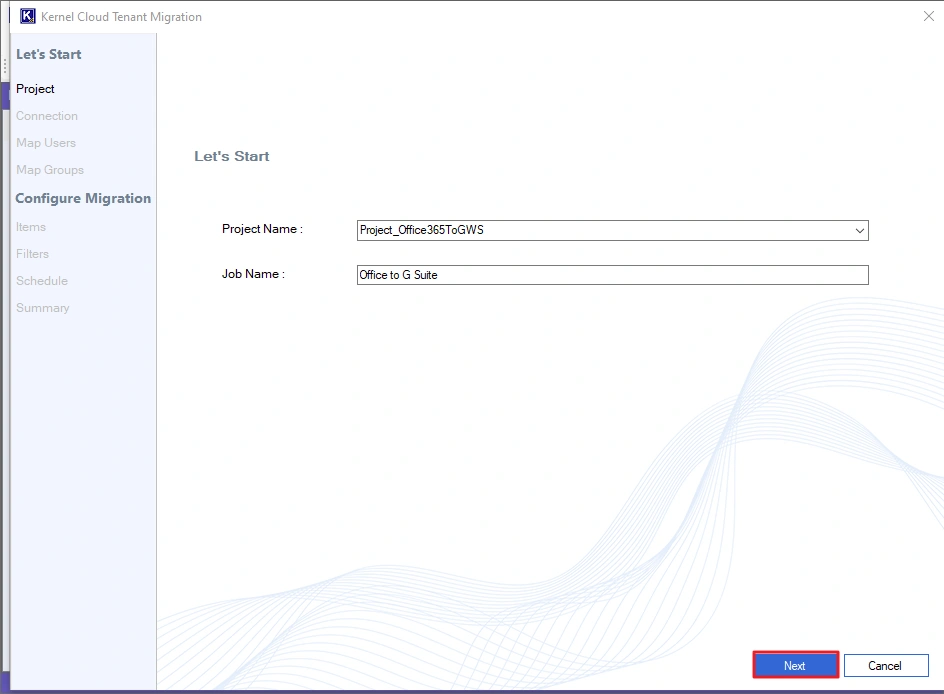
Step 2: Give a Job Name and click Next to continue.
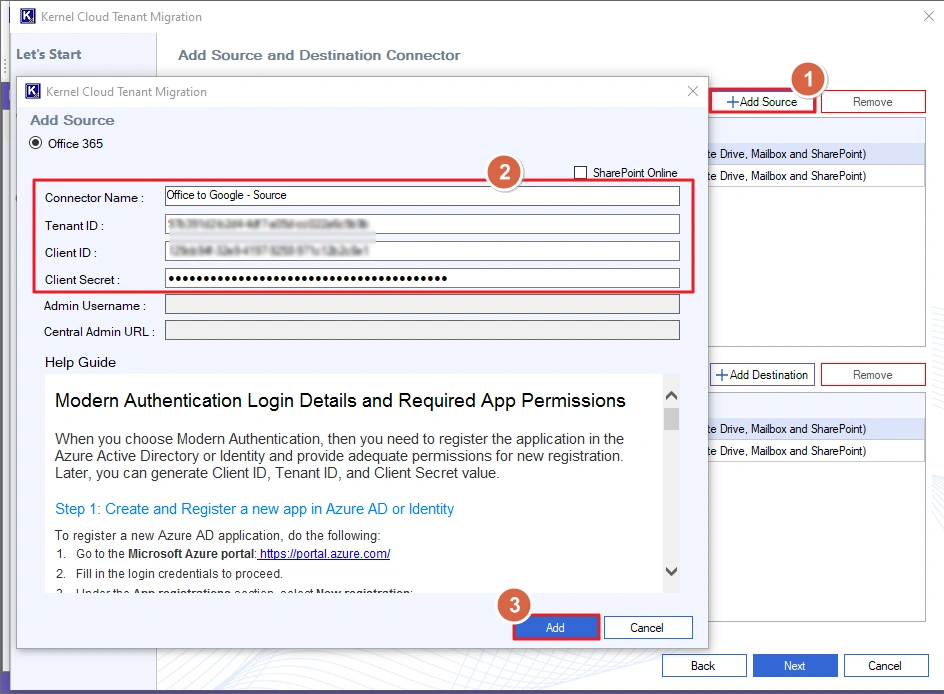
Step 3: Click +Add Source and enter the Connector Name and login credentials for the source Office 365 account. Then, click Add.
Note: If you do not have the required login data, create it using the Help Guide available in the tool
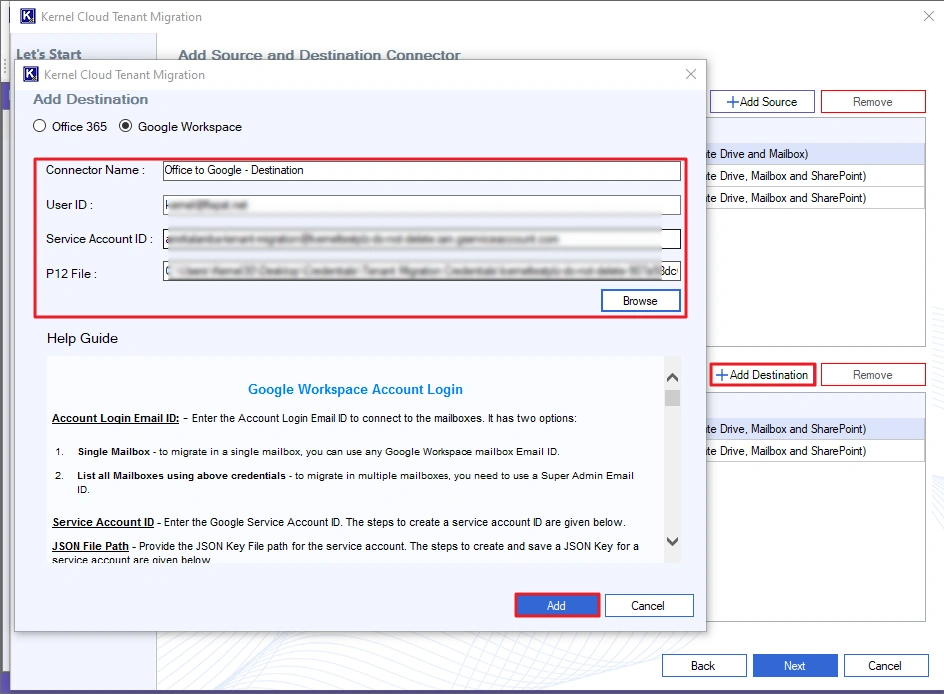
Step 4: Add the target Google Workspace account by clicking on the +Add Destination button. Provide the Connector Name, User ID, Service Account ID, and the P12 key. Then, click Add to securely connect to your Google account.
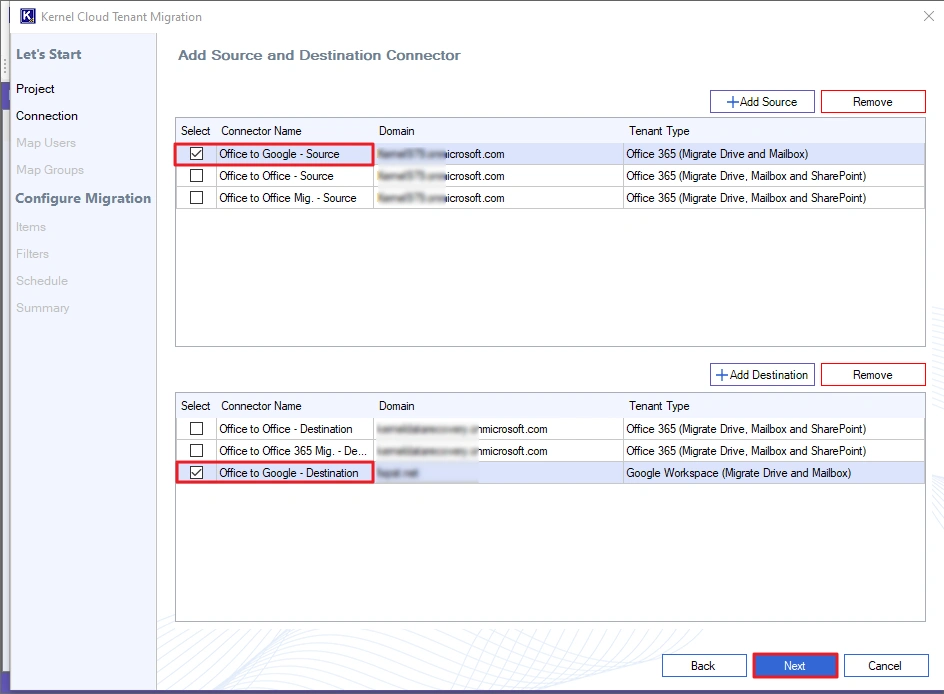
Step 5: Select the source Office 365 account and the target Google Workspace account. Click Next to continue.
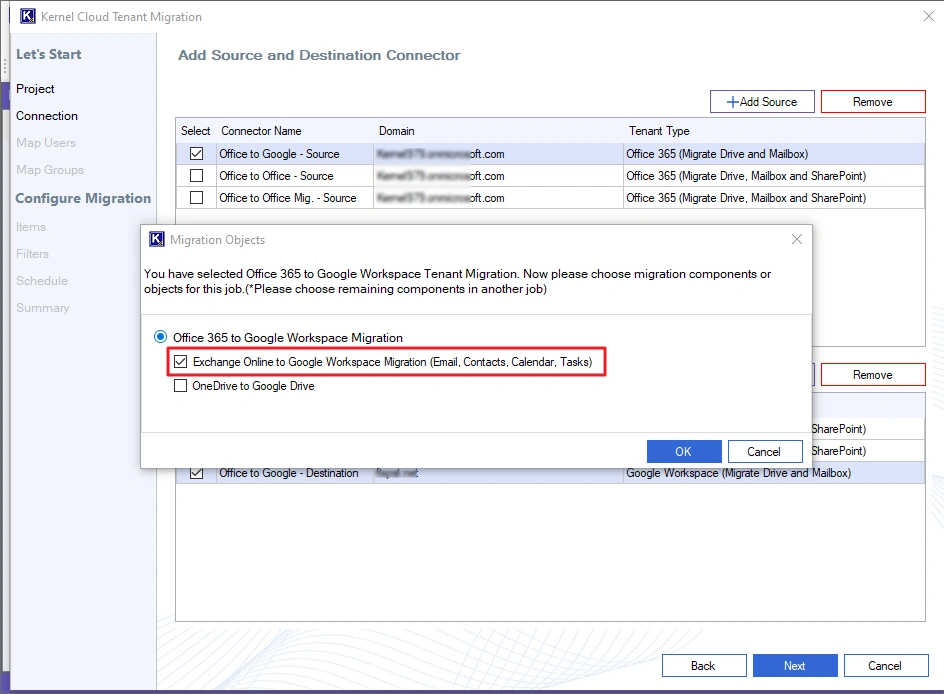
Note: The tool allows you to migrate Exchange mailboxes and OneDrive data to Google Workspace. We will cover both Exchange mailbox to Google Mailbox and OneDrive to Google Drive migration.
Exchange Online to Google Workspace
Step 6: Select the Exchange Online to Google Workspace Migration option and click OK
Note: To migrate both OneDrive and mailbox data together, choose the OneDrive to Google Drive option too.
Step 7: Select the users you want to migrate and map them to the destination users using the three-dot button in the Map column. You can also import a CSV file containing the user-mapping details for faster mapping. Click Next to continue.
Note: If the user with the same alias is present in the destination server, it will be mapped automatically. The mapped users are marked with a green background. Unmapped users are marked with a red background and must be manually mapped.
Note: To create new users in the destination, click Create Users. You can create users for only the selected users or for every unmapped user. Provide a strong password (different or same) for all users. Finally, click Create.

Step 8: Select the Groups you want to migrate and map them to the respective destination groups. For quick and bulk mapping, use a CSV file with accurate information about the mapping details. Then, click Next to continue.
Note: If a source group is available on destination server, it will be auto mapped and marked with a green background. Unmapped groups are marked with a red background and must be mapped manually.

Note: To create new groups in the destination, click the Create Groups button. The tool can also migrate all the Group members by selecting the Manage Member option.

Step 9: In the Select Items for Migration window, make sure the Exchange Online Mailbox is selected for every user. Click Next to proceed.
Note: You can also import a CSV file with details like source, destination, item type, and migration type (mailbox or OneDrive)
Step 10: The tool gives you several filter options for selective data migration.
- Folder Filter: Allows you to include/exclude specific folders from the migration.
- Ignore duplicate mails: Select it to skip the migration of duplicate emails.
- Date Filters: Specify a Start and End date to migrate only the data you send/receive between these dates.
- Items: Select different item types you want to transfer.
After setting up all the filters, click Next.
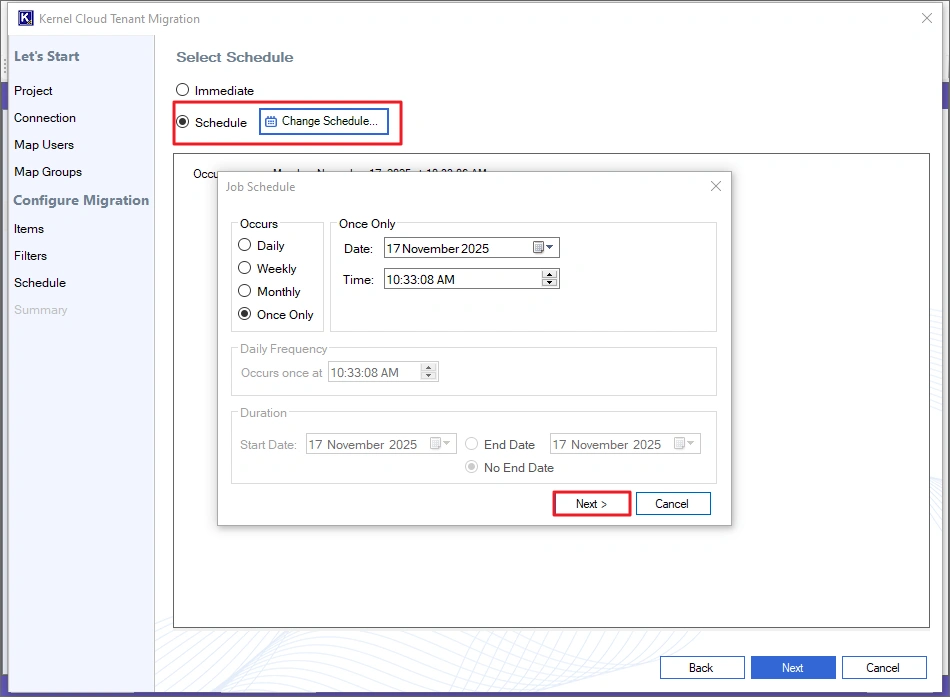
Step 11: To execute the migration immediately, select Immediate and click Next
Note: To configure the migration to run automatically at a later time, choose Schedule and click Change Schedule. Then, pick a date, time, and frequency.
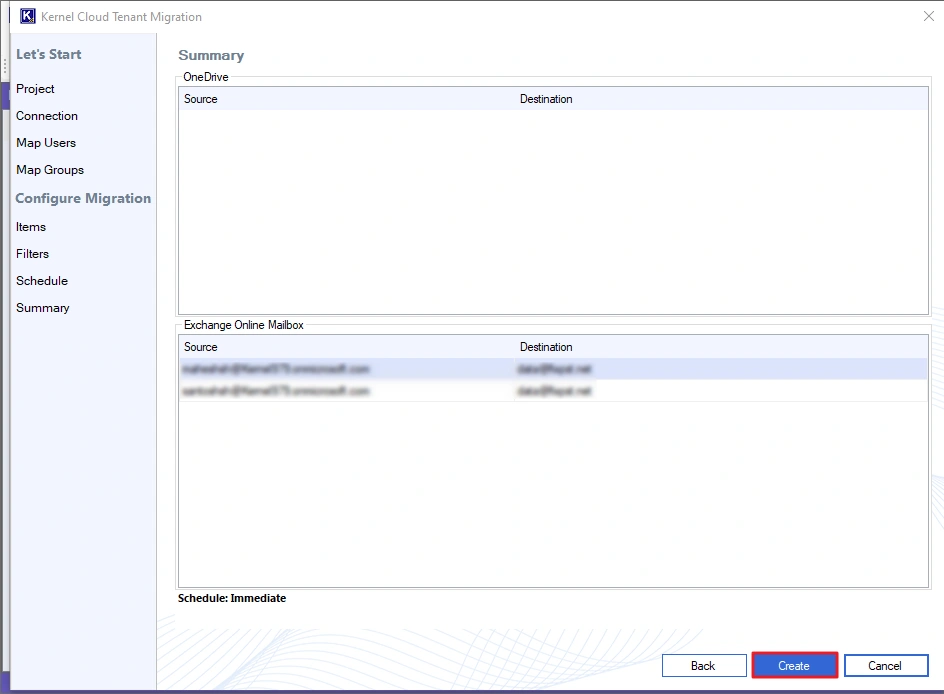
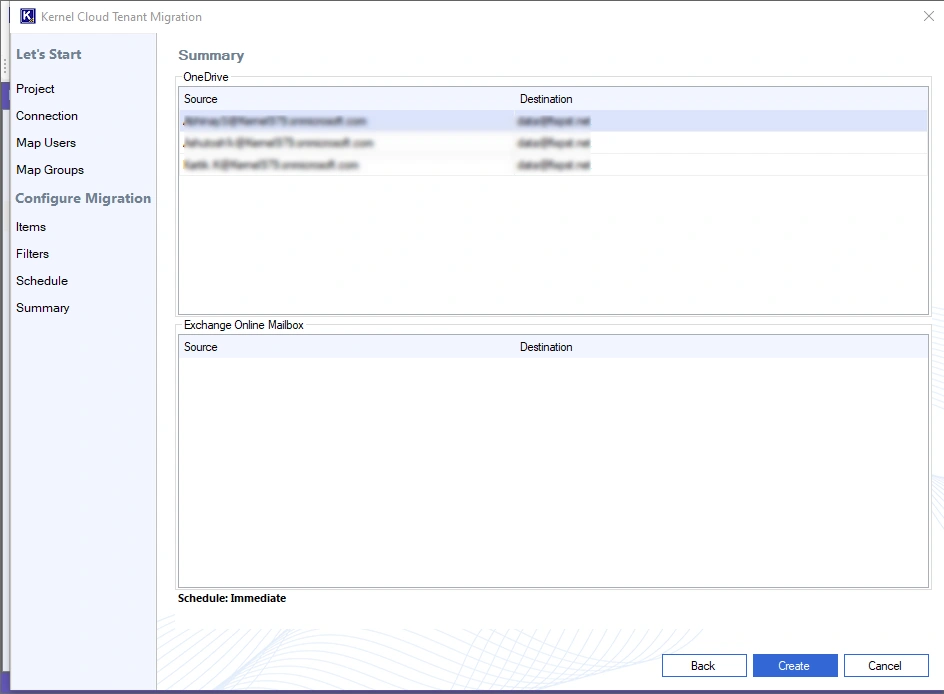
Step 12: The tool will show you a summary of migration. Click Create to begin the migration.
Note: If any detail is incorrect, go back and modify the migration settings.
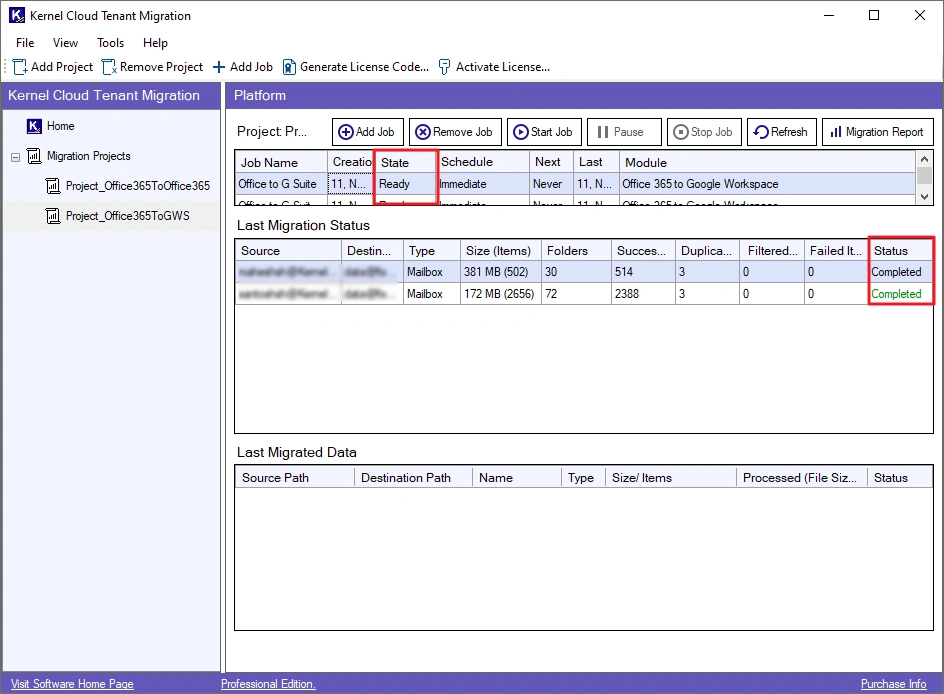
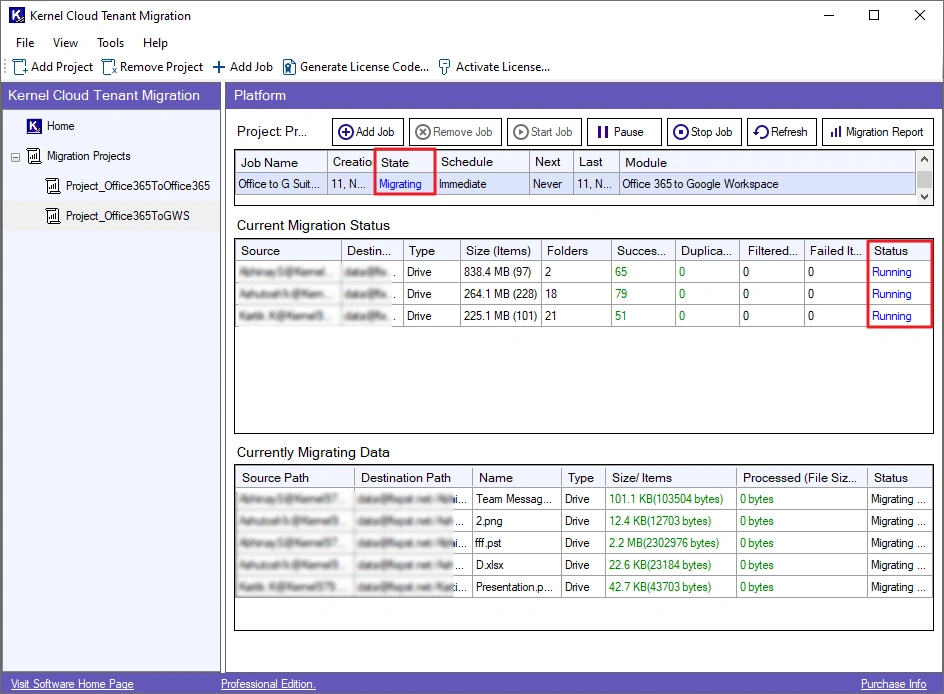
Step 13: The job will start and display the State as Migrating and mailbox Status as Running. You can check live migration on Current Migration Status and Currently Migrating Data options.
You can control the ongoing job using these options:
- Add Job: Click it to create and add a new job.
- Remove Job: Use this to remove any completed or stopped job from the project.
- Start Job: Start any paused or stopped job again.
Pause: Temporarily pause the job. You can resume it anytime. - Stop Job: This button will terminate the migration job.
- Refresh: Use it to refresh the state of the migration.

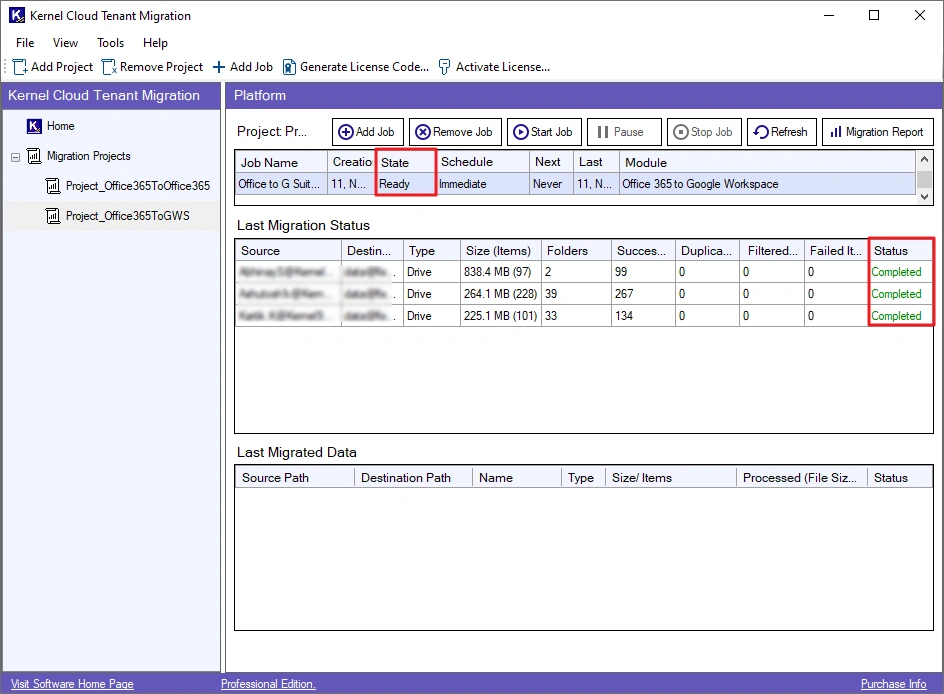
Step 14: When migration is complete, the State will turn to Ready, and the mailbox transfer Status will turn to Completed.
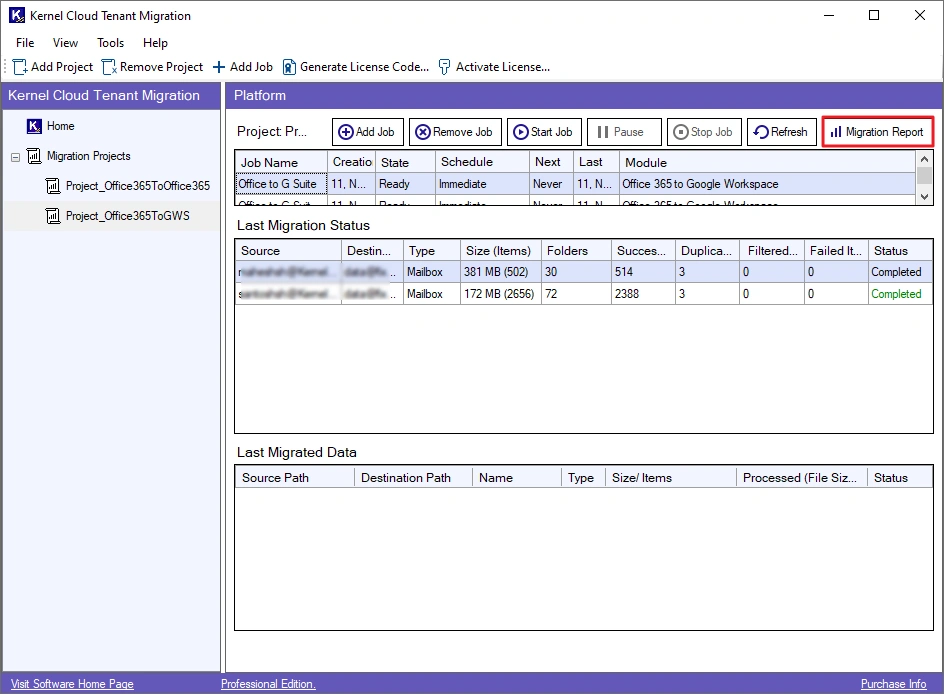
Step 15: Download a detailed migration report with the following steps:
- Select the job, and click the Migration Report button
- Choose a session and click the View Details
- Click Save Reports to CSV, browse a saving location and click Save.
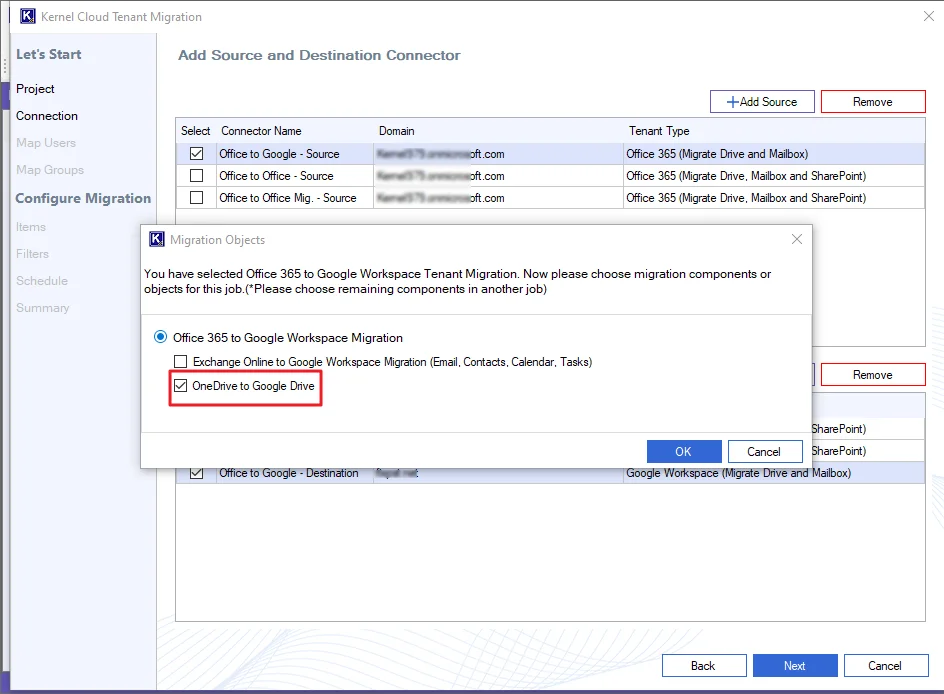
OneDrive to Google Drive Migration
Step 6: Choose the OneDrive to Google Drive option and click OK to confirm.
Note: To migrate the mailbox data, select the Exchange Online (Mailbox Migration) option also.
Step 7: Select the source users for migration. Map them to their new destination accounts by using the three-dot button in the Map column. For bulk mapping, you can import a CSV file that contains all the user-mapping information. Click Next to proceed.
Note: If the user with the same alias is present in the destination server, it will be mapped automatically. The mapped users are marked with a green background. Unmapped users are marked with a red background and must be manually mapped.
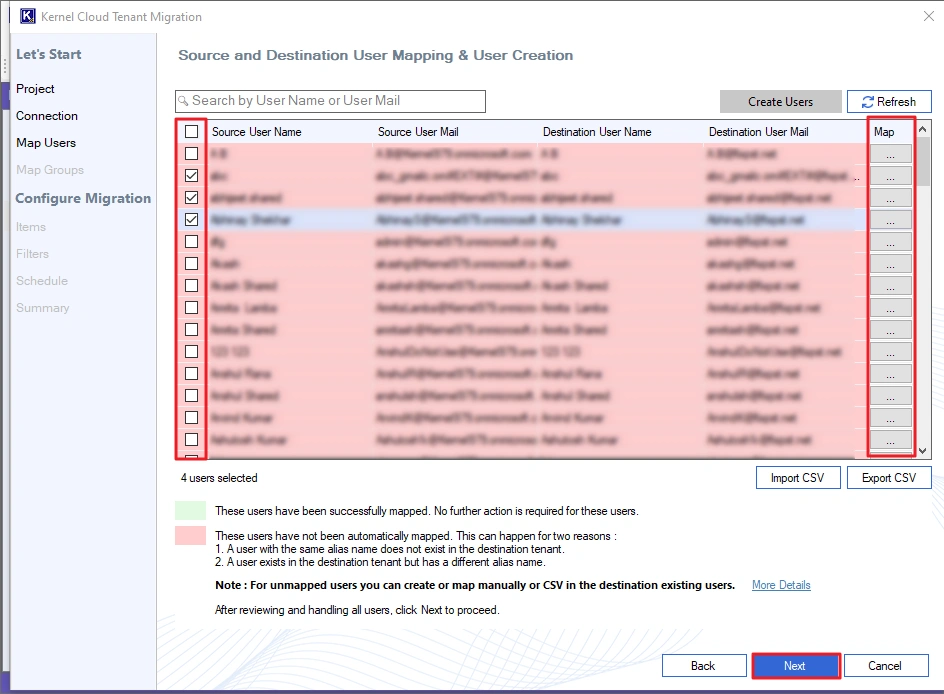
Note: To provision new accounts in the destination, use the Create Users button. You can create accounts for specific users or all unmapped users. You must assign a strong password (which can be the same or different for each new account) and then click Create.

Step 8: Choose the Groups you wish to migrate and link them to the corresponding destination groups. You can use a CSV file with the group mapping details for a faster bulk-mapping process. Click Next to continue.
Note: If a source group is available on destination server, it will be auto mapped and marked with a green background. Unmapped groups are marked with a red background and must be mapped manually using three dots under Map column.

Note: To create new groups in the destination, click the Create Groups button. The tool can also migrate all the Group members by clicking the Manage Member option.

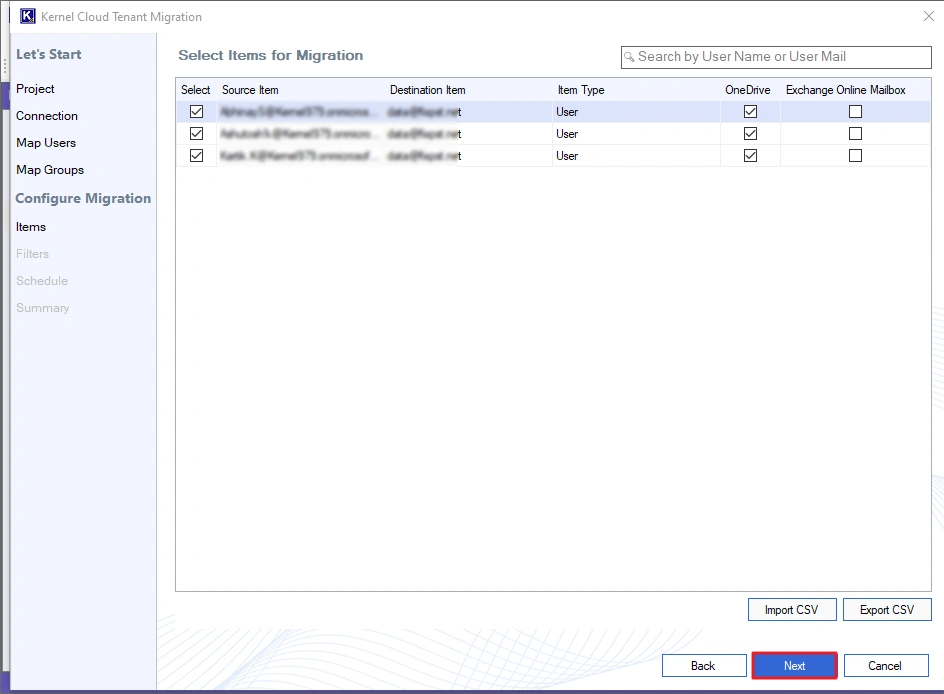
Step 9: On the Select Items for Migration screen, confirm that the OneDrive option is selected for all users. Click Next.
Note: A CSV file can also be used at this stage to import migration details, such as the source, destination, and item type (mailbox or OneDrive).
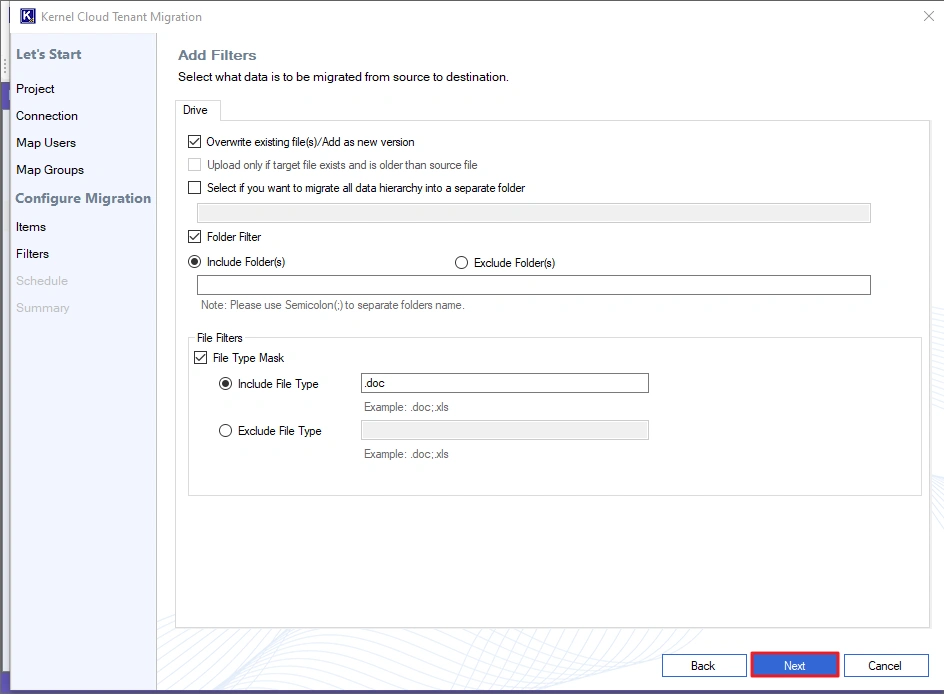
Step 10: Use the provided filters for a more selective migration:
- Folder Filter: Specify folders to either include or exclude from the migration.
- File Filters: To include/exclude individual file types from the migration.
- Create a new folder and transfer complete data into this new folder with original structure.
- You can also choose to migrate all the files or only the modified ones.
After setting up all the filters, click Next.
Step 11: To begin the migration immediately, select the Immediate option and click Next.

Note: To run the task at a different time, choose Schedule. Click Change Schedule to set a specific date, time, and frequency for the migration to run automatically.
Step 12: The tool will display a final migration summary. Review all the details. If everything is correct, click Create to start the job.
Note: If you find any incorrect information in the summary, go back and adjust the settings before continuing.
Step 13: The job will begin, displaying its State as Migrating and the OneDrive data transfer Status as Running. You can check live migration on Current Migration Status and Currently Migrating Data options.
You can control job with the following options:
- Add Job: Creates a new migration job.
- Remove Job: Deletes a stopped or finished job from the list.
- Start Job: Restarts a job that was previously paused or stopped.
- Pause: Temporarily halts the job, allowing it to be resumed later.
- Stop Job: Terminates the migration job completely.
- Refresh: Updates the current state and status.
Step 14: Once the migration is finished, the State will show Ready, and the mailbox transfer Status will change to Completed.
Step 15: Follow these steps to download a detailed report of the migration:
- Select the completed job and click the Migration Report
- Choose the relevant session and click View Details.
- Click Save Reports to CSV, select a location to save the file, and click Save.