Read time 8 minutes
A virtual hard disk extends the data storage capacity of a computer beyond the constraints of a physical hard disk. Unlike a fixed physical hard disk, a virtual hard disk is logically connected to your computer from an external data center. There are two primary types of virtual hard disk files:
- VHD (Virtual Hard Disk): A VHD file, short for Virtual Hard Disk Drive, serves as a virtual counterpart to a physical HDD. It can replicate all elements found on a physical hard drive, including disk partitions, file systems, data files, and directories. These VHD files are commonly employed as the virtual hard disks for virtual machines.
- VHDX (Hyper-V Virtual Hard Disk): The VHDX format stands for Hyper-V Virtual Hard Disk Drive and offers a significantly expanded storage capacity of up to 64 TB when compared to the 2 TB storage limitation of VHD files. VHDX also incorporates advanced features that enhance data protection, safeguarding against data corruption and mitigating the risks associated with extreme power failures.
Not able to access VHD/VHDX file data? Try Kernel for VHD Recovery to recover complete data from corrupt VHD/VHDX files.
What all kinds of virtual disks are there?
There are basically two types of VHDs and they are:
- Fixed-Size: This type of VHD allocation is determined and allocated during its creation process. For instance, if a decision is made to create a virtual disk with a 20 GB size, it is instantiated with precisely 20 GB of storage on the data store, irrespective of whether the entire space is actively used or not.
- Dynamically expanding VHDs: In this type of VHD allocation, the disk space is determined during creation but not immediately allocated. For instance, if you choose to create a 20 GB virtual disk, it will be of 20 GB in size, but it will only consume the actual space that is being utilized. If you store 16 GB of data on it, the virtual disk will occupy 16 GB of space.
Different methods to mount VHD and VHDX file
Method 1: Using windows explorer
It is the simplest way to mount or unmount a VHD or VHDX file. Follow the below mentioned simple steps to Mount and Unmount (Eject):
Step 1: To mount VHD/VHDX file, right-click on the VHD/VHDX file and select Mount.
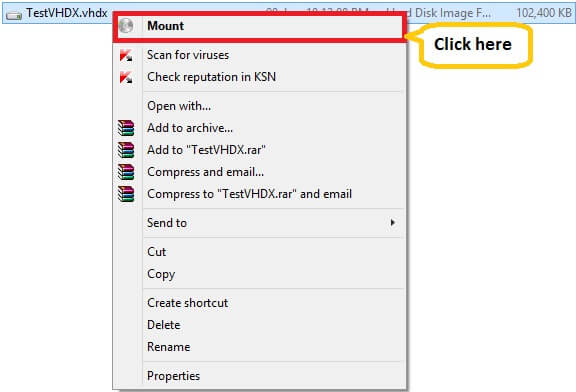
The VHD disk will be added to This PC as an additional drive. You can now copy, move or access the required data from the drive. It behaves like general physical storage now.
Step 2: To unmount VHD/VHDX file, go to the New Volume/drive, right-click and select Eject to detach or unmount.

Please Note: The method can be performed without any technical expertise by any novice user who has a VHD file and wants to restore data from it.
Method 2: Using disk management
Another way to mount or unmount VHD or VHDX file is through Disk Management. Follow the simple steps to mount and unmount:
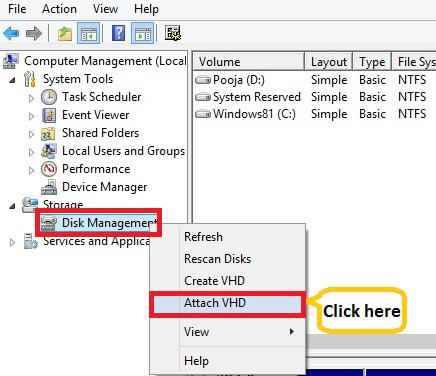
Step 1: To mount VHD, right-click on This PC >> Manage >>Disk Management and click Attach VHD.
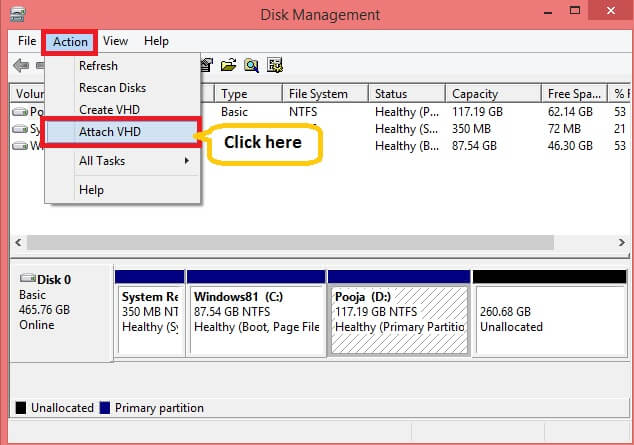
OR, click Windows key and type diskmgmt.msc in the search box to open Disk Management. Expand Action menu and click Attach VHD.
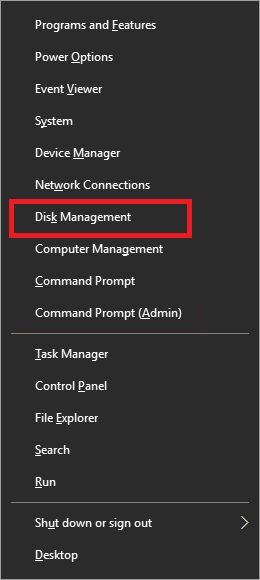
Note: You can press Win+X keys, and choose Disk Management as shown below.
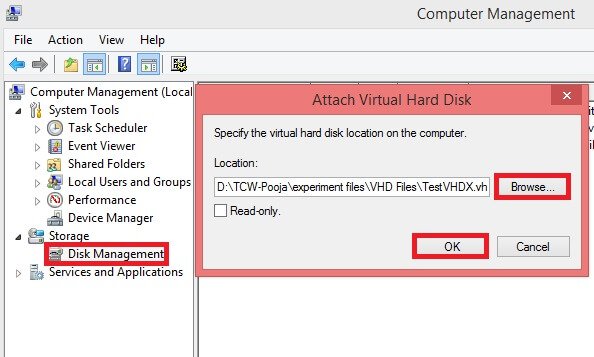
Step 2: To mount VHD, click Attach VHD and click Browse to load the VHD or VHDX file that is to be mounted. Click OK.
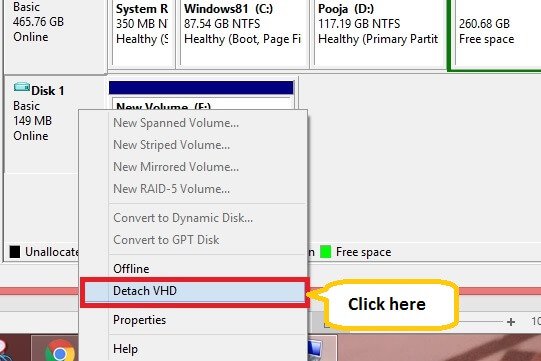
Step 3: To unmount VHD/VHDX file, right-click on the newly added volume and click Detach VHD.
Method 3: Using command prompt
This method can be used in Windows 10/8/7 to mount or unmount VHD/VHDX file.
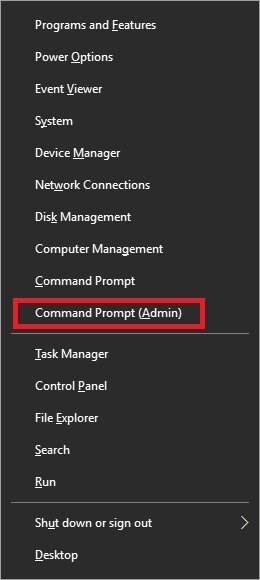
Step 1: Click Win+X, and click Command Prompt (Admin) mode.
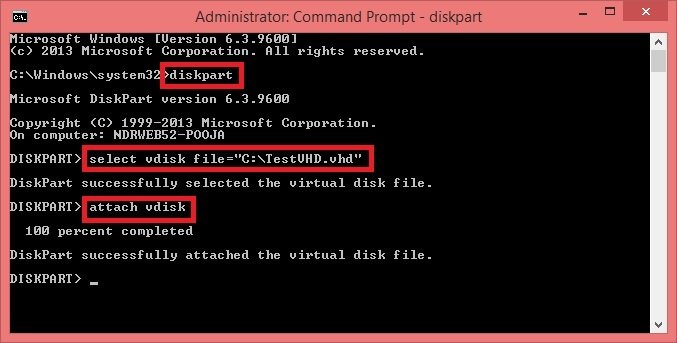
Step 2: In cmd, type diskpart and hit the Enter button. Type the following command to select the VHD/VHDX file by specifying its location.
Select vdisk file = “location of VHD file”
Then, hit Enter.
- To mount the VHD/VHDX file, type attach vdisk and hit Enter.
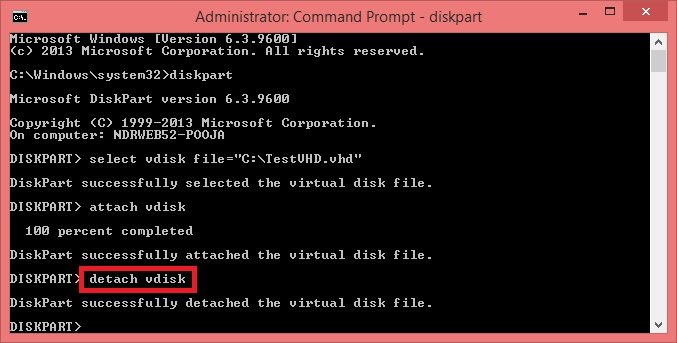
- To unmount a VHD/VHDX file, type detach vdisk and hit Enter.
Method 4: Using PowerShell
With the help of Windows PowerShell cmdlet, you can mount and unmount VHD/VHDX file in both Windows 10/8/7 and Windows Server 2016/2012/2008.
Step 1: Launch PowerShell cmdlet as Administrator.

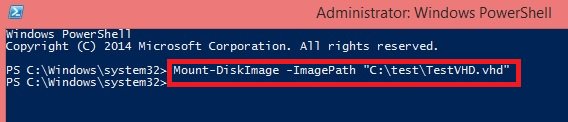
Step 2: Type the following commands to mount/attach the VHD/VHDX files:
Mount-DiskImage -ImagePath “location of VHD file”
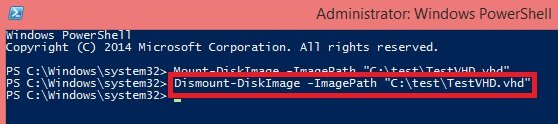
Step 3: You can unmount the virtual hard disk with the help of this simple command:
Dismount-DiskImage -ImagePath “location of VHD file”
Important Note: When working with Hyper-V, you may encounter an error message stating ‘Mount VHD is not recognized as the name of a cmdlet.’ In such cases, it’s necessary to add the ‘Hyper-V Module for Windows PowerShell’ to your server to resolve the issue.
Now you can easily and efficiently copy the required data from VHD file to any disk drive normally and then detach the VHD drive when you are done.
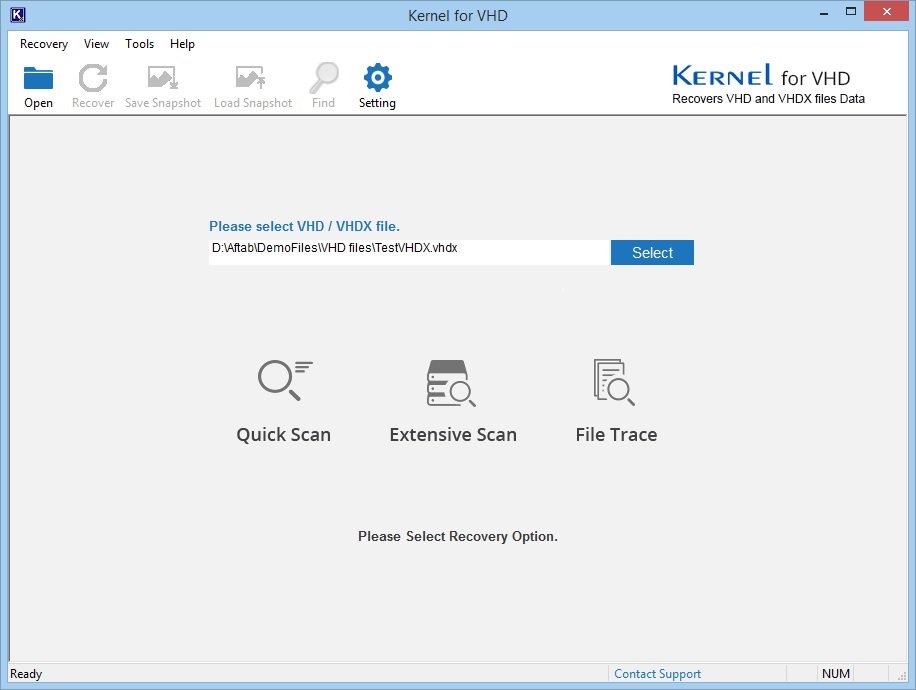
Recover VHD/VHDX data easily – Kernel for VHD Recovery
It is possible that you find some of your VHD files corrupted or damaged. There are many reasons behind a corrupted and unreadable VHD/VHDX file. In that case, simply use this trusted software – Kernel for VHD Recovery, which works professionally and efficiently to recover complete data from a corrupt VHD file.
Final Word
Various methods are available for mounting or unmounting VHD/VHDX files, including PowerShell, Command Prompt, Windows Explorer, and Disk Management. However, in cases where your VHD/VHDX files are corrupted, it’s advisable to consider third-party tools such as the Kernel for VHD Recovery tool for the recovery of VHDX and VHD files.