Read time 6 minutes
Trying to open a JPEG file in photoshop and getting the error “Could not complete your request because an unknown or invalid JPEG maker type is found?” Well, it’s not just only you; many other users have also complained about a similar situation facing the same error. Well, with in-depth research and study, I have found that this is not a platform-based error, as it was also reported by a Mac user a while ago. So, now we know that it is not platform-based, so there must be something wrong with the file.
Reasons you might be facing this error
As we have already discussed and tried to understand the reason, we can figure out that there are not many reasons why it happens. We are listing the two most probable reasons why this error might be happening:
- Different original format
- Corruption in the image
Yes, there are high chances that you are facing this error because the file you are trying to open is originally from a different source. This case mostly happens with beginners, not knowing its repercussions or intentionally by fraudulent. For example, initially, the image was PNG but was changed to JPEG without converting the whole file into JPEG.
Another reason for why you may get this error is because the file is corrupt. Corruption may lead to various problems in the data, and this is one of them.
Methods to fix this error
So now, moving towards the solutions, here we are going to mention free methods to repair corrupt JPEG Files which can help you solve this problem. But before we move to a perfect solution, let’s try some tricks with which you can analyze if you should apply the proper method or not. Let’s discuss:
- Get another image
If you cannot open the image, it might be the reason that it was not transferred or downloaded correctly. In terms of opening a picture, you may need to download or get the image again from the source. Do it again and check if it works. This process will also help you with the corrupt file. If the image got corrupt after entering your system, then you can get the healthy file from elsewhere. - Convert the file format
As we have discussed, that it may also happen that the image was of a different format and was converted incompletely. In such a case, you can try to convert the format of the image, correctly this time. We suggest you to use a reputed converter tool that can do the conversion wholly and accurately. Check if this works for you, or move to the next way to solve this. - Run Troubleshooting
If you have tried all the suggestions we provided above, and none of them worked for you, then this might bring you some peace. You can try running troubleshooting; this will check if the hardware of your system is working fine. Maybe this error was happening due to some of the attachments in your system were not working fine. Issues with a USB cable, external hard drive, etc. may lead to this error in many cases. To run troubleshooting, follow the below-mentioned steps:- Start with opening the Control Panel.
- In Control Panel, select Large as the filter.
- Now, in the Hardware and Sound category, select Configure a device as the next step.
- At last, follow all the steps by troubleshooting wizards properly and finish the process.
- Kernel Photo Repair
Kernel Photo Repair is a photo repair tool by Kernel that repairs corrupt, damaged, and broken videos. This tool is technologically advanced and can fix even severe types of corruption. Follow a few easy steps of the tool and fix the corruption immediately. Let’s start the process:- Download and install the tool from the website and run the tool finally.
- As the tool opens, click on the Add icon to add the corrupt image file.
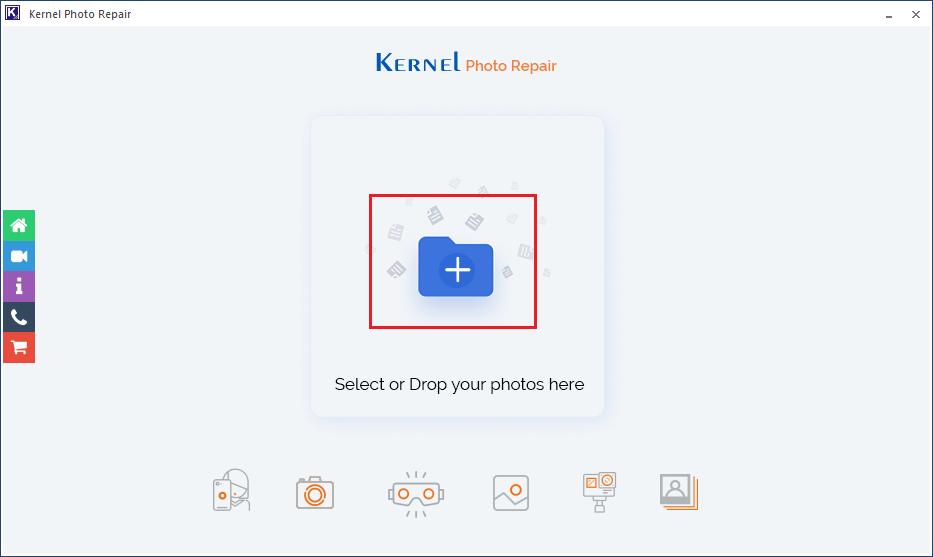
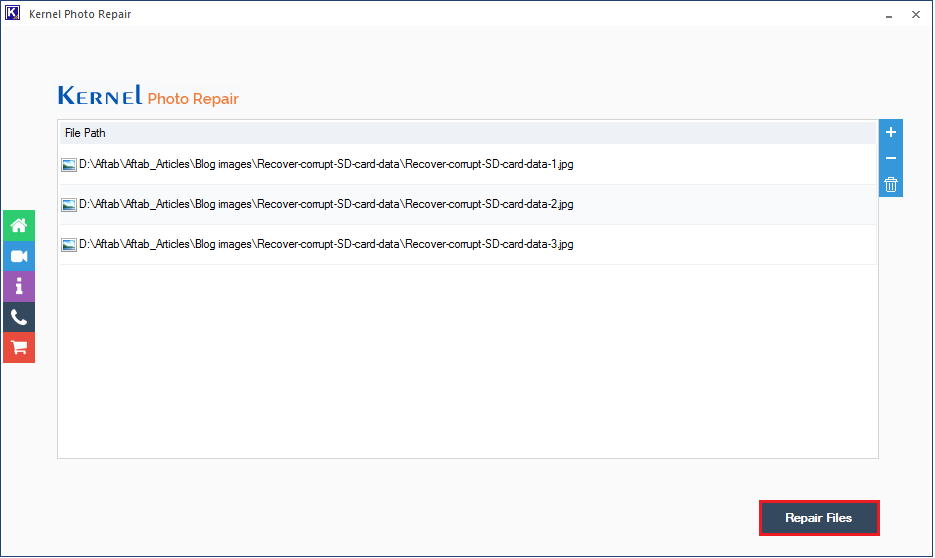
- Now, select the files from your system, single or multiple, and click on the Open button.

- Once the files are added, click on the Repair File option.
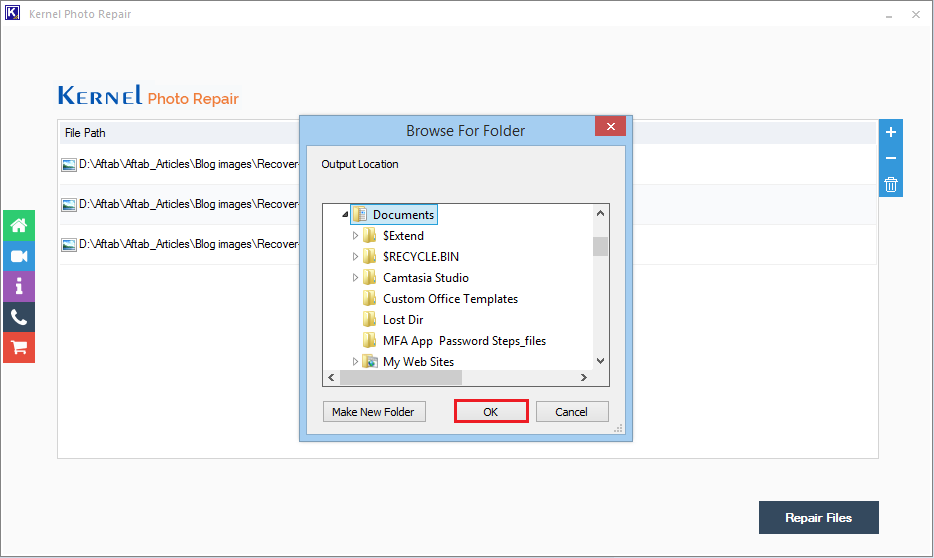
- In the next step, provide a destination to the file and click on OK to proceed.
- As you finish providing a destination to the file, in the next step, the tool will start repairing the file one by one.
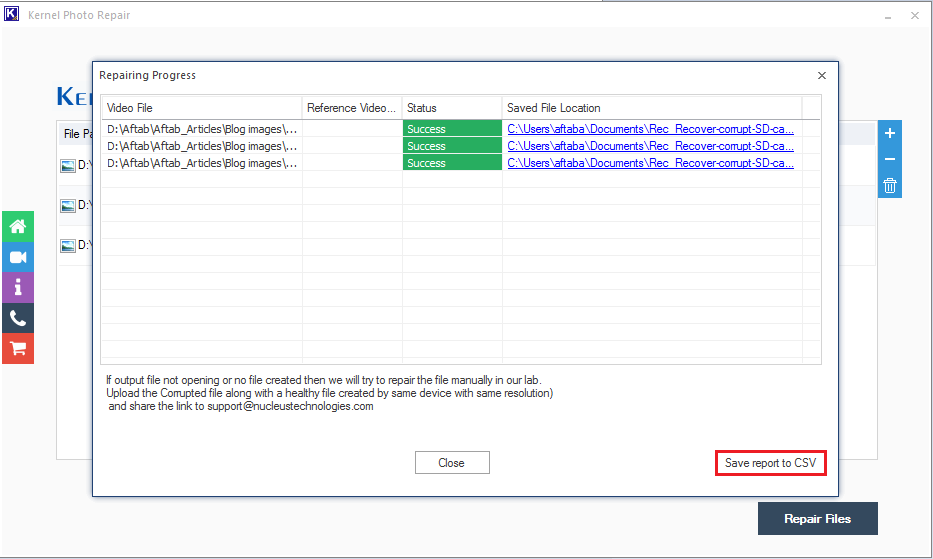
Note: Here, we can click on Save report to CSV to generate the CSV report. - Once the process is done, click on the Close button.
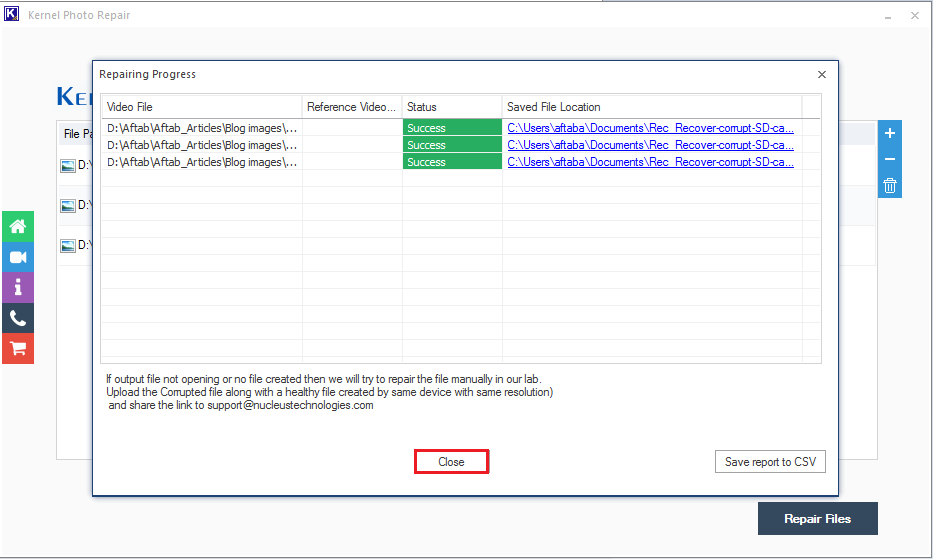
By following these above-mentioned steps, you can fix this issue. If it still persists, that means the file is corrupted. To set the corruption in the file, follow the next process.
Once you are done will finishing all the above steps, your file will be fixed.
Conclusion:
In this blog, we have discussed about the unknown error showing in a JPEG file while opening with Photoshop. As we could see that the problem was arising with Photoshop but can’t be fixed through it, but yo can repair and restore damaged and lost photos in Photoshop. While discussing the solutions, we have also put some light on the ways you can check if the file is actually corrupt or not. At last, as the final solution, we have used Kernel Photo Repair as the ultimate solution to fix the corruption. Using this tool, one can fix any sort of image.
![How to Fix JPEG Header Corruption? [Easy Methods]](https://www.nucleustechnologies.com/blog/wp-content/uploads/2020/01/broken-or-corrupt-jpeg-file-headers.jpg)