Read time: 8 minutes
- Check if the thumbnail preview is enabled or not.
- Delete accumulated Thumbnail cache.
- Check the advanced system settings.
- Perform an SFC scan to repair corrupt files.
Thumbnails help users recognize the inside picture or brand icon of the file without opening it. The thumbnails’ preview for images and other files gets blocked/restricted due to individual settings modified by users or other problems. Even Windows 10 & 11 users experience this issue where their thumbnails are not showing frequently. Like the image given below, users see an icon like this whenever there’s an issue with the thumbnail preview.![]()
It is annoying to say the least, as you’ll need to open every image to see its content. This article talks about the easiest ways to fix this Thumbnail not showing up issue in simple steps.
Why are Thumbnails not showing up in Windows 10?
There are a few reasons for the “Thumbnails preview not showing in Windows 10” issue, which will help you identify the most suitable solution to fix the error.
- Image header is corrupt.
- Thumbnail preview settings are incorrect
- Cached files are piled up, taking up system storage space
- Files view is not optimal
- System visual effects settings are incorrect
- System files have issues and errors
Practical Solutions to Fix “Thumbnails Not Working In Windows”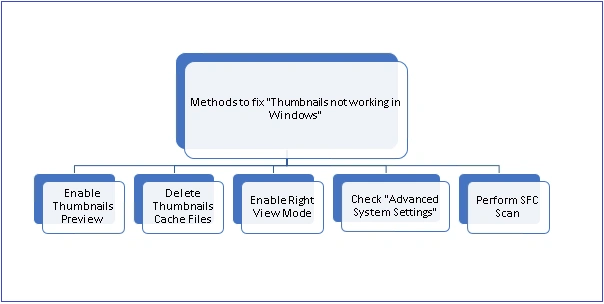
There are a few practical methods available to fix the Thumbnail preview not showing issues that we’ve addressed below. Try these methods to see if the issue gets resolved or not.
1. Enable Thumbnails Preview
One of the Thumbnails’ causes not working is that the view settings for Thumbnails were modified by some user in the past. It can be rectified manually by performing the following steps.
- Open Windows Explorer on your system.
- Go to the “View” tab at the top of the screen and click it. Select “Options”.

- On the “Folder Options” page, from the “View” tab, make sure that the option “Always show icons, never thumbnails” under the “Advanced Settings” section is not selected. If selected, uncheck the option and click “OK”.
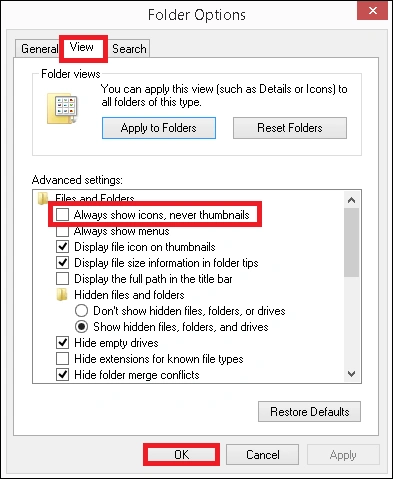
- In this way, the thumbnail preview is enabled.
2. Delete Thumbnails Cache Files
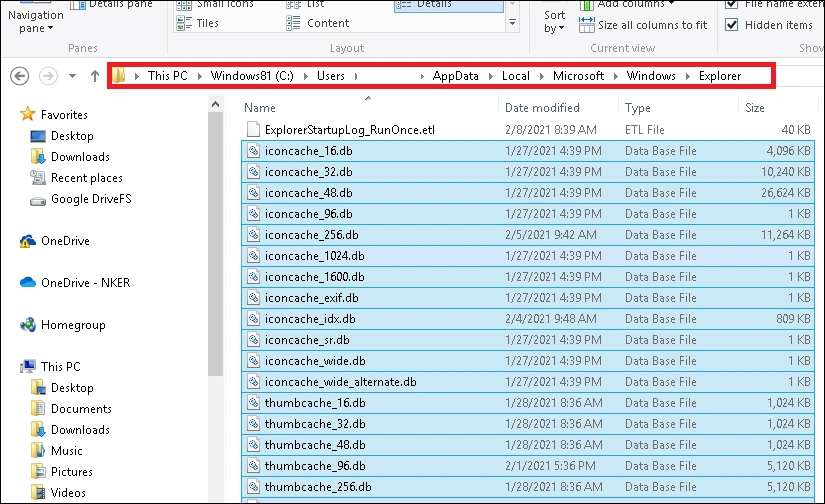
If many Thumbnail cache files are collected on the system storage memory, it can affect the system’s regular functioning folders and files, such as restriction to view. To eliminate this possibility, users can permanently delete the cache files either by directly reaching the saving location of files, using the Command Prompt application, or using the Disk Cleanup feature integrated within the system folder properties.
Using Storage Location
- Reach the following storage location of the thumbnail cache files:
- Select all the files with the .db file extension and use Shift + Del action to permanently delete the files.
Using Disk Cleanup Feature
- Right-click on your C drive and click on the “Properties” option.
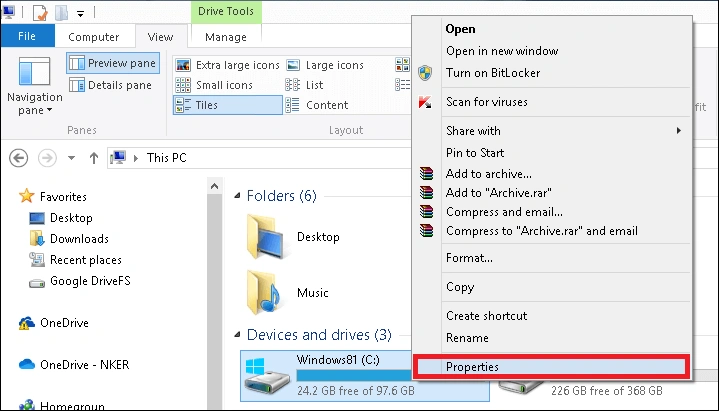
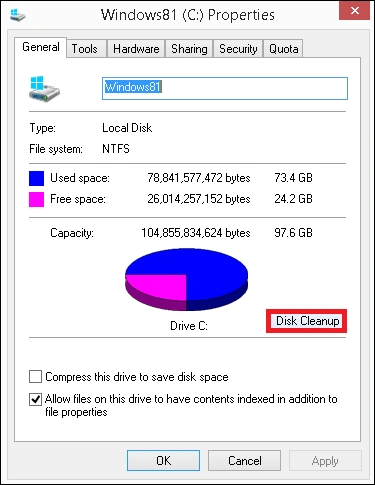
- Now, under the “General” tab, click on the “Disk Cleanup” option.
- Select the “Thumbnails” option, unselect the others, and click “OK”.
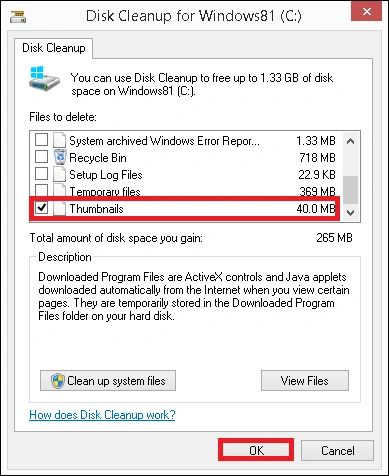
- Finally, click “Delete Files” to complete the process.
- Reboot the system once.
Using Command Prompt
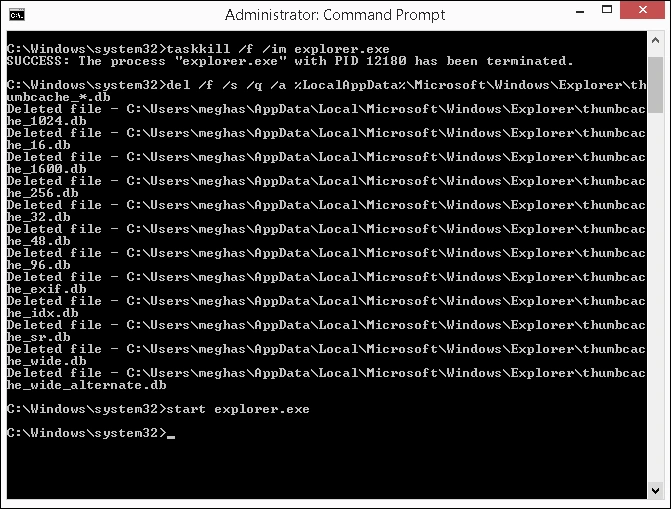
- Search the Command Prompt application in the search bar and right-click on the icon to select the “Run as administrator” option to launch it as the system administrator.
- Run the first command to stop the running File Explorer window.
- Next, run this command to delete the entire cache (database) files.
- The deletion of files will be complete soon. Restart the file explorer with this command.
- Open the File Explorer.
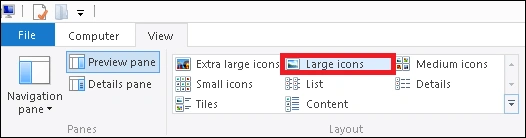
- Switch to the “View” tab on the top of the window. Here, select either “Large icons” or “Extra large icons” to preview folders and files on your system.
- Check if the thumbnail preview is working.
- Search for Advanced system settings and open it.
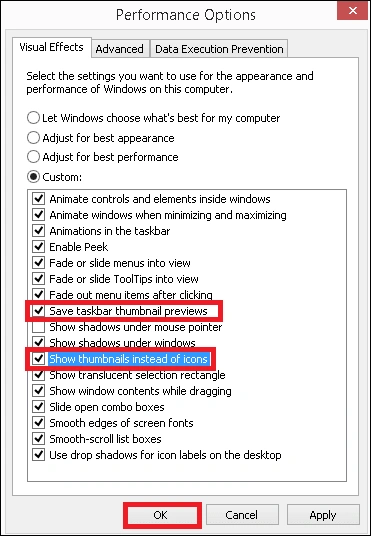
- The “System Properties” page with the “Advanced” tab will get open. Under the “Performance” section, click on the “Settings” option.

- Now, from the Visual Effects tab, select the options “Save taskbar thumbnail previews” and “Show thumbnails instead of icons” under the “Custom” section and click “OK”.
- Run the Command Prompt application as administrator, as done earlier.
- Execute this command.
- Wait for the scanning process to be completed.
- At the end of the scanning, the information related to problematic issues and errors along with the status will be displayed.
Enable Right Folder View Mode
The folder view mode can be modified for trial as sometimes it can affect the view of files’ icons by restricting thumbnails preview. Here is what you can do.
Check “Advanced System Settings”
Under the system advanced settings, you can check the Thumbnail preview options under the Visual Effects section and enable them from there if not selected. Follow these steps.
Perform SFC Scan
Due to problematic issues in the Windows system files, thumbnail preview settings can be affected. You can run a System File Checker (SFC) scan from your end in the Command Prompt application to scan the system for any errors and rectify it there.
What If Your Image Thumbnails Are Corrupt? Best Way To Repair Thumbnail
The manual methods we’ve mentioned above are enough to fix the Thumbnail preview not showing issue. But if you cannot open your image file or if there’s some error restricting the file access, then it’s a possibility that your image is corrupted. This is a significant problem that requires swift action to recover or repair the image. It’s best if you opt for a trusted Photo Repair tool instead of manual methods and online tools to avoid the risk of damaging your images even further. Our suggestion is to try Kernel Photo Repair, which directly repairs the issues of corruption within the added image files and makes them accessible in no time. The process is automated, secured, and user-friendly, thus the most in-demand.
Ending Note
Whenever I face the Thumbnail preview not showing error, clearing the accumulated cache works perfectly for me. Try these methods to see if your issue gets resolved or not. If you’re still unable to view Thumbnails in Windows 11, then your image file might be corrupted. Perform an SFC scan for corruption or use a trusted Photo Repair tool for instant results.
People Also Ask
A. In the Windows File Explorer, make sure to uncheck the Always show icons, never thumbnails option to enable the thumbnails in Windows 11 OS.
A. All Thumbnails are stored in the C Drive of the system in a folder called AppData.
C:\Users\{Username}\AppData\Local\Microsoft\Windows\Explorer
A. Clear the cache to avoid corruption and prevent Thumbnail not showing up error. Also, check if your system’s Graphic cards are updated or not.