Read time: 11 minutes
PST, also known as Personal Storage Table, is the file extension for Microsoft Outlook database file and is responsible for storing the entire data of the user. It enables users to access data of accounts that are configured in Outlook with a POP enabled account. So, whenever you configure an account in Microsoft Outlook, its information will be stored in PST file format.
Whereas Outlook web offers a cloud platform that facilitates universal access to mailboxes through Outlook or a web-based interface which is usually referred to as OWA – Outlook Web Access (now known as Outlook on the Web). Though Outlook desktop application is used by many users, still they prefer to use Outlook on the Web for managing their emails. So, here we are going to elaborate on some effective methods to export PST to Outlook Web Access (OWA).
Why move PST to Outlook Web Access (OWA)?
Primary reasons for migrating your offline PST files to Outlook on the web are:
Anytime email accessibility: By shifting to Office 365 or OWA, you can access the emails anytime from anywhere on any device.
Centralized location: All your scattered PST file data will be available under a single Office 365 account, after migration. No need to worry about managing multiple PST files.
Faster searching: Features like eDiscovery in O365 allow quick data search and export. This saves you valuable time when you need to extract specific emails for data compliance needs.
Safe from corruption: The recommended size for PST files is less than 50GB to prevent corruption. Furthermore, locally stored PSTs are constantly at risk of virus attacks. Moving to the cloud solves this.
Optimize local storage: Some users use the PST to archive or backup mailboxes and fill up most of the hard disk space with it. To free up storage on the hard disk, you can import PST to OWA and delete them from your system.
Methods to move PST to Outlook Web Access (OWA)
There are a few manual methods by which you can transfer PST to Outlook Web Access (OWA). Here, we have provided the step-by-step procedure of applying these methods to get PST to OWA successfully. Have a look at them:
Method 1. Using Azure AzCopy tool
If the PST file is stored on your system, then using the Microsoft Azure AzCopy Tool, you can easily migrate the PST file to Microsoft 365 mailbox, and then access it via Outlook Web Access. However, if you want to export data that is configured with Microsoft Outlook, then you’ll have to first export mailbox data to PST file, then move it to the Outlook web app.
Now we are going to discuss how you can move PST to OWA, which can be achieved by performing the Network Upload method. So, here is a complete step-by-step process of the Network Upload method.
Step 1: Go to Microsoft Purview portal and sign in with your Office 365 account.
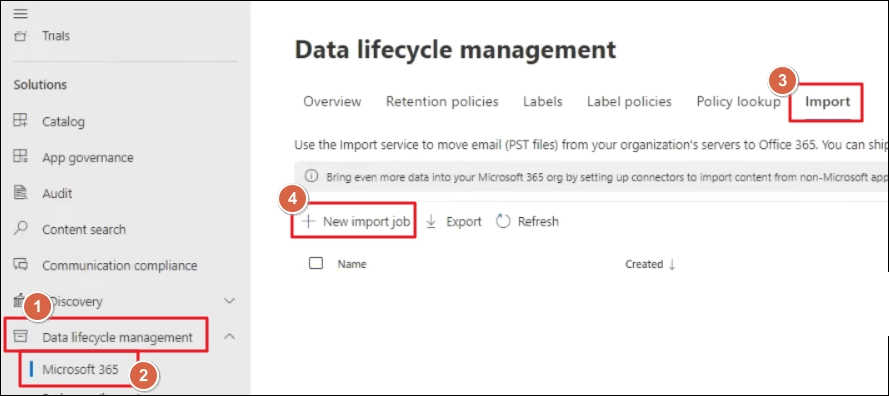
Step 2: From left pane, select Data lifecycle management option. Click on the Microsoft 365 option and on the right-side pane, select the Import tab. Then, click New import job button.
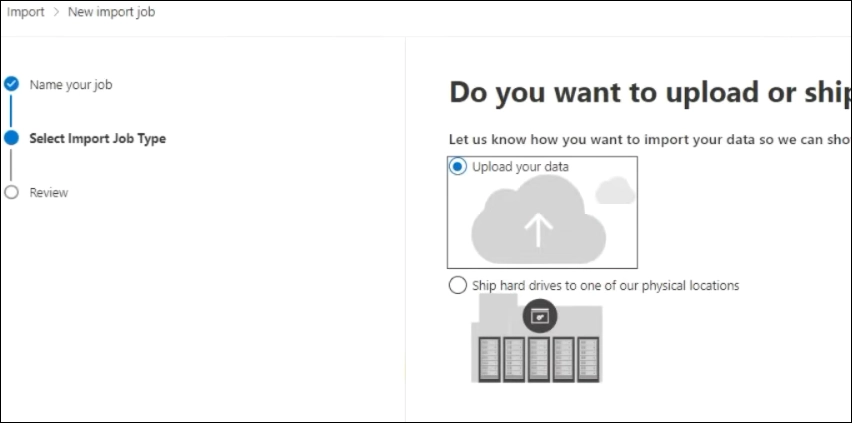
Step 3: Provide a job name and click Next to continue.
Step 4: Choose the Upload your data option and click Next.
Step 5: Click on the Show network upload SAS URL option to copy the URL. Then, download the AzCopy tool.

Step 6: Open the Command Prompt on your system and go to the location where the tool is downloaded.
Step 7: Run the following command:
|
azcopy.exe copy “<PST_files_location>” “<SAS URL>” |
Note: Replace PST_files_location with the directory where all the PST files are stored.
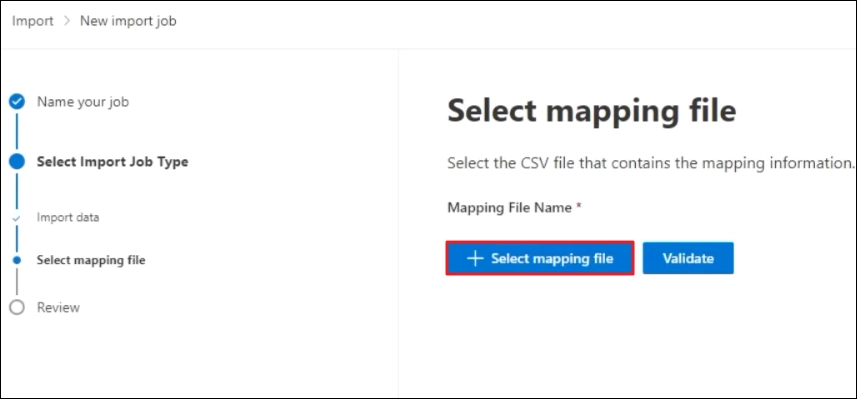
Step 8: Create a CSV file with mapping details to map PST to Office 365 user mailboxes.
Step 9: Go back to the Import job page in Step 5.
Step 10: Tick the options, I’m done uploading my files and I have access to the mapping file. Then click Next.
Step 11: Click Select mapping file button to upload the CSV file created in Step 9
Step 12: Click the Validate button to check the uploaded CSV file for any errors.
Step 13: Click Save to finish the import job creation process.
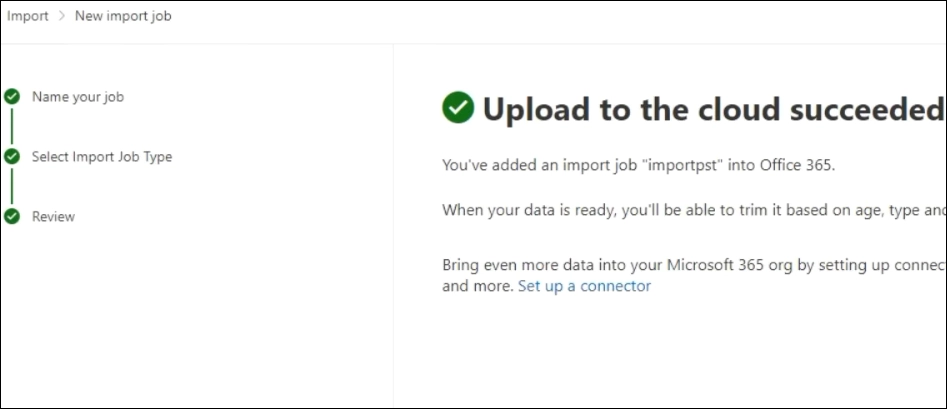
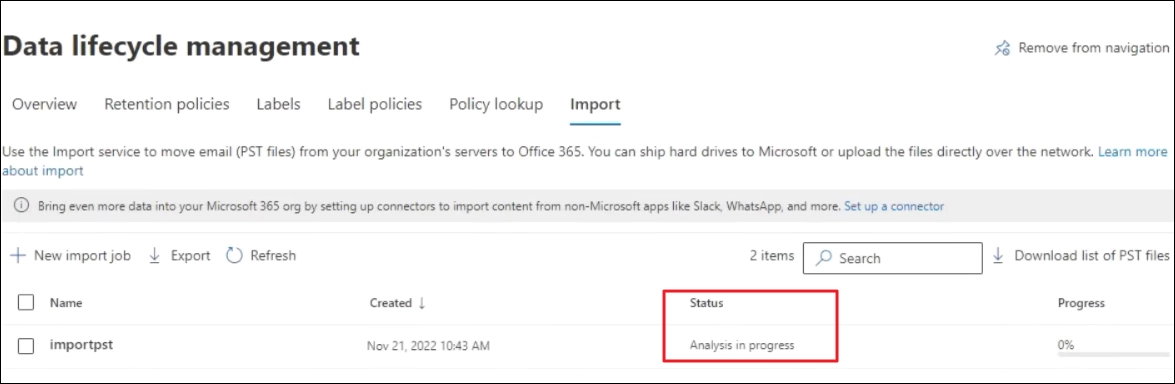
Step 14: Go back to the Import tab (Step 2). Office 365 will scan all the PST files you uploaded. The job process will be displayed as Analysis in progress.
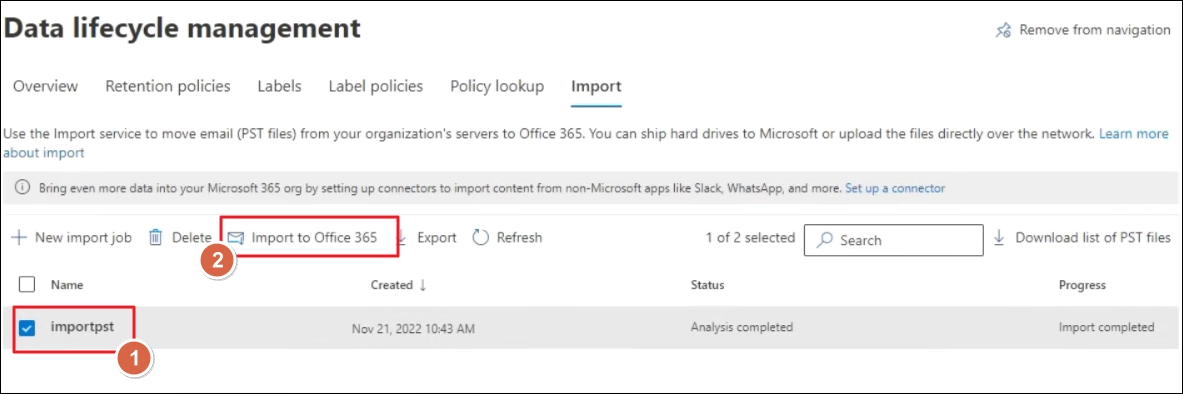
Step 15: When the status changes to Analysis completed, select the job and click Import to Office 365.
Step 16: You will be asked to choose filter your data before importing or uploading complete data. Choose as per your requirement and click Next.

Step 17: Review the operation and click Submit.

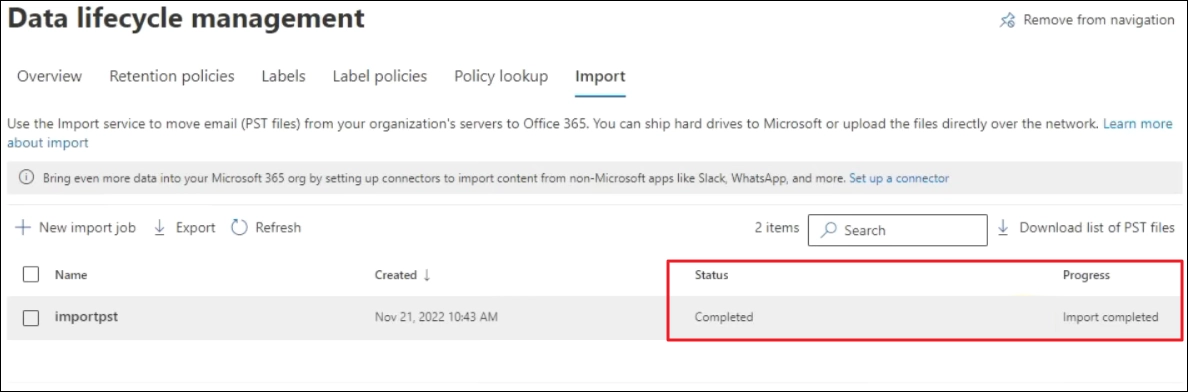
Step 18: The import job will start. When importing is finished, status will be updated to Completed.
Method 2. Using Import/Export
Here is the next manual method that can help to easily import PST to OWA via the Import/Export wizard. Here’s how to do it:
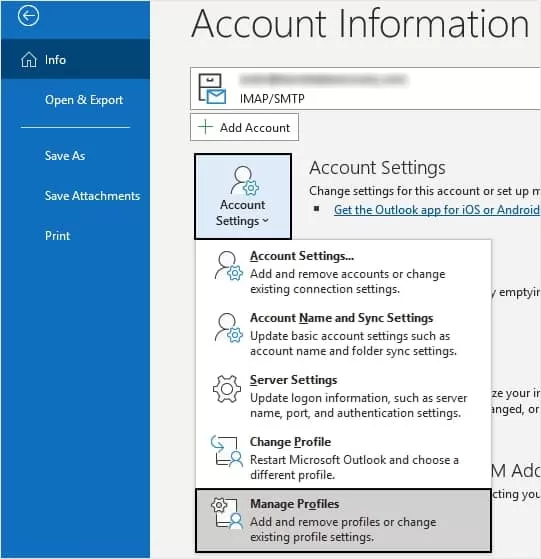
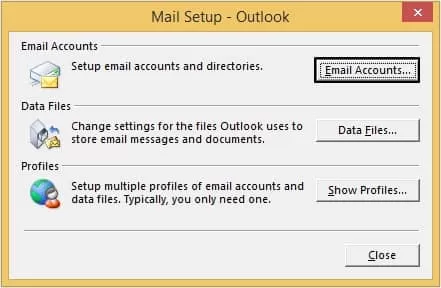
- Access Outlook and go to the File menu. Tap on Add Settings >Manage Profiles.
- Click Email Accounts from the three options.
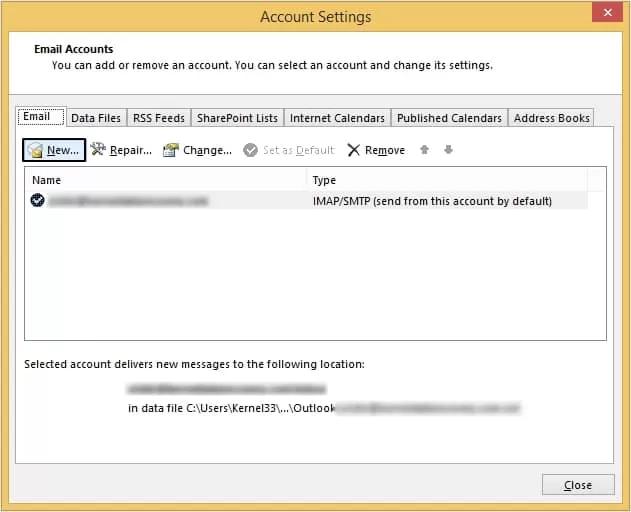
- Now, click on New option.
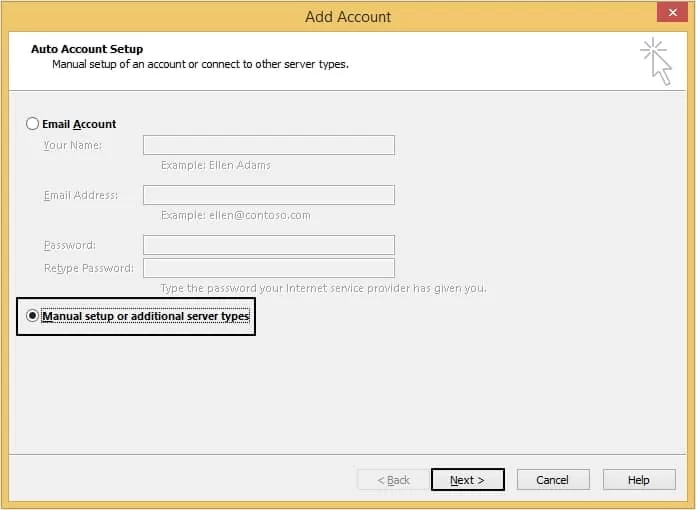
- Moving ahead, click Manual setup or additional server types.
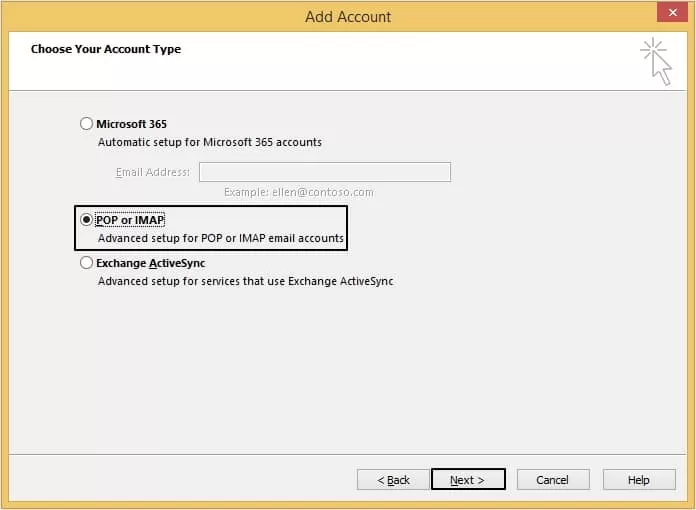
- Now, select POP or IMAP option, then click Next.
- Fill in your credentials and hit Next.
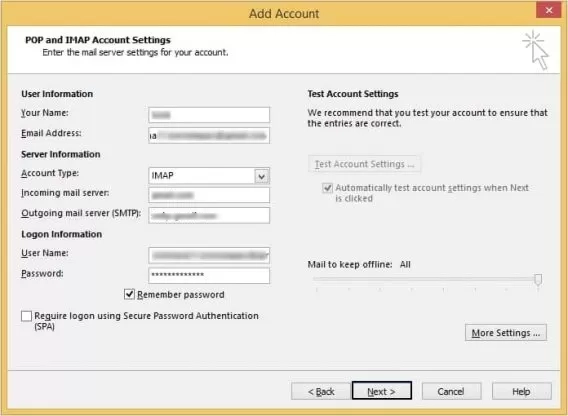
- You will be able to configure Microsoft 365 in Outlook. Now, you can easily migrate PST to Outlook 365 online.
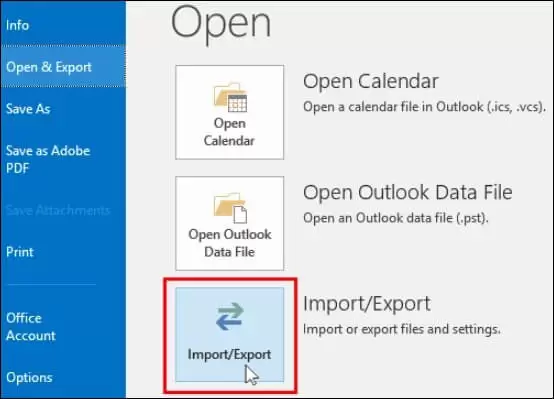
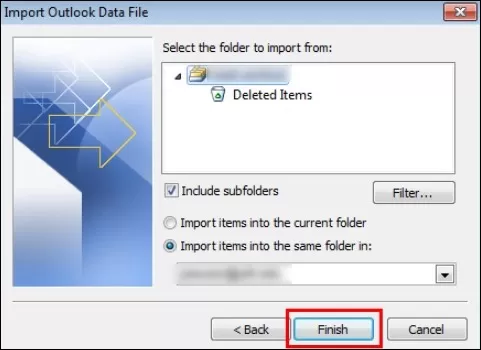
Now we will transfer the PST file in Outlook. - Go to the File menu and click on Open & Export. Tap on Import/Export.
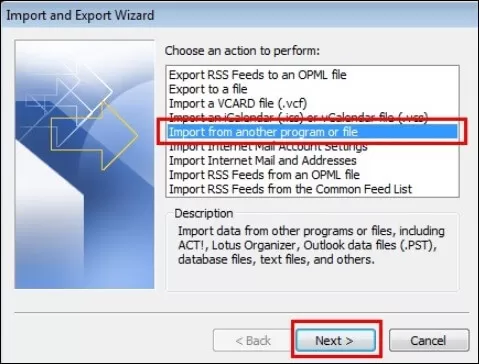
- Click on the option Import from another program or file and hit Next.
- Tap on Outlook Data File (.pst) and hit Next.

- Click on Browse to choose the PST file and click on Next.
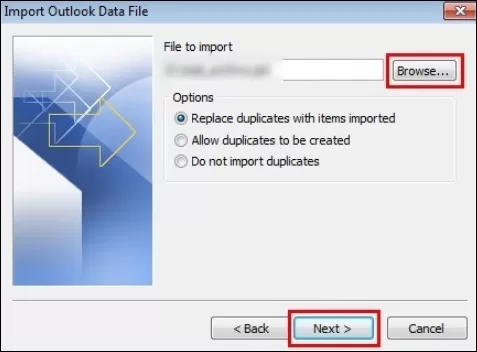
Note: In case you wish to move the complete PST file, choose the root file and check mark the option Include subfolders.
- Tap on Finish to continue.
Limitations of manual methods
The manual method does provide a reliable solution to export PST to OWA, but there are some limitations to it, such as:
- You cannot move a PST file of size more than 20 GB to Outlook Web Access with the Network Upload method.
- Both these methods are very complicated and require technical expertise to perform. So, it is not ideal for non-technical users.
- Using any wrong commands can lead to loss of your PST data, and you’ll have to start again.
- It is quite a lengthy process since a lot off steps are involved and it takes some time to complete the upload process.
So, to overcome these limitations, there is an alternative solution that can be used to move PST items to Microsoft 365, and then access the PST via Outlook Web Access.
Alternative solution to transfer PST items to Outlook Web Access
Manual methods always have a risk factor with them, whether data loss or some other risk. No manual method can match the accuracy and efficiency of a professional utility for a quick transfer of PST to Office 365. One such software is Kernel Import PST to Office 365, it is designed with advanced algorithms to provide you with ease in performing the method.
The software can easily export PST file to Microsoft 365. Utilize the tool’s advanced filters for selective migration. Furthermore, for speeding up data transfer, you can also choose to skip duplicate items, empty folders, and deleted folders. Users get the facility of bulk files transfer, and they can even migrate large files.
Conclusion
Transferring PST to OWA becomes crucial in many situations. Microsoft provides two manual methods to export PST files to Outlook Web Access. As the manual methods are not ideal for every user, we have mentioned here an automated solution that is helpful for every user. This automated method simplifies the PST to Outlook 365 transfer and helps users in accessing them through OWA.
FAQs
A. Yes, you can use the desktop version of Outlook to open those PST files with your email stored in Office 365. This means you won’t have to worry about losing any important emails or data. With just a few clicks, you’ll be able to access all your email history in one convenient location.
A. There are several reasons why this might be happening, including conflicting software, faulty add-ins, and a damaged or corrupt PST file. Oversize, disk errors, and system or Outlook crashes can also cause this frustrating problem.