Read time: 6 minutes
This blog provides a step-by-step guide for migrating Exchange 2013 to 2016. Here, you’ll get to know about the migration of mailboxes, prerequisites for Exchange Server 2016, and installation of Exchange Server 2016.
Exchange Server 2016 has taken the business expectations to new levels, especially for those who are using Exchange Server as a dedicated mail server. The advanced features like collaboration with SharePoint and OneDrive have made Exchange Server 2016 the primary choice of businesses. Besides, it offers integration to the cloud.
So, how can you migrate to Exchange Server 2016 from any other version, e.g., Exchange Server 2013? Well, the migration process is a little complicated; it can be executed efficiently if you follow the proper steps to do it. So, let’s look at the steps to migrate from Exchange Server 2013 to 2016.
Prepare the environment for Exchange 2016 Migration
Before migrating from Exchange 2013 to 2016, you need to check a few things required for the migration. Besides, you need to ensure that you have an accurate environment in place that matches the system requirements.
For instance, you must verify the required parameters of the Exchange Server. Ensure that parameters like RAM, CPU and storage space available for the server are adequate. The basic system requirements for Exchange Server 2013 to 2016 migration include:
Hardware Requirements:
| Processor | Intel 64-bit processor/AMD AMD64 platform. |
| Memory size | 8 GB Minimum. |
| Paging File Size | Minimum physical RAM plus 10 GB. Maximum Physical RAM 32 GB. |
| Disk Space | 30 GB on the drive. 200 MB on System Drive. 500 MB for message queue database. |
| File Format | NTFS for System partition, Exchange binaries, Exchange Diagnostic logging files, transport database files. |
| Drive | DVD-ROM Drive. |
| Screen Resolution | 1024*768 pixels. |
Software Requirements:
| Windows | Windows Server 2012. Windows Server 2012 R2. Windows Server 2016. |
| Mailbox and Edge Transport Server Roles | Windows Server 2012 Standard or Datacenter Windows Server 2012 R2 Standard or Datacenter Windows Server 2016 Standard or Datacenter |
| Management Tools | Windows Server 2012 Standard or Datacenter Windows Server 2012 R2 Standard or Datacenter Windows Server 2016 Standard or Datacenter Windows 10 with 64-bit Windows 8.1 with 64-bit |
| .NET Framework | 4.8, 4.7.2, 4.7.1, 4.6.2 |
| Supported Clients | Microsoft 365 Apps for enterprise, Outlook 2019, Outlook 2016, Outlook 2013, Outlook 2010 SP2, Outlook 2016 for Mac, Outlook for Mac for Office 365. |
Another thing to consider here is the support for Exchange 2016 for your clients. If any of the clients are not on the list of supported clients, you need to upgrade them. To do so,
-
- Install a supported operating system like Windows Server 2012 Standard/Datacenter or Windows Server 2012 R2 Standard/Datacenter
- After installing the OS, join the server to the domain
For better assistance, you can use the Microsoft Exchange Server Deployment Assistant tool to deploy different versions of Exchange Server.
Installation Prerequisites for Exchange 2016
Once you have the above fundamentals in place, you can go ahead with the installation of Exchange Server 2016. But before that, you need the appropriate permissions. Make sure that the below prerequisites are installed before installing Exchange 2016:
Install and configure the following frameworks:
- Microsoft .NET Framework 4.5.2 version
- Windows Management Framework 4.0 version
- Runtime version for Microsoft Unified Communications Managed API 4.0
- Essential features of Windows.
To install the required feature, you can refer to the below-stated commands. You need to run the commands from the PowerShell on a single line.

Installing Exchange Server 2016
Now comes the hard part of the migration. To install Exchange Server 2016, you can follow the below steps:
- Download Exchange Server 2016 from the official site and extract the setup file.
- Run the setup.exe file to start the installation of the Exchange Server.
- The ‘Check for Updates?’ screen appears. Select the first option: Connect to the Internet and check for updates, and click Next.
- If new updates are available, download them and proceed.
- The ‘Setup’ copies the files, initializing the installation process.
- The Introduction page appears on the screen; click Next.
- Accept the terms & conditions on the License Agreement page and click Next to proceed.
- Select ‘Use recommended settings’ under Recommended Settings and click Next.
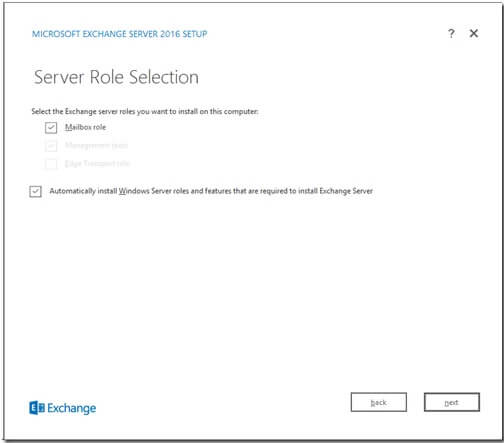
- The Server Role Selection screen appears. Check the checkbox ‘Mailbox role’ and click on the Next tab.
- Now, provide the location to install the software. You can install the software at a default location or a different location.
- Select Yes or No to ‘Disable malware scanning’ under Malware Protection Settings. By default, the settings are enabled. Click Next to proceed ahead.
- The Setup will start performing a ‘readiness check’ on the system and configuring the prerequisites.
- The setup process will start, and a tab will pop up stating that Exchange Server 2016 has been installed successfully.
- You will receive the Setup Completed message. Click Finish to end the installation process.
Migrate Exchange 2013 to 2016 – End Point
The final step is to migrate Exchange 2013 to 2016 by setting up the Service Connection Point (SCP). The Exchange’s object in Active Directory directs domain-joined Outlook clients to a URL. In addition, it helps in receiving auto-discover settings.
The aim is set to Fully Qualified Domain Name of the server by default. You must change this to stop Outlook clients from connecting and getting a certificate warning. You generally receive the alert when proceeding with the default self-signed certificate installed by Exchange Server. You must configure the SCP in reference to the Exchange 2013 endpoint in such a scenario.
Migrate Exchange Mailboxes
There are various ways to move user mailboxes from Exchange Server 2013 to 2016. The Exchange migration moves entire mailboxes from 2013 to 2016 without affecting the mail flow of mailboxes items.
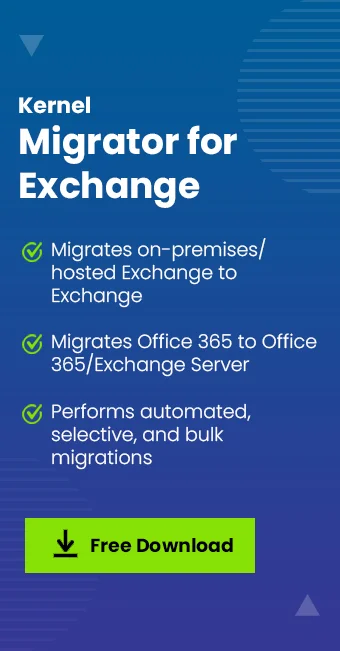
However, we recommend the best way to migrate data from Exchange is a professional tool like Kernel Migration for Exchange. It is one such tool that is specially designed to migrate all mailboxes from one Exchange Server to another directly. Furthermore, the software has advanced features to migrate mailboxes flawlessly. In addition, you can perform pre-migration analysis and various post-migration tasks and generate reports at the end. You can create multiple batches of migration just like staged migration without any technical intervention from the experts.
Furthermore, using the tool is straightforward. All you need to do is add source and destination servers, select user mailboxes, and map mailboxes from Exchange 2013 to Exchange 2016 Server database. Also, the software performs auto-mapping of the source and destination mailboxes and provides an option to create new mailboxes. It can perform all types of migrations, including intra-forest, cross-forest, and Hybrid Migration.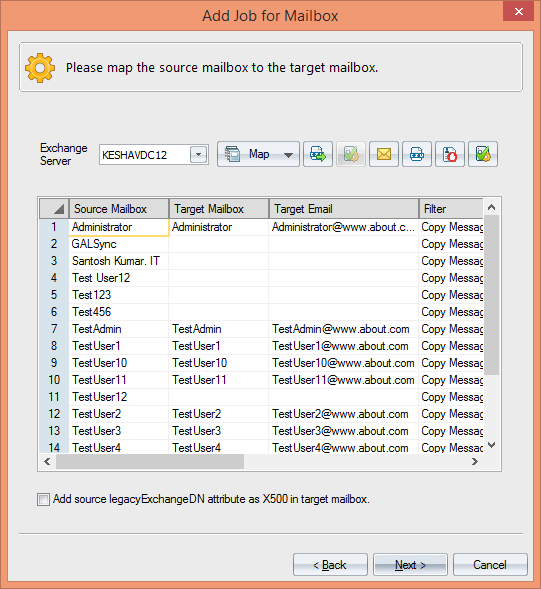
Wrap up
Migrating from Exchange Server 2013 to 2016 is a common task performed by businesses to improve their internal and external email communications. But the migration process often becomes a little hectic, as it involves various critical steps. This article discusses the step-by-step procedure of migrating the data from Exchange Server 2013 to 2016. It also covers the prerequisites required to perform the migration. After the completion of successful migration, you can disable autodiscover after Office 365 migration and decomission Exchange Server 2013.