Read time 4 minutes
"Suppose a user has migrated from on-premises Exchange to Office 365 but has not decommissioned the source Exchange Server. The issue faced by the users includes Outlook clients not able to detect Office 365 even after migration. They are still trying to retrieve the information from on-premises Exchange.”
Autodiscover service in Exchange Server allows access to Exchange Server features with reduced efforts in configuration and platform deployment. It provides a quick way to connect user mailboxes simply using an email address and password. However, it often becomes critical to disable Autodiscover to prevent redirection of old mailboxes to the decommissioned server, to redirect traffic using DNS, etc.
Why need to disable Autodiscover after Office 365 migration?
After the on-premises Exchange to Office 365 migration, the Office 365 internal Outlook users are not able to utilize the Autodiscover feature. In fact, Autodiscover points the Office 365 users to local Exchange Server as a result of which email clients try to connect to old Exchange Server. This issue might arise as internal Exchange Server is still in use of Autodiscover by ISS. User must remove this setting of Autodiscover (internal AutodiscoverVirtualDirectory) with the old Exchange Server to cope up with this issue.
Explore some more reasons to disable Autodiscover after Office 365 migration:
- Prompts Outlook to ask for password again and again or can’t create Outlook profiles.
- Lost user access to public folders and issues with shared mailboxes automapping.
- Incorrect execution of Autodiscover can cause leakage of Windows domain credentials.
- Outlook functionalities like out-of-office, Calendars, etc. show issues in synchronization.
Prerequisites Before Disabling Autodiscover
Before you turn off Autodiscover feature, here is the list of necessary actions you must take:
- Note down the server settings and authentication types for easy configuration.
- Inform your end users and provide them with instruction to set up manually.
- Your Outlook email client must be updated to its latest version.
- Backup and secure Office 365 data before removing Autodiscover to prevent data loss.
- Document existing records like IIS configuration, DNS CNAME/SRV records, etc.
How to Remove or Disable Autodiscover after Office 365 Migration?
With Exchange Management Shell Cmdlets: For security reasons, you should backup the IIS configuration first with the following steps.
On your old Exchange system, run the Command Prompt as administrator by right-clicking on the application exe and selecting Run as administrator option. Then run this command:
The backup of the IIS configuration will be taken. Next, search for the Exchange Management Shell, right-click on it and select Run as administrator option. Let it connect with the Exchange Server. Now run this command to get the information about the current Autodiscover virtual directory.
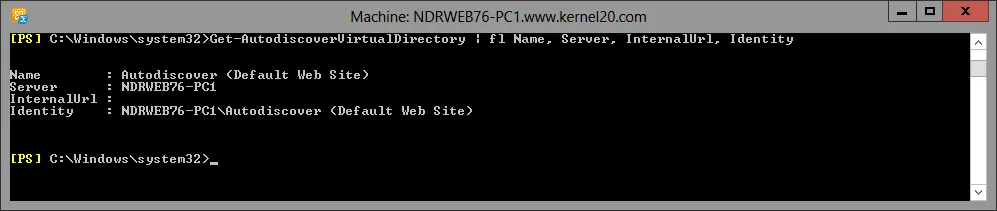
You will get the information about Autodiscover virtual directory like Name, Server, InternalURL, and Identity. From here, write down the exact identity value to notepad or another text file.
Next, run this cmdlet to remove this Autodiscover virtual directory in the Exchange Management Shell application.

Type “Y” and press Enter, when asks for confirmation. The directory will get removed after this.
It will result in no output, which shows that the Autodiscover virtual directory is removed.
To confirm that Autodiscover now points to Office 365, you can run this test.
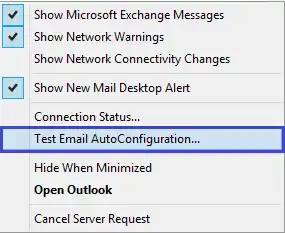
- Run your Outlook application and then go to the system tray on the right-most side of your system’s task bar. Here, press the Ctrl button on the keyboard and right-click the Outlook icon on system tray and select Test Email AutoConfiguration option.
- Now, enter the email address, password, and click the Test option. It will start testing the configuration.
If the results are associated with your configured Office 365 server, then the test is successful.
Quick checklist: Troubleshoot Issues After Disabling Autodiscover
- Create a new Outlook profile (if required).
- Check incoming/ outgoing server settings.
- Verify the Microsoft 365 service for no active outages.
- Flush the local DNS cache.
- Use Microsoft SaRA (Support and Recovery Assistant).
Final words
During the on-premises to Office 365 migration, several prerequisites and permissions should be arranged and assigned before starting the migration. You may face several complications after the process completion for which you may need to disable Autodiscover. This feature can often show issues like Autodiscover not working on Outlook, which requires advanced understanding of Exchange Server and PowerShell commands, which is why you should use Kernel Migration for Exchange software that takes care of complete migration tasks. Create multiple projects for different user mailboxes and migrate them in batches to execute quick and bulk data transfer.
Frequently Asked Questions
Ans. No. Autodiscover is essential to operate Outlook and Exchange server clients to locate the user mailboxes.
Ans. Yes, disabling Autodiscover feature can help you improve security as it prevents credentials leakage and minimizes the chances of account hijacking.