Read time: 9 minutes
Summary: Migrate Distribution Lists to Office 365 groups with the help of Exchange Admin Center or use PowerShell for bulk migration. Make sure that all the DLs are cloud-managed and non-nested for a smooth migration process. After trying these ways, if you still face issues, use a reliable Office 365 migration tool.
During the journey of migrating to cloud, it’s important to migrate Distribution Lists to Office 365, then and there. Moving Distribution Lists (DL) to Microsoft 365 Groups improves collaboration among clients and individuals working together. Distribution Lists in legacy systems make it easy to send the same information to multiple people at once. But Microsoft 365 Groups takes further steps by including shared calendars, chat, and file sharing. That is the prime reason users decide to migrate their organization’s distribution lists to Microsoft 365 Groups in Outlook.
The process of migrating distribution lists to Office 365 Groups is relatively straightforward. You’ll need to create a new Group for each distribution list you want to migrate and then add all the email addresses associated with the distribution list to the Group.
Migrate non-nested Distribution Lists to Microsoft 365 Groups in few steps:
- Sign into Exchange Admin Center.
- Click on Recipients > Groups and choose the Distribution List.
- Select the Upgrade to Microsoft 365 Groups
Migrate Distribution Lists to Office 365 in bulk: Run commands like Upgrade- Distribution Groups and Get-EligibleDistributionGroupForMigration for bulk migration of Distribution Lists to Microsoft Groups.
What are Microsoft 365 Groups?
Microsoft 365 Groups are quite different from Distribution lists as they allow you to select some users, work, communicate, and share resources with them. Also, there is no extra task of giving permissions to each user separately, as adding to the Group automatically provides them with the required permissions. Groups come with a lot of shared features like inbox, files library, calendar, OneNote notebook, Guest access, Discoverable content, Group creation facility for users, etc.
When you create Microsoft 365 Groups, you will get the following facilities with them.
- Easily Searchable Shared Mailbox: New users can search for the shared mailbox in Office 365 groups for the already existing content. This is very advantageous for users who have been added later.
- In-built Shared Files Library: With every Group, you will have a SharePoint files library where the group users can share their documents, store, and edit them collaboratively.
- Shared Group Calendar: Group members can subscribe to this Group calendar and get updates and invites related to group events.
- Guest Access: Microsoft 365 allows you to collaborate with external members who are not part of your organization by adding and accessing the Group and its contents.
- Easy Content Editing: All the members of the Group can easily review the content. In case of sensitive information, you can enable the private Group.
Should I Migrate Distribution Lists to Microsoft 365 Groups?
Well, that depends entirely on your work requirements. If all you require is email broadcasting, then Distribution Lists are enough for you. Moreover, only cloud managed, and non-nested Distribution Lists can be migrated to Microsoft 365 groups. However, if you want smooth collaboration across your organization, then Groups might be the better option for you. Some benefits of migrating Distribution Lists to Office 365 Groups include:
- Centralized access: Group members can access and collaborate over a shared mailbox. Also, new users can view old email threads in Microsoft 365 Groups, unlike Distribution Lists.
- Easy external communication: Group members can easily collaborate with non-members.
- Better compliance: Microsoft 365 Groups easily integrate with Microsoft Purview for data compliance and to set up data retention policies.
- Data recovery: Unlike Distribution Lists, Microsoft 365 Groups have a recovery window of 30 days. Deleted Microsoft 365 Groups can be recovered from the Deleted Groups section in Microsoft 365 Admin Center within 30 days of deletion.
- Better data management: It is easy to manage Groups in Office 365 and backing up Office 365 Groups data is also a great way to protect essential data in case of data loss.
Distribution Lists vs Microsoft 365 Groups: Which One to Choose?
| Features | Distribution Lists | Microsoft 365 Groups |
|---|---|---|
| Email delivery | Yes | Yes |
| Shared Mailbox & Calendars | No | Yes |
| SharePoint integration | No | Yes |
| Teams integration | No | Yes |
| Guest access | No | Yes |
| Security | Basic | High |
| Permissions | Limited | Role-based permissions |
| Suitability | For email broadcasting | Full Team collaboration |
Eligibility Checklist for Distribution List Migration to Office 365
Microsoft allows migration of only a few eligible Distribution Lists to Microsoft 365 Groups. There are certain requirements that a Distribution List must meet in order to be migrated:
- Distribution lists should be Cloud-managed and not synced from on-prem AD.
- Only non-nested lists can be migrated to Microsoft 365 that are not a part of any other lists.
- The Distribution List must have less than 100 owners.
- Must not have an alias with special characters.
- This DL shouldn’t be a dynamic distribution group.
- Shouldn’t be a part of a sender restriction group in another Distribution List.
Method 1. Migrate Distributions Lists to Office 365 Groups using the Exchange Admin Center
Before starting, please note that you must have Global administrator/Exchange administrator rights to proceed with the procedure.
Now, follow the given steps to migrate one or more Distribution Lists to Microsoft 365 Groups in Outlook.
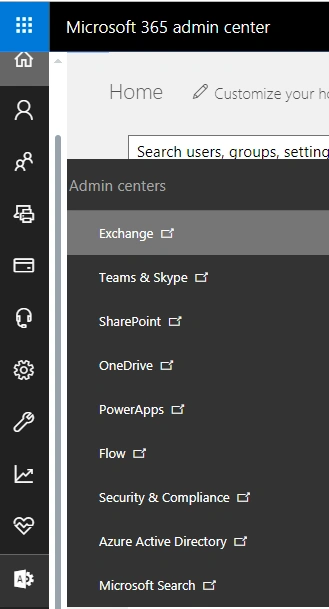
- Log in to your Microsoft 365 account as a Global Administrator. Go to the Admin Center and select Exchange.
- Now, in the opened Exchange Admin Center, go to Recipients and then click Groups.
Now, go to Recipients in the Exchange Admin Center and click Groups.
A notice appears displaying distribution lists or available groups to upgrade to Microsoft 365 groups in Outlook. Click Get Started to continue.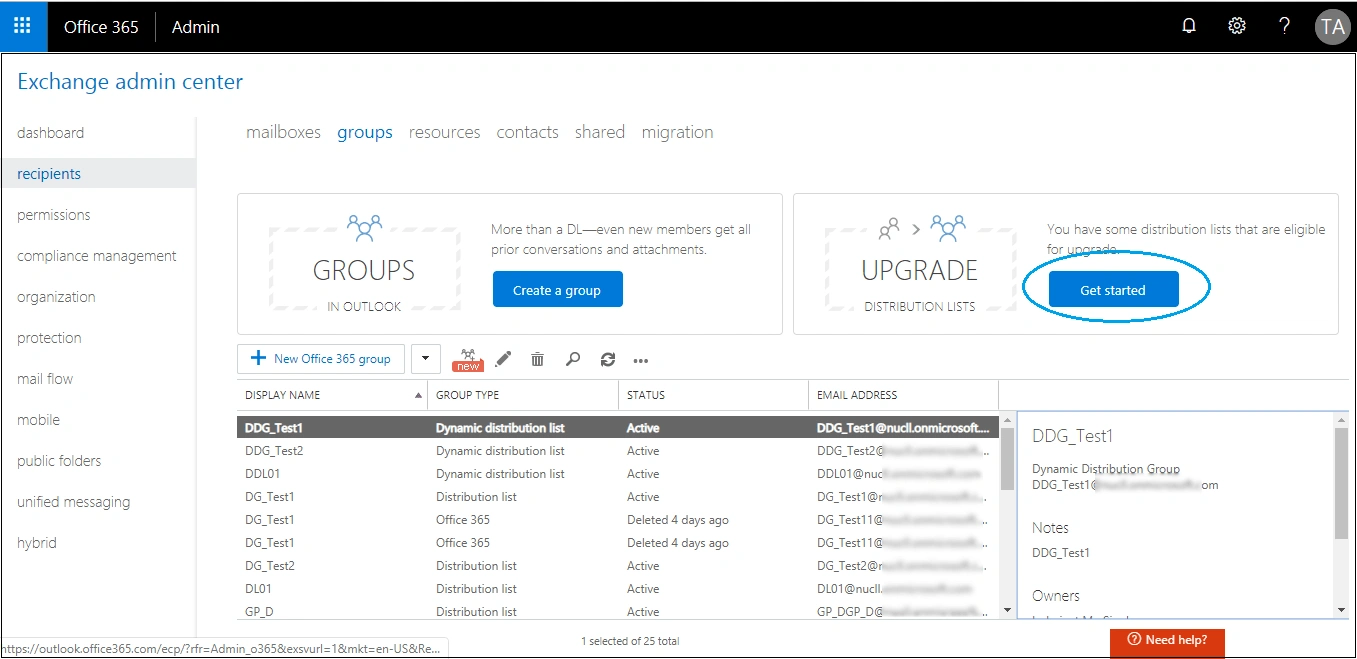
- Select the lists you want to upgrade from the Distribution Lists and move to Microsoft 365 groups in Outlook.
- After selection, click the Start Upgrade icon.

- In the new dialogue box, click OK to confirm the upgrade. The upgrade process starts from there. The process will take time as per the number and size of distribution lists for the upgrade.
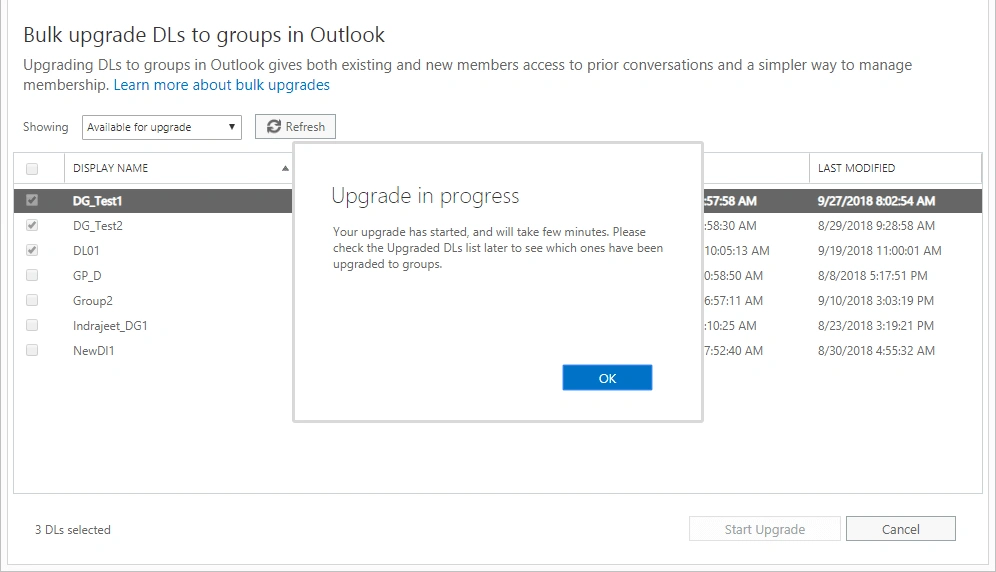 Note: Use Available for upgrade and Upgraded DLs to analyze the status of the upgraded and available for upgrade Distribution lists.
Method 2. Migrate Distributions Lists to Microsoft 365 Groups using PowerShell
Using PowerShell, you can migrate single as well as multiple Distribution Lists, but the cmdlets are different for each operation. For that First, you need to connect Exchange Online to Windows PowerShell manually. Then run these commands in the Exchange Online PowerShell.
To migrate a single Distribution List, run the following cmdlet
At the place of <Dl SMTP address>, provide the SMTP address of your Distribution List
To migrate multiple Distribution Lists, run this cmdlet.
At the place of <DL SMTP address1>, < DL SMTP address2>, < DL SMTP address3>, provide the SMTP respective addresses of your Distribution Lists.
To migrate all eligible Distribution Lists, run any of the following commands.
To get the eligible DLs in the tenant and upgrade them, run the following command –
To get the list of all DLs and upgrade the eligible DLs, run this command
Find and Delete Empty Distribution Lists from Microsoft 365 Account
After connecting to Exchange Online PowerShell, Microsoft 365 users can run certain cmdlets to list out all the empty distribution lists in the account and delete them further using another cmdlet. Here are these cmdlets.
To find out all empty distribution lists, run this cmdlet.
This cmdlet execution would list out all the empty distribution lists. If you want to delete each list, we suggest you run this command.
Now, you don’t have any empty distribution list in your account.
Keep following our blogs to seek all sorts of help regarding the cloud environment – Microsoft 365.
Troubleshooting Common Distribution List Migration Challenges
Problem 1: The Distribution List is still synced with the On-Premises Active Directory.
Fix: Recreate the DL manually as a group using Microsoft 365 Admin Center.
Problem 2: You don’t have enough permissions to migrate the Distribution List to Office 365 group.
Fix: To migrate DLs to Office 365, you must have Global Admin, Exchange Admin, or Microsoft 365 Groups admin permissions.
Problem 3: Nested lists got broken during migration, giving rise to permission inconsistencies.
Fix: Update the nested group memberships once migration is completed.
Problem 4: There’s an SMTP address mismatch.
Fix: Verify that there are no duplicate email addresses, and the Primary SMTP Address matches the target policy.
Protect Microsoft 365 Data During Distribution List Migration
Even though methods like Exchange Admin Center and PowerShell helps to migrate Distribution Lists to Office 365 groups, these methods aren’t completely reliable for complex environments. Enterprises and business organizations have to deal with thousands of legacy Distribution Lists and migrating them together is tricky. To migrate all your DLs safely, it’s recommended to use a trusted Office 365 migration tool. A tool like Kernel Office 365 Migration is perfect for migrating cloud data like emails, calendars, attachments, lists, contacts, etc. with complete integrity to Primary mailboxes, Shared mailboxes, or groups.
Author’s Verdict
If you are looking for an efficient way to manage your email distribution lists, migrating them to Microsoft 365 Groups in Outlook is the best option. Use Exchange Admin Center to move from legacy DLs to Microsoft Office 365 groups to make managing your communications easier.
Moreover, it is advisable to backup your Office 365 data with the help of a trusted Office 365 Backup tool before the migration to protect your important data.
Frequently Asked Questions
A. Only certain Distribution lists that are non-nested and have less than 100 owners can be migrated to Microsoft 365 groups.
A. No, only admins have the right to move distribution groups to Exchange Online.
A. The DL is converted into the Microsoft 365 Group with all the data and the email addresses. Users immediately get access to resources like shared mailboxes, shared calendars, SharePoint sites, etc.
A. If you’ve admin access then migrating distribution lists to Office 365 via Exchange Admin Center is the easiest way. However, if you don’t have admin level permissions or technical knowledge, then Kernel Office 365 Migration tool is the best choice for you.