Read time: 8 minutes
Summary: To recover deleted Office 365 Groups, users can get assistance from Exchange Admin Center, Azure AD PowerShell, PnP PowerShell, Microsoft Graph PowerShell, or Outlook on the Web if it’s within the retention period. But, if the 30-day time window exceeds, then you need to use a specialized Office 365 Backup Tool.
Microsoft 365 focuses on increasing productivity and collaboration with every new feature they add. A game changer in team collaboration is the introduction of Microsoft 365 Groups, which facilitates better information sharing between team members. While using it, you can collaborate with others when sending emails, writing a document, creating spreadsheets, planning projects, creating contacts, scheduling assignments/meetings, etc.
The Administrator can create the Group, add members, and assign different authority levels to all members. The team members share documents, collaborate on various projects, and solve queries. But what if your Office 365 Group got deleted, either intentionally or mistakenly? This is where every user starts finding a way to recover deleted Office 365 Groups. But remember that your data will be recovered only if it is in the retention period.
What is the Retention Period for Deleted Office 365 Groups?
Microsoft uses a “soft-delete” policy for Office 365, which does not delete the data permanently. Instead, it is retained for 30 days by default, even if you have deleted a group. During this time, an administrator can recover all the required data to the desired location. Once the 30 days are over, the Group is deleted permanently and is not recoverable under any condition.
An administrator can use the retention policies and restore the following content:
- Complete Team information
- Entire Planner details
- Email address of the group
- SharePoint Online Team sites and files
- Exchange Online shared inbox and calendar
- Microsoft Entra objects, properties, and members
- OneNote Notebook
- Microsoft Teams
- Power BI classic workspace
Manual Process to Restore the Deleted Office 365 Groups
There are a few methods to restore deleted Office 365 Group, which we are going to discuss below in detail. Follow the instructions stepwise carefully for successful retrieval of data:
Method 1. Restore Deleted Office 365 Group Using Exchange Admin Center
You can easily restore Office 365 Groups using Exchange Admin Center with the help of following steps:
- Login to Office 365 with the Administrator credentials.
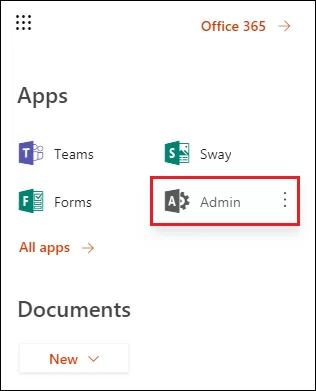
- Click Admin icon in the menu list.
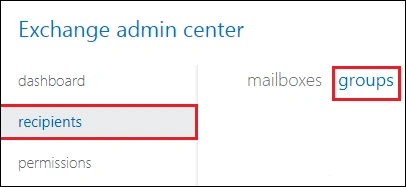
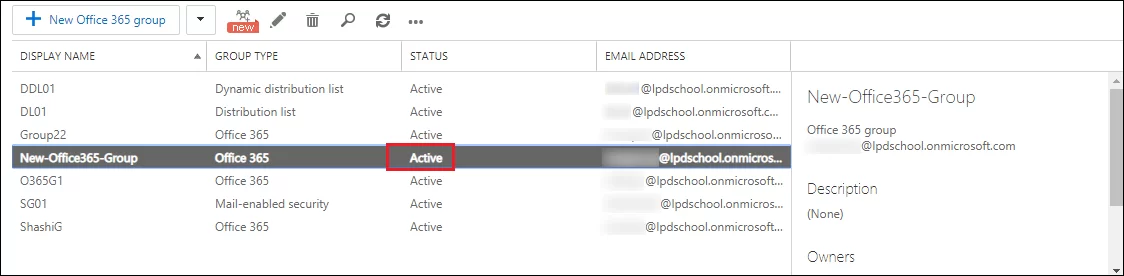
- Under the Recipients category, go to the Groups tab.
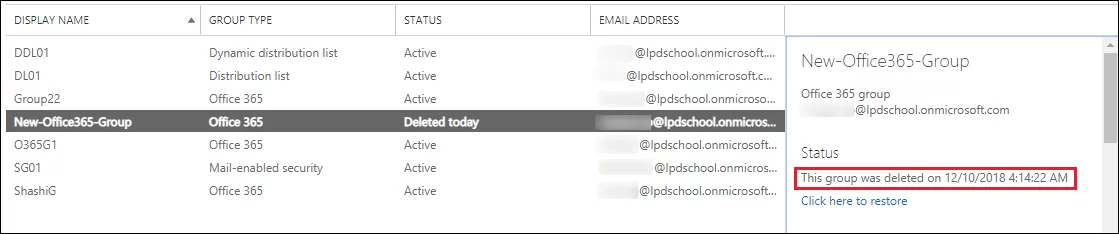
- In the list of Office 365 Groups, if any group is Deleted, then its Status will display brief information about the deletion (such as date and time when it was deleted).
- Now, click the Restore icon from the toolbar.
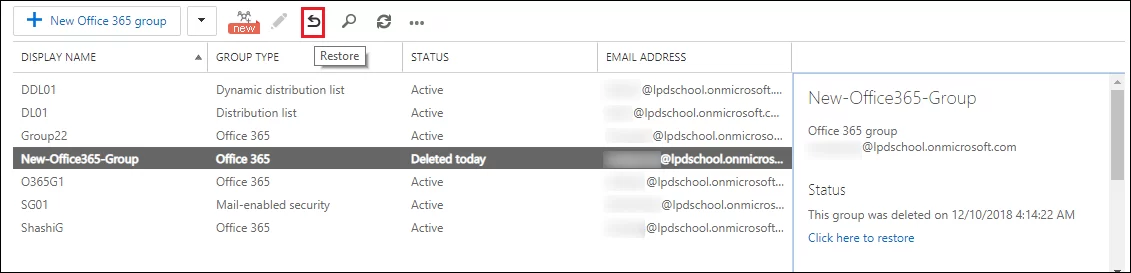
- A pop-up message will give you information about the changes after restoring the group.
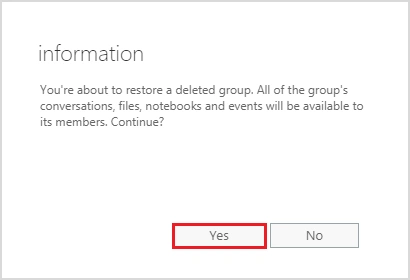
- As soon as the office 365 Groups is restored, its status will change to Active.
Method 2. Recover Deleted Microsoft 365 Groups Using PowerShell
You can recover Office 365 Group using Azure AD PowerShell, PnP PowerShell, and Microsoft Graph PowerShell. We will discuss steps for each technique:
Technique 1. Using Azure AD PowerShell
This method requires installation of latest version of Azure ADM (Active Directory Module). Uninstall older version and use latest AzureADPreview:
Note: You cannot install both GA and Preview versions on same device.
Part A. Install AzureADPreview
- Type Windows PowerShell in the search bar, then right-click on it and select Run as administrator.
- Type the following commands to uninstall older version.
Uninstall-Module AzureAD
OR
Uninstall-Module AzureADPreview - Now, use the below mentioned command to install updated version.
Install-Module AzureADPreview
Part B. Restore Deleted Office 365 Group using PowerShell
- Again, run PowerShell as administrator and type the following command to connect AzureAD.
Connect-AzureAD
- Microsoft Sign In window will appear, then connect to your tenant using Global Admin or Groups Administrator
- Execute the command below and it will list all the deleted Office 365 groups which are in recoverable state.
Get-AzureADMSDeletedGroup
- Locate object ID of the group you wish to restore, then run the following command:
Restore-AzureADMSDeletedDirectoryObject -Id <Your-Group-Object-ID>
Note: Replace <Your-Group-Object-ID> with actual GUID from Step 3.
- Wait for a few minutes, then run the below mentioned command to make sure group has been restored or not.
Get-AzureADGroup -ObjectId <Your-Group-Object-ID>
Technique 2. Using PnP PowerShell
You can use the below mentioned PowerShell script to recover deleted Microsoft 365 account using PnP PowerShell. But keep this in mind, the group may take some time to become active.
#Config Variables
$AdminSiteURL = “https://crescent-admin.sharepoint.com”
$GroupEmail = “retailmgrus@crescent.com”
#Connect to PnP Online
Connect-PnPOnline -Url $AdminSiteURL -Interactive
#Get the deleted Group
$Group = Get-PnPDeletedMicrosoft365Group | Where Mail -eq $GroupEmail
If($Group -ne $null)
{
#Restore the deleted Group
Restore-PnPDeletedMicrosoft365Group -Identity $Group.id
Write-host “Group Restored Successfully!” -f Green
}
Else
{
Write-host “Could not find deleted Group!” -f Yellow
}
Technique 3. Using Microsoft Graph PowerShell
Run the restore command within the retention period to get back your data safely. Just connect, list, and restore all data. Here is how you can do it:
- Connect Microsoft Graph with required permissions.
Connect-MgGraph -Scopes “Group.Read.All”,”Group.ReadWrite.All” -NoWelcome
- List deleted groups and find the Object ID of the required group.
Get-MgDirectoryDeletedGroup | Select-Object Id, DisplayName
- Run the following command to restore the deleted Group.
Restore-MgDirectoryDeletedItem -DirectoryObjectId <ObjectID>
Note: Replace <ObjectID> with the Object ID of the deleted group.
Method 3. Restore Deleted Microsoft 365 Groups Using Outlook Web (for Group Owners)
Group owners can also restore deleted Office 365 Groups within the 30 days retention period (soft delete). Here are the steps to restore Office 365 Group in Outlook Web:
- Access Webmail and sign into your account.
- Scroll down in navigation pane and click Groups.
- Select Manage Groups, then look for Deleted and click on it.
- Find the Group you wish to recover, then click Restore button or link next to it.
What to Do When Office 365 Groups Recovery Fails?
Using this simple procedure, you can easily recover deleted Office 365 Groups to Active status. After the 30-day retention period, the group will be deleted permanently along with all its messages. That’s why it becomes mandatory for you to constantly save Office 365 emails to desktop, so that it does not get deleted accidentally.
Kernel Office 365 Backup and Restore is a simple and efficiently designed tool which can access each mailbox and export Office 365 to PST. It also retrieves the content from Office 365 active or deleted Groups and places it in a PST file.
Common Mistakes to Avoid When Recovering Deleted Office 365 Groups
Administrators often make mistakes that lead to permanent data loss. Here are some common mistakes that you can avoid while recovering deleted Office 365 Group:
- Missing the 30 days: Make sure to take action within the 30 days of group deletion. If the time limit exceeds, all your messages are gone forever.
- Using incorrect PowerShell commands: Double-check all the commands before executing as they may cause some serious issues with your account.
- Misunderstanding group types and scopes: Attempting to restore a distribution group or security group instead of unified Microsoft 365 Group.
- Creating new group with same name or email: You cannot restore the group if a group with same SMTP address exists in directory.
- Incorrectly managing group membership: If memberships were cleared and then the group was deleted, restore will bring back empty group memberships.
Conclusion
You can always recover a group and its content for 30 days if they have been accidentally deleted. After that, there is no way to recover the data unless you use a reliable Office 365 Backup and restore tool to save Office 365 mailboxes to PST or other formats, including the Office 365 Groups. You can save the information in the PST file which is instantly accessible in Outlook.
Frequently Asked Questions
A. If you restore them within the 30 days, then yes, your Teams messages will be restored.
A. Use PowerShell command Get-MgDirectoryDeletedItem. It will list all the groups; you can check deleted date and time to find that specific group.
A. You need Global Administrator information to restore any deleted Office 365 Group and any regular user owning a specific Group can recover it.
A. It means you are deleting a group permanently with team site, group conversations, email messages, files, calendar events, and any other related data.