Read time 4 minutes
When Exchange administrators install a new version of Exchange Server, it creates a new database by default, which is the C drive partition in a separate folder. As the size of the database grows and it becomes tricky to manage, the user should move the database to a new partition drive, which has more space.
But you cannot just copy and paste the database to a new drive. The move should be made following a clear strategy to avoid repercussions post-migration. You will need first to dismount the database, move it to a different location or drive, and mount it back to Exchange.
Reasons for Exchange 2016 move database to another drive
There can be several underlying reasons to compel an Exchange administrator to perform an Exchange 2016 move mailbox to another database. Here, we’ll learn a few of them to understand why we perform this migration.
- Low storage: When the default storage of the Exchange database starts saturating, it is necessary to migrate Exchange 2016 database to another drive to avoid data loss or downtime.
- Mitigate hardware failure: Moving the Exchange database to another drive lowers the load on a single drive. This helps in mitigating the risks of hardware failure.
- Upgrading storage technologies: Get access to enhanced speed with faster storage technologies, such as Solid-state Drive (SSD), by moving the Exchange database to another drive.
- Better performance: Once you move the Exchange 2016 database to another drive, the database gets separated from the transaction logs. Doing this helps in improving the server’s performance.
What is the default location of the Exchange database?
When you have decided Exchange 2016 move mailbox to another database, the first challenge is to get the location of the database file. An Exchange administrator does not need to interact with the database file directly because all the operations can be performed at the Exchange Admin Center. But to move the database, you need to know its location. Here is the location of the default Exchange database file according to its version.
For Exchange Server 2016
C:\Program Files\Microsoft\Exchange Server\V15\Mailbox\Mailbox Database Name.edb
For Exchange Server 2013
C:\Program Files\Microsoft\Exchange Server\V15\Mailbox\Mailbox database Name\Mailbox database Name.edb
For Exchange Server 2010
C:\Program Files\Microsoft\Exchange Server\V14\Mailbox Database\Mailbox Database.edb
If the Administrator has changed the location of the database, then you should run the following cmdlet in the Exchange Management Shell to get the actual location.
Get-MailboxDatabase | fl Name,EdbFilePath,LogFolderPath
After running the cmdlet, you will get the database details, like the name of the database, the entire location of the EDB file, and the transaction log file folder path. The transaction log file records all the activities performed in the database.
Name : DB4321
EdbFilePath : C:\Program Files\Microsoft\Exchange Server\V15\Mailbox\DB4321\DB4321.edb
LogFolderPath : C:\Program Files\Microsoft\Exchange Server\V15\Mailbox\DB4321
Exchange Management Shell to move Exchange 2016 database to another drive
Before starting the database move procedure, you should rename the database. When Exchange Server creates a database, it uses a default name. In case the destination drive already has an existing database file, you may get confused with the two databases having the same name. Furthermore, the operating system may overwrite the existing database with an identical name. To prevent such a situation, it is important that you change the database name using this command:
Set-MailboxDatabase ‘DB4321’ -Name ‘DatabaseHR’
The original name of the database will change from DB4321 to DatabaseHR. Now, you can go ahead and run the move command.
Move-DatabasePath ‘DatabaseHR’ -EdbFilePath ‘D:\ DatabaseHR \ DatabaseHR.edb’ -‘LogFolderPath E:\ DatabaseHR’
The above cmdlet will change the location of the database ‘DatabaseHR’ to a different drive and subsequent folders.
Move cmdlet will automatically dismount, move, and mount the database back to the Exchange Server. You, as a user, don’t need to manually do any other operation.
As mentioned in the method, the database should remain in the dismounted (offline) state, and the user cannot work on it for the time being it’s migrating. However, the time required to complete the task will depend on the database size. Until the database is moved entirely to the new location, the user will have to sit idle, and the productive hours will go to waste.
Alternatively, you can also use an EDB to PST converter tool and export the mailboxes to a PST file. Then, import the PST files to the new database. This approach allows you to continue working with the database during mailbox migration.
Migrate Exchange 2016 database using Exchange admin center
If you do not want to disrupt the performance of the Exchange Server, then you should create a new database at a different location and copy the mailbox data from the older database to the new database. Here is the cmdlet –
New-MailboxDatabase -Name “DatabaseHR” -EdbFilePath D:\DatabaseHR\DatabaseHR\DatabaseHR.edb
After creating the new database, go to the Exchange Admin Center and create a local move request between two databases.
Step 1. In the Recipients tab, go to the Migration and click the Add (+) button. Then select the ‘Move to a different database.’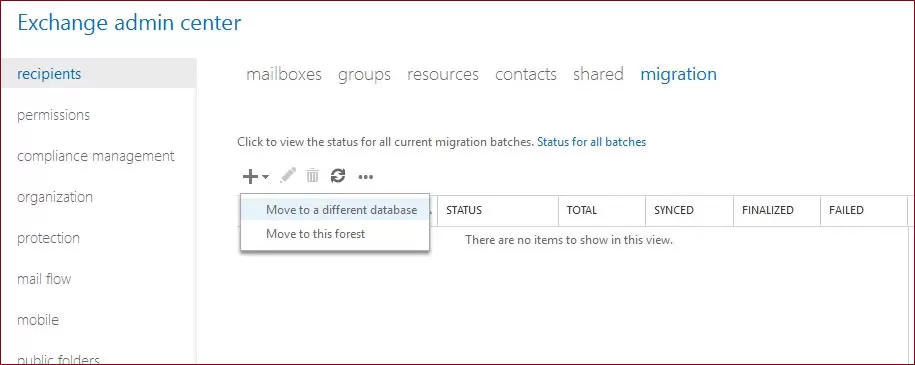
Step 2. On the ‘Select the users that you want to move’ section of the migration wizard, select the users that you want to migrate. Then select all the mailboxes which you need to migrate. Click Next after selecting the mailboxes.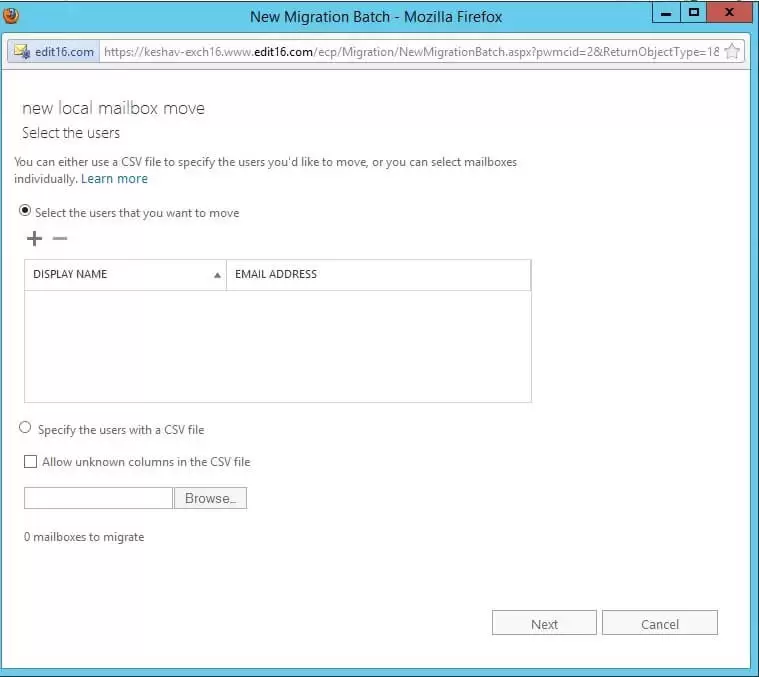
Note: Here, you can select the Target database location in the new drive or partition.
Step 3. On the wizard’s ‘Move configuration’ page, provide a new name to the migration batch, select among primary mailbox and archive mailbox, select the required options, and provide the details like target database, bad item limit, etc. and click Next.
Step 4. Configure the settings as required on the ‘Start the batch’ page of the migration wizard and click New. Start the batch migration. Once this move is added, click View Details to learn more about the migration.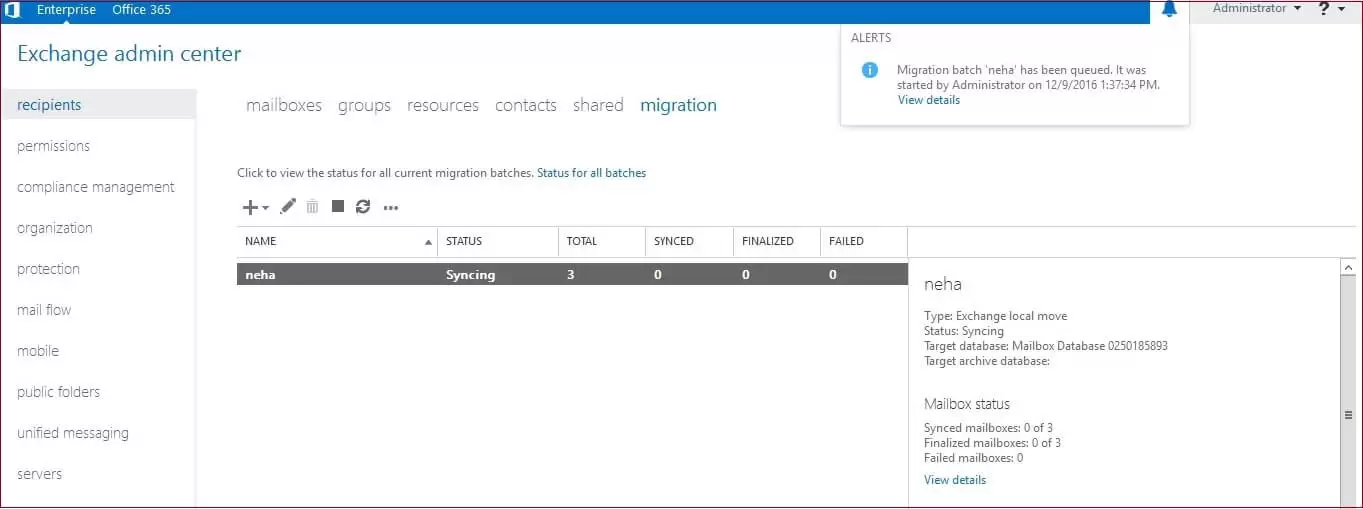
The move request will start and move the chosen mailboxes to the specified target database. The benefit of this procedure is that the user does not face any downtime.
Why should you opt for an automated solution?
Both the methods to move Exchange 2016 database to another drive or location are simple, but they are also time-consuming, unsuitable for large migrations, and pose a risk of data loss. The user must also manually restore the database to the Exchange Server 2016. That is why you should use a professional tool to transfer data and safely maintain data integrity.
Exchange Database Recovery software can access the Exchange database file, retrieve its information, and migrate to another Exchange database. The process is quite smooth, and the tool provides a full migration report after the migration, where you can easily move the Exchange 2016 database to another drive or a different database. With this tool, you can easily move EDB files or data from a live Exchange Server in this way. So, this tool is beneficial in Exchange to Office 365 migration. It works well with older versions like Exchange 2003 and newer versions like Exchange 2019.
Conclusion
The Move-DatabasePath cmdlet in the Exchange Management Shell would be the best to perform Exchange move mailbox to another database. You can also use the ‘Move to a different location’ option in the Exchange Admin Center. However, with a professional Exchange EDB file converter tool like Kernel for Exchange Server Recovery, you can move EDB files or Exchange data from a healthy or corrupt EDB to any Exchange Server (On-Premises or Online).
Frequently Asked Questions
Ans. The Move-DatabasePath cmdlet will not change the original folder hierarchy during the data transfer. All your folders will be moved as they are.
Ans. Both are reliable and give satisfactory results. However, EMS is faster as it only involves running a few commands. But EAC is simpler and more user-friendly. You can choose any one as per your requirement.
Ans. Moving corrupt items to a new location can damage the destination environment. Therefore, you must repair EDB files from the source server and then run the Move-DatabasePath command.