Read time: 4 minutes
Professionals often deal with a heavy load of information directly or indirectly relevant to their organization. To preserve the involved content, you apply retention policies in SharePoint or create an eDiscovery hold on the site. Once it is active, the content is preserved until the hold is deleted or the content location is removed from the hold. All these functionalities work like a breeze to safeguard your data.
However, once applied, it effectively restricts certain operations within a SharePoint site, particularly those related to information deletion, which may occasionally trigger errors. This constitutes the primary motivation for users to consider excluding a site from the eDiscovery hold or Retention policy. Fortunately, executing this exclusion is a straightforward process that can be accomplished by simply following the provided procedure.
What is the difference between eDiscovery hold and Retention policy?
The ongoing discussion regarding eDiscovery hold vs. Retention policy. has persisted over time. Therefore, it is essential to elucidate the distinction between these two concepts before moving forward. Both eDiscovery hold and Retention policy are valuable retention services provided by Microsoft 365 for data preservation. Although these terms are frequently employed interchangeably, they actually encompass distinct and significant variances.
A retention policy entails the set of guidelines that an administrator employs to preserve data for a designated duration and subsequently remove it once that timeframe elapses. On the other hand, eDiscovery stands as an autonomous tool employed to pinpoint, safeguard, and export data, primarily for legal purposes.
Reasons to exclude a site from eDiscovery hold/retention site
In addition to safeguarding your crucial data, implementing an active eDiscovery hold or retention policy can introduce certain challenges for users. These policies may impede several other routine operations that would typically be executed without any issues.
- Cannot delete the site:
You cannot delete the site unless you remove the site from the eDiscovery hold or retention policy. An error will immediately occur- - Prevents deletion of sub-sites:
The applied retention policies in Office 365 cover all the site’s contents. But whenever you attempt to delete any sub-sites, you will receive an error message saying- - Delete all the content of the folder first:
Deleting a folder is only possible when all its associated documents have been removed. Manually deleting a large number of individual documents can be an incredibly challenging task, leading to considerable frustration. In such cases, an error message will be prominently displayed:“You have to delete all the items in this folder before you can delete the folder.”- Other operations where you might face issues are- renaming the site’s URL, bulk deletion of items, or eDiscovery tool not working error.
How to exclude a SharePoint site from eDiscovery hold?
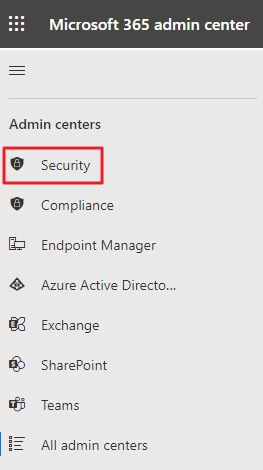
- Sign in to the Microsoft 365 Admin center. Select All Admin Centers and open Security.
- Within the Office 365 Security and Compliance interface, navigate to the eDiscovery section in the left-hand panel. Click on “Open” to access and review all currently active policies.
- Move to the Hold tab. Double-click on the required policy and click on Edit hold.
- Go to the Locations tab. Under SharePoint sites, click on Choose sites.
- The list of sites under the hold policy will be displayed. Click on the X option beside the site you want to exclude from the hold. Finally, select Done to save the changes.
How to exclude a SharePoint site from the retention policy?
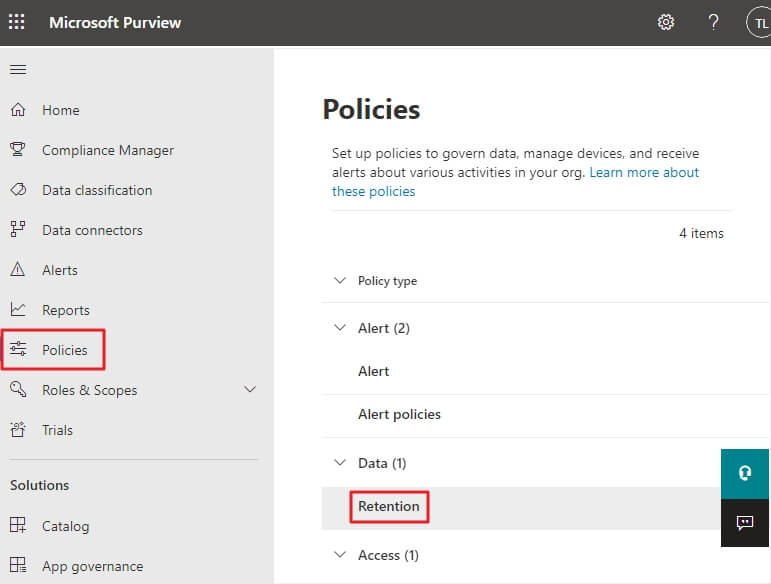
- Log in to the Microsoft 365 Admin center. Click on Show all and select Compliance.
- From the left panel, select Policies. Click on Retention.
- Locate the required retention policy and double-click on it.
- Click on the Edit option beside Applies to content in these locations.
- Under SharePoint sites, click on Exclude sites.
- Enter the site URL, select the + option, and select the checkbox.
- Click on the Exclude option to confirm the removal of the site.
Things to keep in mind while excluding a site
- Excluding sites from hold or policy requires time, ranging from 10 minutes to 24 hours, to take effect.
- Once the eDiscovery hold is disabled, a period of 30 days, known as a delay hold, is applied to the content locations which were previously on hold. During this duration, the admins can recover some content before it gets permanently deleted.
- Ensure you have all the required permissions in the Compliance Admin center to conduct the procedure.
Conclusion
eDiscovery holds and Retention policies are essential Microsoft utilities designed to safeguard user data. However, they can sometimes introduce challenges when attempting to delete items or perform related operations. To ensure seamless operations, it is necessary to exclude the SharePoint site from these eDiscovery holds or Retention policies. While the exclusion process is straightforward, it’s important to note that the effects may take up to 24 hours to fully apply. If you are planning to migrate your sites or other data within SharePoint, you can easily accomplish this task without external assistance by utilizing the Kernel Migration for SharePoint. This versatile tool provides support for all versions of SharePoint, including SharePoint Online, making your migration endeavors more efficient and hassle-free.