Read time: 9 minutes
Summary: The secret to a perfect migration is in its planning. A perfectly planned migration process results in efficient data migration with minimal downtime and data loss. For planning a migration process perfectly, a detailed checklist is essential. Below you’ll learn about the common Teams migration challenges and how a detailed Microsoft Teams migration checklist is necessary. Read the article carefully to create the perfect Teams migration strategy and avoid data loss
Before starting Teams migration, you must have a detailed plan as to how you will execute this data transfer. Without enough planning, you’re just setting yourself up for disaster. While there’s no ‘one size fits all’ approach for Teams migration, it’s essential to have a proper checklist to execute the migration process.
This Microsoft Teams Migration checklist is perfect for IT admins planning to migrate their organizations’ data, and for individuals finding it tricky to migrate Teams data safely. Go through this blog to know the best Teams migration guide to help you plan a safe and secure migration of your data. Let’s start by getting to know what Teams migration is.
Microsoft Teams Migration: The Basics
Microsoft Teams migration, in very simple terms, is the transfer of Teams data from one tenant to another. This process includes private chats, channels, groups, membership settings, app integrations, etc. This migration happens when an organization is restructuring, during company mergers, during acquisitions, or while shifting to a new tenant. It’s basically shifting all the communication from one place to another, without losing the previously shared data.
Common Microsoft Teams Migration Challenges
People face several challenges when shifting data from one Microsoft Teams tenant to another. From limited storage space to the risk of downtime, the challenges don’t seem to end. Other common Teams migration risks include:
- Lack of storage– If you don’t carefully analyze the volume of data you need to migrate, you’ll have storage issues after the migration is completed. Carefully check what data is junk and what actually needs to be migrated.
- Lack of planning– This is probably the biggest flaw of any failed Teams migration process. Months of planning goes into a near-perfect Microsoft Teams migration to avoid loss of crucial data. Not recognizing the importance of proper planning can have disastrous results and may even bring your productivity to a standstill.
- Improperly setting up permissions: Verify that you’ve set up permissions and assigned roles properly to the required users before migration. Failure to do so can create serious issues during and after you’ve migrated your data.
- Not setting a proper timeline: Be realistic about how much time it will take to complete the migration. Set a proper timeline and proceed accordingly to avoid any data lapse or productivity loss.
- Lack of communication with employees: Starting Teams migration without communicating with employees can invite confusion and resistance. Users might even lose unsaved data if they’re not aware of the migration beforehand.
Detailed Microsoft Teams Migration Checklist
Before preparing a Teams migration strategy, you must be clear about these three things:
- What do you wish to achieve with this migration?
- Do you have enough storage in the new tenant?
- Do you have the required roles and permissions to perform this migration?
Afterwards, you must divide Teams migration steps into three phases to perform a successful and safe migration. These phases include, Pre-migration process, Executing the migration, and Post migration process. Doing so helps in carrying out the entire process in a systematic manner and avoid any confusion.
Note: Before proceeding with the planning of migration, take a backup of your entire data at a safe place for immediate recovery in case of data loss. Follow the 3-2-1 Backup Rule to safely backup all your data.
Phase 1. Pre Migration Planning
Planning done before migration is even more important than starting the migration process itself. This phase decides how the rest of migration will go; will it succeed or fail? Below we’ve given the Teams pre-migration checklist to make sure that your planning doesn’t leave any gaps and you execute a near perfect migration of your data.
- Identify Scope of Migration
Define what you want to achieve from this migration and set realistic goals. Set up your goals of this migration and how you’d achieve them. It would help if you preplanned the migration by checking the desired source and destination tenants, Teams, their channels, chats, attachment files, disabled users, etc. Check if the accounts are active and responsive to use Teams.
Also, check how many users are not using Teams to exclude them from the migration. You should use such Office 365 accounts that support Microsoft Teams in their subscription plans. Prechecking, all the data, size, and environment will help you minimize even the slightest chance of lousy migration. You should also take a backup of Microsoft Teams to avoid any data loss situation.
- Create a Dedicated Team of Employees for Teams Migration
Train certain users to carry out this migration process without fail. With a dedicated team, it’ll be easier to assign roles and manage the entire migration process with efficiency. Having a proper set of users helps in avoiding any confusion or mistakes during the entire process.
- Use the Administrator Account for Migration
Preferably try to use the Global Administrator account for Teams data migration. The Global admin account grants access to assign roles and permissions to the required users. This is necessary to migrate all your existing roles and permissions to the new Teams tenant.
- Clear up the Source Tenant
The source account may have multiple Teams that do not have essential chats. Many Teams may have empty space and deleted chats. Make sure to remove these empty, unused, and deleted chats to clear up the source tenant and reduce clutter. Doing this avoids confusion further in the migration process.
- Ready the Destination Tenant
Map all the users to the new Teams tenant in advance to save time. This’ll also give you an idea if you’ve enough space in the destination tenant or not. If not, remove clutter to free up space.
- Communicate with the Employees
Tell the employees about the migration process beforehand to avoid confusion. Answer any doubts they might be having and offer training, if and when needed.
- Restrict Teams usage during the Migration
During the migration, the overall content of the Team, like chats channels, calls, activities, and permissions, is migrated. Working on Teams while migration is going on can create discrepancies in the migrated data and may even lead to data loss.
Phase 2. Execute Migration
After pre-planning is done, it’s time to start the migration process. We’ll carry out the process in two steps. First the pilot migration will take place and then the actual migration will start in small batches.
- Choose the Migration Method
It’s necessary to select a migration method that suits your requirements the best. Cutover migration works best for organizations having over 150-2000 users whereas Phased migration is the appropriate choice for larger organizations having huge volumes of data. Moreover, using a professional Microsoft Teams migration tool is the best choice for this task as it automates the entire migration process and minimizes downtime.
- Start the Pilot Migration
Due to the large size of the Teams, the time required for migration is relatively high. If you migrate all your Teams at the same time, then it will take many person-hours. If it is failed, then all the data will be lost. So, you should run a test migration and check the overall process. Then you can increase the number of Teams in later migration batches.
Doing so will help you analyze what are the gaps in your planning and then make changes accordingly.
- Communicate with Users
Get feedback about the Pilot migration from users and ask about the challenges they faced. Make a list of all the errors and challenges they faced and all the things that can be improved. Plan the rest of your migration according to the feedback received from users.
- Start the Actual Migration
Migrate all your data in small batches instead of a ‘big bang’ migration. This will help in organizing the data in a better way and avoid any potential data loss. If the planning was done perfectly, the migration would proceed with minimal downtime.
Phase 3. Post Migration Optimization
Make sure that all the Teams data like chats, files, channels & groups, permissions, and roles have migrated successfully. Go through the migration log report to see what errors and challenges arose and note them down to avoid them in future. Take feedback from users to learn about the challenges they faced and see if they’re settling well in the new Teams tenant.
Verify that all the permissions have moved to the new tenant and the email flow is working well. For a week or two, check the performance of the new tenant to prevent loss of productivity. Provide training to users, if and when required. Finally, when you’ve all data and there’s no use of the old tenant anymore, decommission it to save space and money.
Perform Teams Migration with an Automated Tool
It’s a lengthy and tricky task to migrate teams from one tenant to another when there’s absolutely no chance of mistake. Even a single error, be it human or technical, can have disastrous consequences for your data. Moreover, it’s not possible to manage large volumes of data without the help of a dedicated migration tool.
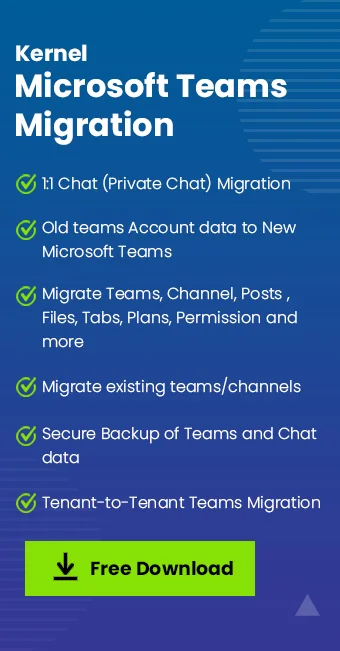
A tool like Kernel Microsoft Teams Migration tool efficiently migrates all data including chats, channels, files, groups, etc. from one tenant to another. This tool is specifically designed to migrate huge volume of data at once with the correct chat hierarchy, date-time stamp, and other metadata.
Some unique features of this tool include:
- Migrate public, private, or custom channels from one Teams tenant to another.
- Map source and destination tenant easily with this tool for 100% accurate data transfer.
- Incremental migration feature allows you to pause migration in between and start it from that point, without the risk of creating duplicate data.
- Migrate 1:1 personal chats with full integrity using this advanced Teams migration software.
- Set up a secure connection with source and destination tenant with the help of Azure Modern Authentication feature.
- Generate a detailed log report after the migration is completed to oversee the migrated data and challenges that occurred.
- Supports all Office 365 plans including Business Basic, Standard, Premium, and Enterprise without any restrictions.
Conclusion
Microsoft Teams is a lengthy process with multiple steps involved. Every step requires thorough planning to make sure the migration is carried out perfectly. With a detailed checklist to guide you, this process becomes a lot easier. We hope the checklist mentioned above helped you plan and perform a safe and secure migration of Teams data. For best results, take the help of a professional migration tool. Kernel Microsoft Teams Migration software facilitates migration between two Teams from different Office 365 Tenants.
FAQs
A. There’s no manual way to migrate Microsoft Teams to another tenant. Although a workaround method using Microsoft Compliance Center can export conversations to the new tenant, it’s a tricky and labor-intensive process. The best option available for risk-free migration is to use a professional tool like Kernel Microsoft Teams Migration.
A. If you choose migration tool from a reliable source, then a professional tool like Kernel Microsoft Teams Migration is the safest option to migrate Teams data without data loss.