Read time: 9 minutes
As hybrid work models become the norm globally, users prefer cloud storage services such as Microsoft OneDrive for a centralized storage to keep files accessible. Yet, this convenience often comes at a hidden cost & issues to local devices. Most of the users don’t pay attention to where their OneDrive files are stored until the system drive starts eating up space or the system begins to slow down. Your OneDrive files don’t have to stay stuck on your system drive. You can change OneDrive folder location on Windows 10 & 11 to store your files where it is most convenient for you.
By default, OneDrive saves everything to the primary drive (C: drive), which may not be ideal. Over time, this results in performance issues and makes file management more complex than it needs to be. That’s where changing the OneDrive folder location becomes useful. You can move your files to a larger drive & free up valuable space on your primary system drive.
What is the Need to Change OneDrive Folder Location?
To improve the storage management and system performance, the need to change OneDrive default folder location occurs. It grants better control over how your files are stored and synced. Some main reasons are as follows:
- Free up space on the C: drive: Moving OneDrive folder to another location or drive reduces load on the primary drive (C), which often has limited storage.
- Better file organization: Having the OneDrive folder at the preferred location helps to access & organize files in a better way.
- Improve system performance: Reduced load on the primary or system drive improves overall speed.
- Use secondary storage devices: You can move OneDrive to another internal drive or external storage.
- Support for large data more efficiently: Users change local OneDrive folder location for better adaptability with heavy files & business data.
Checklist You Need to Follow Before Changing Folder Location
Execution without preparation is risky. You may face sync errors or data loss. Follow the checklist given below to run the process smoothly.
- Establish a stable internet connection.
- Update OneDrive and Windows to their latest versions.
- Free up enough space in the new location or drive.
- Pause file sync temporarily before doing anything.
- Close all OneDrive files or folders to avoid interruptions.
- Keep a backup of important data for recovery if data loss occurs.
- Note down the current folder path to avoid future issues.
- Check for unsupported file names that are already there.
Manual Method: Change OneDrive Folder Location (Step -by-Step)
The manual method is simple and works when you change OneDrive folder location in Windows 11 effectively. The steps are below, go through them:
Step 1: Open File Explorer, find and right-click on OneDrive. Tap on Settings.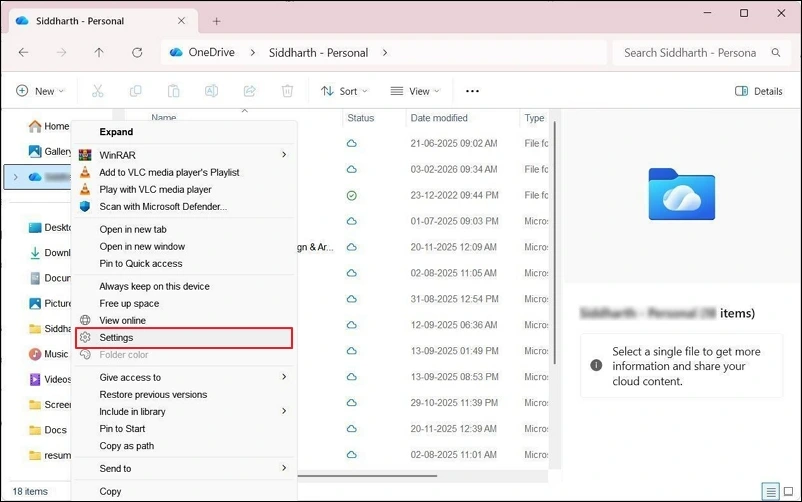
Step 2: Click on Unlink from this PC. Confirm the action for disconnecting your current OneDrive setup. Files will be there, but stop syncing.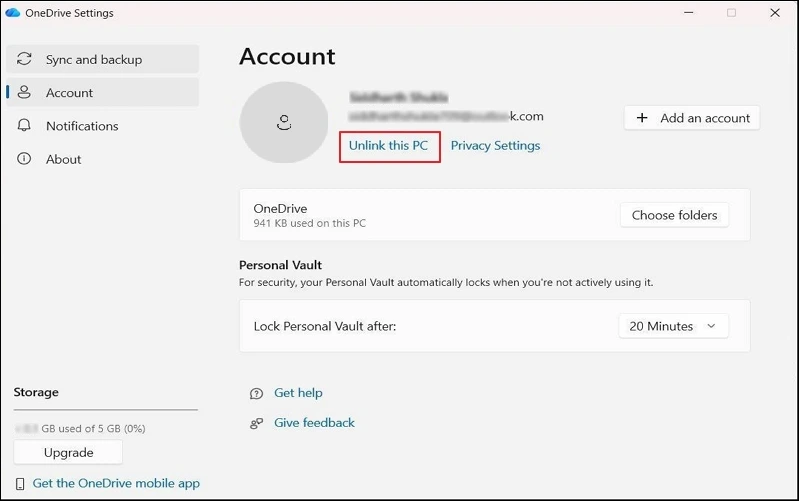
Step 3: Select your One-Drive folder, tap on Move to, then New Location.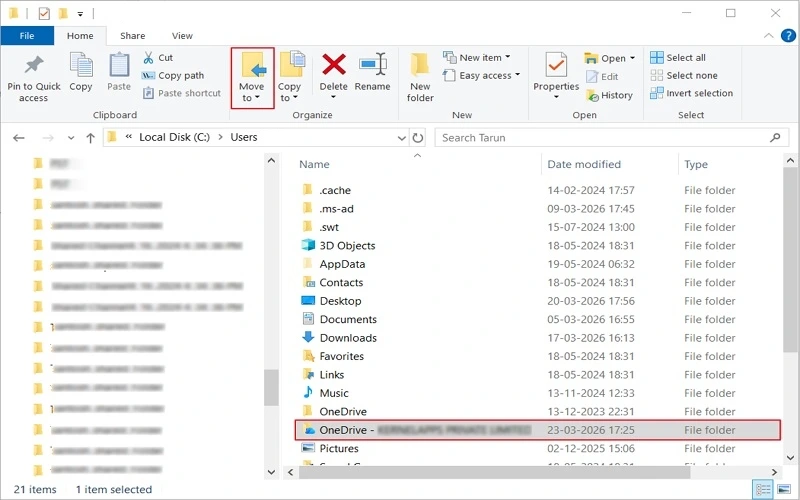
Step 4: Now navigate to your preferred location or drive and move the folder.
Step 5: Open OneDrive & enter your account details. You will now set up the folder again.
Step 6: Choose a new folder location and confirm the selection. This links OneDrive to the new location.
Once done, restart the system. Your OneDrive will now work from the new location.
What if You Need to Migrate One OneDrive File to Another?
Migration between OneDrive tenants is a tedious task and requires a series of steps that consume valuable time unnecessarily and may cause errors often. To counter such issues and manual hassle, you can use a standalone Kernel OneDrive Migration Tool. It is a desktop-based software that simplifies the migration hassle and maintains the process’s smoothness so that no errors or data loss can occur. With this tool, you can migrate entire data from OneDrive to OneDrive at a large scale.
A few helpful features are as follows:
- Migrate bulk OneDrive data, including images, videos, & files.
- Perform OneDrive tenant-to-tenant migration with all data preserved.
- Keeps OneDrive folder or file permissions.
- Allows to create OneDrive Users and Groups in the destination.
- Multiple filters to move only the selective OneDrive data.
- Complete OneDrive migration report for future audit.
- Automated scheduled OneDrive migration on a daily, weekly, & monthly basis.
Final Say
When facing storage or performance issues, you can change OneDrive folder location. It is a simple but useful way to manage storage and improve system performance. Be it Windows 10 or Windows 11, you can change OneDrive folder location if you perform the steps carefully.
But if you want to migrate OneDrive from one tenant to another, manual working may put you in trouble. A professional approach can help you out. The Kernel OneDrive Migration tool is suitable for migrating bulk data with a full control process via features like delta migration, custom filters, schedule migration, etc. The trial version is free. Try it out today!!
People Also Ask
A: Yes, you can change local OneDrive folder location effectively in a few easy steps. Just unlink your OneDrive, move your folder to another location, and sign in again with your credentials.
A: Yes, you can, but make sure that the external drive is always connected when you start up your PC. Doing so helps to sync the new file in the OneDrive.
A: It is a very simple task. Just check the OneDrive sync status and check the older selected in the sync settings.
A: No. If you perform the steps carefully then all your files and OneDrive data remain untouched at the new location or drive. There will be no data loss overall.