


Read time 7 minutes
While working with Outlook, users often face various errors due to several reasons, such as PST file corruption, relocation of the PST file, Outlook profile corruption, PST corruption, etc. One such common error that intervenes in the productivity of the email client is 0x8004010F, . This error is commonly encountered in Outlook 2010 and Outlook 2013.
The 0x8004010F error primarily arises from a corrupt Outlook profile, which hampers the email client’s ability to send or receive messages. Whenever the user tries to send or receive an email, Outlook will give either of the following error:
0x8004010F: Outlook Data File cannot be accessed.
or
0x8004010F: The operation failed. An object could not be found.
Reasons behind the Outlook 0x8004010F error
There are several reasons for Outlook send and receive errors. Some of the primary ones are listed below.
- Invalid/corrupted Outlook profile configuration.
- Unstable/no internet connection.
- Corrupted OST file
- Shared mailbox for sending/receiving emails.
- Old OST file copy after upgrading Outlook.
- Damaged Outlook program files.
- OST file relocation on the device.
- Exchange Server can’t access the offline Address Book.
- Insufficient read/write permissions.
- Firewall blocking Outlook connectivity.
- Incorrect primary account with OST file.
How to fix the Outlook error 0x8004010F?
To fix Outlook error the recommended solution involves identifying the location of the default Outlook data file (PST) and then creating a new user profile to make it the default profile. Here is the step-by-step process:
- Locate the Outlook data file (PST).
- Create a new profile in Outlook.
- Set the new Outlook profile as the default.
Method 1: Locate the Outlook data file (PST)
- Start the Outlook application. Click File > Account Settings> Account Settings
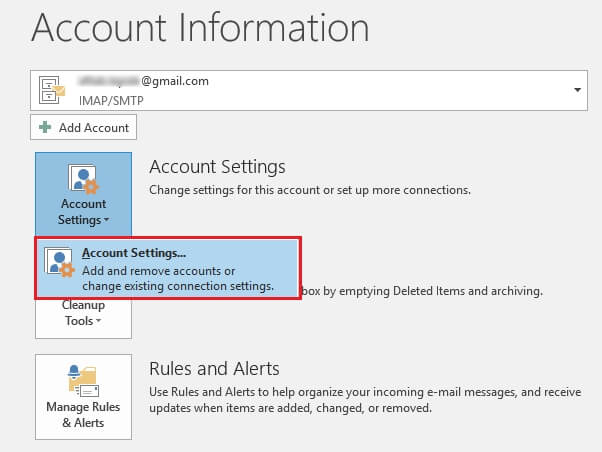
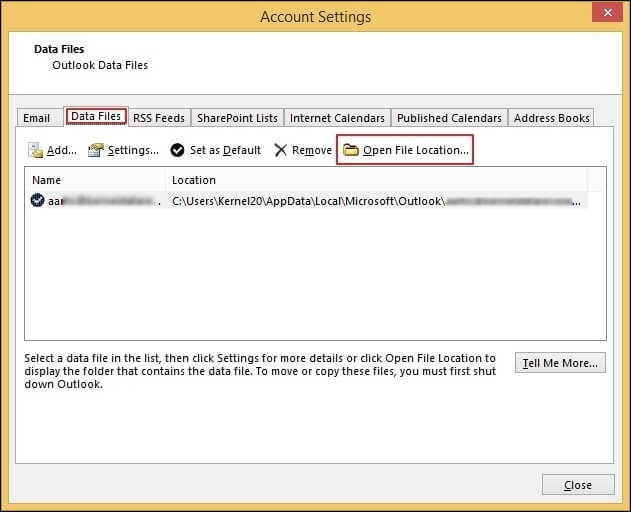
- In Account Settings, go to the Data Files tab and note the name and location of the default Outlook data file (the default data file always has a checkmark before it). Click Close.
Method 2: Create a new profile in Outlook
To create a new Outlook profile with an IMAP/POP3 account, you can do it manually or utilize the auto account setup. Both methods are explained below:
Use auto account setup to create an Outlook profile
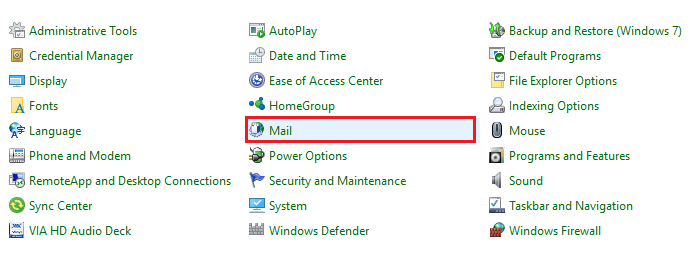
- Go to the Control Panel. Then click Mail. It will open the Mail Setup – Outlook window.
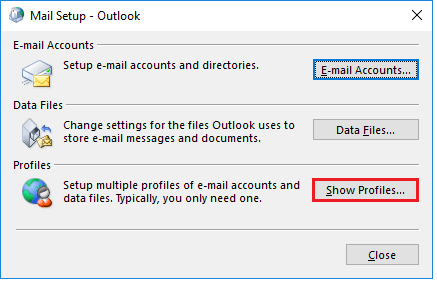
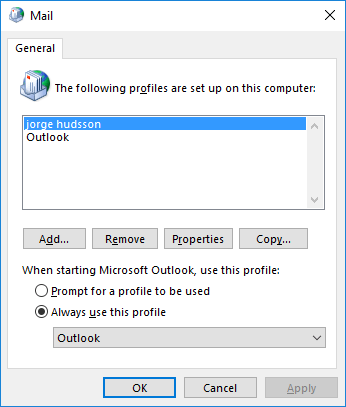
- In Mail Setup – Outlook window, click the Show Profiles button.
- In the Mail dialogue box, click Add.
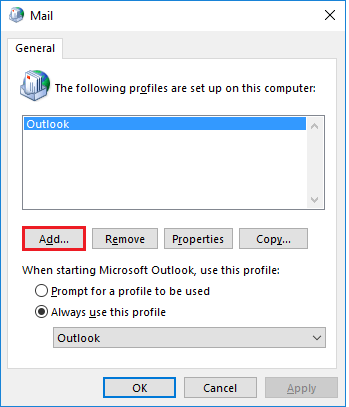
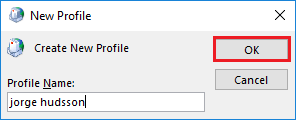
- Input a new Profile Name in the New Profile window. Then click OK.
- Input your user credentials in the Add Account window and click Next. The account is created.

Use manual method to create an Outlook profile
To create a profile manually, follow the below steps:
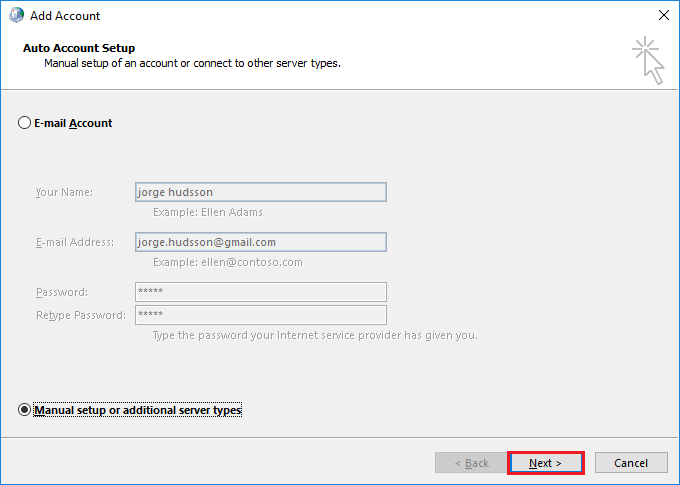
- In Add Account, select the Manual setup or additional server types option. Then click Next.
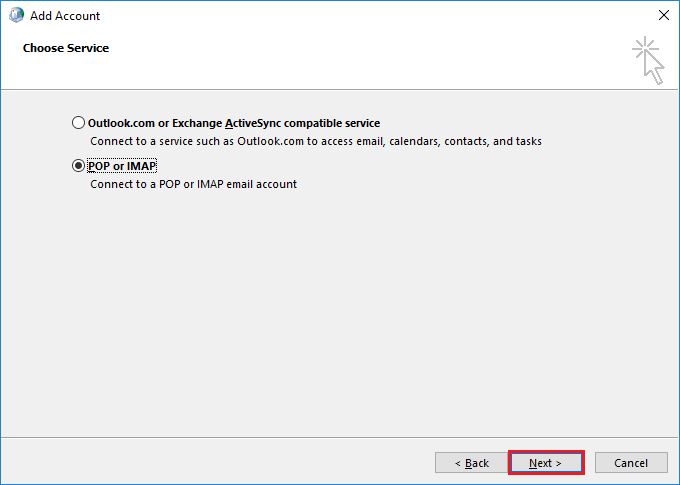
- In Choose Service, select POP or IMAP to connect to a POP or IMAP account and click Next.
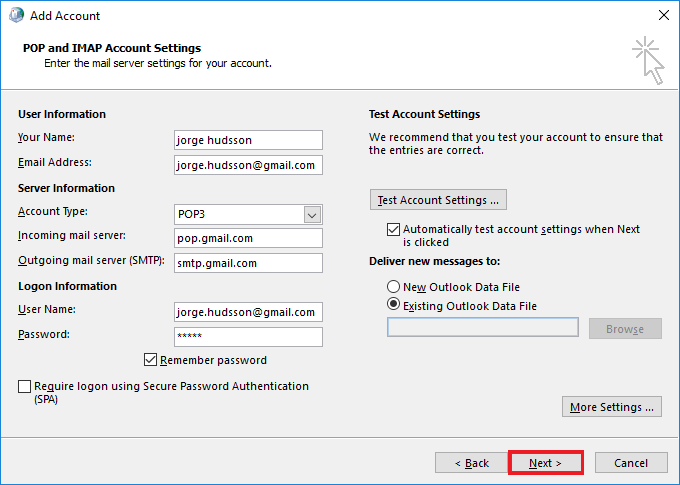
- In POP and IMAP Account Settings, input your account details. Under Deliver messages to, select Existing Outlook Data File. Click Browse and select the Outlook data file of the previous account, and click OK. Then click Next.
- In Test Account Settings, click Close and then Finish.
Method 3: Set the new Outlook profile as the default
To make the newly created Outlook profile as the default profile, follow these steps:
- Go to the Control panel and click Mail.
- Now click on Show Profiles in the Mail Setup – Outlook.
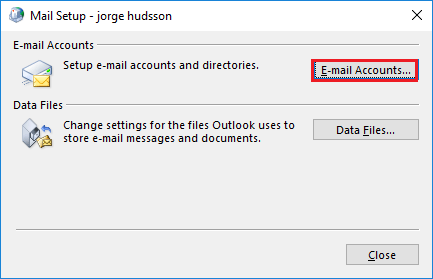
- Then, in the Mail window, select the newly created profile and click Properties.
- In the Mail Setup windows, click on Email Accounts.
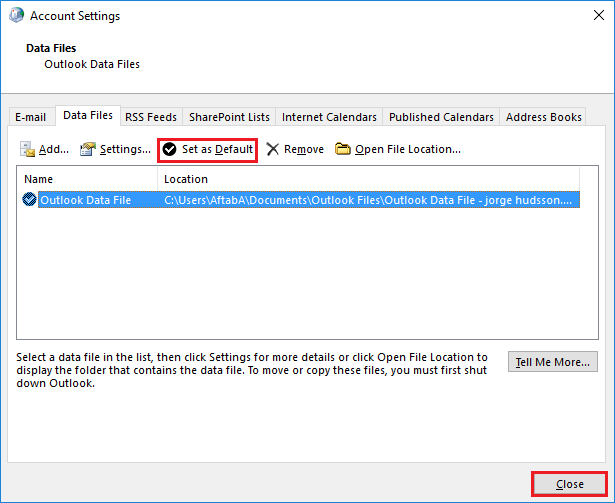
- In the Account Settings window, go to Data File and click Set as Default. Click Close.
Now, the new Outlook data file has been created, and it will work without any issues.
Method 4: Repairing the OST file
If you encounter issues with the OST file, try repairing it through the commonly used Inbox Repair tool, known as SCANPST.EXE. Access the tool from Outlook’s installation directory and follow the easy steps given below.
- Go to the location: C:\Program Files\Microsoft Office\root\OfficeXX\ and access ScanPST.exe
- Tap on browse and choose the OST file from the location: C:\Users\user\AppData\Local\Microsoft\Outlook

- Initiate the error search by clicking Start, then click Repair to address issues with your OST file.
After completing the repair process, restart Outlook and click Send/Receive to confirm that Outlook is functioning correctly, and the error has been resolved.
Method 5: Repairing Outlook
When encountering issues with Outlook, repairing the installation files is a suggested solution. If that doesn’t work, the next step is to reinstall Outlook. Follow these simple steps to repair Outlook and restore optimal functionality to your device.
- Access the Control Panel and go to Programs > Programs and Features
- Look for Microsoft Office and tap on change. Choose the option Repair > Continue
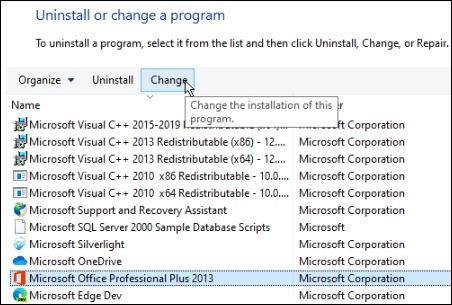
- Follow the wizard and restart Outlook to fix the error.
Method 6: Disable antivirus programs
Though anti-virus software is crucial for a computer and its programs, it often shows issues with running Outlook. Disabling this software will help to fix the error 0x8004010F and perform Outlook operations again.
- To do this, go to the taskbar on the bottom of your screen and right-click to open the menu.
- Now select Task Manager and when it opens, select the antivirus software and hit the disable button.
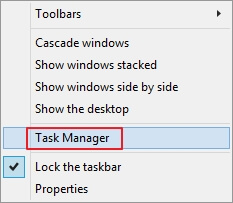
- Restart your Windows OS and now try sending emails using your Outlook account.
This should resolve the error, allowing you to operate your emails effortlessly.
Method 7: Disable Windows Defender
The Windows Defender Firewall might sometimes cause Outlook to malfunction. Press Windows + Q key type firewall in the search box and open Windows Defender Firewall. It helps to ensure that the firewall doesn’t block Outlook from performing its operations.
Turn off the firewall on the left of the control panel and its radio options to disable WDF. Click OK to exit the window. This will fix the error, and you’ll start sending and receiving email messages again.
Method 8: Restart Outlook and check network connectivity
Sometimes, when other solutions don’t work, the problem is quite small and resolves as soon as you restart the outlook application or your computer. Don’t forget to check internet connectivity, which might hinder incoming and outgoing email messages.
If the above-mentioned methods don’t seem to help, moving further with a professional tool is a reliable option.
Resolve Outlook errors using Outlook file repair tool
Creating a new Outlook profile often resolves the “Outlook data file cannot be accessed” error. However, if the issue persists, it may indicate PST file corruption. To address such errors comprehensively, consider utilizing a PST recovery tool, such as Kernel for Outlook PST Repair. The tool employs advanced algorithms to find specific items based on various criteria like from, to, send date, receive date, etc.
Features of PST Recovery tool
- Restore deleted Outlook emails with all the mailbox contents, including messages, calendars, etc.
- No size limitation on batch recovery of Outlook emails.
- Repair archive and password-protected and Unicode/ANSI PST files.
- Filters support selective data recovery.
The recovered files can be directly migrated to cloud platforms like Office 365 or email servers like MS Exchange Live Server.
Preventive measures to avoid such Outlook errors
Once you recover your email account, you probably don’t want to be stuck in the loop of repairing it again. This can be done if you follow preventive measures regularly. Here is what you need to consider:
- Regularly check and update your Windows and Outlook version to the latest available version.
- Go for a reliable antivirus program that doesn’t interfere with other applications.
- Make sure there is enough disk space where you keep Outlook data files.
- Unexpected system or power shutdowns can cause disruptions, so always close your applications and system appropriately.
- Always be watchful of the clicks you make on the browser, which can bring malware to your system.
Wrapping up
Manual solutions such as creating a new profile or repairing the OST file are suggested to fix Outlook Send/Receive Error 0x8004010F caused by issues like corrupt files, firewall interference, large emails, etc. However, a reliable tool like Kernel for Outlook PST Repair is recommended for more severe cases. This expert utility efficiently repairs PST files, ensuring a lasting solution and restoring smooth functionality to Outlook.
This article was very helpful in understanding how to fix the error 0x8004010F. It was very easy to follow and it took me no time to fix the issue. Thank you for sharing such an informative article!
I’ve been having this same issue with Outlook send and receive errors. I’ve tried all the solutions I could find online, but nothing has worked. I found this article on Google search. May be it helps me. Thanks for sharing the solution!
Thank you issue got resolved.
It is an helpful and informative article to remove the “0x8004010F” error. I used the method step-by-step and it worked for me enough. Thanks.
Above mention method helped me to fix Outlook 0x8004010F errors.
Thank you!
hello there, I tried 1 or two methods to correct my outlook but not succeded.problem is it is not showing any kind of error instead it keeps on sending the mail but it’s not going out of the outbox. at bottom of the screen, it shows connecting to the server but doesn’t do anything.it keeps on sending and connecting but actually, nothing is going on.WHAT COULD BE THE PROBLEM?