


Read time 6 minutes
The ever-increasing popularity of Microsoft’s cloud platform, Office 365, has prompted numerous Exchange administrators to transition from their existing on-premises Exchange to Office 365. However, migrating on-premises Exchange to Office 365 is a complex endeavor that presents significant challenges when relying solely on native options.
Express Migration – A Noteworthy Entry in the Native Options
Several native migration options are at the disposal of administrators seeking to transition from their on-premises Exchange Server to Office 365. These choices encompass cutover migration, hybrid migration, and staged migration. Additionally, Express Migration, the most recent addition to this repertoire, stands out as an excellent alternative to cutover migration, particularly well-suited for small and medium-sized organizations.
According to Microsoft, Express Migration ensures uninterrupted service for users by maintaining mail flow continuity throughout the entire migration process. This method is not only swift but also budget-friendly, making it an ideal choice for organizations.
Transitioning from an on-premises Exchange Server to the cloud-based Exchange Online can pose challenges for small businesses. Conventional methods such as hybrid and cutover migrations often entail intricate infrastructure and server configurations. However, Express Migration offers an ideal solution tailored to the needs of small and medium-sized organizations. This approach comes with numerous advantages, including:
- User names/passwords syncing from on-premises
- No need to recreate and rebuild Outlook profiles
- Zero downtime during the entire migration process
Use this method to migrate emails if you:
- Have any of these environments – Exchange 2016, Exchange 2013, and/or Exchange 2010 server on-premises.
- Don’t require directory synchronization to manage your users.
- Target to migrate to Office 365 over a short period of few weeks or less.
#1. Preparing Express Migration (Verify Domain)
Before embarking on the migration process, it is crucial to ensure that you have successfully registered for an Office 365 subscription and have a verified domain. Additionally, make certain that the external domain name has been properly incorporated as an Alternative UPN suffix within the ‘Active Directory Domains & Trusts’ settings.
Use the following instructions to do so:
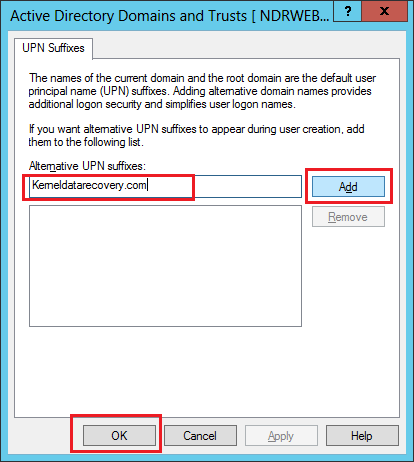
- Right-click Active Directory Domains and Trusts, and select Properties.
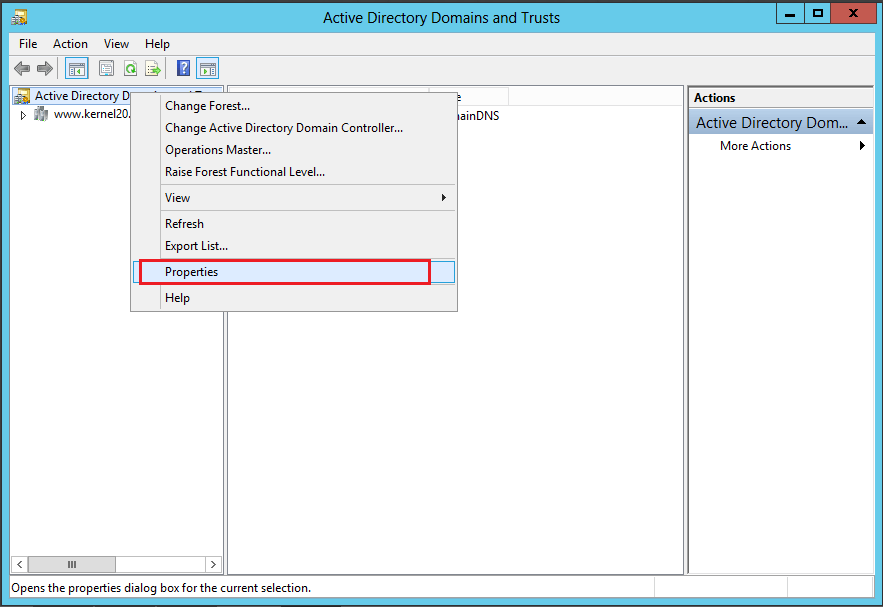
- To add an alternative UPN suffixes, provide your verified email domain name and select Add. Click OK to save the settings.
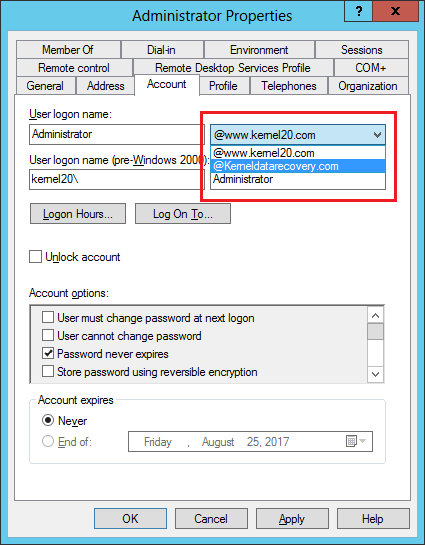
Doing this will ensure that your on-premises users are assigned their UPN suffix to their matching email domain name. In Active Directory Users & Computers, select properties, and click Account tab and provide the relevant domain name against the user logon name.
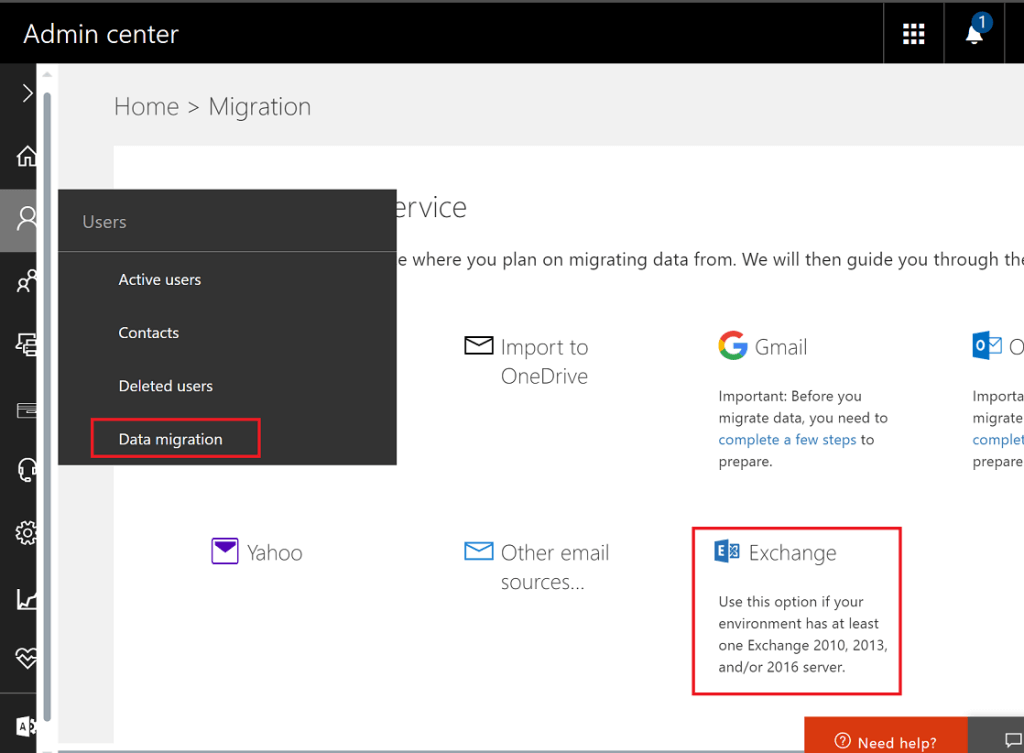
#2. Begin Express Migration from Office 365 Portal
Get into the Admin Center of Office 365 portal, and navigate to Users, and then to Data Migration.
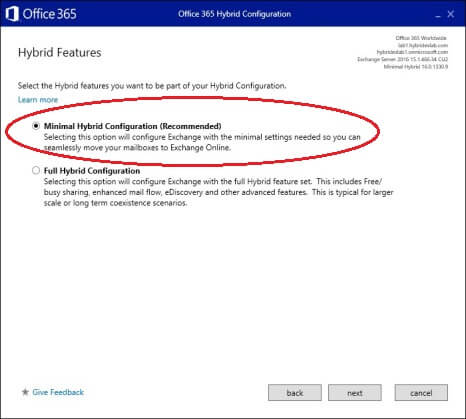
Make sure you’ve Exchange 2016, Exchange 2013, Exchange 2011 or SBS 2011, before downloading and executing Hybrid Configuration Wizard. This wizard helps you to establish hybrid deployment in on-premises Active directory. It also lets you define and configure various parameters for your hybrid deployment. To do this, it first creates the HybridConfiguration object and gather existing Exchange and Active Directory topology configuration data. You can also learn to create and configure a new hybrid deployment through this valuable tool.
#3. Run Directory Synchronization
For seamless migration in small enterprises, opt for the Office 365 Minimal Hybrid Configuration. Next, choose the “Synchronize users & passwords one time” option to swiftly transfer your user mailboxes (typically 50 or fewer) with minimal hassle. This will initiate the installation of Azure AD Connect for data migration and synchronization. Simply follow the default Express settings and allow the synchronization process to finalize. Upon successful migration, you’ll have various user management options at your disposal.
- Cloud-only: A Method to manage new users and passwords in Office 365 portal, but has no connection with on-premises accounts.
- Azure AD Connect: This method includes all the operations related to synchronization identity data (including passwords) between Azure AD and the on-premises environment.
- Microsoft Essential Dashboard Integration: A centralized location to administer Office 365 mailboxes, and distribution groups without Exchange Server.
#4. Assign Office 365 Licenses to Users
After Azure AD Connect successfully synchronizes mailbox users along with their passwords, the next step is to allocate Office 365 licenses for migrating their on-premises mailboxes.
- In Admin center, select Users > Active Users > Edit to assign product licenses.
#5. Begin Mailbox Data Migration
After assigning the licenses, you can begin the mailbox migration, with the following steps:
- Select Users > Data migration, and select Exchange as your data service on the Migration page.
- On Data migration page, select Start migration to allow moving the user mailboxes that you want to migrate.
Note: It is a good practice to run a migration test for two or three users, before migrating them all at once. It is advised to ensure that everything works perfectly as expected.
#6. After Migration, Update DNS Record
DNS records play a crucial role in email systems, serving as navigational waypoints to guide the delivery of emails. Following the successful migration from on-premises Exchange to Office 365, it is imperative to conclude the setup of your DNS records as part of the transition process.
- In Admin center > Settings > Domains and them update domain name.
Limitations of Express Migration
No doubt that Express Migration is a simplified migration method, but it does have certain limitations like:
- Performs one batch at a time.
- Supports only one migration endpoint.
- Migration can be performed only on licensed Office 365 users.
- Some elements (like a user changes the password manually, or new user is created) may not be synchronized with Office 365 during the migration – and hence creating unexpected troubles.
The ‘Express’ method may not be the most suitable option for larger organizations due to its limitation of a single endpoint and the potential for a time-consuming batch migration process. In contrast, utilizing a third-party Exchange migration tool offers a more efficient alternative for larger organizations looking to recover Exchange databases and seamlessly restore them to both live Exchange environments and online Exchange portals.
Conclusion
Express migration is an excellent option for small businesses seeking a swift transition from on-premises Exchange to Exchange Online (Office 365) in a matter of mere weeks, if not less.
I was looking for a secure third-party software solution for the Exchange Server to Office 365 migration. Then I got the reference from this amazing Kernel Exchange Migration tool which is really an excellent tool for all the requirements related to Exchange migration.
Surely it is the best tool for migrating Live Exchange server data to Office 365. And I love the support provided by your team. That is really helpful.