Read time 8 minutes
If your organization uses Microsoft 365, your users can sign into any tenant by default including personal tenants, contractors, or competitors. Tenant Restrictions v2 is the solution for it. It lets you define an allow list of Microsoft 365 tenants that your users can access from the corporate network.
This guide explains what Tenant Restrictions v2 is and how you can apply it in your organization.
What is Microsoft Tenant Restrictions v2?
Microsoft Tenant Restrictions v2 or TRv2 is a Microsoft Entra ID (formerly Azure AD) security feature to prevent unauthorized external users from accessing corporate devices or networks.
TRv2 adds more granularity, such as individual user, group, and application controls. It basically operates on two protection types:
- Authentication Plane Protection: It stops users on organizational networks/devices from logging into foreign tenants.
- Data Plane Protection: It identifies and stops the use of stolen or copied access tokens. Even if an attacker gets access to a legitimate token from elsewhere, data plane enforcement flags the request as coming from an unauthorized source and denies access.
Key Differences Between TRv1 and TRv2
Microsoft TRv1 and TRv2 are security controls used to prevent unauthorized data removal by blocking unknown external tenants. Let’s find out the difference between the two policies:
| Basis | Tenant Restrictions v1 | Tenant Restrictions v2 |
|---|---|---|
| Policy Configuration | It is network based and managed manually inserting lists in network proxy headers | It is cloud based and managed centrally into Microsoft Entra Admin Center using Cross-Tenant Access Settings |
| Granularity | Tenant level | Granular |
| Header Limitations | Prone to limits | No header size limits |
| External Identities Control | Limited | Allows specific configuration only |
| Universal Enforcement | Requires complex on-premises proxy rules and manual routing configurations | Easily adapts across networks and platforms via the Global Secure Access (GSA) client or Windows GPO |
Setting Up Tenant Restrictions v2: Step-by-Step
The process to set up tenant restrictions v2 requires an Entra ID P1/P2 license and involves configuring cross-tenant access in the cloud.
Configure Default Microsoft Tenant Restrictions v2 Policy
The following are the steps to configure default Microsoft Entra Tenant Restrictions v2 policy using Microsoft Entra Admin Center:
- Sign into Microsoft Entra Admin Center with your admin credentials.
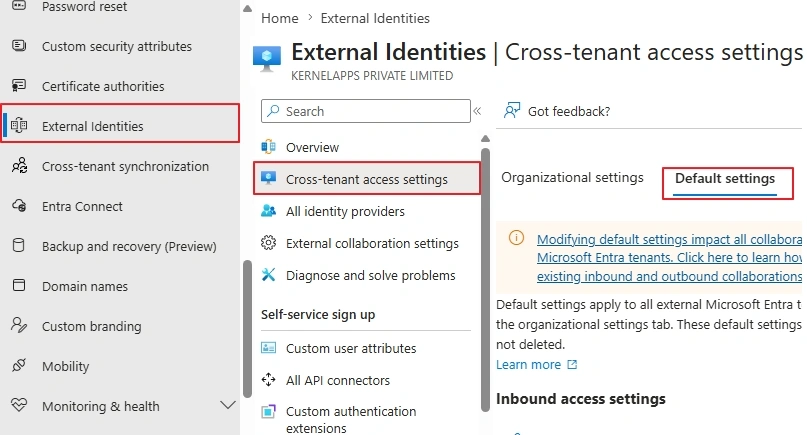
- Click on the External Identities from the left pane >Cross-tenant access settings >Default settings.
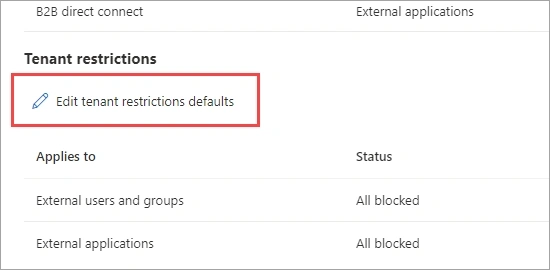
- Scroll down a little and click Edit tenant restrictions defaults.
- If default Policy ID doesn’t exist in the tenant, then click on the Create policy
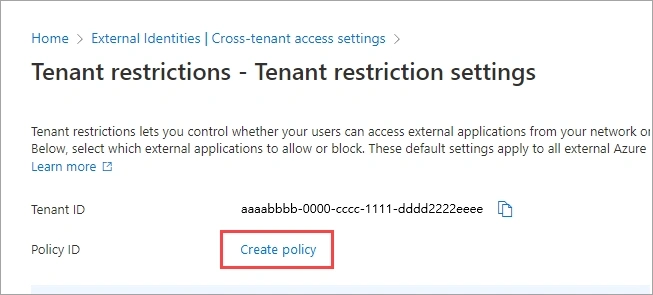
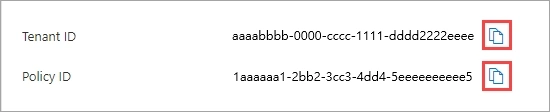
- It will display both Tenant ID and Policy ID, copy both of them.
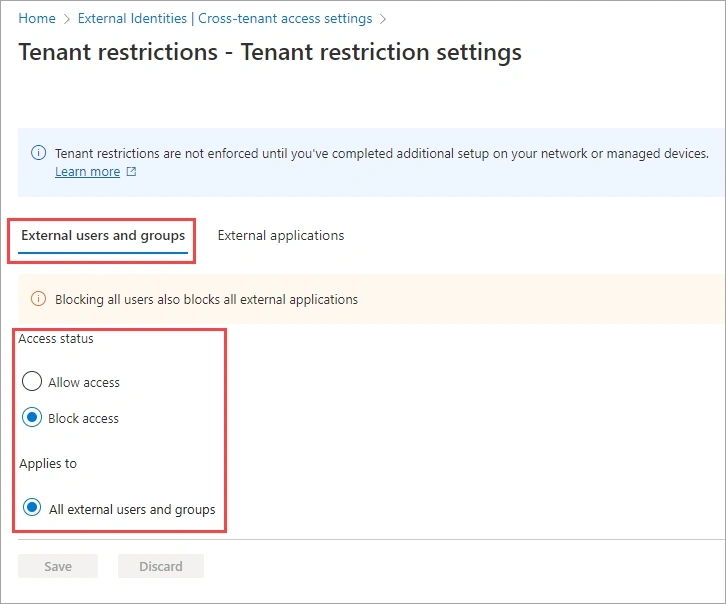
- Click on External users and groups and select any from Allow access (give external applications access to all users signed in with external accounts) and Block access (block external applications access to all users signed in with external accounts).
- Now, go to the External applications tab, and select any from Allow access (give access to all apps assigned in “Applies to” to users signed in with external accounts) and Block access (block access to all apps assigned in “Applies to” to users signed in with external accounts).
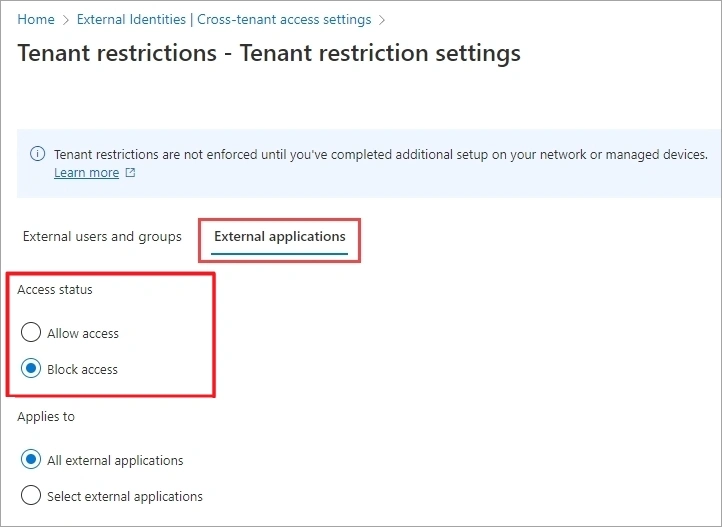
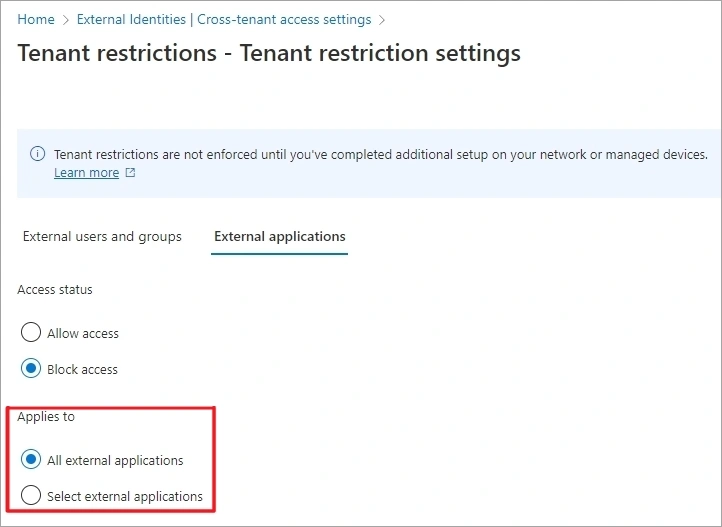
- From Applies to select any of the options: All external applications (apply the action you choose in Access status to all external applications) or Select external applications (choose external applications to apply action selected in Access status). Lastly, click Save.
Note: You can even access it from Microsoft 365 Admin Center >Show all >Identity.
Note: You will need them when you configure Windows clients to enable tenant restrictions.
Note: Default settings apply universally, you can’t limit them to specific users or groups, so “Applies to” is always set to “All external users and groups” in your tenant.
Configure Microsoft Tenant Restrictions v2 for Specific Partners
The following are the steps to add organization specific TRv2 settings that outweigh default settings:
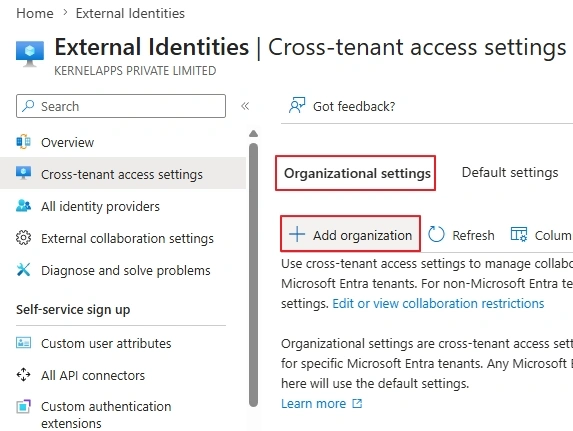
- In Microsoft Entra Admin Center, click on the External Identities >Cross-tenant access settings >Organizational settings> Add organization.
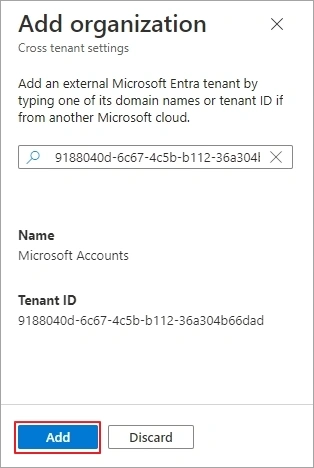
- Enter Domain name or Tenant ID. then click Add.
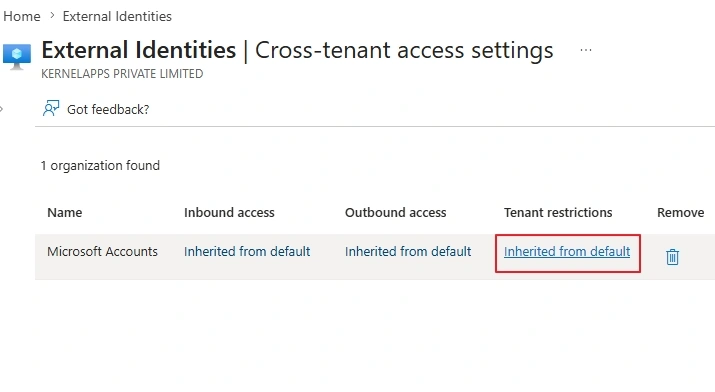
- Look for the Tenant restrictions column, then click Inherited from default to change settings for this organization.
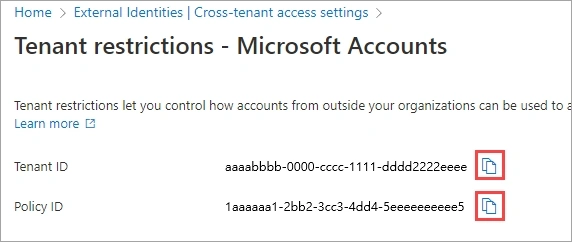
- Copy both Tenant ID and Policy ID.
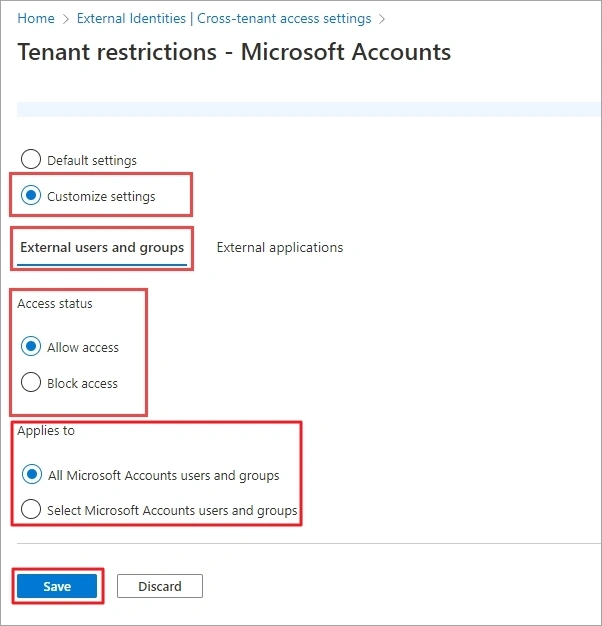
- Click on Customize settings, then go to External users and groups tab and select any: Allow access or Block access.
- Select All Microsoft Accounts users and groups under Applies to and click Save.
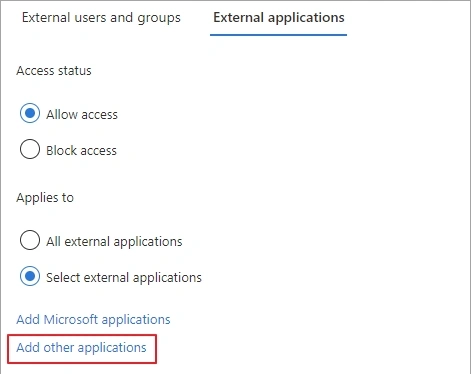
- In the External applications tab, select any from Allow access and Block access. Under Applies to select any option: All external applications or Select external applications, then click Save.
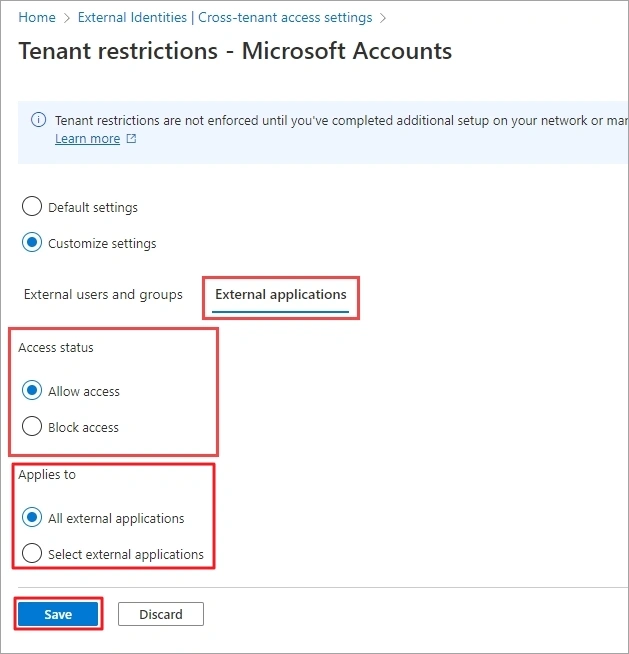
- Now, click on Add Microsoft applications or Add other applications
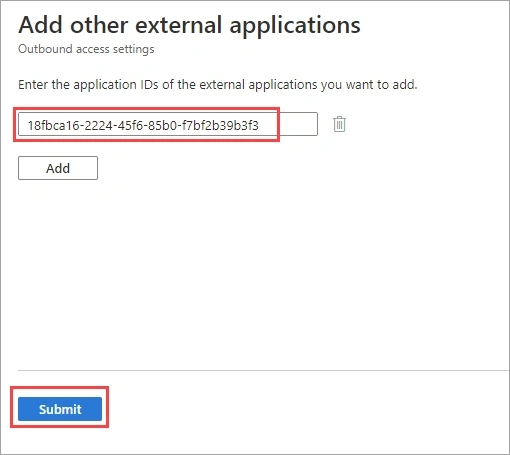
- Enter the application IDs for all the external applications you want to add and click Add, then repeat the process for each application you want to add. Lastly, click Submit.
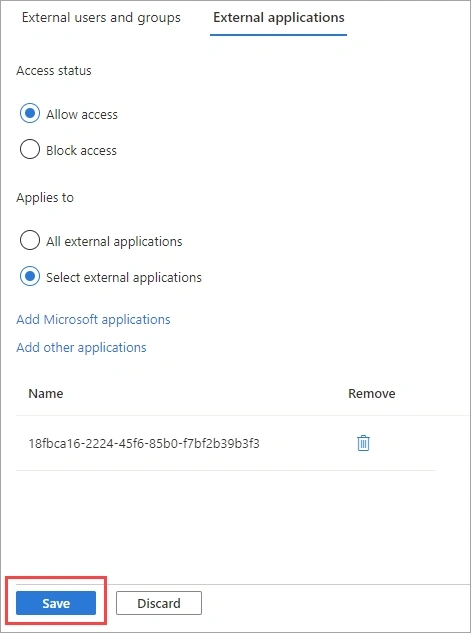
- The application that you added will be listed in External applications, click Save.
Note: You will need them when you configure Windows clients to enable tenant restrictions.
Note: You can choose Select Microsoft Accounts users and groups option for other organizations.
Tenant Restrictions v2 vs Conditional Access: What’s the Difference?
Microsoft Entra Tenant Restrictions v2 controls users’ access to external organizations using your corporate devices. Whereas, organizations set up Conditional Access in Office 365 to control how users can access their own resources. Let’s know about this in detail:
| Basis | Tenant Restrictions v2 | Conditional Access |
|---|---|---|
| Purpose | Stops users from signing into unapproved external tenants | Protects organization’s resources by enabling zero-trust requirement before granting access |
| How it works | Acts on network or OS traffic plane to make sure users can sign into authorized external directories | It acts as a gatekeeper for your own tenant by allowing users who meets your requirements |
| Central Management | Managed by Microsoft Entra Cross Tenant access settings | Managed by Microsoft Entra Conditional Access policies |
Best Practices For Implementing TRv2 in Your Organization
Check out the best practices for implementing TRv2 in your organization:
- Global Secure Access: Implement Microsoft Entra Global Secure Access to provide universal protection on authentication.
- Configure Cross-Tenant Access Settings: In Entra ID, establish a baseline collaboration policy with trusted partners.
- Apply Layered Endpoint Controls: Pair TRv2 with Conditional Access so that corporate assets can only be accessed from trusted devices.
- Turn-on Authentication & Data Plane Protection: Prevent anonymous users from joining Teams meeting with “Anyone with the link”.
- Establish Continuous Governance: Keep a regular check on the TRv2 policies with Microsoft Defender for Cloud Apps.
Integrating TRv2 Policies With Tenant-to-Tenant Migration
Organizations often need to keep tight control over tenant-to-tenant migration during mergers, acquisitions, and divestments. And in this scenario, Microsoft Tenant Restrictions v2 and the best Kernel Cloud Tenant Migration tool will work together flawlessly. First, turn on TRv2, and then perform the migration task. The restriction will make sure your data remains secure throughout the migration process. Further, our software will focus on transferring data precisely from one cloud tenant to another.
Final Verdict
Microsoft Tenant Restrictions v2 is the best way to stop data exfiltration to unauthorized external environments. When combined with Conditional Access, Data Loss Prevention policy, and a cloud migration strategy, tenant restrictions v2 becomes a core pillar of your Microsoft 365 data security standard.
People Also Ask
TRv2 won’t apply because traffic doesn’t hit your proxy.
Yes, if the mobile device routes traffic through your corporate network, VPN, or Global Secure Access client.