Read time 11 minutes
Exchange Server helps organizations by storing crucial data like email, notes, contacts, etc. Businesses often export Exchange mailbox data to PST for taking backups and smooth migration. The Exchange Administrator might need to export mailbox data whenever an employee leaves a company either to retain the data or for compliance purposes. Another reason can be to take backup of their account to keep them protected. For a novice Exchange Server 2010 user, it requires lots of understanding, preparation, and prerequisites to complete the export process.
Microsoft Exchange Server 2010 offers two methods to export mailbox data to PST. The first one includes Exchange Management Shell commands, and the other is through the Exchange Admin Center. The Exchange mailbox should be healthy, active, and accessible for users. However, the export process will not affect the existing mailbox, and you can still work on it when performing the import Exchange 2010 mailboxes to PST process.
How to export Exchange 2010 to PST?
Here are two effective methods that will surely help you to import Exchange 2010 to PST file with ease. Let’s understand their procedures below:
Use PowerShell cmdlets to export Exchange 2010 to PST
PowerShell cmdlets are used for a range of Exchange backup and migration activities including exporting mailbox data from Exchange 2010 to PST. If you’re a technical person well-versed with the Exchange commands, then using PowerShell is the best way to export Exchange 2010 mailboxes to PST. This process consists of four major steps. Here we have mentioned all the steps in detail.
- Grant ‘Mailbox Import Export’ permissions to the user: As a user, you’ll have to assign the Mailbox Import Export role & allow them full rights to Exchange account to perform this procedure. By default, these rights are not assigned to any account, so you’ll have to provide them manually. Use the below command to get necessary permissions and roles.
New-ManagementRoleAssignment –Role “Mailbox Import Export” –User Administrator
In this command, the syntax ‘User’ is the username.
- Create a shared folder to store the exported PST files: There are often multiple Client Access Servers (CAS) in a network, and the export-mailbox request can be processed by any of them. So, you need to ensure that the path to store the PST file is valid. The best way to do this is to create a new Network Shared folder and grant Exchange Trusted Subsystem group read/write permissions to this folder.
- Export Mailbox to PST: Once everything is configured, you can export Exchange 2010 mailboxes to PST using PowerShell cmdlets. However, using the PowerShell cmdlets depends on what type of mailboxes you want to export from Exchange 2010. For every mailbox type, there is a different cmdlet. We have mentioned all of them here.
- For primary mailbox: You can use the below cmdlet to export primary mailboxes to PST.
New-MailboxExportRequest -Mailbox <username> -FilePath <pstFilePath>
The syntax refers to the location where the generated PST file will be stored. No new directory is created when you use this command, so ensure that the path you’re using exists.
- For personal Archive mailboxes: Use the below cmdlet to export archive mailboxes to PST
New-MailboxExportRequest -Mailbox <username> -IsArchive -FilePath <pstFilePath>
However, you’ll need to recover archive mailbox in Exchange 2010 before exporting if they are deleted permanently.
- For specific data from user mailbox:
New-MailboxExportRequest -Mailbox <username> -ContentFilter {<filter>} -FilePath <pstFilePath>
In this cmdlet, the {} syntax can be any value that streamlines data filtering allowing you to export only the selective data.
- For specific mailbox folder: A mailbox folder in Exchange includes many folders like Inbox, sent items, calendar, contacts, deleted items, journals, tasks, etc. The specific folder is denoted with opening and closing # markers. For example, if you want to export sent items, then it will be denoted as #sentitems# in the below command.
New-MailboxExportRequest -Mailbox <username> -IncludeFolders “#Sentitems#” -FilePath <pstFilePath>
Here we exported only the Sent items folder to the PST file.
- Modification in export: When the export request is running, and you want to make some amendments to it, then you can modify the running commands in a limited way. Remember you cannot modify the basic information of the export command like the source mailbox, destination PST file, destination folder for the PST. Here is an example of request modification –
Set-MailboxExportRequest -Identity ‘ValeriaBarnes\mailbox’ -BadItemLimit 15
The command will set the bad item limit to the 15 for the selected mailbox.
When you need to pause the request, you can use another cmdlet to halt it.
Get-MailboxExportRequest -Status InProgress | Suspend-MailboxExportRequest -SuspendComment “Please resume the migration after Friday at 10 P.M.”
It is a fine example of suspending an in-progress migration process, and the “SuspendComment” will resume the migration after a definite time.
To resume the export process after some time.
Get-MailboxExportRequest -Status Suspended | Resume-MailboxExportRequest
The command will resume any suspended process.
- For primary mailbox: You can use the below cmdlet to export primary mailboxes to PST.
- Cleaning Up: Once the export to PST is complete, you need to clean up the export process to make sure everything is working fine, and there is no data loss.You can check the status of all active export jobs with the following command:
Get-MailboxExportRequest | Get-MailboxExportRequestStatistics
Now, remove all the assigned permissions to clean up the Exchange 2010 export process with the following command:
Remove-ManagementRoleAssignment “Mailbox Import Export-<username>”
Similarly, you can remove the mailbox export request from the Exchange Server.
Here are some of the points you need to remember while running the export command in the Exchange Management Shell:
- You can apply the filters on the emails present in the mailboxes. The available criteria are sender, recipients, attachments, folder, message content, message size, importance, etc.
- You can include or exclude specific folders by their name.
- You can mention the destination folder for the PST file.
- When you have created multiple requests, you can put a priority value for them to specify the order.
These four steps will be included in the export process of Exchange 2010 mailboxes to PST. But this process is very complicated, time-consuming, and challenging for beginners as well as inexperienced administrators. So, a better alternative to this process is using EDB to PST conversion utility, that quickly extract Exchange mailbox from EDB files in minimal efforts.
Use the Exchange Admin Center (EAC) to export Exchange 2010 to PST
EAC provides you an excellent way to export Exchange mailboxes to PST as it uses the GUI interface that simplifies to export PST from Exchange. Although it doesn’t provide as many options as Exchange PowerShell, it makes it pretty easy to export the mailbox data.
To import Exchange mailboxes to PST with Exchange Admin Center, follow the below steps:
- Go to Exchange Admin Center and login as an administrator.
- Now, go to Recipients>>Mailboxes
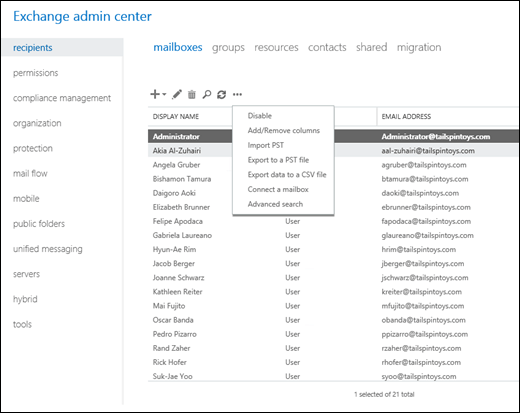
- Here click the three dots (More options) and select Export to a PST file from the drop-down menu.
- In the opened wizard, select the mailbox that you want to export to PST and click ‘Next.’
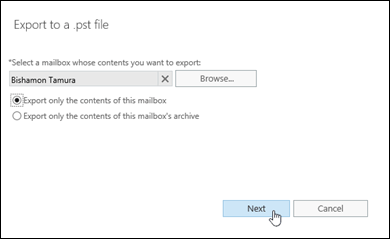
Note: While exporting mailbox data to PST, make sure you select the appropriate option to ensure what mailbox content you want to export.
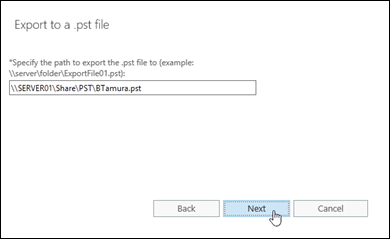
- Provide a location on the server where you want to save the exported file, enter the name for the PST file, and then click ‘Next.’
- Now, click Browse to select the user account to which you want to send notifications.
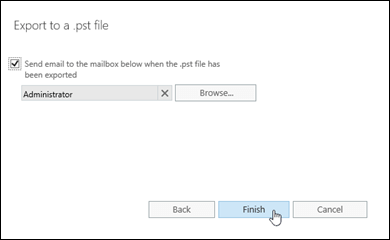
- After making a selection, click Finish to start the PST export on Exchange 2010 mailbox server. Once the process is complete, you will receive an email from Exchange.
An important point to note is that this progress of the Export cannot be checked or verified unless it is complete.
A quick solution to export Exchange 2010 mailboxes to PST
Using manual methods to import Exchange 2010 Mailboxes to PST might not provide desired outputs. The ultimate method to perform this task is to use a third-party Kernel for EDB to PST tool. It is a great utility that allows users to convert Exchange 2010 mailboxes to PST easily. It is embedded with some unique features like bulk conversion of EDB file, specific mailboxes migration, exporting EDB file to Office 365 or Live Exchange, etc. Also, the user interface of this software is very simple, which makes it easy to convert EDB file to PST even for non-technical users.
Wrap up
When the Exchange Server 2010 database becomes corrupt, you cannot export them to a PST file, making impossible to access the mailbox data. As discussed above, to avoid such risks we have outlined the need to export EDB file to PST using an automate Exchange server recovery software that provides exceptional results & help in the process to export Exchange 2010 mailboxes to PST. It can recover entire mailboxes from a corrupt EDB file and save them to a new or existing PST file.
To import Exchange 2010 mailbox to PST, you can either use Exchange Admin Centre or PowerShell commands which require a lot of technical knowledge. Instead of these workarounds, you can use our professional EDB to PST converter tool for easy procedure and advanced outcomes.
Yes, you can migrate Exchange 2010 mailbox to Office 365, but the manual solution may hamper your migration experience. Use only recommended automated tool and make sure a quick process with data integrity and security.