Read time: 5 minutes
Office 365 migration is a complicated process that should be completed without any issues. Unfortunately, sometimes the migration can get stuck on syncing or completing, leading to downtime. This problem can occur due to several factors, such as large mailbox sizes, improper permissions, or other technical issues.
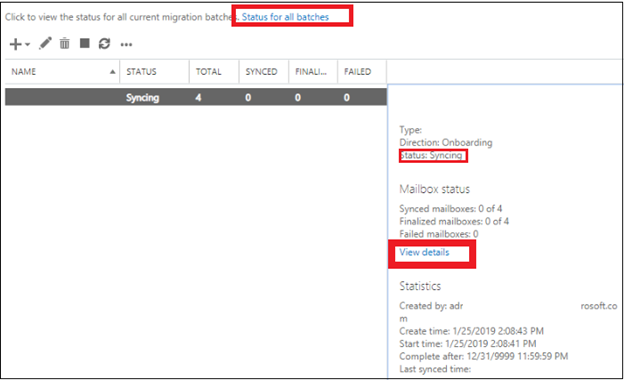
You can view the status of the mailbox migration batches in the Exchange Admin Center. In the above case, you will see that the syncing process is still running but none of the mailboxes has migrated yet.
Get Kernel Office 365 to Office 365 Migration Tool to seamlessly migrate Office 365 data in a safe and easy way.
As you can see in the above image, even after the considerate time of starting the migration batch, the status is Syncing, and under the Mailbox status, zero mailboxes have been synced from the total four in the batch. If you want to check it in detail, click on the View details option. It shows that the migration has stuck, and you need a proper solution in the specific situation.
Resolving Syncing Issue
If you have faced such a problem earlier, then you may be aware of the struggle to complete the migration. But here is a solution that you can follow and resume a stuck migration request.
Read also : How small organizations can migrate exchange mailboxes to Office 365?
First, you should know the actual status of the migration by running the following command –
After it shows the status as Syncing, then OK. But if it shows the status as Queued for a long time, you need to troubleshoot the problem.
- There is a possibility that the Exchange Server does not have ‘ContentSubmitters’ Security Group, which is necessary for placing the data. So, you need to create it in the Active Directory by following the upcoming steps
- In Active Directory, right-click on the folder where you want to create the security group, click New, and then choose Group.
- Provide the name ‘ContentSubmitters’ and select the Group Type as ‘Security.’
- In the Active Directory, go to the View tab and check the Advanced Features.
- Now go to the ContentSubmitters group, right-click and select Properties. Here, under the Security tab, see if the Administrators Group has the Full Control option checked. Check it and click OK.
- Click the Add button, and input the name ‘Network Service,’ . Then, click OK.
- Provide Full control to the newly created group Network Service.
- Finally, restart the two Exchange Services – Microsoft Exchange Search and Microsoft Exchange Search Host Controller.
Now, go to Exchange Management Shell and run the same command –
Get-MoveRequest | Get-MoveRequestStatisticsNow the status of the migration batch should be changed to Syncing or any other stage of migration.
- If the migration status shows ‘StalledDuetoCI,’ then it is an issue you need to rectify.CI means Content Indexing, and you must turn it off for the respective mailbox database until the migration is complete.To get the complete name of the database, go to Exchange Admin Center and check the databases tab. Here, selects the database for which you are conducting the migration. Then go to database copies and get the complete name of the database.
Now go to Exchange Management Shell and run the command –Set-MailboxDatabase “MailboxDatabase12345” -IndexEnabled:$FalseAfter running the command successfully, restart the Exchange services like Microsoft Exchange Search, Microsoft Exchange Search Host Controller, and Microsoft Exchange Mailbox Replication.
Now recheck the status of the migration.
Get-MoveRequest | Get-MoveRequestStatisticsThe status of the migration should change to Migrating or Syncing. But keep in mind that you need to enable content indexing after successfully completing the migration.
Set-MailboxDatabase “MailboxDatabase12345” -IndexEnabled:$TrueUsing the troubleshooting methods mentioned here, you can effectively resolve this issue.
- While creating a new migration batch, you have different options available to start and complete the migration process. You will see the below options if you start migration:
Manually start the Batch later.- Automatically Start the batch.
- Start the batch automatically after the chosen time.
Similar to the above process, completing the migration process also includes the below options:
- Manual complete the batch.
- Automatically complete the migration batch.
- Complete the batch automatically after the chosen time.
If you want to prevent from the above issue, it is recommended to choose the manual to complete the batch option. As this is a manual method, you need not wait to complete the syncing process.
Conclusion
In summary, an efficient Exchange to Office 365 migration can be a complicated process. However, it does not have to be. Organizations can avoid many pitfalls by delegating the migration work to a professional tool like Kernel Office 365 Migration. This tool not only offers expert supervision, but also top-notch migration techniques and automation capabilities.
With these features, this utility represents the perfect solution for those who want to migrate their Exchange environment to Office 365 with ease, precision, and confidence.