Read time: 6 minutes
Is your business in the process of merging or acquiring another company? Do you need to move all your Office 365 data from one tenant to another? Understand the strategies and best practices for Microsoft 365 cross-tenant migration in this article. Also, use our Best Office 365 Migration Software for a quick, secure, and easy transition.
Microsoft 365 is the imperative foundation of modern business growth and workflow. It is the most reliable platform among organizations due to its innovative, collaborative tools.
Generally, organizations undergo significant changes such as mergers, acquisitions, privation, or rebranding. So, if you need to migrate Microsoft 365 data from one tenant to another. Microsoft provides a native procedure for the Microsoft 365 cross-tenant migration. However, it might be troublesome and result in other issues like interruptions, data loss, security issues, etc.
To help you out, this guide provides suitable strategies, and a reliable solution needed for cross-tenant Microsoft 365 migration. Before going further, first know the circumstances that compel users for such transformation.
Reasons for Microsoft 365 Cross-Tenant Migration
Among many, some of the common reasons for cross-tenant Microsoft 365 migration are:
- For Mergers and Acquisitions: Several organizations merge, acquire, or modify their brands. In such conditions, they need to take over several Microsoft 365 tenants with their individual configurations and collaborative mechanisms.
- For Restructuring or Internal Reorganizing: For reorganizing teams, resources, and communication channels, organizations reevaluate their infrastructure to escape the repetitions. This helps them to maintain smooth processing, reduce costs, and create a balanced digital ecosystem.
- For Data Security and Compliance: Cross-tenant mailbox migration provides centralized control over security policies, data access, and compliance measures. By this, you can also ensure sensitive information and safeguard your audits, monitoring, and security protocols.
- For Enhanced Collaboration and Productivity: Working on multiple tenants disrupts the smooth collaboration among teams, employees, and clients. Hence, a consolidated tenant can help strengthen advanced data sharing, communication, and teamwork across organizations.
Now, let’s understand the helpful strategies for Office 365 cross-tenant migration.
Effective Strategies for Microsoft 365 Cross-Tenant Migration
The migration process can be tedious sometimes. So, the below strategies will help you in Step-by-Step Office 365 Tenant to Tenant Migration in no time:
1. Gather the Required Data
Analyze the email data, including inboxes, contacts, calendars, tasks, and notes. Also, evaluate the number of mailboxes and their sizes in your current emailing environment,
2. Pick a Suitable Migration Method
After gathering the required Microsoft data for migration, figure out the most suited migration method for Microsoft 365 cross-tenant migration. Opting for adequate methods guarantees a safe and uninterrupted transition.
3. Set up the Source Environment
The source environment must be prepared properly before performing Microsoft 365 cross-tenant migration. It will escape technical errors & data loss issues and allow for a secure, effective cross-tenant mailbox migration.
Note: Again, check for the proper configuration of the source environment and verify the permissions that allow performing Office 365 cross-tenant migration. Also, check the essential compliance or legal requirements before migration.
4. Set up the Target Environment
Configuring a new environment for your existing Microsoft 365 data is challenging. Set up the new tenant’s security policies accordingly and validate the appropriate license and permissions.
5. Get your Business Partners Ready
Lastly, prepare teams for the migration and their role in maintaining the data integrity. Provide advanced training sessions to the teams about the upcoming migration and associated risks and changes.
After understanding effective planning and strategies, let’s check the easy and secure Microsoft 365 cross-tenant migration technique.
How to Achieve a Successful Microsoft 365 Cross-Tenant Migration?
For Microsoft 365 cross-tenant migration, there are many tools available for you. You just need to pick a perfect tool that can meet your M365 migration requirements effectively.
User Query: I have 100 Microsoft 365 users with a 4.5 TB mailbox size. Could you please suggest high-end, secure, and quick approaches for Microsoft 365 cross-tenant migration?
Note: Using Microsoft’s native process for cross-tenant mailbox migration can be time-consuming and requires top tech expertise. You can try PowerShell scripts to accomplish your migration purpose, but you may get bothered and fail to do so for larger tenants. In such a situation, opting for third-party Office 365 migration tools may be more advantageous. These tools not only speed up the migration process but also provide additional features for an advanced and effortless migration.
Secure Solution for Microsoft 365 Cross-Tenant Migration
From the plethora of Office 365 cross-tenant migration utilities, Kernel Office 365 Migration Tool is a well-suited software that helps perform tenant-to-tenant migration without hassle. Embedded with high-powered algorithms and smart filtering options, this tool is safer, quicker, and more efficient.
It can handle even the most complex migrations quickly with zero data loss. Robust migration features, such as mailbox direct mapping, wide compatibility, no size limit, zero data loss, etc., make it the most useful Office 365 Migration tool today.
The other major features of the tool are:
- Uninterrupted, secure, and lossless bulk Office 365 cross-tenant migration.
- Migrate Exchange Online, SharePoint Online, One Drive, Microsoft Teams, and Microsoft Planner on the same or different tenants.
- Advanced filters for the selective Microsoft 365 data migration.
- Migrate all permissions of OneDrive shared folders and files, Teams members, private channels and shared channels, and SharePoint sites, lists, and libraries effectively.
- Support all Microsoft 365 business plans and subscriptions and their security levels, such as GCC High, GCC, and DOD.
Step-by-Step Guide to Execute Microsoft 365 Cross-Tenant Migration
Here is the detailed procedure of tool for cross-tenant mailbox migration. Follow the steps below for the easy and secure migration:
- Download and install the Kernel Office 365 Migration Software.
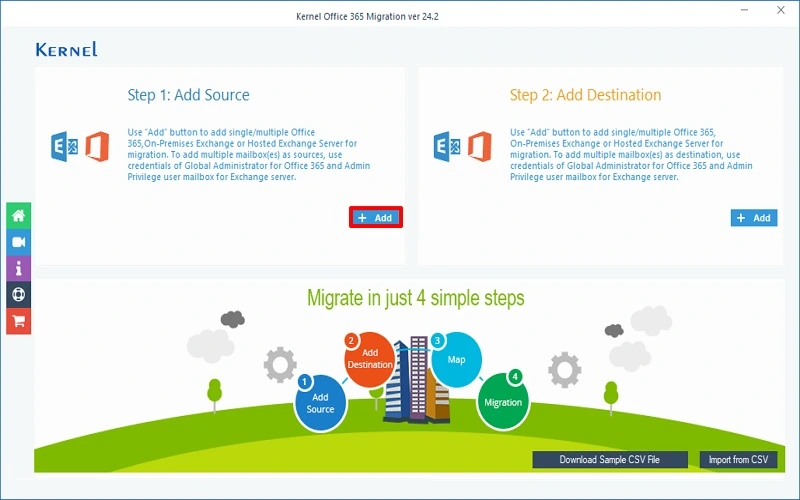
- Open it and click +Add button in the Add Source section to configure the Office 365 accounts.
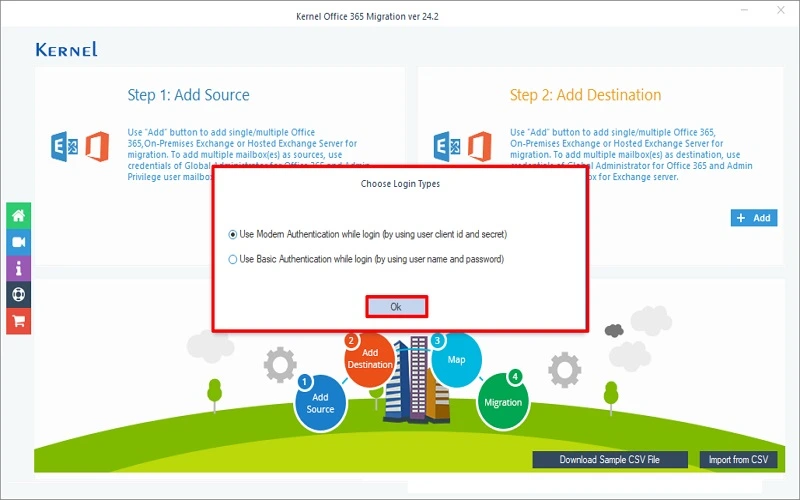
- Choose your Login type and click OK.
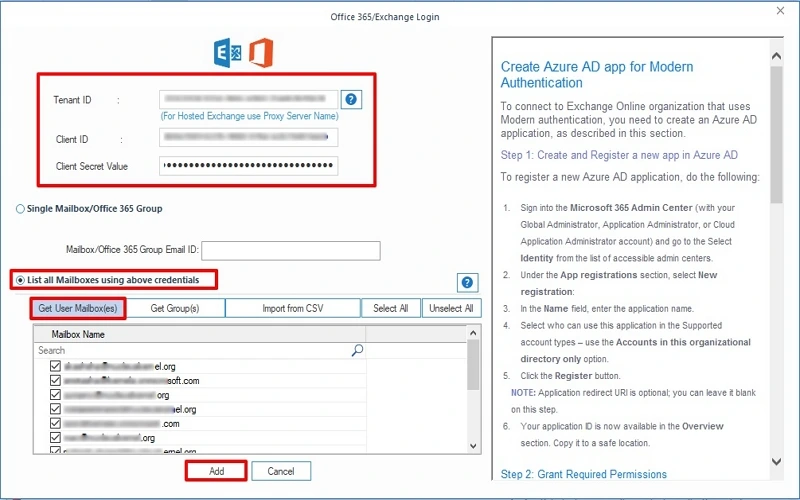
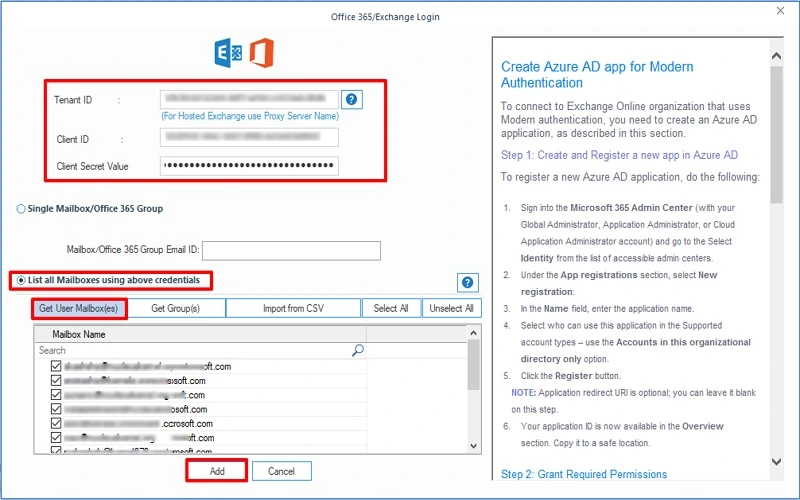
- Enter the Tenant ID, Client ID, and Client Secret Value Choose the List all mailboxes using above credential option and tap on Get User Mailbox(es). All mailboxes will be listed there, choose the required mailbox and click Add.
- Now, click +Add button in the Add Destination section to configure the target Office 365 account.
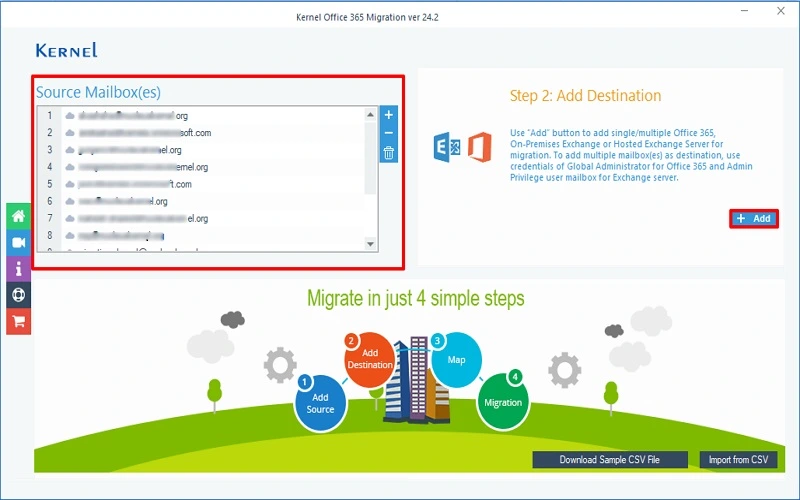
- Enter the Tenant ID, Client ID, and Client Secret Value To get user mailboxes of targeted account, choose the List all mailboxes using above credential option and tap on Get User Mailbox(es). All mailboxes will be listed there, choose the required mailbox and click Add.
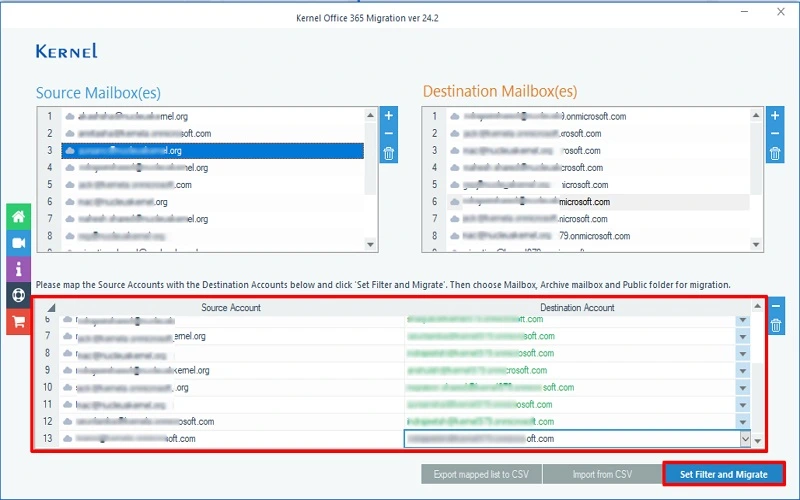
- A list of mailboxes of both Office 365 accounts will appear. Now, map the source account and destination account using the dropdown. Click the Set Filters and Migrate button.
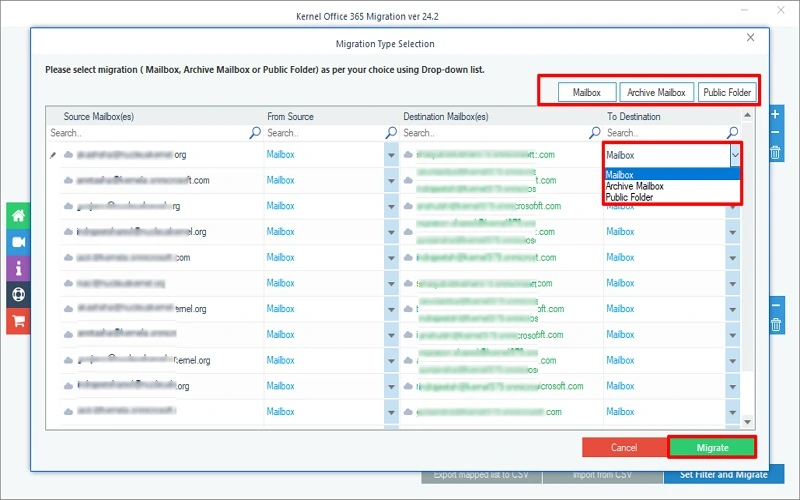
- In the Migration type selection page, choose between Mailbox, Archive folder, or Public folder. Click Migrate.
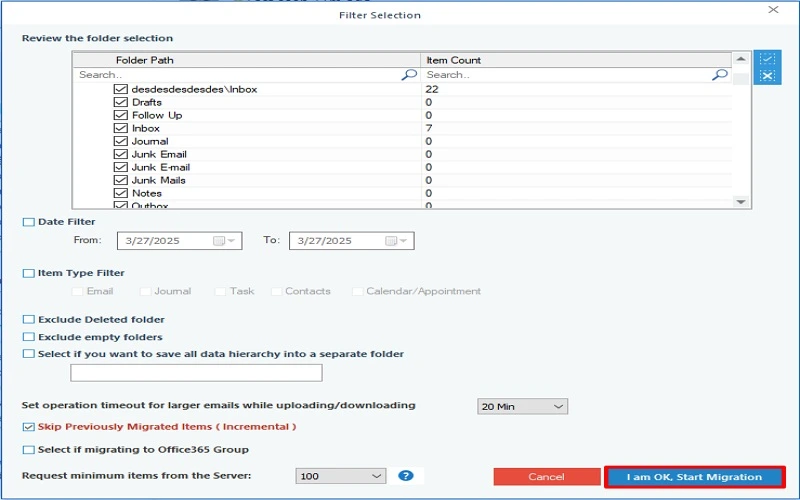
- Review the folder selection and apply the available filters accordingly. Click I’m Ok, Start Migration.
- The migration process will start. Wait for the process to complete. After completion click Ok from the dialogue box.
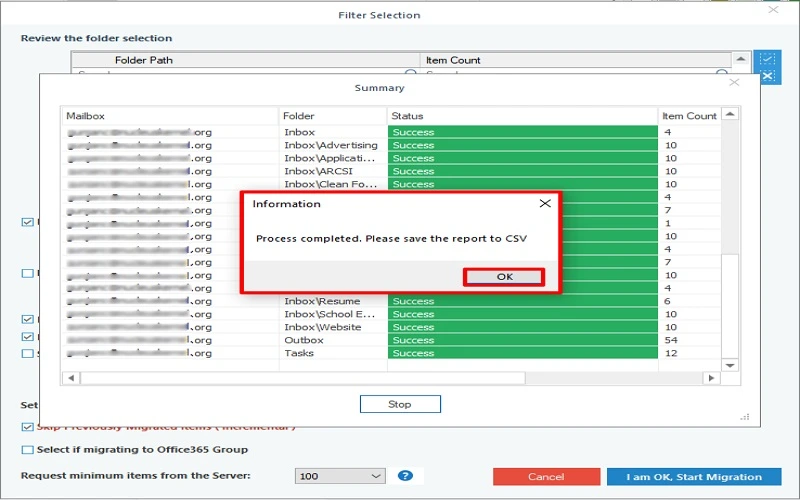
Note: You can save the migration report to CSV file.
Conclusion
We hope this step-by-step guide has helped you perform Microsoft 365 cross-tenant migration securely. Here, you can choose either a manual or automated solution at your convenience. Although manual methods are cost-effective, they come with huge risks and limitations. Therefore, select the recommended solution to perform the entire cross-tenant Microsoft 365 migration error-free. The software also comes with a trial version. Download now and evaluate its efficiency.
Commonly Asked Questions
A. To transfer Microsoft 365 tenant to another tenant safely:
1. Ensure proper licensing and permissions with both source & target tenants ready.
2. Also, validate trust, map users.
3. Then, start the migration process with a reliable Office 365 migration solution.
A. Apart from Microsoft’s in-built manual solution, there are multiple tools available to perform cross-tenant mailbox migration. However, the Kernel Office 365 Migration tool helps you with innovative features and more advanced capabilities, ensuring simple procedures and zero data loss.
A. If you’re willing to perform cross-tenant Microsoft 365 migration without using the professional tool, you may face data loss, downtime, business disruption, and security issues, respectively.

