Read time 4 minutes
Office 365 offers many features to simplify mailbox organization, with ‘Clutter’ being one of them. This automated filtering system sorts less important emails into separate folders, creating space in your main Inbox for critical messages. However, ‘Clutter’ can sometimes be overly active, misplacing important emails.
The good news is that in Office 365, you have the power to disable ‘Clutter’ and regain control over your Inbox. In this post, we will provide you with clear, step-by-step instructions on how to turn off ‘Clutter’ in your Office 365 mailbox.
By doing so, you can ensure that only you decide which emails remain visible, taking back control of your email management effortlessly. So, if you’ve been struggling with ‘Clutter,’ stay with us as we guide you toward a clutter-free mailbox experience.
Clutter in Office 365
Clutter is a feature in Office 365 that helps you focus on the email messages that are most important to you. Clutter moves unnecessary messages from your Inbox so you can easily scan for the messages that need your attention. Clutter learns from the user’s email habits and gets better over time at figuring out what messages they’re going to ignore. Moreover, you can control whether Clutter is turned on or off for your account, and you can always move a message back to your Inbox if Clutter misclassified it.
If you find that Clutter isn’t moving any emails, or if it’s not moving the types of emails you want it to, there are a few things you can do to improve its performance. First, make sure that Clutter is turned on for your account. You can do this by going to the Clutter page in Office 365 settings. Next, take a look at your email habits and see if there are any patterns that Clutter isn’t picking upon. For example, if you always delete messages from certain senders without reading them, Clutter might not realize that these messages are a low priority for you.
But as some users rely on rules for managing the mails, this Clutter feature is unnecessary for them. Also, users who complain about not finding the emails crucial for them in their Inbox can check for the emails in Clutter. So, they can consider disabling this feature.
Here we are discussing two ways for disabling the Clutter feature, one for administrators and the other for end users.
Outlook versions that support Clutter are
- Outlook on the web for Exchange Server 2019
- Outlook on the web for Exchange Server 2016
- Outlook Web App Light Office for business
- Microsoft 365 admin Outlook on the web
- Outlook Web App for Office 365 Small Business
- Outlook Web App for Office 365
- Outlook 2021/Outlook 2019/Outlook 2016/Outlook 2013
- Outlook for Microsoft 365
How can Office 365 administrators disable Clutter?
Though a useful feature, Clutter can be a nuisance sometimes. So, Office administrators can disable this feature for users. Here is how they can do this:
Open Windows PowerShell on your system. Connect to Office 365 using these steps:
- Run this command first.
$UserCredential = Get-Credential
- It will ask for the Office 365 login credentials. Enter your Office 365 username, and password then click OK.
- Now, run these two commands one after another.
$Session = New-PSSession -ConfigurationName Microsoft.Exchange -ConnectionUri https://outlook.office365.com/powershell-liveid/ -Credential $UserCredential -Authentication Basic -AllowRedirection
Import-PSSession $Session -DisableNameChecking
- Office 365 account is successfully connected through PowerShell. Execute this command to disable the Clutter feature for Office 365 mailboxes.
For Single Mailbox –Set-Clutter -Identity “user name” -Enable $falseFor Multiple Mailboxes –
$users = “user name 1″,”user name 2”
ForEach ($user in $users) {
Set-Clutter -Identity $user -Enable $false
}For All Office 365 User Mailboxes –
Get-Mailbox -ResultSize Unlimited | Set-Clutter -Enable $falseNote: You can enable the clutter feature for your Office 365 mailboxes, by just passing the true value to -Enable parameter as shown:
Set-Clutter -Identity “user name” -Enable $true
How can Office 365 end users disable Clutter?
Office 365 end users can also easily disable/enable the clutter feature in their mailboxes. Open your mailbox and follow these steps:
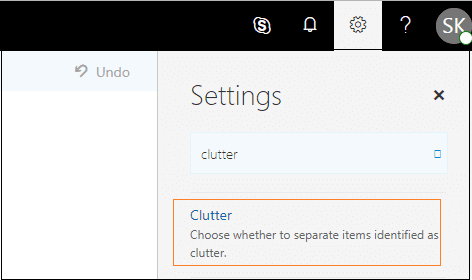
- Go to the gear-shaped Settings icon and search for the ‘clutter’ word. Click on the Clutter option.
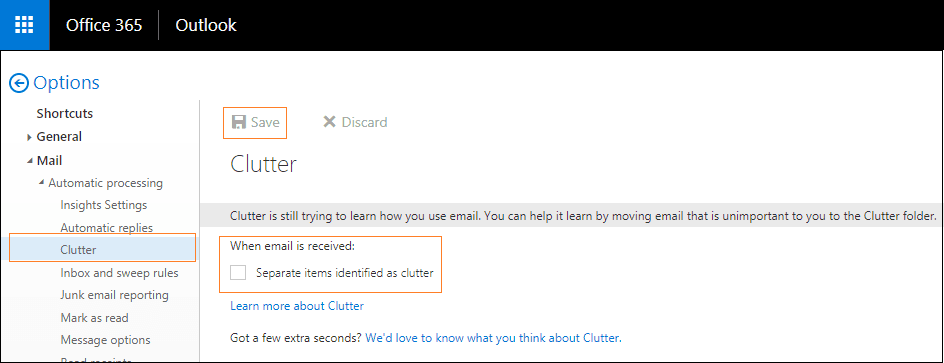
- Now, clear the checkbox “Separate items identified as clutter” and click on Save to save the settings.
This will disable the clutter feature in your Office 365 mailbox.
Note: As per Microsoft sources, Clutter will be replaced with a new feature, namely, Focused Inbox.
Disable clutter in Outlook
If you are using Outlook, follow the steps given below to disable clutter in Outlook.
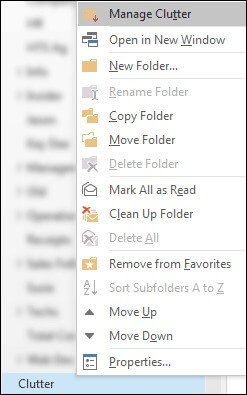
- Access Outlook and right click on the Clutter Folder.
- Tap on Manage Clutter.
- Once you find the Clutter section, deselect the option ‘Separate items identified as clutter.’ You will be able to turn off Clutter in your Inbox this way.
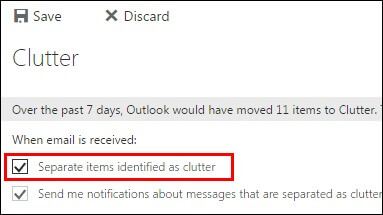
- Once you have customized your settings, click Save to finish.
Conclusion
So, if you’re an Office 365 user dealing with the ‘Clutter’ folder, we’ve shown you how to regain control. While it aims to declutter your inbox, ‘Clutter’ can sometimes create more mess. By following our instructions, you can easily disable this feature and enjoy a clutter-free mailbox. Get rid of unwanted email shuffling and manage your emails yourself.
If you ever need to safeguard your Office 365 data, consider Kernel Office 365 Backup and Restore tool. Try out the trial today.