Read time: 4 minutes
Summary: Exchange public folder permissions authorize who can access or manage the folder and its subfolders. You can assign permissions using the Exchange Admin Centre (EAC) or Exchange Management Shell. In this article, you’ll get clear steps of these methods and an advanced Exchange migration solution to fulfil migration needs that many users prefer.
The management of Exchange public folder permissions is the admin task that looks simple on the surface, but is complex in reality. Especially, it becomes more complex with nested public folders or different Exchange versions. However, the appropriate public folder permissions are necessary to maintain smooth operations regardless of the Exchange server version.
Now, you don’t need to worry anymore. We’ll assist you here with clear steps that result in effective outcomes. But before they understand Exchange public folder permissions and their levels in detail. Let’s get started now!
What are Exchange Public Folder Permissions and their Levels?
Public folder permissions let users perform actions, like read, create, edit, or delete, specifically. Mainly, they are assigned by the Exchange server admin to authenticate/limit the folder from unauthorized access. Moreover, they control content visibility and maintain data integrity across teams. With these permissions, organizations share emails, documents, etc., securely with specific accessibility controls to the authorized users.
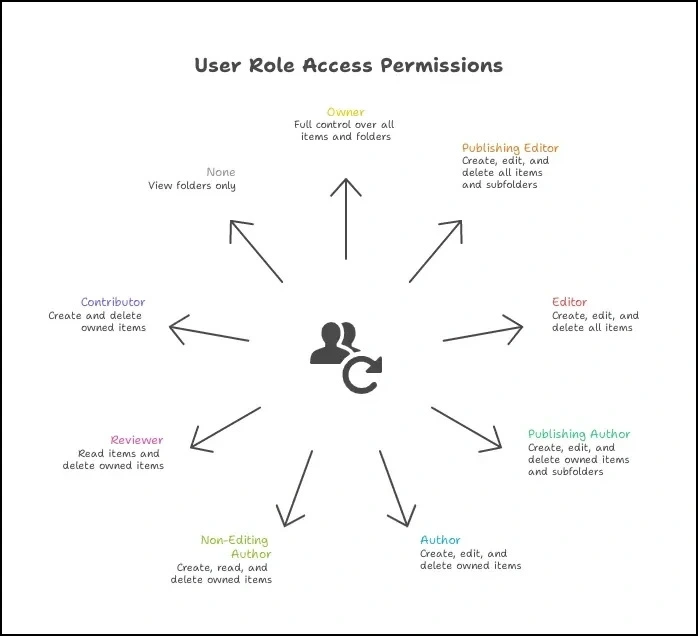
On the other hand, public folder permission levels in Exchange range from owner to contributor and none. Understand all public folder permission levels in Exchange below:
Methods to Grant Exchange Public Folder Permissions
To manage/grant Exchange public folder permissions, you can use Exchange Admin Centre (GUI-based) or Exchange Management Shell commands.
Method 1. Grant Exchange Public Folder Permissions via EAC
This is a GUI-based method by which you easily manage permissions in the Exchange public folder and its subfolders without having enough technical skills. To do the same, make sure that you have the necessary admin roles/permissions. After that, follow the steps below:
- Go to the Exchange Admin Centre (EAC) portal and log in with your admin credentials.
- Click on Public folders. You will see the public folder list.
- Select the required public folder and tap on the Pencil icon (Edit).
- Choose Permissions and tap on Add (+) to add a user.
- Tap on Browse and choose the user. Select the permission level from the options (Author, Editor, Owner, etc.). Click Save.
Method 2. Grant Exchange Public Folder Permissions Using PowerShell
If you are a tech expert and familiar with PowerShell commands, you can execute this method without errors. With this, you can manage permissions across multiple public folders and subfolders in a few seconds. Follow the steps:
Step 1. Open the Exchange Online PowerShell after connecting to Exchange Online via PowerShell.
Note: Open the Exchange Management Shell (EMS) for Exchange on-premises.
Step 2. Now, execute the below PowerShell command to grant full access to a public folder:
Add-PublicFolderClientPermission -Identity "\FolderName" -User "UserName" -AccessRights CreateItemsExample:
Add-PublicFolderClientPermission -Identity "\My Public Folder" -User Chris -AccessRights CreateItems
Note: To grant the same permissions to all subfolders, run the command below:
Get-PublicFolder -Identity "\FolderName" -Recurse | Add-PublicFolderClientPermission -User "UserName" -AccessRights CreateItems
Example:
Get-PublicFolder -Identity "\FolderName" -Recurse | Add-PublicFolderClientPermission -Identity "\My Public Folder" -User Chris -AccessRights CreateItems
Also, you can check the permission using the command below:
Get-PublicFolderClientPermission -Identity "\FolderName" -User "UserName"
Example:
Get-PublicFolderClientPermission -Identity "\My Public Folder" -User Chris
- FolderName: Specify the path of the public folder.
- UserName: The username of the person you’re granting permissions to.
- CreateItems: Specify access to control over the public folder.
What if You Need to Migrate One Exchange Server to Another?
The process of moving data between two Exchange Servers requires multiple steps which create difficulties. But the automated professional tool makes it easier. The Exchange Migrator helps you move public folders to a new server or to Exchange Online while keeping your folder permissions. Kernel Migrator for Exchange is one such powerful tool that migrates mailboxes, public folders, & groups between on-premises Exchange Server, Hosted Exchange, & Exchange Online.
The tool maintains complete data retention, which includes user roles and rights and folder permissions. Other features include pre-migration analysis and filters for selective migration so that users can complete their migration work without experiencing obstacles.
Conclusion
We hope you are well-through with the best methods to assign public folder permissions [EAC and PowerShell]. Moreover, Exchange public folder permissions management is a necessary skill for any Exchange admin. But do remember to grant only the right access levels to protect your data from unauthorized accessibility.
Just in case, you need to migrate Exchange server data to on-premises Exchange Server, Hosted Exchange, or Exchange Online as well with all permissions & data intact, go with the professional Exchange migrator for reliable & quick outcomes.
Frequently Asked Questions
You can manage Exchange public folder permissions using the Exchange Admin Center (EAC) or Exchange Management Shell (EMS).
No. Exchange public folder permissions don’t inherit automatically. You’ll need to assign to each subfolder separately.