

Read time: 9 minutes
Quick Answer:
- Enable high-quality uploads in your mobile settings. Just go to Settings > Account > Data Usage > Upload Highest Quality.
- Upload photos on Instagram with a 4:5 ratio and 1800px only to avoid compression
- Try to use sRGB color profile, and don’t resize after editing the images.
- Take photos using the mobile phone’s camera instead of the in-app camera.
- Use the sharpening tool in Instagram to neutralize the effect of Instagram’s compression.
So, I recently shared photos of my vacation on my Instagram stories, and a few hours later, I noticed that some of my uploaded pictures turned out to be blurry. I had no option but to delete the pictures and post them again with the correct resolution.
Instagram photos sometimes turn out to be blurry due to compression, incorrect photo size, or low-quality pictures. Just to make sure you don’t go through the same frustrating experience I went through, here in this blog, I’ve given the best methods to fix blurry Instagram photos.
Why are my pictures blurry on Instagram?
There may be a variety of reasons affecting the quality of photos in Instagram. Some common reasons include:
- Images are not of good quality.
- Posting images with the wrong aspect ratio.
- Using an inappropriate image format.
- The photo is of poor quality and low resolution.
- Data Saving mode is enabled in Instagram.
Common problems and their solutions to fix blurry Instagram photos
Users face a common set of problems that result in blurry Instagram photos. We’ve explained these problems in detail and have given the best possible solution to fix the issue.
Problem 1. Images are not of good quality
You created multiple photos of your business proposals, promotional plans, and ad banners to promote your business on Instagram, but while downloading, they turned blurry. Perhaps during photoshoots and promotional events, you clicked some low-quality images, and after uploading them, it gets blurry on Instagram.
Solution: Make sure to always download images in the highest quality available. Also, while clicking pictures, verify that you’re clicking high-quality pictures. Always remember that your photo must be over 1 MB.
Problem 2. Posting Images with the wrong aspect ratio
When you upload a high-quality image on Instagram, the app fetches the image and provides an aspect ratio that may change the quality of the photo to view.
Solution: Whenever you post your high-quality picture, choose a good aspect ratio for your Instagram post. And then, select the best balance to make your photo attractive and qualitative. The most usual aspect ratio of photo format is 1:1 for square photos, 1.91:1 for landscape photos, and 4:5 for landscape photos.
Problem 3. Using inappropriate image format
If you are going to upload an inappropriate image format, then Instagram automatically changes its format and then uploads it; that’s why you see blurry Instagram photos.
Solution: Always consider JPEG for better quality photos because Instagram allows only JPEG and PNG picture formats. At times, PNG images are not of good quality, and if we talk about JPEG, it’s a perfect choice for everyone.
Problem 4. The image is in low resolution
Resolution of the image creates a positive impact on the viewer. A low-resolution image in not clear enough to understand its content. You cannot use such images professionally.
Solution: Click good-quality pictures from mobile phones and cameras. Keep the smartphone steady while taking some pictures making it clear. After that, as previously mentioned, upload it in JPEG format on Instagram.
Problem 5. Data Saving mode on Instagram
Do not turn on your data saving mode on the Instagram mobile application. It deducts image quality and provides you with blurry Instagram photos.
Here are some steps to turn off your Data saving mode on Instagram:
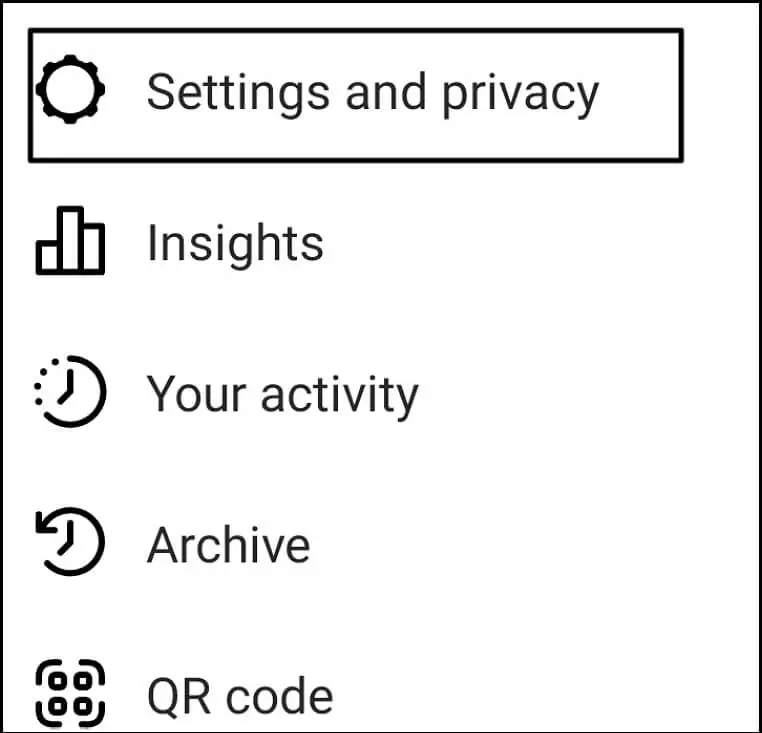
- pen the ‘Instagram’ mobile application and ‘Click’ on your ‘Profile icon’.

- In the right corner, you will see three dots; ‘Click’ on them.

- Now Find the ‘Settings and privacy’ section in the menu and ‘Click’ on it.
- Find the ‘Data usage and media quality’ section there and ‘Click’ on it.
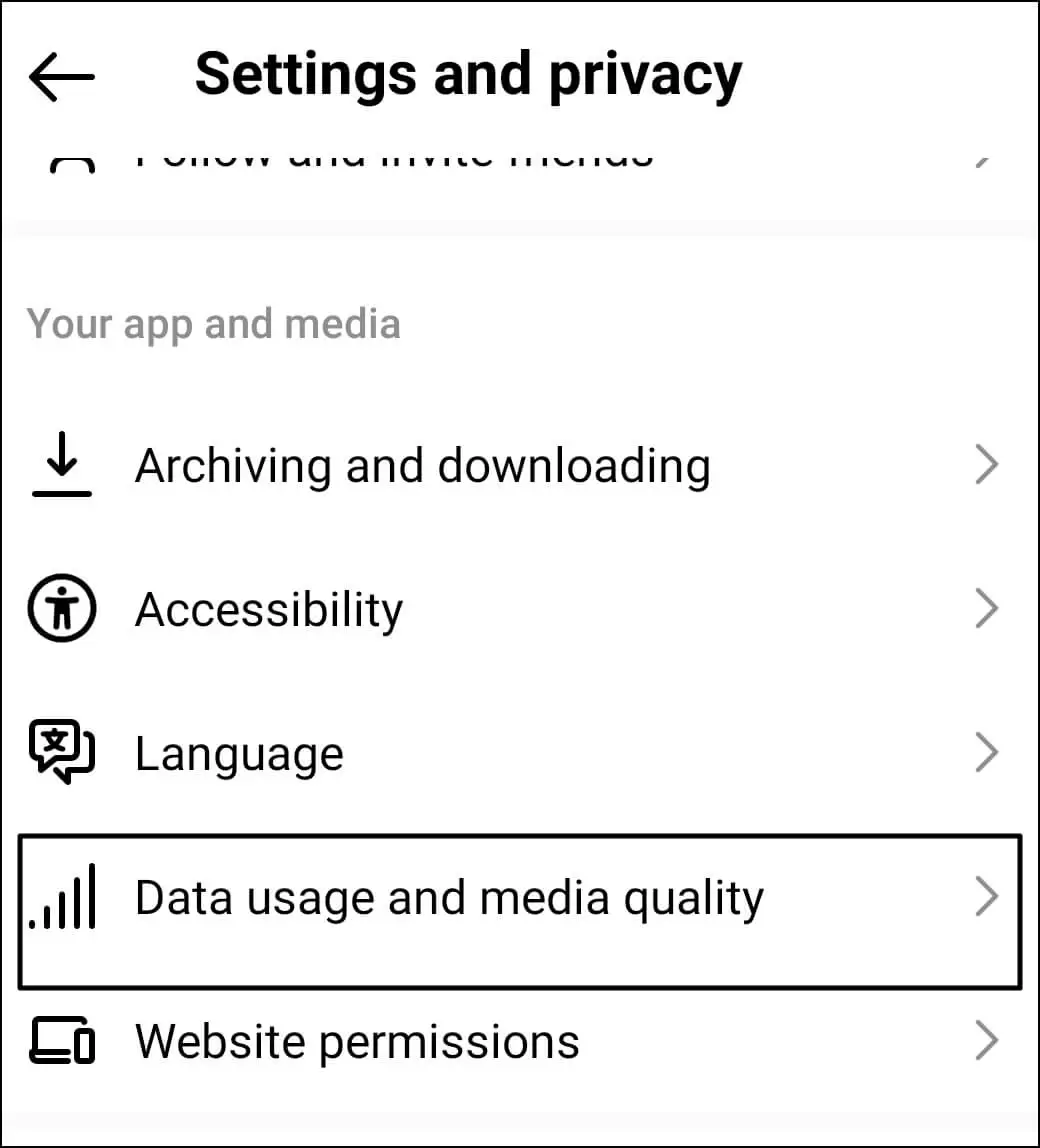
- You can see two options there:
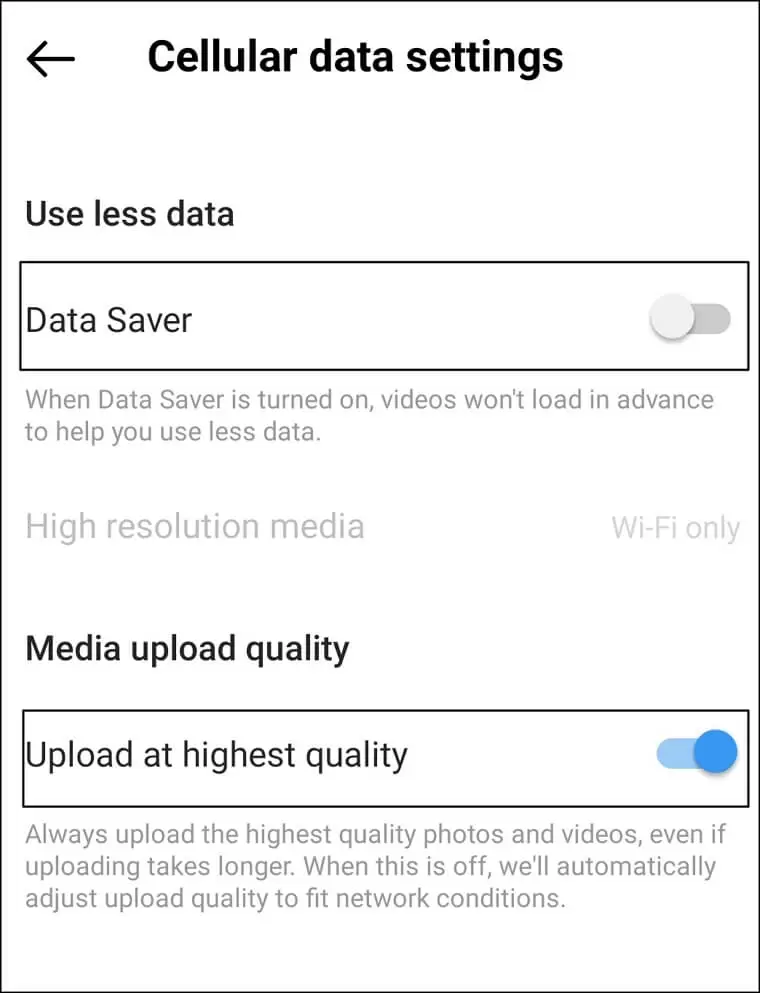
- First, turn off your Data Saver mode.
- Second, turn on ‘Upload at highest quality’ mode. Now ‘Restart’ your Instagram mobile app and enjoy your Instagram feeds without errors.
Problem 6. Mobile camera settings
Maybe your mobile’s camera settings are incorrectly configured, due to which your pictures are turning out to be blurry.
Solution: Open the default camera application of your mobile, go to Settings, and choose the optimal picture size.
Note: Every mobile phone’s UI is different, so look for Settings in your camera application and set picture size accordingly.
Best practices to avoid blurry photos
- Take pictures in optimum lighting to avoid blurriness and grainy photos.
- Export images in JPEG format only with 90-95% quality.
- Don’t upload screenshots from other messaging apps.
- Edit with professional tools like Lightroom and Adobe Photoshop.
- Upload images up to 1.5MB in size.
Is there a reliable way to fix blurry photos on Instagram?
When your images are still blurry even with the correct camera settings and photo size, the reason could be corruption. Users face this situation while editing or transferring images from one device to another. It can lead to image corruption and give rise to visual distortions like blurriness in images. To recover your images safely, a trusted Photo Repair tool is recommended by experts.
The Kernel Photo Repair tool is an advanced tool to recover corrupted photos. It’s not only bound to recover your corrupted photos; You can get high-quality photos and then upload them on Instagram.
Quick guide to recovering your corrupted photo using Kernel Photo Repair tool:
Now let’s go with elaborated ways to recover your Photos:
- Go and Download the Kernel Photo Repair tool.
- Install the Kernel Photo Repair tool to recover every format of corrupted photos.

- After Installing the Kernel Photo Repair tool, you can see Select or Drop your photos here.
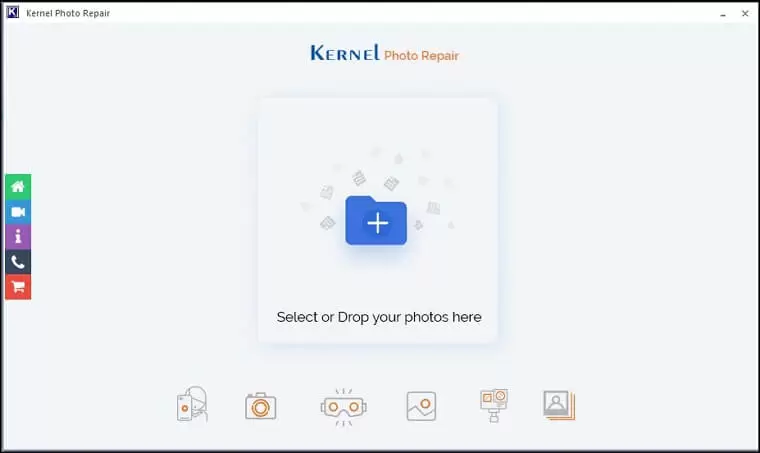
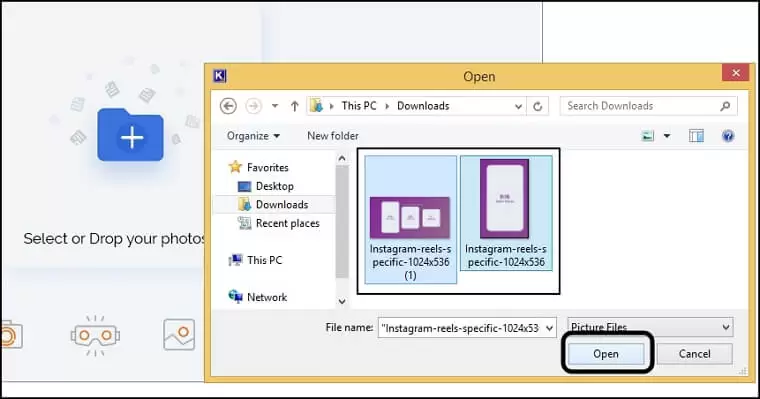
- Click on Select or Drop your photos here. Select the corrupted photos from your Storage device and click on Open it.
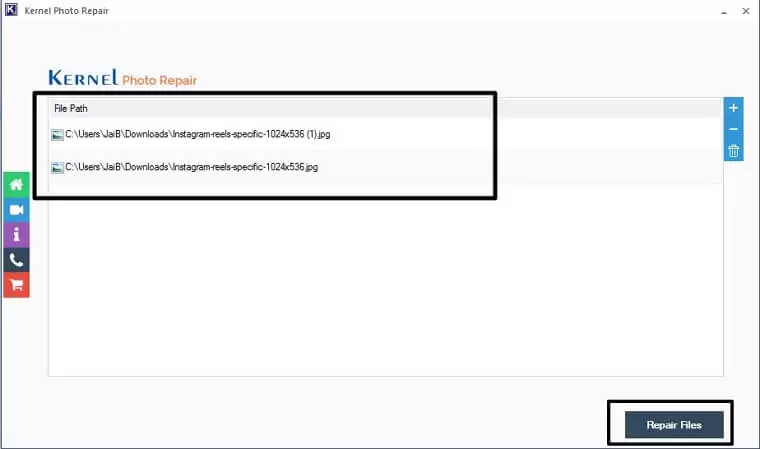
- You can see your Corrupted photos in the Repairing list. After that, click on Repair Files.
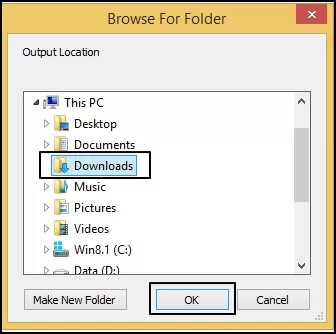
- When you click Repair Files, a pop-up will appear on your screen where you must choose a destination where you want to save your file and click OK.
- The software will start recovering your corrupted photos; after recovering files, click on Close. Go to the destination file and enjoy your photos posted on Instagram.

Final Take
Fixing blurry images in Instagram isn’t a hard task and can be performed by even beginners. Try these given manual workarounds to see if you can resolve cannot fix blurry Instagram photos issue. If your images still look blurry, there’s a chance that the files might be damaged or corrupted. Try the Kernel Photo Recovery tool to fix your blurry Instagram photos. It will scan the bad files and repair them with clear visibility. Later, you can upload them to your Instagram app and gain likes and shares.
People also ask
A. Instagram automatically compresses photos and videos to 1800px if they’re wider than the set limit. This is to optimize the loading speed and save bandwidth.
A. This is most likely to happen because of Instagram’s compression and resizing during photo upload.
A. Yes, internet speed plays a big part in the compression of photos, which may result in blurry uploads.
A. No, once the image is uploaded, it can’t be edited. What you can do is delete the image again, optimize its size, and then upload it again.


![Easy Way to Restore Deleted Instagram Photos and Videos [Safely]](https://www.nucleustechnologies.com/blog/wp-content/uploads/2020/03/restore-deleted-and-lost-instagram-videos-photos.jpg)