Read time: 9 minutes
Okay! So you are too dealing with the Blue Screen of Death i.e. BSOD on Windows 10. I can totally understand and relate to your problem. This error is considered one of the most terrible ones. This error displays on Windows 10 when your system gets crashed. So now I’m going to tell you the troubleshooting methods to fix PFN LIST corrupt Window error i.e. also referred to as BSOD.
What is PFN LIST Corrupt error?
Page Frame Number i.e., PFN is supposed to keep track of the list that represents the physical memory pages of your Windows system which means RAM’s current physical pages. And sometimes due to hard drive failure, corrupt disk drivers, and virus or malware infection, it gives the blue screen error — PFN_LIST_CORRUPT.
Solutions to fix PFN LIST CORRUPT error on Windows 10
The common solutions to fix PFN LIST CORRUPT error on Windows 10 are simple. We will discuss some of them, which you can try one after the other.
Keep Windows Updated
Every software has its own flaws. Windows 10 is also known for errors and bugs. This keeps the system in a healthy state and helps to repair bad sectors in Windows 10 to avoid any further problem. So, to keep your system free from errors and bugs, you need to update the system.
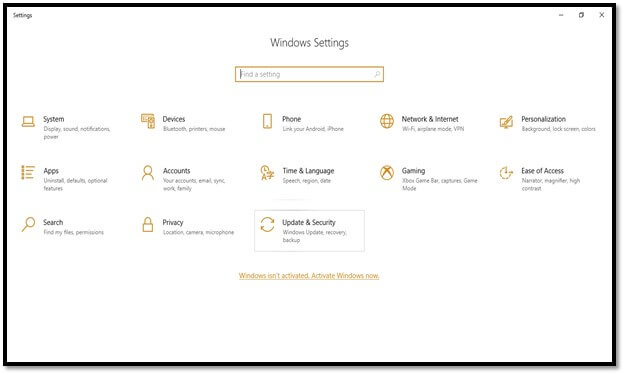
- Go to Settings.
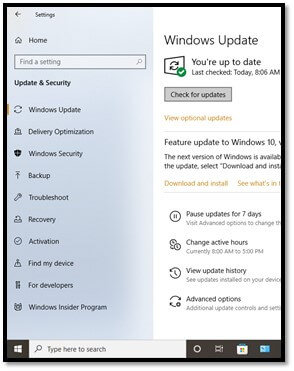
- Select Windows Update & Security from the Settings list.
- Click on the Check for updates box and start downloading the latest updates.
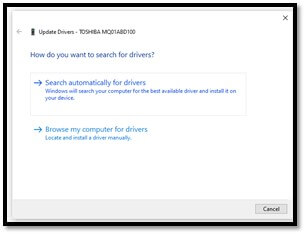
Keep Drivers Updated
Sometimes because of drive failure, the BSOD error happens in the system. So, Keep regularly updating your drivers to get bugs free system. Sometimes one must keep repeating this process for all installed drivers.
- Go to Device Manager.
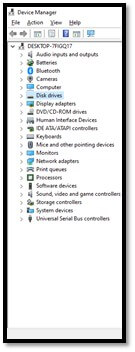
- Now select the drivers for the update.
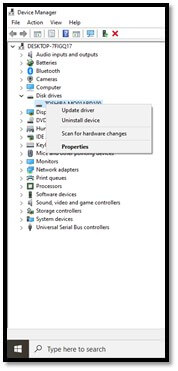
- Click on Search automatically for drivers to install the driver. And wait for the drivers to get updated and installed.
Run the BSOD Troubleshooter
In Windows 10’s Settings, you can easily find this in-built troubleshooting tool which can easily resolve the stop code PFN LIST CORRUPT error.
- Go to the Settings app.
- Select the Update & Security section.
- Now select Troubleshoot from the menu from the left pane.
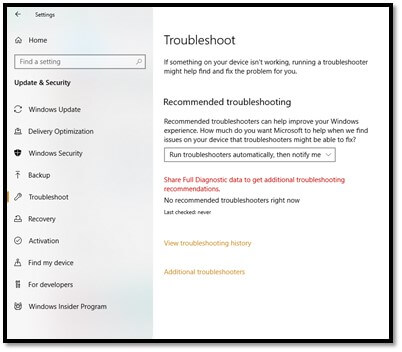
- Select BSOD from the right pane and click on the Run the troubleshooter.
- And follow the instructions on the screen to complete the troubleshooter.
Run the SFC scan
Using this command-line troubleshooter, one can easily resolve the issues, including BSOD errors and PFN LIST CORRUPT errors.
- Firstly open Command Prompt and type sfc/scannow.
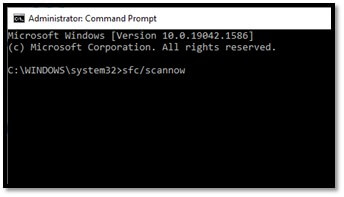
- Now wait till the process gets done. If the solution is found, it will automatically be applied.
- Now you can restart your computer when the process is done.
Run DISM using the Standard way
- Open Command Prompt and type DISM /Online /Cleanup-Image /RestoreHealth.
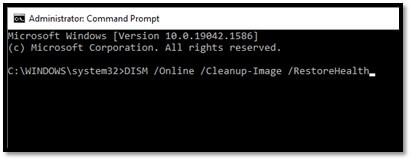
- Now wait till the scan gets finished.
- Update your system and restart your computer.
Run DISM Using Windows Installation Media
- Insert your Windows installation media.
- Open Command Prompt.
- Now type the following commands and press Enter after each command-
- Again, type the following command and press Enter:
- Make sure to change an X value with the letter of the mounted drive with the Windows 10 installation.
- When the process gets over, you can restart your computer.
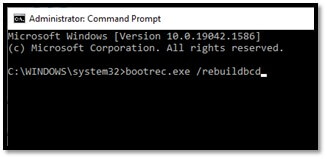
Check the Hard Drive
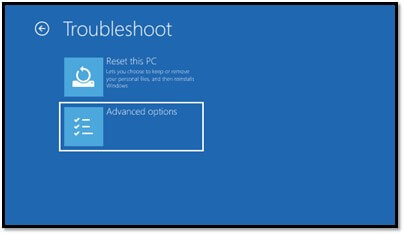
- Enter the Advanced Startup (restart your computer while holding the Shift key).
- Choose Troubleshoot, and then Advanced Options.
- Select Command Prompt from the list of options.
- Now, enter the following lines and press Enter key after each command to run it-
- For better performance, you can also run the following command using the command prompt-
- Now you can restart your computer and check if the issue is resolved.
Disable Microsoft One Drive using the Local Computer Policy panel
- Press Windows Key + S and enter the group policy.
- Select the Edit group policy.

- Navigate into Local Computer Policy on the left pane, and then access Computer Configuration
- Now choose Administrative Templates then click Windows Components and OneDrive.
- In the right pane, locate Prevent the usage of OneDrive for file storage and double click it.
- Select Enabled and click Apply and OK to disable OneDrive.
Disable Microsoft One Drive using the Registry Editor
- Press Windows Key + R and type regedit.
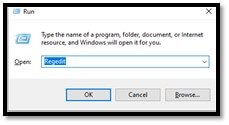
- Press Enter or click OK to start Registry Editor.
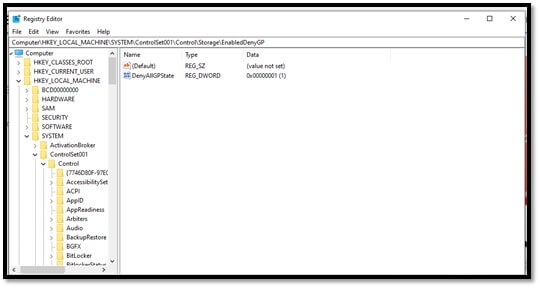
- One needs to navigate to the following key in the left pane:
- Here you can expand the Windows key and search for the One Drive key. If the key doesn’t exist, go to the next step to create it.
- Now right-click the Windows key and choose New and then Key. Enter OneDrive as the name of the key.
- Select the OneDrive key. In the right pane, right-click and choose New and then DWORD (32-bit) Value. Enter the code below as the name of the new DWORD: DisableFileSyncNGSC
- Double click the DisableFileSyncNGSC and change its Value data to 1.
- Click OK to save changes.
Disable Microsoft OneDrive using Safe Mode
- Restart your computer. Try this a few times while it boots which results to start an Automatic Repair process.
- Choose Troubleshoot, then Advanced options, and go to Startup Settings.
- Click the Restart button. Once your computer restarts again,
- Now you can see a list of options. Press F5 to select Safe Mode with Networking.
- Once the Safe Mode starts, disable the OneDrive.
Uninstall the Problematic Software
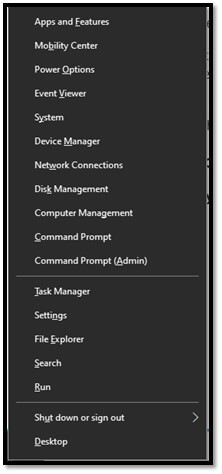
- Press Windows Key + X to open the Power User Menu.
- Now selects Device Manager from the list.
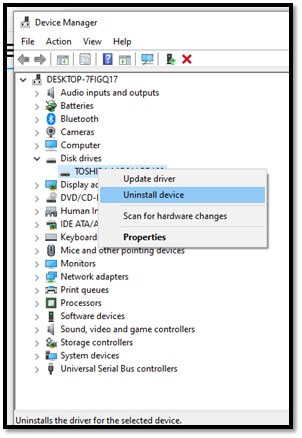
- Once the Device Manager starts, you need to locate the driver which you want to remove.
- Right-click it and choose Uninstall. If available, check to Delete the driver software for this device and click OK.
- Now restart your computer.
Note- In addition to antivirus and drivers, sometimes regular applications can cause errors. Therefore, one should always do a little research before finding a driver that is causing this problem.
Check Hardware Regularly
After research, we found out that the fault in your hardware, most commonly in RAM, can lead to PFN LIST CORRUPT error. We also found that after replacing RAM, the issue was already resolved. So please check all your hardware like motherboard, network card, and graphics card, so that your systems keep running smoothly.
Additional Tip: Try a Windows Recovery Tool
After discussing all the above solutions, I found out the PFN LIST CORRUPT error in Windows 10 is really a major issue but like every Windows problem, this one also can be resolved using Kernel for Window Data Recovery. This tool deals with every problem which leads to error; it can easily retrieve corrupt, lost, or inaccessible data from the failed hard disks, provides 3-tier scanning to ensure complete recovery of data from corrupted or deleted partitions, also retrieve all data files from removable drives when connected to your Windows PC and a lot more.
It has the ability to recover deleted temp files, lost data and all other deleted folders. It provides complete retrieval of Windows data lost due to virus/malware infections, software bugs, or any other issue. It allows rapid recovery of all files and folders, from both logical and physical drives. So, after having this tool, your all problem related to data recovery will be easily resolved.
Summing up
I hope you find this blog useful to resolve your PFN LIST CORRUPT error in Windows 10. We have discussed all the solutions in this blog to fix this error. But some methods, such as disabling one Drive or reinstalling Windows may cause data loss. For that problem, you can totally rely upon our window recovery tool to retrieve data even from a formatted, corrupted, or crashed system. It saves recovered Windows data to the specified location. It supports all Windows Operating Systems for data recovery.