Read time: 7 minutes
Microsoft Outlook users often face the error “Your mailbox has been temporarily moved to Microsoft Exchange Server” after profile corruption, Exchange sync issues, or OST file damage. This problem may block mailbox access, email sync, and Outlook performance.
For example, when configured with Office 365 account, sometimes you may face the following message pop-up as shown in the image below while accessing Outlook: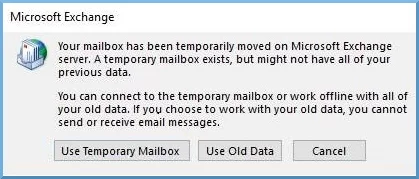
Though the error message gives an option, we advise you NOT to connect to the temporary mailbox, as it may cause data loss. After this error message, it is understood that your mailbox has been temporarily moved to Microsoft Exchange Server, and users need to resolve this issue to maintain and manage the data again. However, we’re going to understand the prominent causes and effective resolution for Microsoft Exchange mailbox has been temporarily moved issue, respectively. In this guide, you will find practical fixes, profile troubleshooting steps, and professional OST recovery solutions to restore mailbox access safely.
Why your mailbox has been temporarily moved on Microsoft Exchange Server?
There may be many common reasons behind the error, so we’ve outlined some significant causes that might be culprit are:
- Corrupted or misconfigured Outlook profile with your Microsoft Office 365 account.
- Conflicts between Antivirus or anti-malware in your Outlook application.
- Faulty or damaged add-ins will interrupt your application.
- Exchange migration or Autodiscover conflicts between on-premises Exchange and Microsoft 365.
- Damaged/ or corrupted Outlook data file can also cause the issue.
Now, you need to run some troubleshooting methods to resolve the inconveniences when your Microsoft Exchange mailbox is temporarily moved.
Methods to resolve mailbox moved to Exchange Server issue
Encountering such an issue will create confusion and hamper user productivity. To fix the error “Your mailbox has been temporarily moved to Microsoft Exchange Server”, we’ve mentioned some reliable and proven methods below. Read the steps carefully to avoid process failure.
Method 1. Enable the Cached Exchange Mode
Cached Exchange Mode creates a synchronized offline copy of the mailbox in an OST file. If Outlook fails to sync properly, users may face mailbox relocation errors. Re-enabling this option refreshes the mailbox connection and rebuilds synchronization settings.
It increases the user’s workflow and accessibility even with internet interruptions. Enabling this setting will help in resolving the issue “Your mailbox has been temporarily moved to Microsoft Exchange Server”
Here’s how to enable Outlook Cached Exchange mode:
Note: Make sure that Outlook application is closed before performing this method.
Steps 1. Open Control Panel and click the Mail option and click the E-mail Accounts button.
Steps 2. Select the account and double-click It.
Steps 3. Check the option Use Cached Exchange Mode.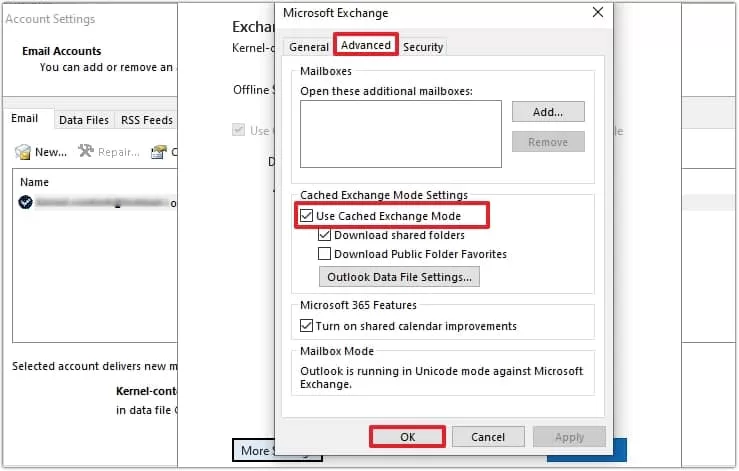
Note: If it’s already enabled, you can disable it and enable it again after restarting Outlook.
Now, restart Outlook and see if the profile gets opened.
Method 2. Delete all Outlook profiles except the primary account
Sometimes, one of the Outlook profiles might get corrupted, making Outlook throw the error “Your mailbox has been temporarily moved to Microsoft Exchange Server”. The damaged profile can interfere with other Outlook profiles, too. If you are not sure which profile is facing corruption, then you have to delete all the Outlook profiles, leaving only your primary account. Follow the steps below to remove your Outlook profile:
Note: Make sure that Outlook application is closed.
Steps 1. Go to Control Panel, click the Mail option and choose the Show Profiles button.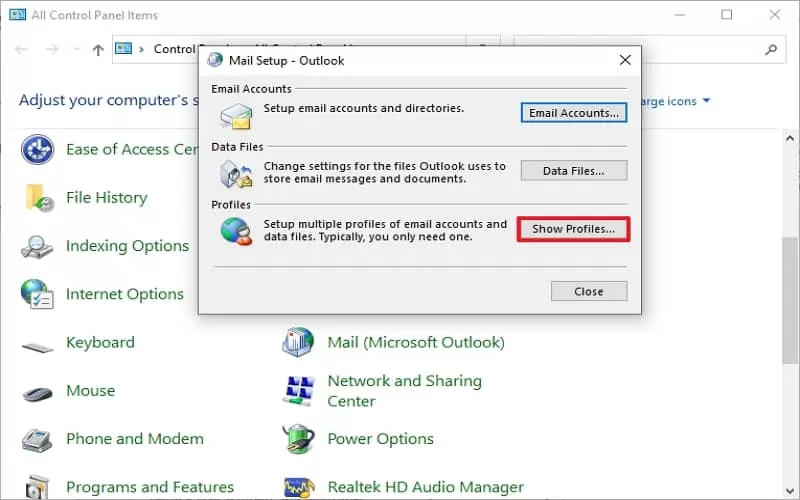
Steps 2. Select the account that is facing the problem and click the Remove button.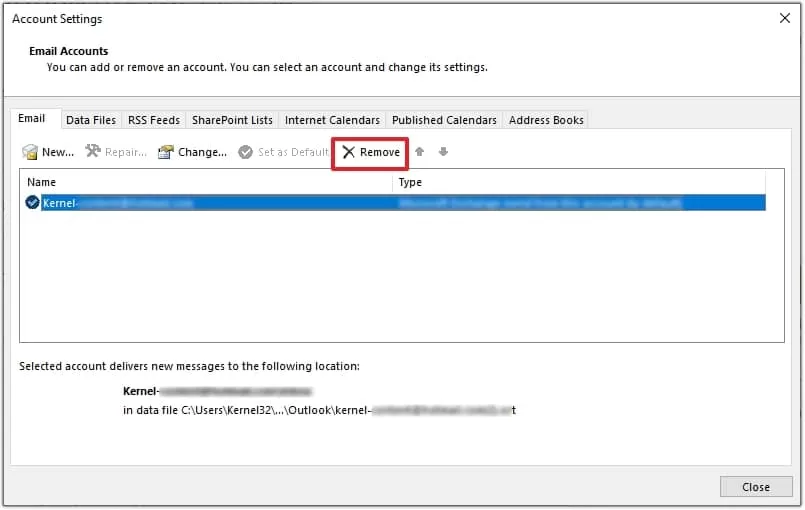
Steps 3. There will be a caution message. Click the Yes button.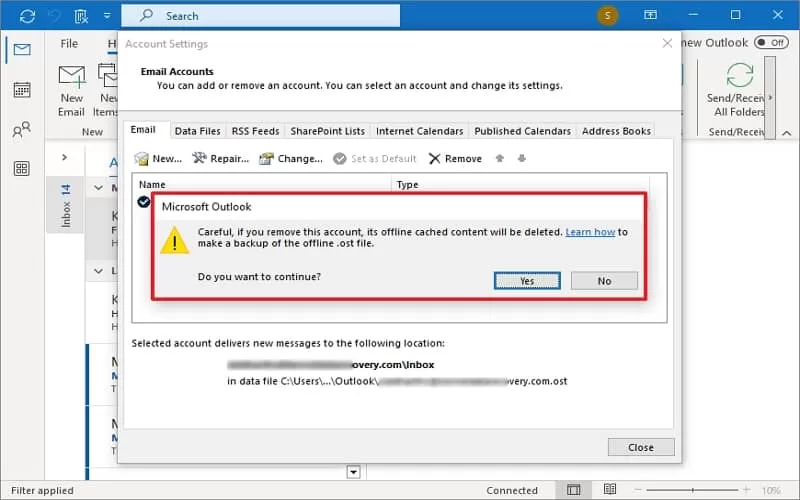
Follow the same procedure for each account, leaving the primary profile. Now, start Outlook and see if it works.
Method 3. Create a new profile and delete the original one
A fresh Outlook profile removes damaged mailbox settings, invalid cache references, and broken synchronization entries. It works well when Outlook repeatedly opens a temporary mailbox instead of the original Exchange mailbox. You must delete your main account and create a new profile in Outlook to resolve the error “Your mailbox has been temporarily moved to Microsoft Exchange Server”.
Follow the steps below to create a new Outlook profile and make it the default.
Steps 1. Start the Control Panel, click the Mail option, and select E-mail Accounts option.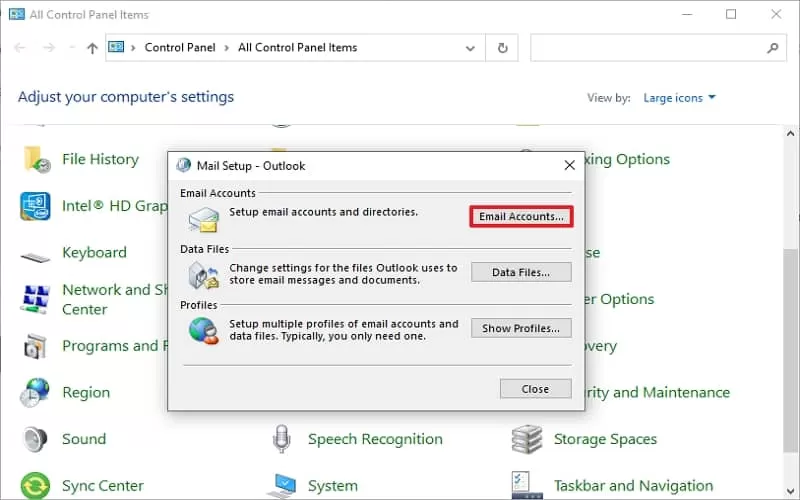
Steps 2. Click the New icon.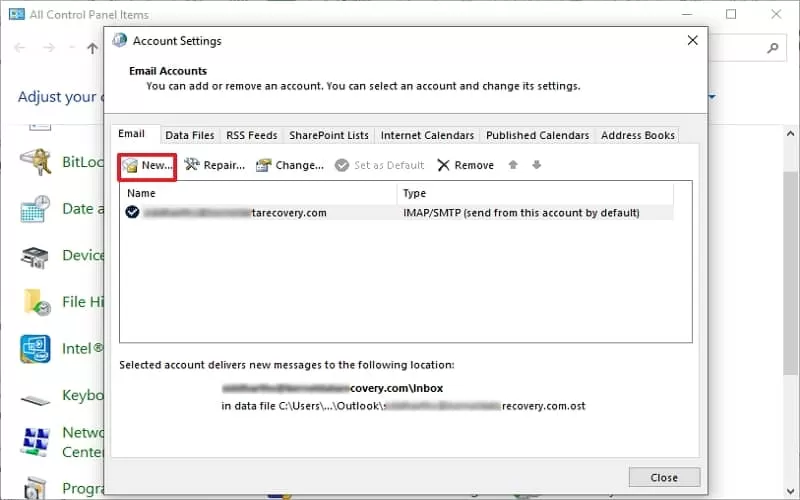
Steps 3. Input the details for the new account and click Next.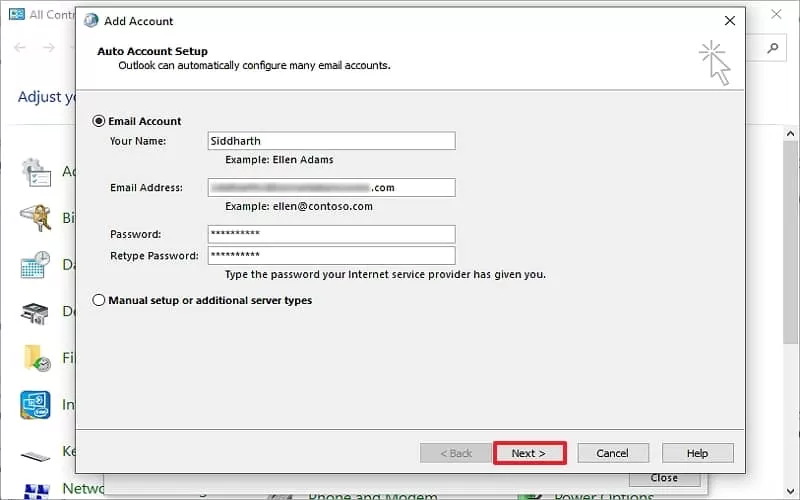
Steps 4. After creating the account, you can delete the previous account and use the current account as the default. Furthermore, you can go to the Mail option and choose the option to ‘Always use this profile.’ Select the account you have created.
Method 4. Disable unnecessary add-ins
Outlook in addition to its various features also allows the integration of add-ins to add extra functionality. Sometimes, these add-ins fail to correctly integrate or synchronize with Outlook’s other features or settings, which, as a result, introduces different errors & bugs.
Press Win + R and type, “Outlook.exe/safe” and hit Enter. This will launch Outlook in safe mode. If the issue persists, then the add-ins are not responsible for the error so move to the next method. However, if Outlook opens normally in safe mode, then it is confirmed that an add-in is the culprit. To remove the faulty add-in, execute the process mentioned below.
To access add-ins in Outlook, do the following:
Steps 1. Open Outlook, click File, and select Options from the navigation panel on left.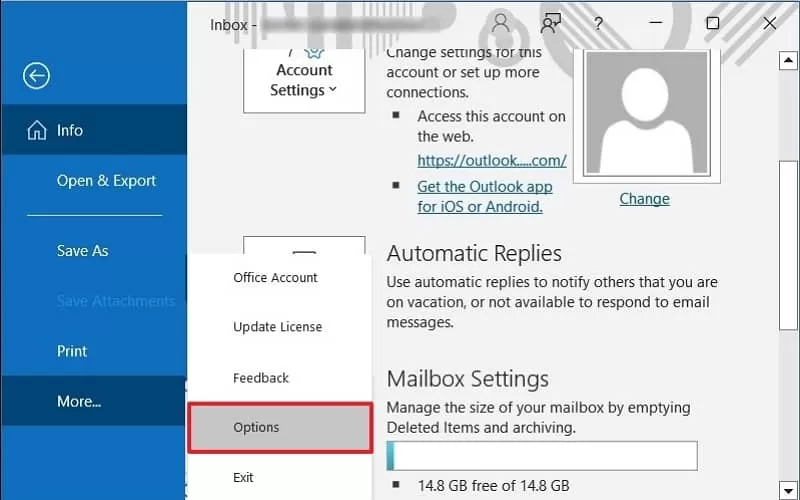
Steps 2. Select the Add-in tab.
Steps 3. Choose COM Add-ins in the Manage section and click Go.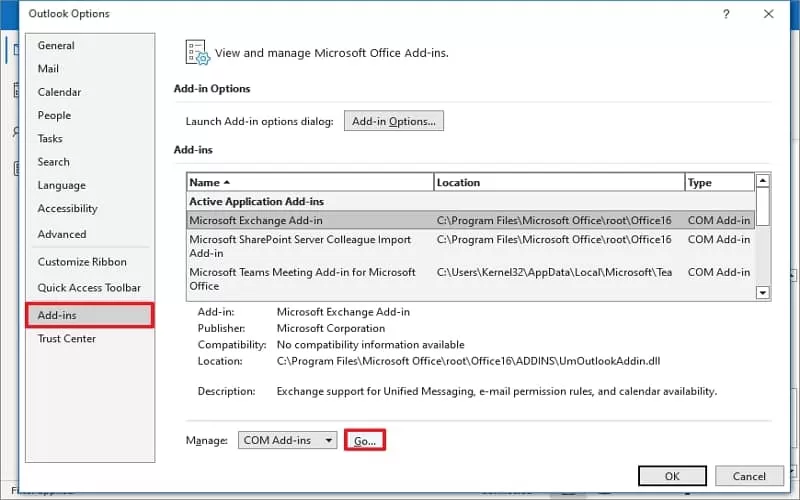
Steps 4. From the list uncheck any add-in and click OK.
Restart Outlook to verify the existence of the error. If the issue persists, repeat the above 2 steps for the remaining add-ins until you find the faulty one.
Method 5. Enable ModAuth in Outlook 2013
Modern Authentication (ModAuth) is the latest authentication mechanism from Microsoft to enable a fast and secure user sign in and identification. This is supported by Microsoft versions 2013 and later. However, in Outlook 2013, it is disabled by default and can cause trouble with user authentication.
A failed user identification could also bring the error “Your mailbox has been temporarily moved to Microsoft Exchange Server” in Outlook 2013. To fix it, you must enable the ModAuth through Registry Editor. To resolve this issue, follow these steps to enable ModAuth in Outlook 2013:
Steps 1. Open the Run window by pressing Windows key + R. Then, type “regedit” into the text box and hit Enter.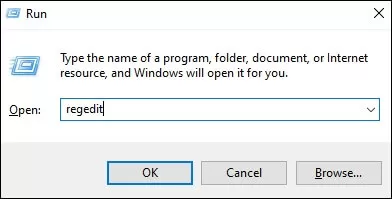
Steps 2. You will be prompted to grant admin access by the UAC (User Account Control). Tap on Yes.
Steps 3. You can navigate to the following location once you’re inside the Registry Editor:
HKCU\SOFTWARE\Microsoft\Office\15.0\Common\Identity\
If you paste the address directly into the navigation bar and press Enter, you can also get to that location instantly.
Steps 4. Inside the Identity key, click the EnableADAL button, set the value to 1 and the Base to hexadecimal. In case the value REG_DWORD is not created, create yourself by right-clicking on an empty space > New > Dword (32-bit) value.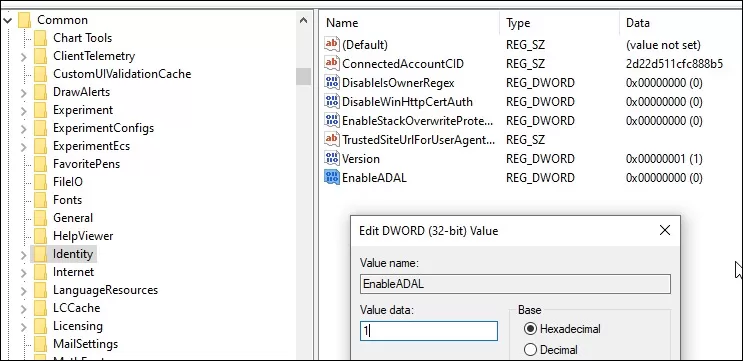
Steps 5. After that, double mouse click on the Version value & put the Base to Hexadecimal along with the Value data to 1.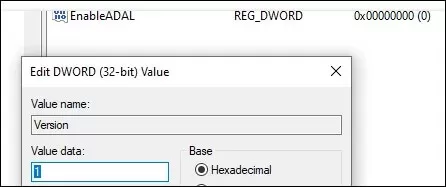
Steps 6. The changes will take effect once you restart your computer. Quit the Registry Editor and then restart your PC.
If all the above-mentioned methods are not able to fix ““Your mailbox has been temporarily moved to Microsoft Exchange Server” error, then there might be some corruption with your Outlook data files. Try to repair corrupt OST files with advanced utilities.
Method 6. Repair corrupt Outlook data file
Corruption or damage in the Outlook data file can introduce the confusing error “Your mailbox has been temporarily moved to Microsoft Exchange Server”. To resolve it, you have to run a reliable repair utility compatible with the OST and PST files of Outlook. Fortunately, Microsoft, along with the various Office apps, provides an application Inbox Repair tool, to fix damaged or corrupted Outlook files. The in-house tool from Microsoft can resolve minor issues, such as consistency issues in the Outlook data file. However, it lacks the ability to operate on a file larger than 2Gb in size and can’t treat a severely damaged file.
Recover corrupt OST data using a professional solution
When ScanPST fails to fix severely corrupted, large PST files or cannot rebuild the mailbox cache, users need a reliable OST file repair utility to repair inaccessible mailbox data and restore emails, contacts, calendars, and attachments securely. One such advanced tool that is highly rated by professionals is Kernel for OST to PST Converter. It allows users to recover data from inaccessible, orphaned, encrypted, or corrupt OST files. The OST to PST tool software supports direct OST to PST export while preserving mailbox structure, attachments, contacts, tasks, and calendar data.
Salient features of this advanced tool are:
- Convert OST files to multiple formats such as PST, PDF, MSG, EML, HTML, etc.
- Easily import OST files to Office 365, Live Exchange, Gmail, etc. for wide accessibility.
- Repair and recover mailboxes from corrupted or inaccessible OST files.
- Access and operate OST files of any size, even the encrypted files, without any limitations.
- Support for selective mailbox recovery with advanced search filters.
Final words
The temporary mailbox error in Outlook may affect mailbox access, synchronization, and productivity. Manual methods help in minor cases, but severe OST corruption often requires a professional OST recovery tool, which can easily help you to recover OST file data and then save it in a healthy PST for easy accessibility.
FAQs
A- Exchange Server is a server-based system specifically designed for managing network resources, including email functionality. On the other hand Outlook is a desktop-based email client, which works in conjunction with Exchange but does not share the same functionality or purpose.
A- Outlook usually opens a temporary mailbox when the Exchange profile fails to sync correctly, or the OST file becomes inaccessible due to corruption, migration issues, or authentication conflicts.
A- Yes, severe OST corruption may disconnect Outlook from the original Exchange mailbox and trigger the temporary mailbox error message.
A- Use a professional OST Converter tool to easily convert orphaned or corrupted OST files to PST with complete data accuracy.