Read time: 6 minutes
Microsoft Teams can be invaluable for streamlining communication, collaboration, and productivity among your team members. But all that data storage means you’ll encounter an occasional need to clear the cache to free up space, refresh your system, and boost performance. Clearing your cache in Microsoft Teams can be a tricky task, and it’s one that many users overlook while troubleshooting technical issues with the application.
But mastering some simple steps will help you have top Teams performance, ensuring quick access and optimization of how you interact with all available content. This guide provides comprehensive instructions on how to easily clear the cache in Microsoft Teams so you can get back to working more efficiently. Read on to learn how to improve system performance by clearing the cached data.
Why is it necessary to clear cache in Microsoft Teams?
Like any application, Teams can also become sluggish over time & can even lead to Microsoft Teams not Loading issues due to the accumulation of data stored in its cache. Clearing the cache can help improve performance and make sure everything is running smoothly. Here are four reasons why you should consider clearing your cache in Microsoft Teams.
- Increases performance: Cache data files can take up a lot of storage space on your device and slow down performance. By clearing out these files regularly, you will be able to keep your device running quickly and efficiently. You’ll also be able to access content quicker since the files won’t have to load from the hard drive every time you open them.
- Resolves issues with syncing content: If you’re having issues syncing content between devices or programs, it could be due to a clogged-up cache file that’s preventing the data from loading properly. Clearing out this file will free up space for fresh data to be loaded so that everything can sync correctly again.
- Fixes login issues: If you’re having trouble logging into Microsoft Teams, it could be because there is some kind of issue with your cached login credentials. Clearing the caches should resolve this issue, as it will reset all your credentials and allow you to log in again without any problems.
- Helps to stop crashes or freezes: If your computer freezes or crashes while using Microsoft Teams, it could be due to an overloaded cache file causing the program to malfunction. Clearing out this file should help get rid of any bugs or glitches that may have been causing the issue in the first place and get things back on track quickly and easily.
Clear Teams cache data in Windows
If you are a Microsoft Teams user, you may have noticed that the Teams app tends to take up quite a bit of storage space. This is due to the caching of data on your system.
To improve Microsoft Teams performance, we will cover the solution in two sections, one for Windows users and another for Mac users.
As a Windows user, you know how troublesome the increased cache memory can be. Excess cache stored in your system can lead to issues like Teams crash which can be extremely irritating especially when you have an online meeting to attend. Follow the steps below to save yourself from such a dire situation.
If you have the old/classic Teams version installed, follow the steps mentioned below to clear cache:
- The first step is to check that Microsoft Teams is not running.
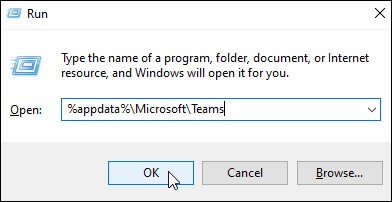
- Next, open the Run dialog box & type up %appdata%\Microsoft\Teams, and then hit OK. This will open a directory where all your Teams cache data is stored.
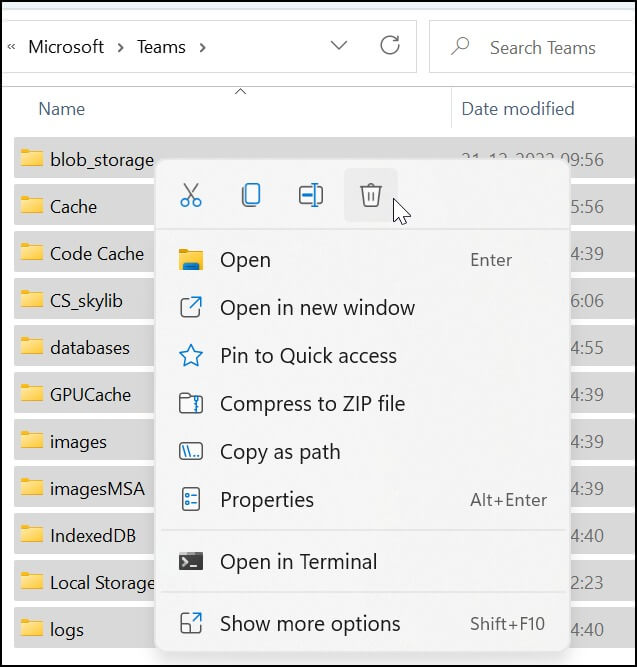
- Once you’ve opened the directory, delete all the files and folders. After that, restart Microsoft Teams.
You should now see that all your cached data has been cleared from the application, allowing it to run more smoothly and efficiently than before.
If you are using the latest version of Teams, then you can try two different ways to clear your cache. Follow the methods explained below:
- Delete cache manually from drive
Delete Teams files from your local drive using the steps mentioned below:
- Ensure Teams app is closed.
- Press Windows key + R to open run dialog box and type
- Delete all the items in the folder and restart Teams.
%userprofile%\appdata\local\Packages\MSTeams_8wekyb3d8bbwe\LocalCache\Microsoft\MSTeams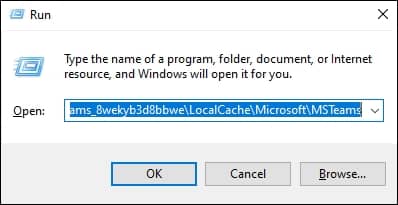
- Reset the app
Another way to delete data is by resetting the Teams app. To do so, execute the steps below:
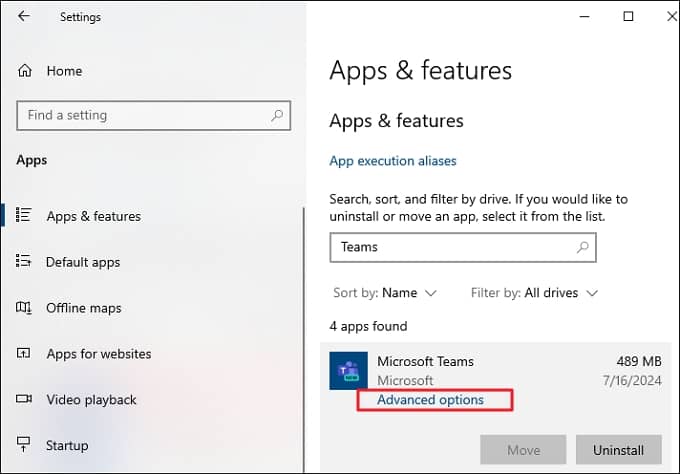
- Open system settings and click App & Features.
- Type Teams in the search field on right, select the new Teams app, and click Advanced options.
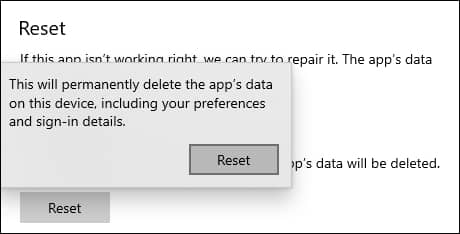
- In the new window, scroll down and click Reset > Reset.
For Mac users, the procedure to delete locally stored cache is pretty much the same as that for Windows users. Follow the procedure below to eliminate unwanted data and increase Teams performance.
Classic Teams users can perform the following steps:
- Close Teams if running.
- In Finder, open the /Application/Utilities folder and launch Terminal by double-clicking on it.
- Enter the command following command & press Return.
- Reboot system.
If you have installed the Teams new version, then:
- Quit Teams, and in Finder, open the /Application/Utilities folder and launch Terminal by double-clicking on it.
- Enter the command:
- And press Return, then enter the second command below and press Return.
- Reboot system.
Can clearing Teams cache result in data loss?
Clearing the Teams cache memory can be a beneficial activity in terms of optimizing Teams performance and freeing up storage space, but if it is done incorrectly or without proper backing up, then it can lead to data loss. This is why businesses need to be extremely careful when managing their Teams data.
To avoid data loss scenarios, it is extremely important to regularly take Teams backup. However, as you know, Teams comprises several modules. To accurately make a backup of every component, including chat, channels, posts, files, etc., you need a reliable tool.
Kernel Microsoft Teams Backup is a sophisticated tool embedded with algorithms that scan and create precise backup Microsoft Teams data. The Team backup tool allows you to save your online Teams data securely offline. Different Team conversations are stored locally in separate folders.
Features of Kernel Microsoft Teams Backup tool:
- Backup entire Teams data with no data size limit & consistent efficiency.
- Backup 1:1 chat & save shared documents in original format.
- Features incremental backup to avoid duplicate data in backup.
- Compatible with every Windows version
- User-friendly interface for a quick process with no room for error.
- Backup only what you need by adding filters at your convenience.
Closing notes
If you’re a Microsoft Teams user, then you might have come across issues such as low disk space, laggy Teams performance, and more due to oversized Teams cache. In this article, we have mentioned some simple steps to clear cache in Microsoft teams. We hope this blog is helpful for you and you can follow the steps without any issues. Ensure to create Teams backup with the Kernel Microsoft Teams Backup tool to safeguard your data.