Read time: 9 minutes
SharePoint 2010 is still used across many organizations, and most users now prefer upgrading SharePoint 2010 to 2013 for a smooth experience. However, unlike SharePoint 2007 to 2010 in-place upgrade, there’s no provision that allows direct version upgrade. This means there’s just one option to access the capabilities of the upgraded version, which is to migrate from SharePoint 2010 to 2013.
The SharePoint version migration involves a lot of challenges, such as handling authentication shift, redesigning the deprecated SharePoint 2010 workflows, etc. This calls for a structured and well-planned migration of sites to avoid migration failures or missing data.
Pre-requisites to migrate SharePoint 2010 to SharePoint 2013
Here is what you need to know while migrating SharePoint sites:
- Update SharePoint 2010 farm on your SharePoint 2010 farm with the latest service packs/patches.
- Update SharePoint 2010 farm with latest service packs/patches installed on your SharePoint 2010 farm.
- Document farm configuration settings in SharePoint Server 2010.
- Change your SharePoint 2010 web applications from classic mode to claims.
- Clean up SharePoint 2010 by deleting unused site collection, orphaned users & sites, removing unused features and document versions/ features not supported by SharePoint 2013.
Always run a database consistency check before backing up the database of the SharePoint 2010 farm.
Note: There is no direct procedure to upgrade SharePoint 2010 to SharePoint 2013. You can’t reuse your existing Hardware for SharePoint 2013 or install both SharePoint 2010 and SharePoint 2013 on the same machine. So, the only way to upgrade server is to migrate.
Why does Microsoft recommend the database-attach method?
With the SharePoint in-place upgrade, an upgraded version of the SharePoint server is applied directly on existing SharePoint version. This feature was removed from the versions released after 2010. Here’s why Microsoft recommends the database-attach method for version upgrade:
- Do not involve overwriting/ modifying the current server version, rather SharePoint admins copy the database files and attach them to a different isolated SharePoint farm.
- Allow admins to put the source server in Read-only mode to provide content access to the users when the server is actually busy in copying the database to the new environment.
- Database attach method provides the admin with the ease to perform selective upgrade for specific content and services applications and skip everything irrelevant.
- This method runs a quicker upgrade than methods like traditional restore, which is because the database is directly registered to a new server.
Steps to Migrate SharePoint 2010 to SharePoint 2013
We will briefly overview the direct method of SharePoint 2010 to 2013 migration. This process involves multiple steps, as given below:
Step 1. Create a New SharePoint 2013 Farm
The first step in the process of migration is to install and configure SharePoint 2013 on a new farm. Set up all farm configurations in the Source SharePoint 2010 farm, including all essential configurations such as AAM, Email settings, managed pats, etc. Then, install all the third-party software, language packs, custom features, and solutions of the SharePoint 2010 farm into your SharePoint 2013 farm. Create a web application similar to your existing SharePoint 2010 farm for a SharePoint 2013 farm.
Since we will be using the existing content database associated with SharePoint 2010, you can delete the default content database linked with the new web application. If you fail to delete the root site database of the existing web application, running a “Test-SPContentDatabase” cmdlet as a part of the migration process can result in orphaned site issues. This happens because the root site collection exists in both content databases resulting in conflict.
Also, the farm administrator should set the SharePoint 2010 Products to read-only status. This will allow users to access the old database even during the migration. SharePoint 2013 farm is now installed and configured.
Step 2. Backup and Restore SharePoint 2010 Database to SharePoint 2013 SQL Server
Next, you must create a backup or a copy of the SharePoint 2010 content databases and restore them to SharePoint 2013’s SQL Server. It requires SQL Server Management Studio to perform the tasks.
It can be done in two ways, using central administration or using PowerShell cmdlet.
- By using central administration: To retrieve all content databases of a particular web application, you must identify and list all source content databases from central administration.
You can do it by following this path in your SharePoint 2010:
(Central Administration >> Application Management >> Manage Content Databases)

- By using the PowerShell cmdlet: Use the PowerShell cmdlet to retrieve all content databases of a particular web application.
Use the below syntax:
Get-SPContentDatabase -Web Application “<Site Name>” | Select Name
Create Backup
You can create a backup of databases from the SharePoint 2010 SQL Server by logging into the SQL server box of the SharePoint 2010 farm. And then, all you’ve to do is open SQL Server Management Studio and expand the databases node.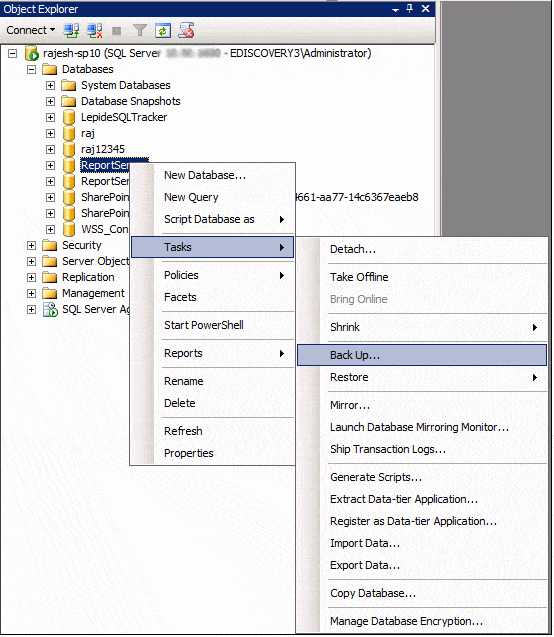
Restore Database
To restore all databases from SharePoint 2010 to SharePoint 2013 SQL Server, copy all required databases backup files to your target SharePoint 2013’s SQL Server database location. Once you have copied the database files, the next step is to open the SQL Server Management Studio and click Restore Database.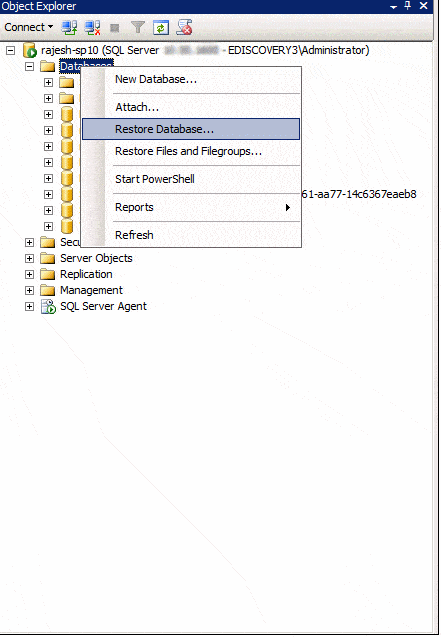
Step 3. Verify content databases with Test-SPContentDatabase
Simply execute the PowerShell cmdlet: Test-SPContentDatabase cmdlet and scan content databases of the provided web application.
For this, you can use the syntax:
Test-SPContentDatabase -Name <Database name> -WebApplication <Web-App-URL>
This syntax will report various issues such as missing features, solution dependencies, orphaned sites, wide lists, etc.
Step 4. Run “Mount-SPContentDatabase” to attach content databases to SharePoint 2013
Once you’ve fixed all the issues reported by Test-SPContentDatabase, you can start attaching content databases to SharePoint 2013 web application. Always try to mount the root site collection’s database first, and if you’re migrating ‘My sites,’ then migrate its host first.
Mount-SPContentDatabase -name “Database name” -DatabaseServer “Database Server Name” -WebApplication “Web-App-URL” -confirm: $false
After mounting the content database to the web application, you can easily access the site collection in SharePoint 2010 mode.
Step 5. Upgrade Site Collections to move to SharePoint 2013
The last step in this migration process is upgrading the site collections. After the SharePoint 2010 to SharePoint 2013 migration, all migrated site collections will run on SharePoint 2013, but with their original user interface and functionalities. Therefore, to access the enhanced features of SharePoint 2013, you have to upgrade all site collections to SharePoint 2013 explicitly. Site Collection administrators can do this using the upgrade reminder banner options or using the Central Administrator or PowerShell commands.
Get Upgrade Status
Upgrades are time-consuming when many site collections are on a particular content database. You can easily get the upgrade status from the “Upgrade Status” on the central administration page.
Follow this path to finally migrate SharePoint 2010 to SharePoint 2013:
(Central Admin >> Upgrade and Migration >> Check upgrade status)
Limitations of manual method of SharePoint 2010 to SharePoint 2013 migration
- It doesn’t support granular migration.
- It is very time-consuming.
- You can verify content before migration, but for that, you should have knowledge of various PowerShell commands.
- With it, you can’t migrate unlimited content with utmost concurrency.
- Confusion due to the involvement of multiple steps.
- Manual migration will increase the chances of errors and data loss.
Due to these limitations, organizations face various challenges while migrating to SharePoint 2013. You can overcome these issues by utilizing a SharePoint data migration tool.
Go to Solution to Migrate from SharePoint 2010 to 2013
Migrating data from SharePoint 2010 to SharePoint 2013 is crucial to continue embracing the platform’s amazing capabilities. However, the migration should be done considering that the data security is maintained and there’s no loss of data during the transfer. Fortunately, Kernel Migration for SharePoint (KMS)– an automated SharePoint content migration solution to migrate content from SharePoint 2010 to SharePoint 2013 is designed to overcome the limitations of the native migration method.
It helps you to avoid these risks by lessening the time and expenses involved in the migration. Also, it ensures complete data integrity.
Features that tune SharePoint migration performance
Here are some capabilities of the tool that make it easy for users to migrate their SharePoint 2010 sites to SharePoint 2013, 2016, and 2019.
- Feature a user-friendly interface that supports easy installation.
- Migrate SharePoint site, its content, along with the metadata.
- Easily remap users between Source and SharePoint Servers.
- It also migrates permissions from the Source to the destination.
- Schedule the migration jobs for one-way synchronization.
- Run a granular migration to move only the needed content.
- Supports bulk migration of SharePoint sites, lists, and libraries.
- Migrates document versions between SharePoint platforms.
Download the free trial version of the tool and test the tool’s functionality to learn the way it performs migration.
In the Final Analysis
SharePoint migration 2010 to 2013 using native methods is time-consuming and can cause complications in accessing the data later. With the recommended SharePoint migration tool, you can control the migration process irrespective of the SharePoint version you’re using. The tool will simplify the process for you and also provide you with the detailed migration reports at the end of each process.
Frequently asked questions
A . No, you can’t directly upgrade from SharePoint 2010 to 2013. Rather, what you can do is migrate SharePoint 2010 to SharePoint 2013 to upgrade the versions.
A . There is no surety of permissions migration during SharePoint data transfers when you perform it using manual solutions.
A . Using the database-attach approach over an in-place upgrade will help you minimize business downtime. It will send the database to Read-only state so that the data is not modified but still accessed easily.