Kernel OST to PST Converter Tool
Kernel OST to PST Converter tool allows you to convert inaccessible, orphaned, or damaged Outlook OST files into accessible PST format with guaranteed results. You can also directly migrate OST file data to various email clients & servers with 100% data accuracy.
Download the free trial version and migrate 25 items per folder.- Convert OST emails, contacts, calendar, tasks, and notes.
- Developed with a multi-thread architecture for fast bulk OST file conversion without data loss.
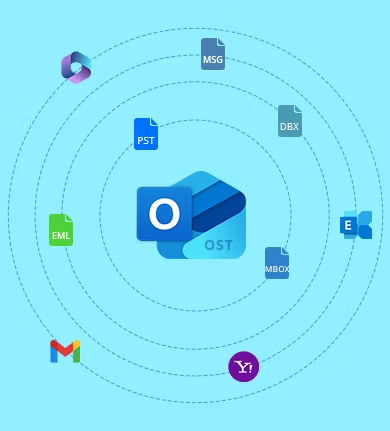
- Convert complete OST file into PST, EML, MSG, DBX, MBOX, etc. formats with complete accuracy.
- Save OST file directly to Office 365, Exchange Server, Gmail, Yahoo, etc., email platforms.
- Built-in date, item type, subject, etc., filters for a user-controlled Outlook OST to PST conversion.
- Recover deleted and corrupt data from OST file with all email metadata in original file formats.
- Preserve original folder structure, metadata, read/unread status, and rich text formatting.
- Split large resultant PST files into smaller parts (e.g., 2GB, 5GB, 10GB) for better management.
- Download free OST to PST converter trial version and get access to all the advanced features.
Top Benefits of Kernel OST to PST Converter Tool
Our reliable OST to PST software provides multiple advanced benefits to simplify all your OST-related tasks
Mailbox Migration
Download Kernel for OST to PST converter software to simplify the process of migrating your entire user mailboxes from the OST file to multiple email servers and IMAP-enabled accounts for enhanced data accessibility.
Recover Deleted Data from OST Files
Recover your emails, attachments, contacts, etc., mailbox items from the OST file. This OST to PST tool allows you to retrieve accidentally deleted data along with deep repair & restoration of corrupt OST file data.
Solve Exchange Server Errors
Don’t let your business suffer from annoying Exchange errors. Be it the Exchange Server dirty shutdown issue or something else, use our OST to PST converter tool to remove the error and restore workflow.
Office 365 OST to PST
Kernel OST to PST Converter is a reliable tool to convert your OST file, associated with your Exchange Online account, to a PST file. You can quickly backup and archive the cloud Office 365 OST to PST with our tool.
Exchange OST to PST
Use our tool to save your orphaned OST files from Exchange Server On-Premises to portable PST format. It is an ideal tool for admins needing to restore user data after server crashes or decommissioning.
Outlook OST to PST
Whether you have a legacy Outlook 2007 OST file or the latest Outlook OST versions, our tool handles them with ease. It easily bypasses the OST file size limit and allows you to save any Outlook OST to PST.

As a system admin, I send/receive a lot of emails every day. My mailbox size often grows exponentially, and I needed a reliable tool to archive my critical messages to an offline PST file without losing a single email & attachment. Thanks to the Kernel OST to PST tool, I easily exported all my emails while preventing oversized OST file issues.

A key employee of ours left, and their Exchange account was deactivated with critical project data in the orphaned OST file. All standard recovery methods failed. This OST to PST converter was an absolute lifesaver. It quickly converted the OST to a usable PST file with all emails in the original folder structure. This tool is now an essential part of our IT toolkit.

Recently, we shifted from classic Outlook to New Outlook and wanted all the data in it. This OST to PST converter tool is a lifesaver for our organization. It converted our file without damaging the original structure. I highly recommend Kernel OST to PST Converter to all users for converting their OST files.

I am impressed with the Kernel OST to PST Converter tool. It effortlessly converted my files in PST format by keeping everything in place. The simple interface made the conversion smooth and easy for me. Thank you to the team for being there with me throughout the conversion process. Best tool for error-free conversion!
Kernel OST to PST Converter Tool Prime Features
Explore the advanced features of our OST to PST tool that allow a secure & error-free conversion of OST files to PST and other formats.
Convert OST to PST in Bulk
Transform OST file to PST in bulk and access them in any Outlook version. Export offline, orphaned, or inaccessible OST file data, including emails, contacts, distribution lists, calendars, notes, tasks, etc., with the simple and easy-to-use interface of the tool.
Repair Corrupt OST Files
The software allows you to repair damaged or inaccessible OST files and save them to new healthy PST files. This OST Recovery tool uses powerful algorithms that help with accurate & fast mailbox recovery.
Recover Deleted Items
Get back your accidentally deleted data or lost emails due to a data transfer. The OST to PST converter tool scans and recovers data with original key attributes and structure. For easy identification, the deleted records are shown in red color.
Export to Multiple Formats
Export Outlook OST emails to PST, DBX, and MBOX files in one go. Additionally, you can save individual emails to PDF, MSG, EML, TXT, RTF, or HTML files and view them separately in a tool as per the output file format.
Export Specific OST Items
Convert OST to PST according to your requirements. Use our OST to PST converter tool to customize migration based on item type, date range, folder name, From, To, and Subject filters for a selective data transfer.
Automatic OST File Detection
Use the Search feature to locate OST files from the system drive or folder. With the embedded search algorithms, the tool provides a quick OST file search and eliminates the need to manually find the Outlook data file in the system.
Unlimited OST to PST Conversion
Use the OST to PST conversion software to convert any OST file. The software has no OST file size or item limitations. Add, scan, preview, and convert large-sized OST files without losing a single bit of data.
Preserve Folder Hierarchy
With the Kernel OST to PST converter software, preserve the original structure of the mailbox folders throughout the conversion of OST files. The output PST file will have the same folder hierarchy as the source OST file after conversion.
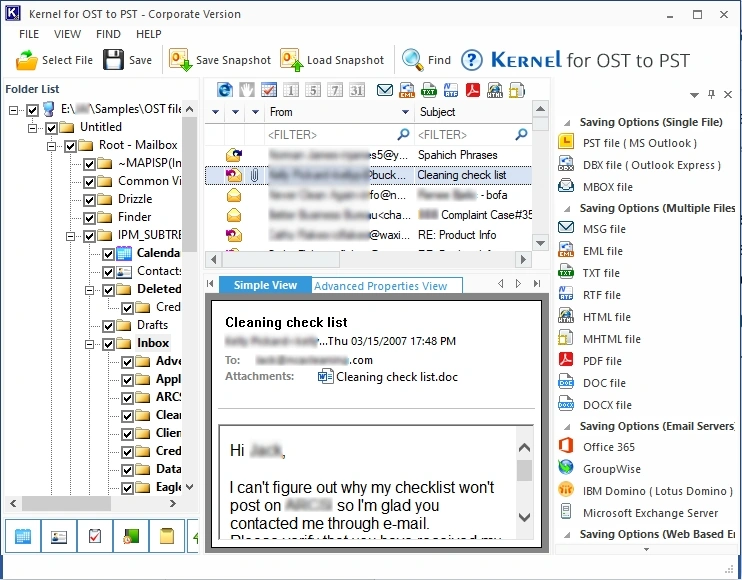
Preview OST Emails
Preview all the recovered items from OST files using the Simple and Advanced Properties View. Select any email, attachments, contacts, calendar, etc., to get a clear preview along with metadata and email properties like Hex, Txt, and Unicode.
Find Email Messages
Search for specific OST file messages with the 'Find' option. Enter keywords and parameters like sender, recipient, subject, and date to locate the desired emails quickly. View/export the search results in multiple file formats.
Migrate OST Mailbox to Office 365
Export OST file items to Office 365 directly using our OST to PST software. Migrate your mailbox data from an offline Outlook file to any Office 365 tenant. Automate the email migration with our best OST to PST converter software.
Restore to Live Exchange Server
Restore an OST file data to the Live Exchange server, Lotus Domino, and GroupWise. Map OST file items with the Live Exchange mailboxes. Restore OST files to Exchange Server versions, including 2019, 2016, and earlier versions.
Migrate OST items to Gmail account
Utilize the tool’s intuitive feature to import OST to Gmail and other web-based email platforms, like Yahoo, iCloud, Google Apps, Outlook.com, and AOL. OST to PST Converter tool assures no data loss during migration.
Apply Saving Preferences
Apply the Saving Preferences to recover emails from the OST mailbox. OST to PST conversion tool allows easy selection from: Save all emails (including deleted), Save all emails (excluding deleted), or Save deleted emails only.
Split Oversized PSTs
Efficiently manage the recovered data from large-sized OST files using the Split PST option. Split PST files into multiple manageable and smaller-sized PST files of varying sizes, including 1 GB, 2 GB, 3 GB, etc.
Free OST to PST Converter
The OST to PST converter software provides a free trial version, which allows you to convert 25 items per folder without data loss. Experience all the features without paying anything, and perform precise and hassle-free conversion.
Load Saved Snapshot
The Save Snapshot feature of the OST to PST tool allows you to save the snapshot of the conversion and resume it later. No need to restart the process. Simply load the snapshot to continue from where you left off the OST to PST conversion.
Graphical Analysis Report
Generate a graphical report of the total items converted using the software’s inbuilt File Analysis Report feature. Create reports based on parameters: Mail Flow Density by Date, senders, item types, & interaction between users.
How to Convert OST File to PST?
Here’s the easy step-by-step guide to convert OST file of any size & from any Outlook version to PST:
- Step 1: Download, install, & open the Kernel OST to PST converter.
- Step 2: Choose to convert a single or multiple OST files and add them.
- Step 3: The tool will scan and display all the items for preview, including deleted ones.
- Step 4: Select the files/folders to convert and click Save.
- Step 5: Choose the output as PST and click Next.
- Step 6: Apply the filters as per your requirements and click Next.
- Step 7: Define a location to save the converted files and click Finish to start OST to PST conversion.
Types of Data Converted by Kernel for OST to PST Converter
This feature-rich software allows you to convert every component of the OST file to PST with a 100% error-free process.
Save all your emails with all the original key attributes like:
- CC
- BCC
- From
- Date
- Subject
- Signature, etc.
Transfer attachments from OST to PST without restrictions. The tool allows you to convert all the file formats like:
- Images: JPG, PNG, BMP, TIFF, etc.
- Documents: PDFs, TXT, DOCS, PPT, etc.
- Media Files: Audio & video files.
- Archive Files: ZIP files and more.
Save all your folders in the output PST file, including:
- Inbox
- Draft
- Sent Items
- Outbox
- Deleted Items, etc.
Keep all your important contacts when you migrate or convert OST to PST with all fields like:
- Name
- Contact Number
- Location, etc.
Hold on to your upcoming events with our OST to PST Converter tool. Save calendar entities like:
- Meetings
- Appointments
- Recurring Events
- One-Day Events, etc.
Preserve your notes the way they were. The tool converts your:
- Note Text
- Subject
- Color
- Category
Keep all your to-do lists after conversion. The tool keeps:
- Task Title
- Due Date
- Start Date
- Task Status
- Priority, etc.
Who Can Benefit from Our OST to PST Converter?
Kernel OST to PST Converter acts as a versatile solution to meet the conversion requirements of all, ranging from individuals to large enterprises. Find detailed explanation on users who can benefit from OST to PST conversion tool.
Outlook users
Regular Outlook users and remote employees often need to convert OST file to PST to access data stored within the offline Outlook file. Allows conversion of data from inaccessible or orphaned OST files for easy data access and communication.
IT Administrators
IT administrators within organizations manage large user databases and their crucial data using Kernel OST to PST converter. System administrators convert their Exchange OST to PST to recover lost and deleted email items from damaged or corrupt files.
Data Migration Experts
Our OST to PST Converter tool assists data migration experts to take care of all the migration from an orphaned or offline OST file to PST. Use the tool to migrate emails, attachments, contacts, or calendars from OST to PST file.
Small Businesses to Large Enterprises
Businesses of all sizes, including small, medium, and large enterprises benefit from best .ost to .pst converter. Easily recover, export orphaned OST to PST and migrate OST to Office 365 or Live Exchange Server.
Frequently Asked Questions about OST to PST Converter Software
Video Tutorial of Kernel OST to PST Converter
Watch the video tutorial to learn how to use Kernel OST to PST Converter Tool seamlessly
What customers are saying about Kernel OST to PST Converter

Efficiently migrated my offline OST file without any data loss. A reliable and user-friendly tool that did the conversion accurately. A must-have tool.
Sudeep RamachandraiahMIT Services - Head - Business Development
![]()
Kernel OST to PST Converter Software Prerequisites & Recommendations
Version: 26.0
Release Date: Dec 2025
License Type: Personal, Home, Corporate & Technician
MS Exchange Server: 2019, 2016, 2013, and earlier versions
MS Outlook: Office 365, 2024, 2021, 2019, 2016, and previous versions
Outlook Express: 6.0, 5.5, 5.0 and 4.0
Hard Disk: 50 MB of disk space
Memory: 128 MB Minimum
Processor: Intel® Pentium Processor compatible (x86, x64) or equivalent
Operating System: Windows 365, 11, 10, 8.1, and older versions, Windows Server 2022, 2019 & older versions