Read Time: 10 minutes
Quick Highlights: You can try the instant solutions to fix the Outlook 0x80040900 error before applying the advanced ones.
- Check the internet connection.
- Turn off Work Offline mode if enabled.
- Temporarily disable Antivirus and Firewall programs.
- Update the Outlook app (File > Office Account > Update Options > Update Now).
- Access Outlook in safe mode (via Outlook.exe /safe run command) & identify problematic add-ins.
- Manually Sync (in New Outlook) & Send/Receive All Folders (in Classic Outlook).
Once checked & applied successfully, go through the upcoming section to learn the effective solutions besides the quick fixes.
Outlook isn’t sending or receiving emails and keeps showing the error message below.
Task ‘xyc@server – Receiving’ reported error (0x80040900): ‘The server name you entered cannot be found on the network (it might be down temporarily). Verify that you are online and that the server name is correct.’
It generally indicates that Outlook cannot find or connect to the configured mail server. So, instead of randomly applying fixes, let’s walk through a systematic approach to fix the Outlook 0x80040900 error.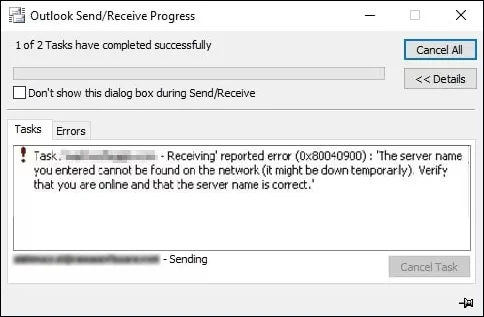
Why Does the Outlook 0x80040900 Error Appear? – Know Possible Reasons
You may face the error for several reasons. Here, we list the most prominent ones:
- Temporary mail server outage.
- DNS or server-resolution problem.
- Corrupted or damaged Outlook profile.
- Damaged or outdated Office installation.
- Work Offline mode is enabled in Outlook.
- Internet or network connectivity problems.
- Outlook data files are damaged or corrupted.
- Incorrect server details or encryption settings.
- Problematic add-ins interfere with Outlook operations.
Manual Ways to Fix the Outlook 0x80040900 Error [Top 5]
Since the Outlook 0x80040900 error is not specific to one cause, we have provided different solutions that apply to the distinct origins of the problem. So, go through them to find the most applicable methods for your situation.
Solution 1. Repair or Change the Email Account Server Settings
You can repair the configured email account directly from Outlook or change the server details to the updated ones using the Control Panel. Here are the steps for both:
To Repair Email Account
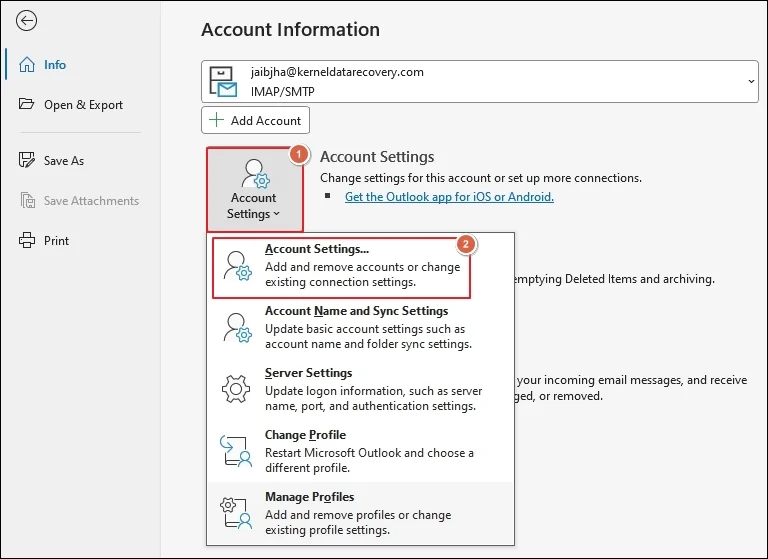
- Step 1. Access the Outlook application and go to the File menu.
- Step 2. Expand Account Settings and proceed to Account Settings.
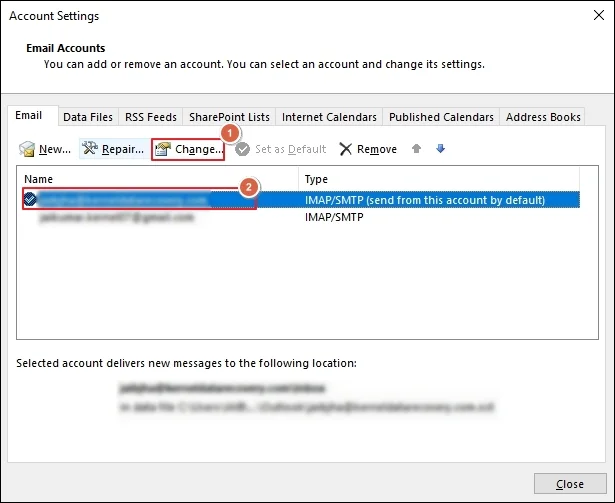
- Step 3. Select your email account under the Email tab. Then, click the Change option.
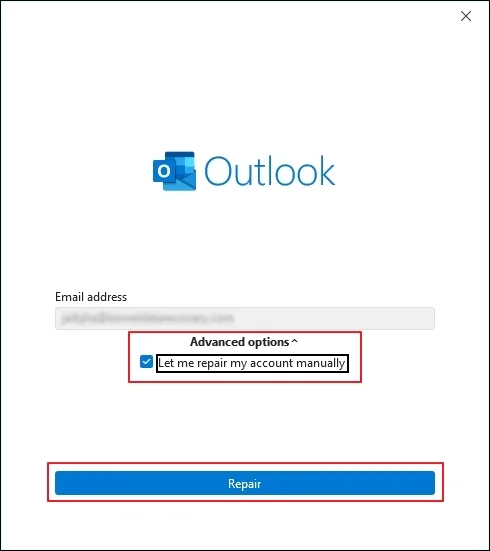
- Step 4. Access the Advanced options dropdown and check the Let me repair my account manually option.
- Step 5. Then, click the Repair option to proceed.
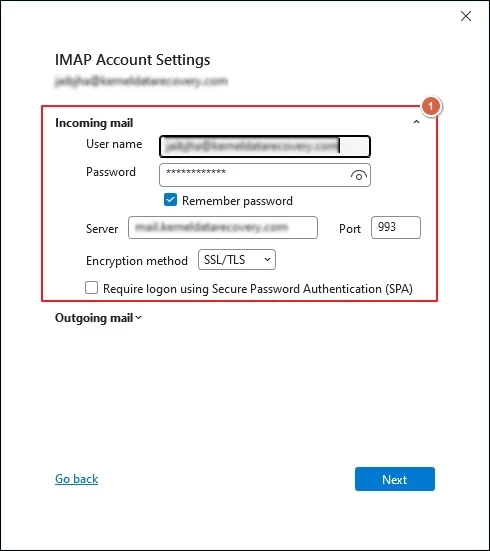
- Step 6. Expand the Incoming mail to verify the entered details.
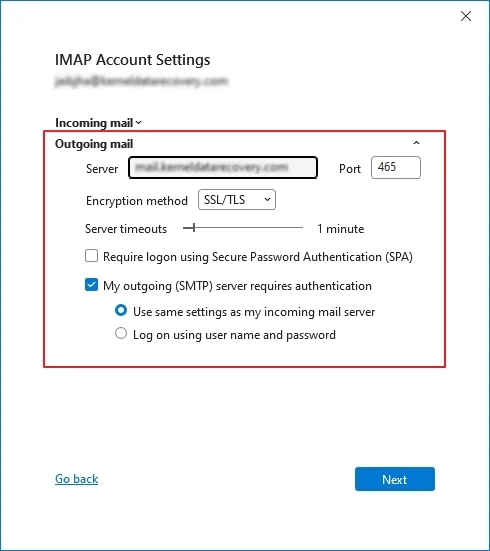
- Step 7. Then, check the entered Outgoing mail server details and click Next.
- Step 8. It will start repairing your account.
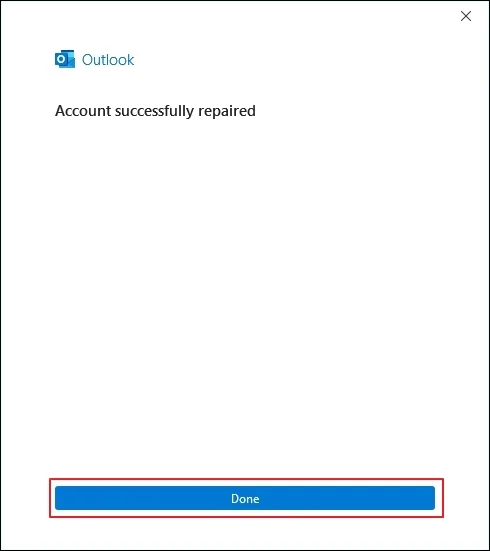
- Step 9. Wait for it to complete and proceed to Done.
To Change Server Details
- Step 1. Close the Outlook application and open the Control Panel.
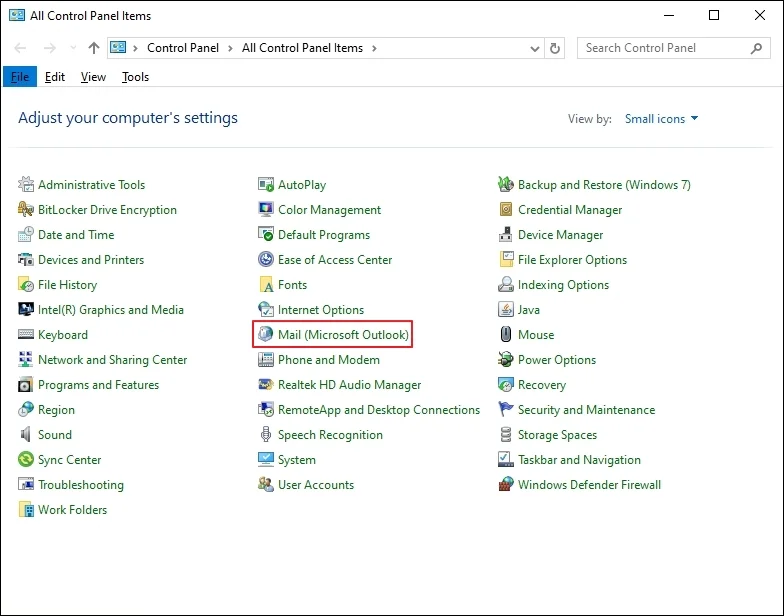
- Step 2. Click the Mail (Microsoft Outlook) option to proceed.
- Step 3. Go to Email Accounts under the Mail Setup wizard.
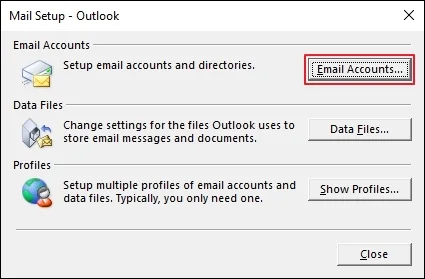
- Step 4. Choose the required mail and tap on Change.
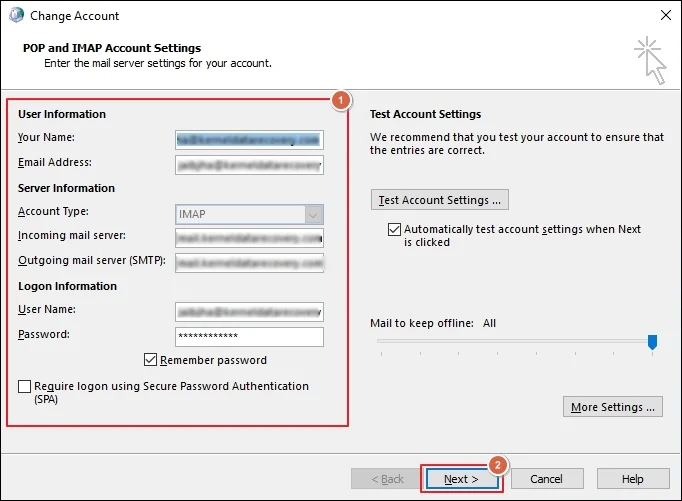
- Step 5. Replace all the entered details with the updated email server details as per your email provider.
- Step 6. Click Next to set up the account with the changed details.
- Step 7. When it’s done, open Outlook to check if the 0x80040900 error is resolved.
Solution 2. Modify the Server Timeout Settings
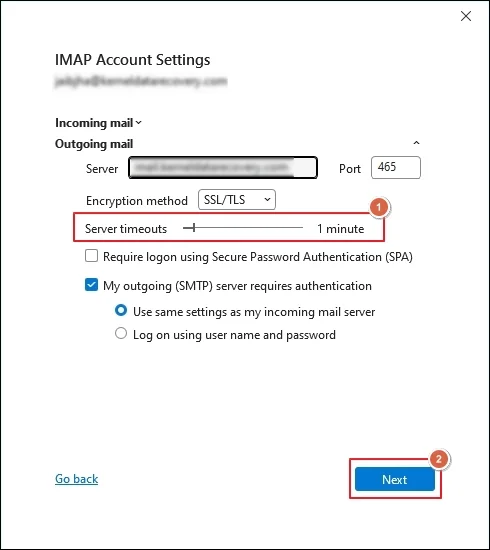
Maximize the server timeout in Outlook to provide additional time for communicating with the mail server before disconnection. Here are the complete steps.
- Step 1. Go to Account Settings > Account Settings.
- Step 2. Select the email account and click Change.
- Step 3. Navigate to the Server timeouts slider and maximize it.
- Step 4. Then, click Next to proceed.
- Step 5. Once completed, check whether the issue is resolved or not.
Solution 3. Remove or Create A New Outlook Profile
If the above methods won’t work for you, try to remove the existing Outlook profile. It will delete broken internal configuration files & offer a clean profile. Once completed, follow the steps below to create one.
- Step 1. Go to Control Panel and choose Mail (Microsoft Outlook).
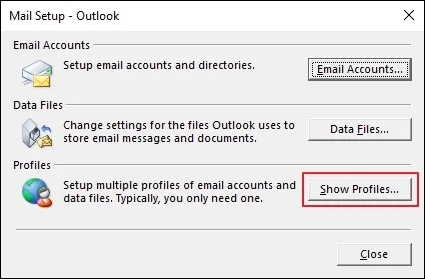
- Step 2. Then, click on Show Profiles to proceed.
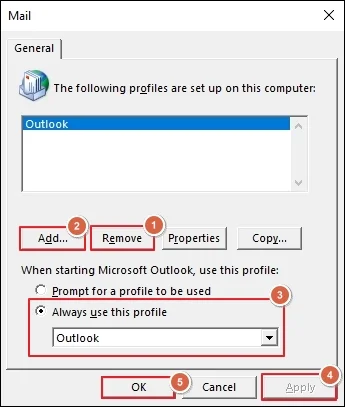
- Step 3. Remove the existing configured profile that creates the problem.
- Step 4. Add a new profile by setting up the same email account.
- Step 5. Set the Always use this profile option to make it the default after completion.
- Step 6. Then, click Apply and click OK to continue.
Solution 4. Repair Microsoft Office Installation
You can repair the Microsoft Office 365 installation to replace damaged program files, reset broken service components, and clear configuration that prevent Outlook from connecting to the server. Here’s how:
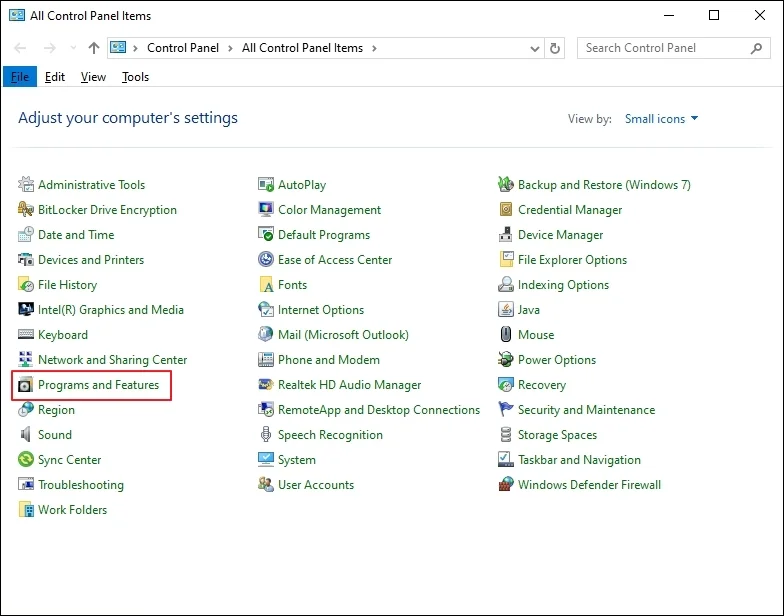
- Step 1. Access the Control Panel and click on Programs and Features.
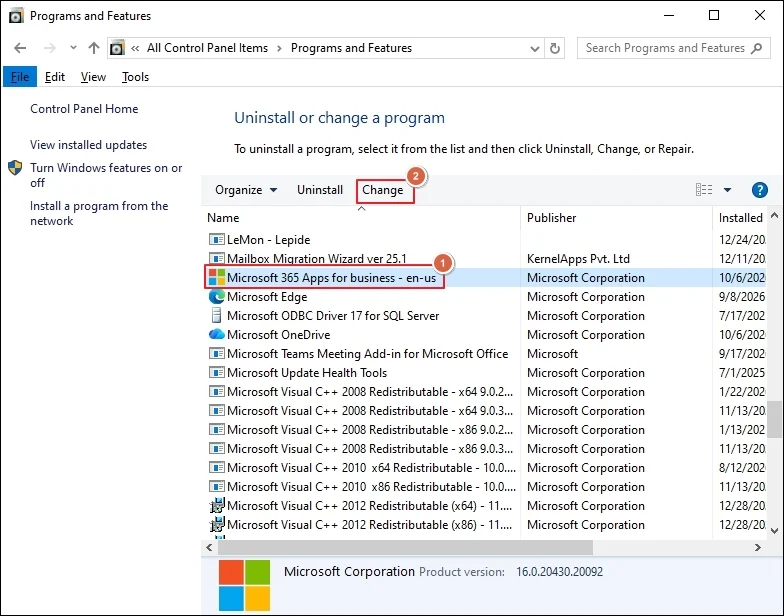
- Step 2. Select Microsoft 365 Apps and proceed to the Change option.
- Step 3. Choose the applicable repair option:
- Quick Repair
- Online Repair
Here, we are going with Quick Repair.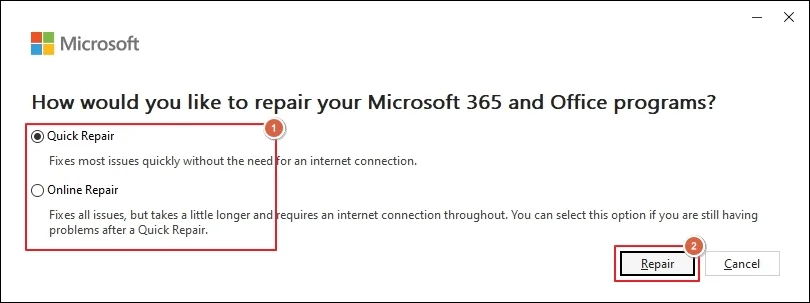
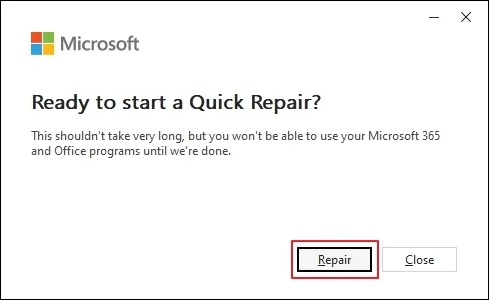
- Step 4. Once selected, click on the Repair option to proceed.
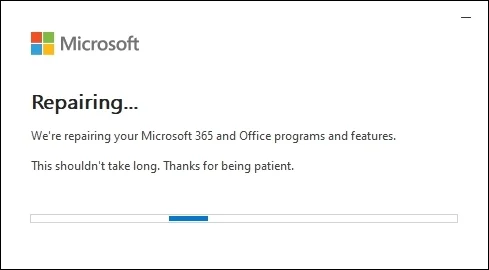
- Step 5. It will start repairing the installed Office 365 programs and features.
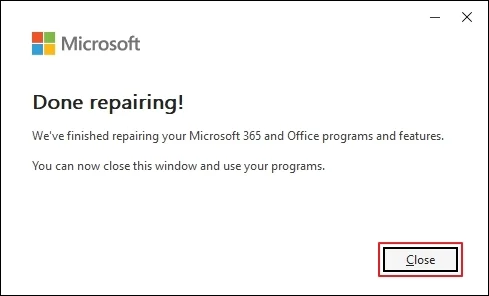
- Step 6. Close the wizard once the repair is done.
Solution 5. Repair the Outlook Data File
Sometimes, corrupted or damaged Outlook data files can be the reason behind the 0x80040900 error. So, use the Inbox Repair tool to scan and repair the Outlook data files that stop Outlook from connecting to the mail server. Here’s how:
- Step 1. Close the Outlook application before you start.
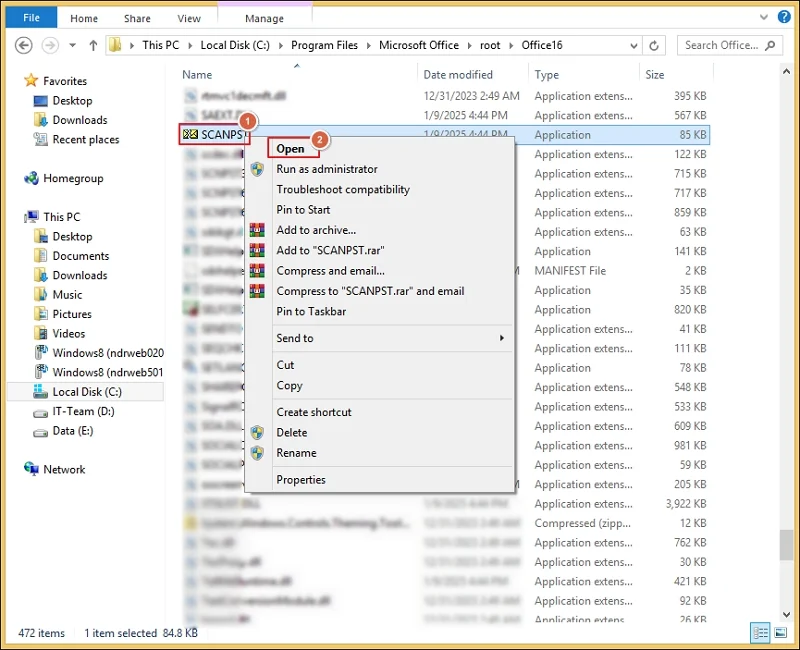
- Step 2. Navigate to the location where the SCANPST.EXE tool is stored.
- Step 3. Then, Open the Inbox Repair tool.
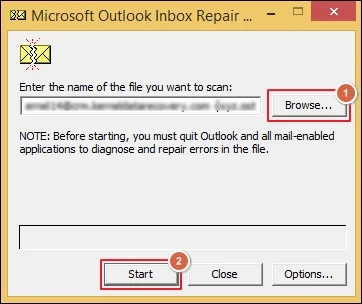
- Step 4. Browse to choose the saved location of the Outlook data file.
Note: To find the stored location, go to Account Settings > Account Settings > Data Files > Open File Location.
- Step 5. Then, Start scanning the added file.
- Step 6. Once scanning is completed, Repair the shown inconsistencies.
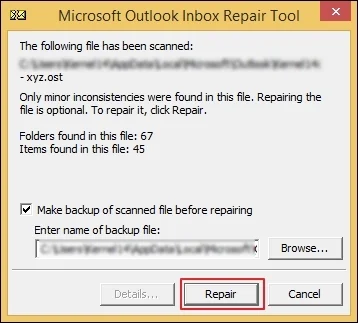
- Step 7. Finally, click OK when the process is finished.
Please Note That: SCANPST.EXE only helps you fix minor corruption or damage in Outlook data files. It becomes ineffective when the file corruption level is severe and requires deep repair. Therefore, using our Kernel for Outlook PST Repair tool will be one of the best approaches. The software scans and repairs multiple damaged, inaccessible, corrupted PST files without imposing any size restrictions. It handles different corruption levels of PST files that arise due to Outlook errors, such as 0x8004210A, 0x800CCC0B, and 0x8004210B.
Let’s Recap
Here, we have covered a detailed guide on how to fix the Outlook error 0x80040900 using different solutions. You can check out the step-by-step guide to apply the suitable methods on your own to resolve the error in most cases.
However, if the error occurs due to severe PST file corruption, then go with the recommended approach. The software supports recovery of deleted emails & other items from PST files along with the permanent ones.