Read time 6 minutes
Migrating PST files to Office 365 mailboxes is one of the most complicated tasks. But, Office 365 import service made it easier for users to move their PST files to Office 365 mailboxes. You can access the import service in Security & Compliance Center of Office 365 to quickly bulk-import PST files to Office 365/Exchange Online mailboxes. It offers two methods:

Get Kernel Import PST to Office 365 tool to effectively transfer PST file data to Office 365 directly in bulk.
Drive shipping method complete overview
Here, we are going to discuss the Drive Shipping Method in detail. Let’s have a look at how this method works.
Download the secure storage key and PST import tool
To download the secure storage key and PST import tool, follow the below steps:
- Go to Office 365 Security and Compliance Center via https://protection.office.com/
- Now, go to Data Governance, select Import and then click New Import job on the Import page.
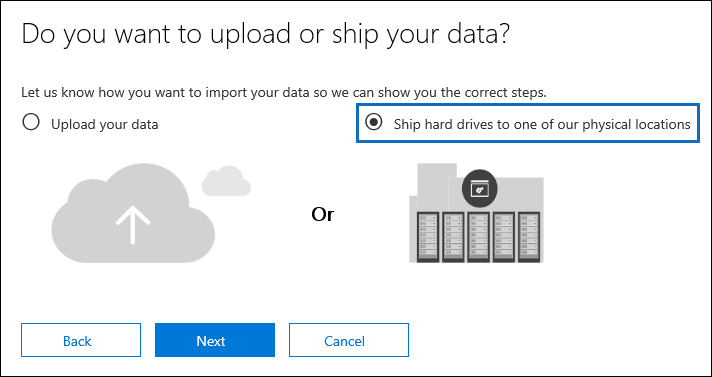
- From “Choose import job type,” click “Ship hard drives to one of our physical locations” and click “Next.”
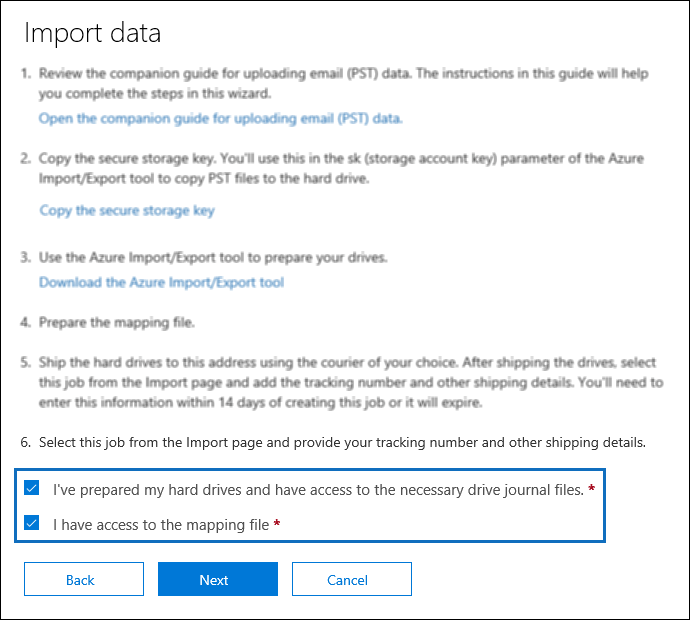
- Do the following two steps on the Import data page:
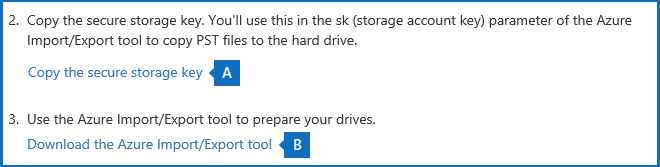
After completing both the steps close the “Import” page wizard and install WAIImportExport.exe tool on your system.
Copy PST files to hard drive
The WAIImportExport.exe tool encrypts the hard drive with BitLocker, copies the PST files to hard drive, and creates a journal file that stores information for the copy process.
- In Command Prompt, go to the directory where WAIImportExport.exe tools installed.
- Now, run the following command to copy PST files to the hard drive:
WAImportExport.exe PrepImport /j:<Name of journal file> /t:<Drive letter> /id:<Name of session> /srcdir:<Location of PST files> /dstdir:<PST file path> /sk:<Storage account key> /encrypt /logdir:<Log file location>
After running the command, the tool will start copying PST files to the hard drive. It will take some time according to the size and number of PST files.
Create the PST import mapping file
To perform mapping correctly, you will have to create a CSV file, which you will have to submit while creating a PST import job.
- Download the copy of the PST Import mapping file.
- Save the CSV file on your local computer. You can edit the CSV file using Microsoft Excel.
Create PST import job in Office 365
Now, you’ll again to create a PST import job in the import service in Office 365. The CSV mapping file will be submitted here. And the import service will use the information in the mapping file to import the PST file to the specified user mailboxes. Follow step 1 to create a PST import job in Office 365.
- After creating a job, select the following options from the “Import Data” page, and then click “Next.”
- In the next step, click “Select drive file” and go to the folder where WAIImportExport.exe is located. The journal file created earlier will be copied to this folder.
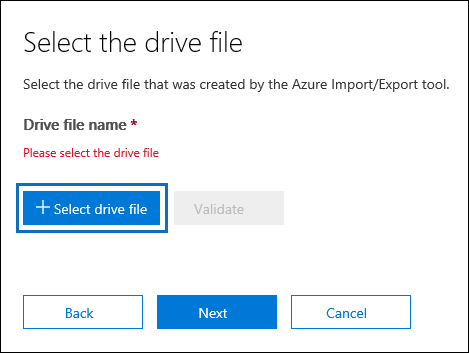
- Select the journal file and when it appears under “Drive file name,” click “Validate” to check your drive file for errors.
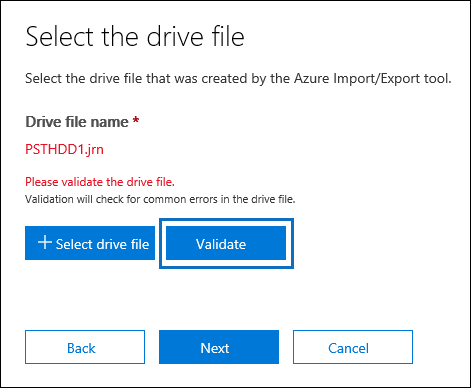
- After adding and validating journal files that you want to ship to Microsoft, click “Next.”
- Now, click “Select mapping file” to submit the PST import mapping file that you created earlier and validate it. After validating the CSV file, click “Save” to save the import job.
- Click “Refresh” on the import page to display the new drive shipping import job in the list of import jobs.
Ship hard drive to Microsoft
The next step in the Drive Shipping method is the shipping of the hard drive to Microsoft along with the shipment tracking number and return shipment information. It will take 7-10 business days for Microsoft to upload your PST files to Azure storage area after receiving the hard drive. Until then, complete the following steps:
- Go to the Security & Compliance center in Office 365 and select “Data Governance,” and then click “Import.”
- Enter the tracking number, delivery carrier, return carrier account number and click “Save.”
- Click “Refresh” to update this information on the Import job page.
Filter the data and start the import job
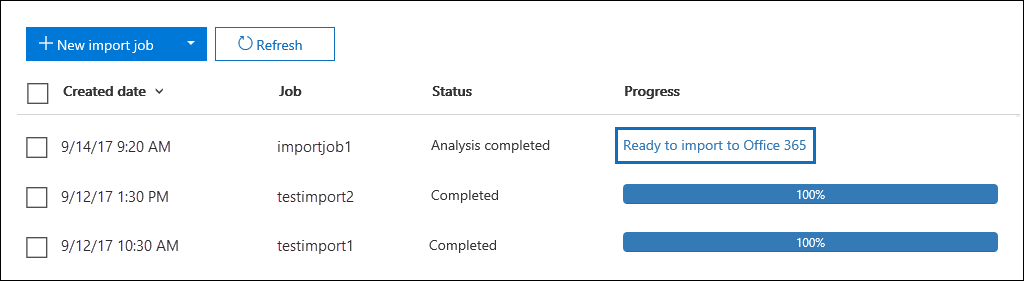
Once Microsoft receives your hard drive, the status will change to Drives received. To upload the PST file to Azure storage, data center personnel will use the information in the journal file. After uploading, the status will change to Analysis in progress. It indicates that Office 365 is analyzing the data to identify the age of the items and messages types in the PST files.
- In the Import page, you can use filters to import specific data or the whole data of the PST files.
- Click “Ready to import to Office 365,” a wizard will appear on the screen.
- When the “Filter your data” page appears, you can decide if you want to filter your data before importing. If you don’t want to filter, click “No, I want to import everything,” and click “Next.”
- And finally, to import the data, click “Import data” to start the import job.
Refresh the “Import Page” to update the status of the import job. When the import job is finished, the status will change to Completed. Using this technique, you can easily export PST files data to Office 365. But, as you can see the drive shipping method is a complex method, and also take more than 1-2 weeks to move your PST file to Office 365.
Alternative of drive shipping method
Well, not every organization can wait for 1-2 weeks to move their PST data to Office 365. Also, it’s not easy to go through the hassle of drive shipping method which is very complicated. Some organizations need an immediate solution, that’s where Kernel Import PST to Office 365 becomes important. It is the number one tool to export PST files to Office in bulk immediately. Also, the working process of the software makes it one of the handy tools, as any person with basic knowledge can move PST file to Office 365 without Outlook, by using this tool.