Read time 5 minutes
OLM is the primary format used by Outlook for Mac to store mailbox data like emails, contacts, calendars, attachment files, etc. Since OLM files can only be viewed in Outlook for Mac, users convert OLM to MBOX to easily access them in popular email clients like Apple Mail, Thunderbird, and Microsoft Outlook. Utilize this guide and know how to convert OLM file to MBOX format quickly. Before doing that, let’s go through the reasons for OLM to MBOX conversion
Reasons to Convert OLM to MBOX
MBOX files are accessible to all open-source email clients. Along with its advantages, there could be many other reasons to convert OLM to MBOX. Some of these are:
- Users convert OLM files to MBOX format when they shift email clients Outlook for Mac to Thunderbird or Apple Mail.
- Users might be shifting from macOS to Windows OS, which is why they’re converting OLM files to MBOX format.
- MBOX file is much better as compared to OLM format to archive important data for a long time.
- Users can share important data with clients and colleagues by converting OLM files to MBOX format. Since OLM files can only be opened in Outlook for Mac, converting them to MBOX format helps users to share data easily.
These differences make the MBOX files unique in their work. Let us now move towards the methods that help to convert OLM to MBOX format effectively.
Methods to Convert OLM to MBOX Manually
There are few methods of converting OLM to MBOX manually. However, this section will provide a universal method for OLM to MBOX conversion.
Method 1. Drag and Drop Technique
This method converts an OLM folder into MBOX, not an entire mailbox. This process requires to be performed repeatedly in two parts until all OLM mailbox items are converted into MBOX. This method is only applicable in Outlook for Mac in 2016, 2019 and 2021. To do the same, follow the steps below:
Part 1. Import OLM file into Outlook for Mac
Step 1. Open Outlook for Mac, click on Tools, and choose Import.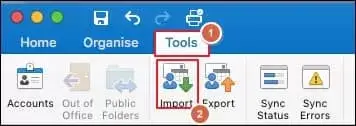
Step 2. Select Outlook for Mac archive file (.olm) and click on Continue.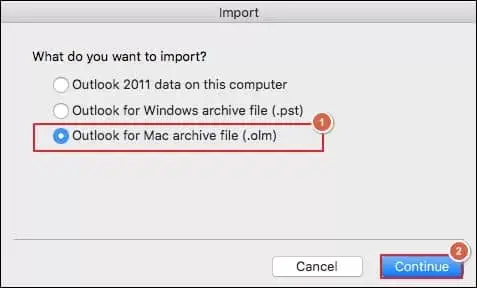
Step 3. Now, browse the desired OLM file and click on Import.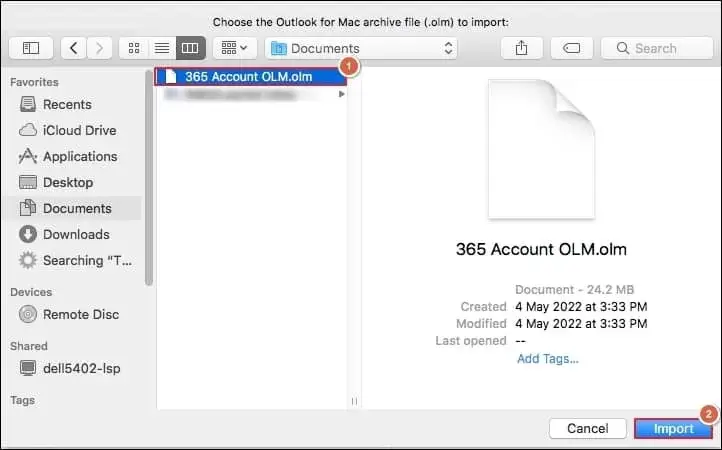
You can see the imported OLM files under the On My Computer tab in Outlook for Mac.
Part 2. Drag and Drop OLM File into MBOX
Step 1. Once again open Outlook for Mac on your device.
Step 2. Open imported OLM data into Outlook for Mac and, select the desired folder, drag and drop to the desired location in File Explorer.
It will save your OLM folder in MBOX format on your device.
Method 2. Convert OLM to MBOX Using Gmail and Outlook
Another way to convert OLM file to MBOX format is by configuring IMAP account in Outlook for Mac and then exporting the OLM file. Here are the steps of how you can execute the method:
Part 1. Enable IMAP in Gmail Account
Step 1. Open Gmail and login with your credentials.
Step 2. Now, click on the Gear icon located at top right corner, and click See all settings.
Step 3. Now, go to Forwarding and POP/IMAP tab and look for IMAP access. Turn-on Enable IMAP option and click Save Changes.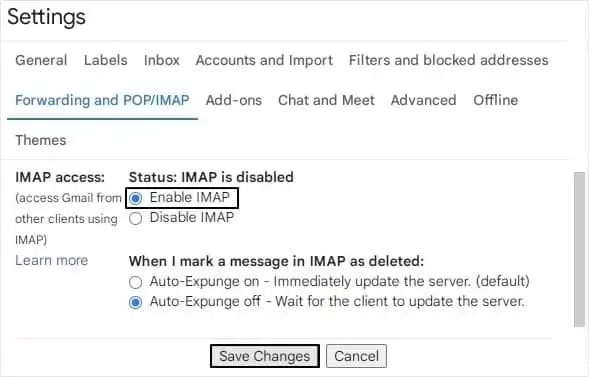
Part 2. Configure IMAP Account in Outlook for Mac and Export OLM Files
Step 1. Launch Outlook email client and click on Tools >Account >Email.
Step 2. Enter the credentials of your Gmail account and add your account.
Step 3. Select the desired emails to convert into MBOX format and right click on it to move them.
Step 4. Now, click the Control Panel option, then click Mail >Open an account.
Step 5. Click on the New option and apply the necessary settings.
Step 6. In this way, the IMAP account gets set-up in Windows Outlook.
Step 7. Create a new PST file using the Import/Export option of Outlook.
Step 8. Later you can export the PST file into MBOX format.
When are Manual Methods Suitable for OLM to MBOX Conversion?
- Best for small mailboxes: The given methods work best when users have a small number of OLM files or limited number of mailbox folders.
- One-time conversion of OLM files: The given methods work well for a one-time conversion of OLM files to an MBOX supported client.
- Access to Outlook Mac: Users still having access to their Mac Outlook account can execute these methods easily.
- For selective conversion: If users need to convert only selected few mailboxes, the drag and drop method works well for this purpose.
How to Convert OLM to MBOX in Bulk?
The manual methods are a suitable choice for users with small number of files. Now, if someone wants to migrate multiple large-sized OLM files quickly, their approach must be little different. Enterprises handle large sets of data on a daily basis. They need a quick solution to convert all their files with minimal downtime. You can use OLM to PST Converter software which simplifies your work and convert all your files safely. The tool easily imports OLM files to Gmail, Exchange Server, Domino, or GroupWise.
To convert OLM files into MBOX format in bulk, follow these simple steps:
Step 1. Download Kernel for OLM to PST Converter software.
Step 2. Finalize the set-up of the tool by following the given instructions.
Step 3. Launch the tool on your device and click on the “Select File” option in the toolbar.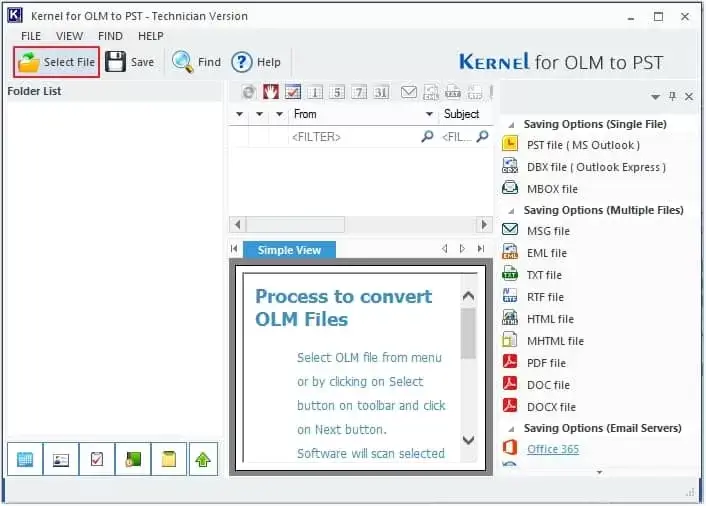
Step 4. Click on Browse button to upload OLM file, then click Next.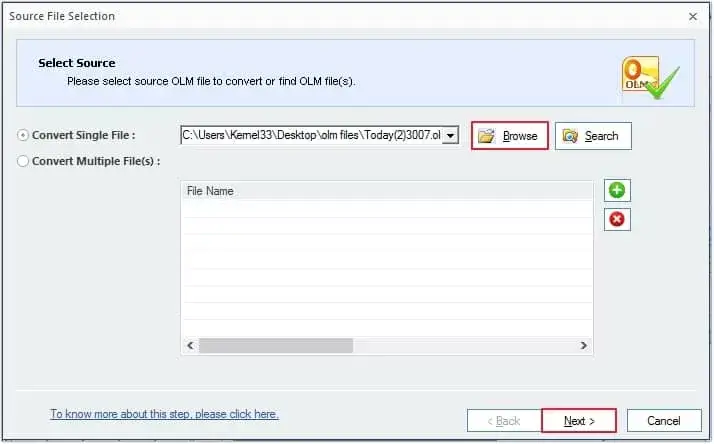
Step 5. Preview your OLM email in the original hierarchy and select the file you want to convert then click on the Save button.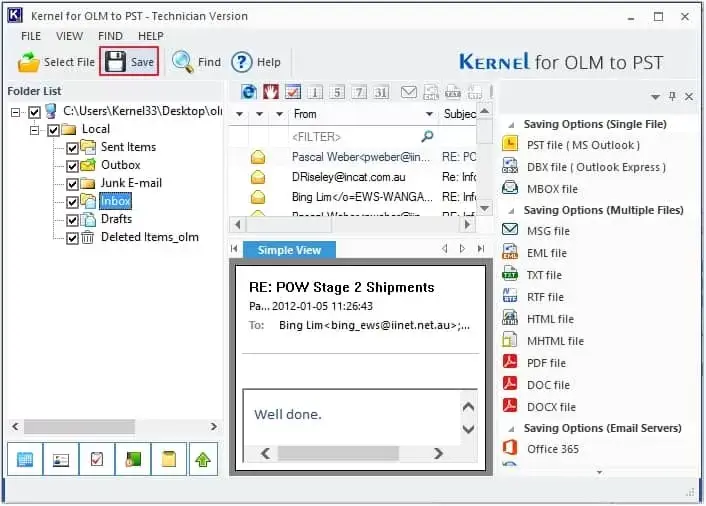
Step 6. Choose the MBOX File from various file-saving options and click Next.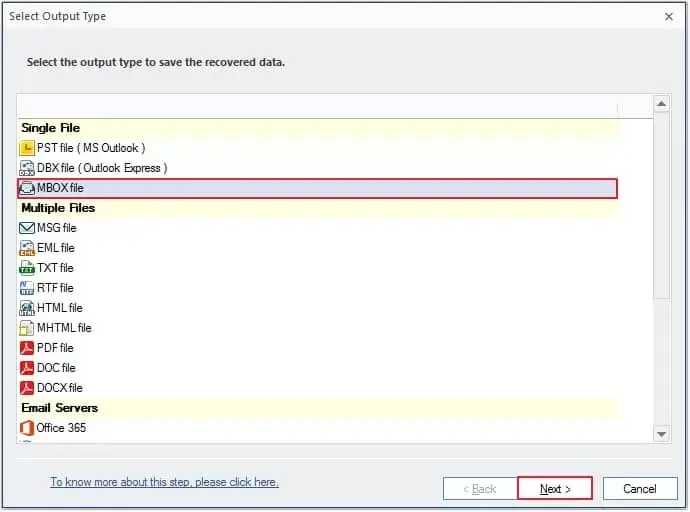
Step 7. In this section, choose necessary filters to convert specific data from the OLM file to MBOX. Simply select the desired filtering options and then click on Next.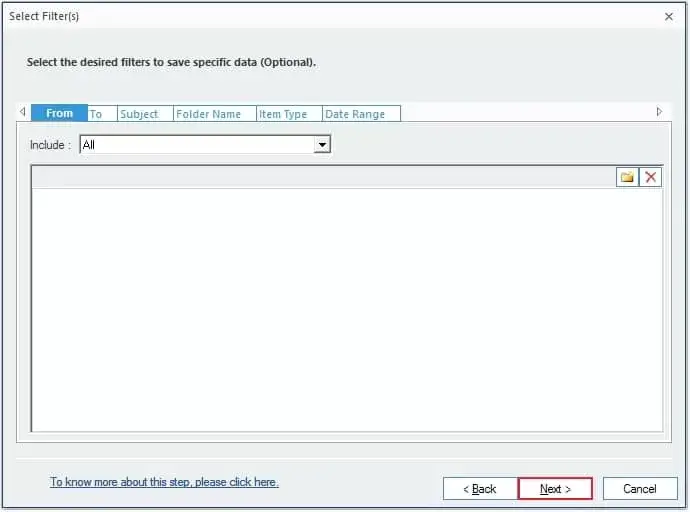
Step 8. Select the necessary MBOX email client (e.g., Apple Mail) and then click Browse to provide a saving location. Once done, click on Finish.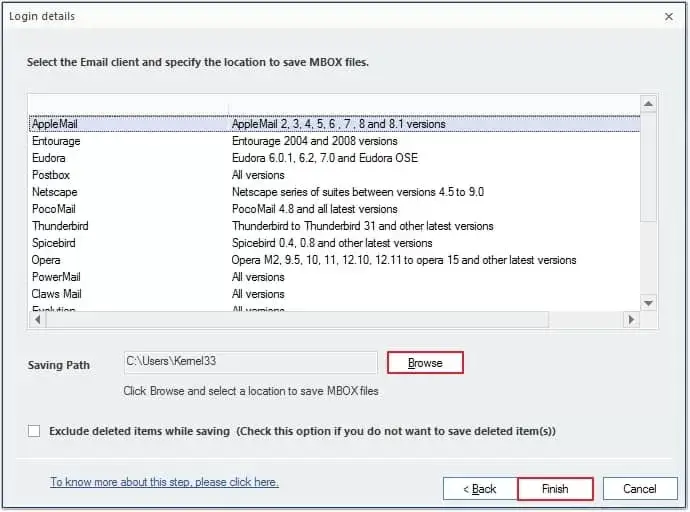
Step 9. It will take a while for conversion and popup with successful conversion message with saving location. Click the OK button to finish the process.
Conclusion
If you wish to transfer your emails between platforms such as Thunderbird, Apple Mail, or Gmail manually, then you need to convert OLM file to MBOX format. Choose an approach that suits your migration requirements the best. Consider the number of OLM files that you have for migration, the size of your mailbox, and whether you need to preserve the folder structure for compliance reasons or not.
Frequently Asked Questions
A. Yes, users can view their MBOX files in Microsoft Outlook by importing them into the email client.
A. No, there’s no direct method available to import OLM files in Thunderbird. However, you can import a small number of OLM files via the drag and drop method.
A. Yes! With Kernel for OLM to PST Converter tool, users can easily convert their OLM files to MBOX without needing to open Outlook for Mac.