Read time: 5 minutes
Nowadays, the rise in cyber threats is really a big concern that requires efficient handling from the mail administrator. It is an ongoing battle that may get worse due to various phishing campaigns implemented by attackers. Fortunately, growth in technology introduced various new standards to be protected against such attempts.
To prevent various cyber threats, including email spoofing and phishing attacks, each organization needs to implement DKIM in Microsoft 365. As email usage and capabilities continuously grow, this protocol must configure to Microsoft 365 to ensure that the receiving mail comes from a legitimate domain. DKIM (DomainKeys Identified Mail) is one of the trios of authentication protocols (SPF, DMARC, and DKIM) where a digital signature is added to all outbound email messages. To check the legacy of the sender domain, the receiver server determines these signatures. It also includes a private key which is responsible for encrypting the header of the outgoing mail.
This protocol also transfers the sender’s emails to spam or junk folders. It generally happens when the sender domain doesn’t pass the authentication tests.
Setup DKIM for Microsoft 365
The configuring of the specific protocol to Microsoft 365 doesn’t require in the below two cases:
- Using the default .onmicrosoft.com domain.
- You have only one custom domain.
But if you are not involved in any of the above cases, you can configure it in Microsoft 365 through the manual approach. It includes several stages, such as creating two DKIM records, publishing them for your custom domain in DNS, and enabling signing.
Create DKIM records for Microsoft 365
Creating records of the specific protocol is quite important as it maps an alias name to the specific domain name. To create a custom domain, you must create records for pointing out the initial domain. These records look like the following:
Points to: selector1-CompanyDomainName-com._domainkey.TenantName.onmicrosoft.com
Points to: selector2-CompanyDomainName-com._domainkey.TenantName.onmicrosoft.com
If the company domain is xyz.com, you need to create below two records:
Points to: selector1-company-com._domainkey.company.onmicrosoft.com
Points to: selector2-company-com._domainkey.company.onmicrosoft.com
Publish DKIM records in DNS
If you create a custom domain in addition to the default domain, you must publish two records for a single custom domain. For this, you need to use the following format for these records:
Points to address or value: selector1-._domainkey.
TTL: 3600
Points to address or value: selector2-._domainkey.
TTL: 3600
Enable DKIM signing
After performing the above steps, now it’s time to enable signing in Microsoft 365. You can perform the same using two methods, i.e., Microsoft 365 Defender or PowerShell.
Enable DKIM signing using Microsoft 365 Defender portal
If you want to enable this signing using the Defender portal, you must follow the below steps:
- Enter the URL https://security.microsoft.com to login to Microsoft 365 Defender portal. Click on Email & Collaboration -> Policies & Rules -> Threat policies -> Email
Authentication Settings -> DKIM. You can also browse
https://security.microsoft.com/dkimv2 to go directly to the specific page.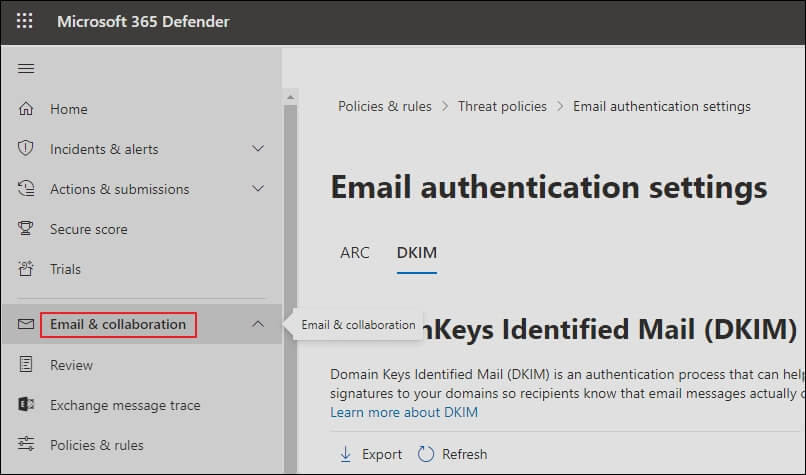
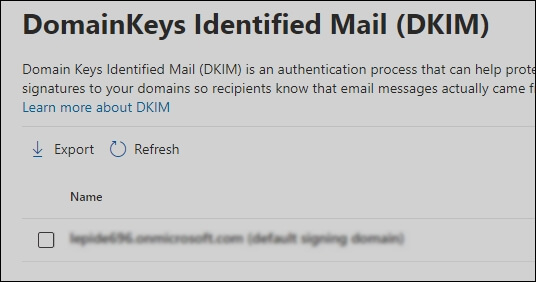
- Next, click on the domain you want to enable.
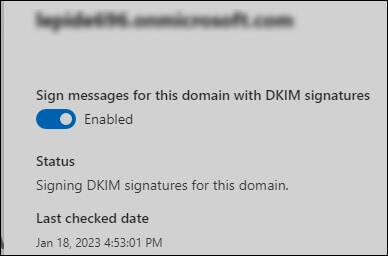
- Finally, change the Sign messages for this domain with DKIM signatures to Enabled.
If you receive error messages while enabling the signing using the Microsoft 365 Defender portal, another method is also available, i.e., PowerShell.
Enable DKIM signing using PowerShell
You can also use PowerShell to enable signing in Microsoft 365. For this, you must follow the below steps:
- First, connect to Exchange Online PowerShell and run the below command:
Set-DkimSigningConfig -Identity -Enabled $true
- Here, Domain refers to your custom domain name for which you want to enable signing.
For example: If the company domain is abc.com, you must run the below command:Set-DkimSigningConfig -Identity contoso.com -Enabled $true
Confirm DKIM signing is configured properly for Microsoft 365
- You need to wait for sometimes after performing the above steps to save the changes. After that, ensure that the signing has successfully been configured to Microsoft 365:
- Send an email from the specific account for which you just enabled signing to another email account. If it transfers successfully, it means that signing has been configured to Microsoft 365.
- AOL account may skip the DKIM check. Hence, you should not use it for testing purposes.
- Look at the header in the specific message. If it has successfully been enabled, you can see the hostname and domain in the message.
- Look at the Authentication-Results header; it should include DKIM = pass or OK.
Conclusion
Many organizations setup this protocol for Microsoft 365 to ensure the safe delivery of mail to client/customer mailboxes. You might see that some of the incoming emails from the specific domain transfer to your spam or junk folder. Have you ever thought about which mechanism relies on this? Actually, this protocol is responsible in this particular case; it happens when the domain of the incoming mail doesn’t pass the authentication tests. You can consider it as an effective authentication method to secure Office 365 mailboxes.
Before setting this authentication protocol for Microsoft 365, it is recommended to keep a backup of your mailboxes to prevent data loss. You can use an effective tool named Kernel Office 365 Backup & Restore that is capable of backing up your private mailboxes, shared mailboxes, archive mailboxes, and Microsoft 365 groups. Hence, you need not worry as data can easily be restored if data loss happens.