Office 365 is a cloud platform, widely popular to streamline the workflow of organisations, professionals, and individuals remotely. It provides a complete suite of tools, applications, and cloud storage for various purposes, including personal and professional ones. Office 365 also facilitates shared mailboxes and groups for its users to enhance collaboration and communication between team and project members to share emails, calendars, and files seamlessly.
To experience the benefits of cloud platforms such as teamwork, interaction and information exchange or accessing the PST file in online Outlook, users need to upload PST to Office 365. However, many users fail to do the same, which causes blunders and troublesome situations when uploading PST files to Office 365. So, we’ll go through an exclusive method to upload PST files to Office 365 while maintaining data integrity after analyzing the significant reasons to transfer PST to Office 365.
Why Users Need to Upload PST File to Office 365?
There are several scenarios that compel users to upload PST to Office 365. Some of the significant reasons are as follows:
- Uploading PST files to Office 365 enhances the accessibility of emails from any device and location.
- Facilitates improved data security to reduce the risk of data loss from accidental deletion or hardware failure for PST files.
- Provides centralized cloud storage to manage and store emails quickly.
- Allows easy and advanced collaboration with team members by accessing and working with all email data in a single location.
After seeing these beneficial aspects for users to transfer PST to Office 365, let’s understand the easy and effortless procedure to upload PST to Office 365.
How to Upload PST to Office 365 Mailbox?
Whether a small business owner or an IT professional, everyone wants a simple and secure process to transfer PST file to Office 365 mailbox. Manual methods are also available to upload PST to Office 365, but they consume more time and are prone to data loss. Due to the risks and limitations of manual approaches, they are considered inappropriate and non-preferable ways to transfer PST to Office 365. So, because of the unavailability of effective methods to add PST to Office 365, relying on the automated upload PST to Office 365 tool is a safe and secure approach.
Reliable Solution to Add PST file to Office 365 Securely
Kernel Import PST to Office 365 is the best and leading tool to transfer PST to Office 365 easily in a few steps, keeping all data intact. This software is an advanced solution that allows users to quickly add PST data to multiple mailboxes and Office 365 Groups. It does not require any technical expertise; even a novice user perform all the steps needed to transfer PST to Office 365. Moreover, you can add a PST file to Office 365 or Exchange even if you don’t have Outlook installed on your system.
![]()
![]()
Now, let's know other robust and outstanding features of the tool:
- Upload PST file to Office 365 Groups using a modern authentication process.
- Transfer PST to Office 365 with complete accuracy and data integrity.
- Offers improved security and an error-free login process for secure migration.
- Provides innovative filters to upload selective data from PST files.
- Ensures faster migration by escaping duplicates, empty folders, and deleted folders.
Easy Steps to Upload PST to Office 365 Mailbox
Now, let's perform the effortless and easy stepwise procedure associated with the tool to transfer PST to Office 365 effectively:
Step 1. Launch the tool. Add PST files in the Add Source section and similarly, add Office 365 account as destination.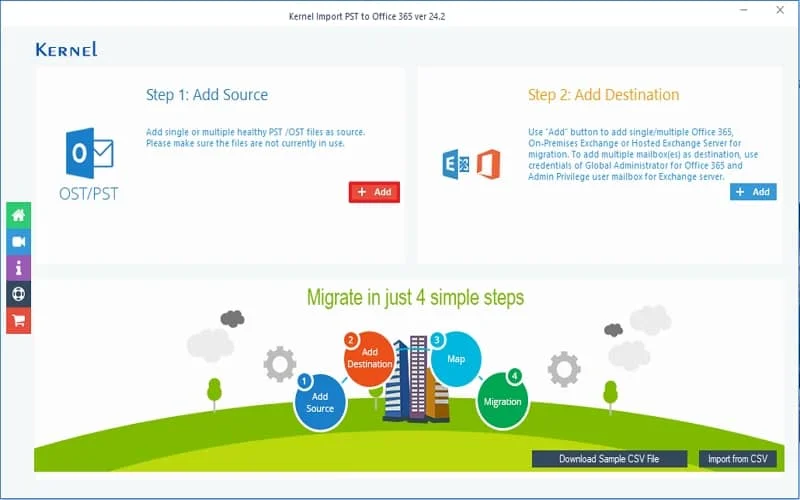
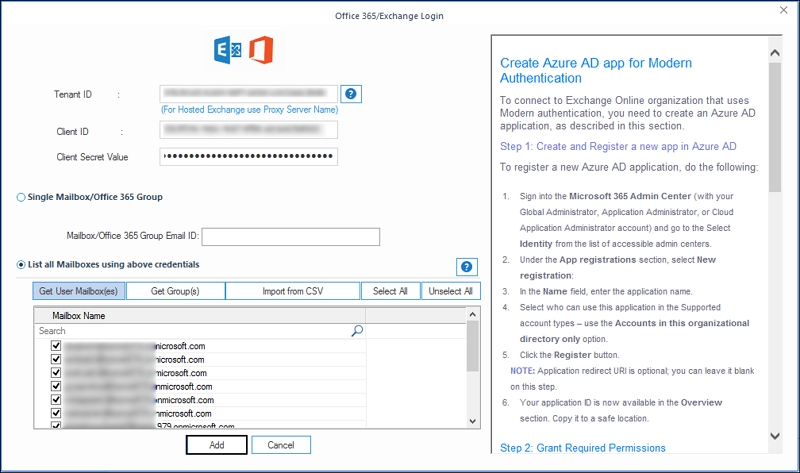
Step 2. Log in either by Modern Authentication or Basic Authentication. Enter details like Tenant ID, Client ID, Client Secret Value and click on Add.
Step 3. Map the source account with the destination account and click on Set Filters to Migrate button.
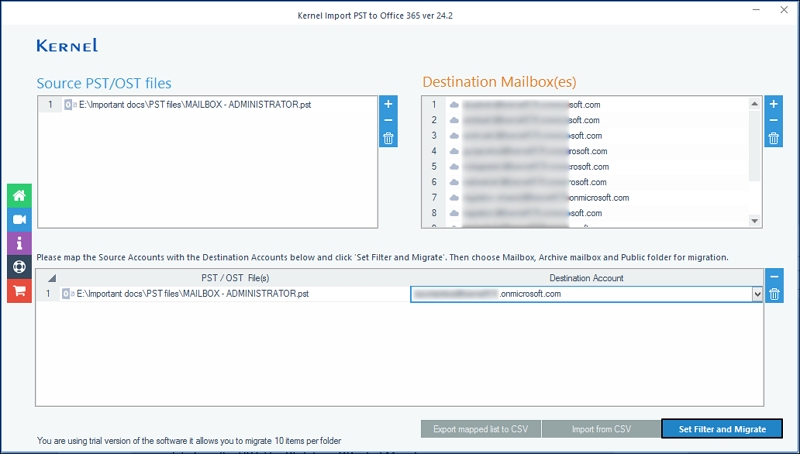
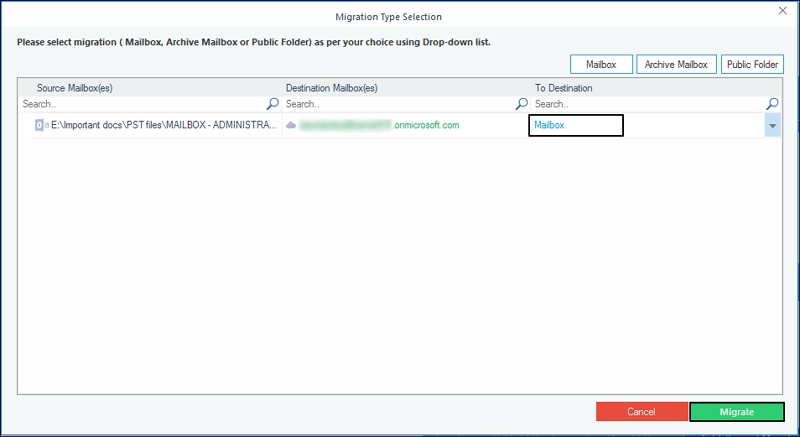
Step 4. Select whether you want to migrate Mailbox, Archive folder, or Public Folder to the destination. Then click on Migrate.
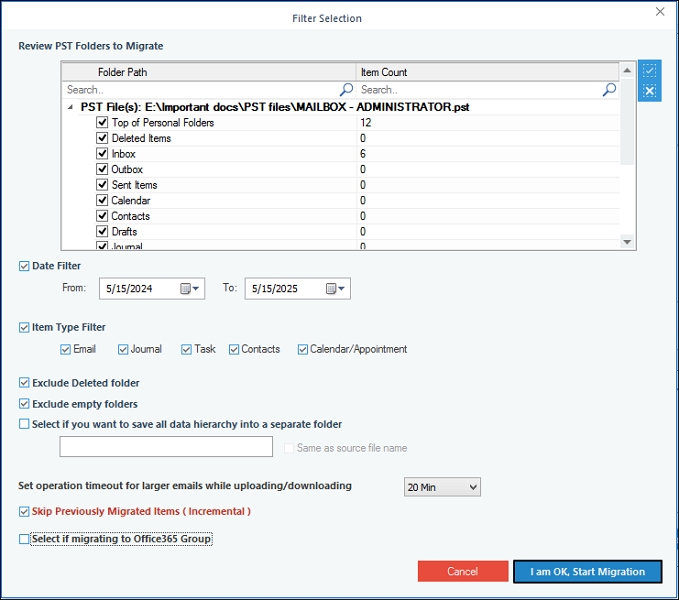
Step 5. Review the PST folders and apply the advanced filters. Finally click I am OK, start Migration.
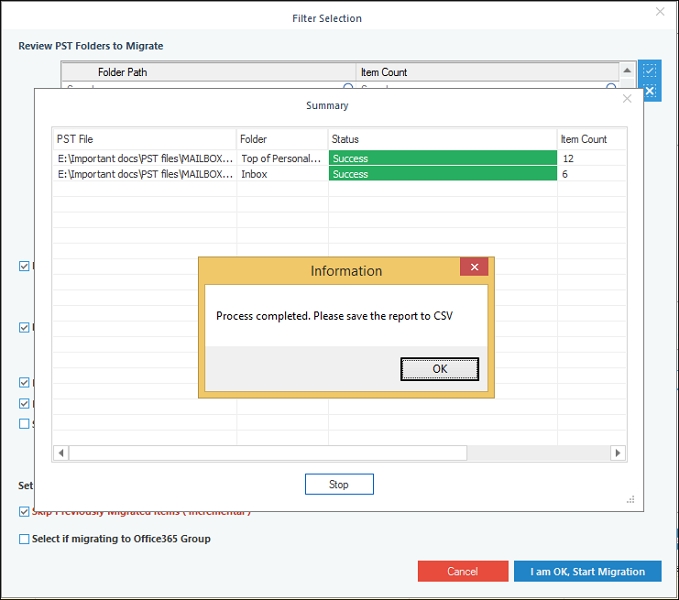
Step 6. The migration process will start.
Step 7. After the process is successful, you’ll receive a pop-up message to save the process report in a CSV format. Click OK to finish uploading PST file to Office 365 process.
Conclusion
We’ve analyzed several advantages of uploading PST files to Office 365. We’ve also given the stepwise procedure to add PST to Office 365 mailbox. However, the manual methods might disturb the folder hierarchy and even lead to data loss. To avoid all such risks, the above-mentioned PST to Office 365 tool is the best choice. Features like bulk migration and advanced filtering options make this tool the best and most straightforward utility. Use the trial version for free and avail all the benefits. Download Now!