

Read time 13 minutes
This article includes:
- How to Migrate Outlook Emails to Microsoft 365, Manually
- How to Migrate Outlook Mailbox(es) to Microsoft 365, Automatically
Organizations and their professionals are moving rapidly from on-premises environments to all cloud-based platforms since it can significantly boost your business productivity. Cloud platforms have many facilities such as better security, limitless accessibility, advanced security features, collaborative tools (Yammer, SharePoint, Skype for Business, MS Teams), extended mailboxes, flexible subscription plans, inbuilt migration features, and an enterprise-level email server. But after subscribing to Microsoft 365, many end-users often have to migrate emails from Outlook on their desktop to Microsoft 365 mailbox due to organizational policies, mergers & acquisitions, or the need for periodic backups to the safe cloud destination. It is important to know that MS Outlook stores all the user’s data including emails, contacts, calendar entries, notes, and tasks in the form of a PST file format. Here, we will discuss both manual and automated methods to help you import PST files to Microsoft 365 mailboxes.


Now migrate Outlook Emails to Office 365/ Microsoft 365 environment using the automated tool Kernel Import PST to Office 365.
What is the need to migrate the PST file to Microsoft 365 mailbox?
- Organizational policies
Many companies have mentioned in their policies to migrate all their essential Outlook PST files to Microsoft 365 mailbox for security or backup purposes. This can also happen when an employee switches to a new organization and starts with a Microsoft 365 account. - Creation of a new account
When you are using some other email account and need to create a new mailbox, it is required to migrate PST files from Outlook to receive all the important information even in the new one. - Periodic backups
Taking backup of all the essential data is a wise habit. Users often back up all their PST data to keep it safe from any kind of data loss and other risks. This is a precautionary measure that should be taken on a regular basis. - Change of system
While changing to a new and advanced system, there is a need to create a new Outlook account. To import all the data in that as well, users often migrate only their necessary emails. - Accessibility from anywhere
One of the greatest advantages of Office 365 is its universal accessibility. You can access data from anywhere and from any device. So, after moving data from PST files to Office 365, you can access it from anywhere.
How to migrate Outlook emails to Microsoft 365 manually?
For importing PST files manually to the Microsoft 365 mailbox or performing mailbox migration to Microsoft 365, we’ll first need to configure Microsoft 365 account in MS Outlook. Then, you need to use its Import/Export feature. To do this, follow the steps below
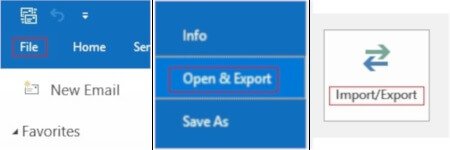
- Open Outlook, click the File tab, click Open & Export, and select Import/Export.
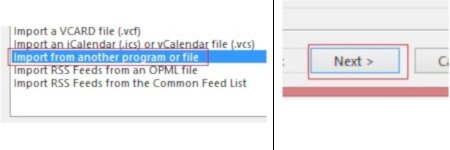
- Select Import from another program in the Import and Export wizard and click Next.
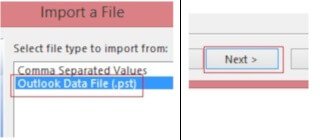
- Select Outlook Data File (.pst) and click Next.
- Browse for the Outlook PST data file, select it and click Next.
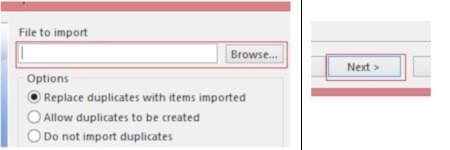
- Set Options according to your preference to manage duplicate items in the file and click Next.
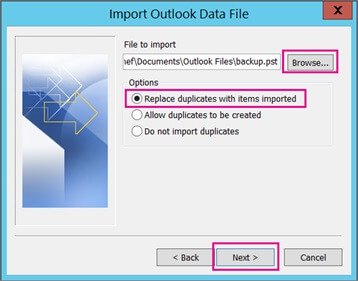
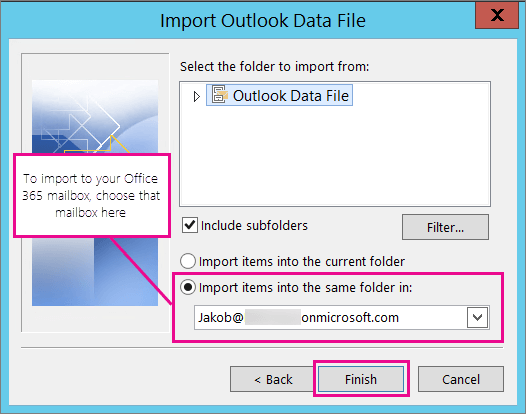
Note: If the PST file is password-protected, enter the password, and unlock it, click OK. - Choose the Import items to the same folder in the option and select the Microsoft 365 mailbox; Click Finish.


That’s it! You have imported the PST file to your Office 365 mailbox.
That’s it! The manual method is crisp, and there is nothing to worry about except some of its limitations-
- Need to configure Office 365 account in Outlook.
- It does not work for large-sized PST files. Mailbox files especially those of more than 150GB do not migrate at all.
- It can migrate only a single mailbox at a time.
- The chances of data loss are high.
- It is quite a lengthy process as only a single mailbox is migrated at once.
- There isn’t any guarantee of complete data migration. Chances are that some data might be missing.
- It is not suitable for a complete beginner. The user must have knowledge about Outlook to some extent.
- No PST import reports are available.
However, there are two more methods from Microsoft (Network Upload Method & Driving Shipping Method), which can be used to import PST files to Microsoft 365 mailboxes.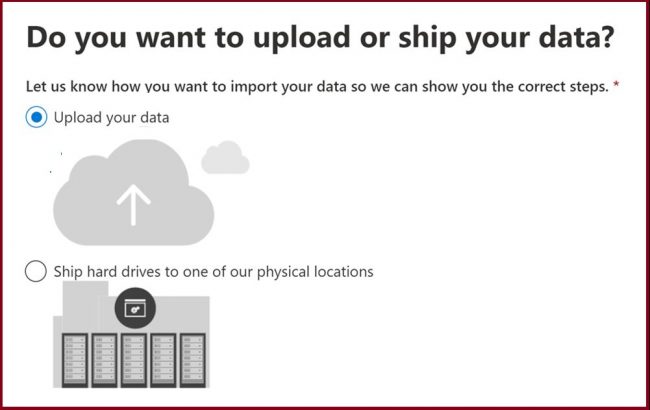

The Network Upload method is a great way and free approach to importing PST data to Microsoft 365. It allows administrators to import their entire PST data to Microsoft 365 using the Azure AzCopy tool. But keep in mind that the PST file should be stored on a file server or shared folder in your organization before migrating it to Microsoft 365. The steps involved in the Network upload method are: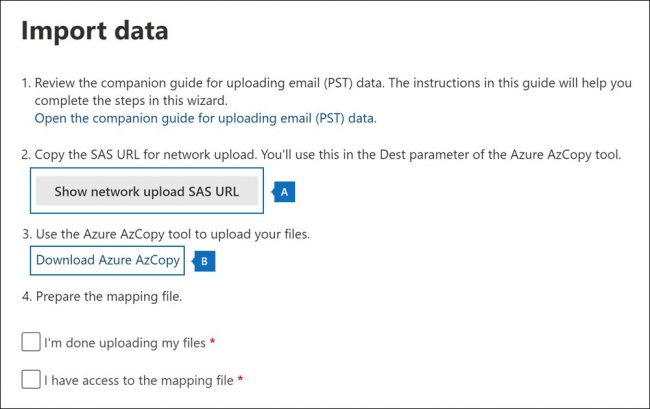

- Step 1: Assigning the roles
- Step 2: Creating the import job
- Step 3: Uploading PST files to the Azure Storage
- Step 4: Verifying the uploaded Outlook PST files
- Step 5: Mapping the Outlook PST files
- Step 6: Starting the PST import job
For this method to work, the user account you will use to upload the Outlook PST to Office 365 must have the roles Import Export and Mail Recipients. Also, you’ll need the AzureAZCopy tool.
The steps are as follows:
Here is how to assign the roles in EAC.
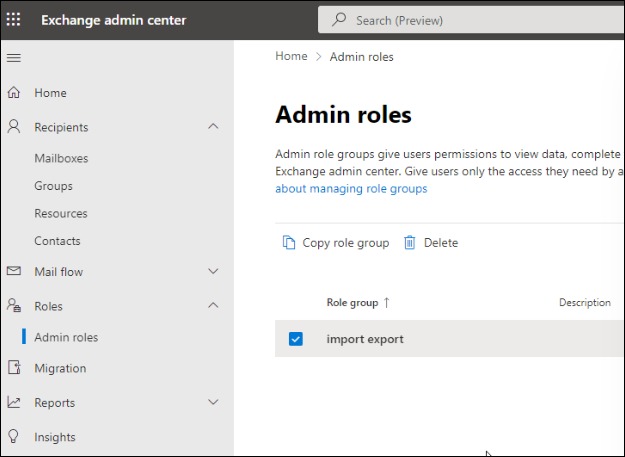
- Access Exchange Admin Center and tap on Roles. Go to Admin Roles and search for import export.
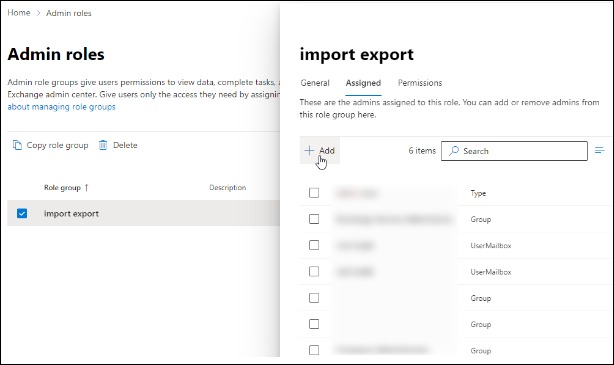
- Within the Assigned tab, click on Add. Select the user you wish to assign roles to import the PST file.
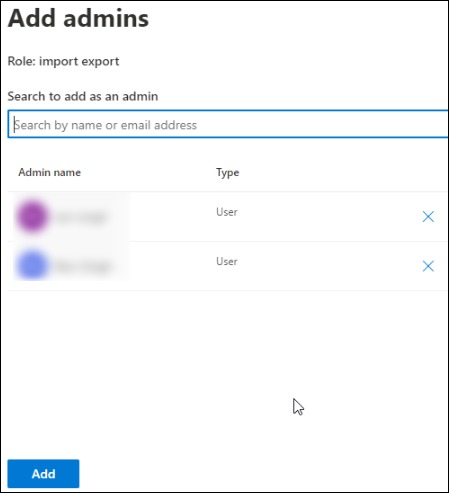
- Choose the users and tap on Add.


For creating the Outlook PST to Office 365 import job to upload PST files to Azure Storage, here are the steps:
- Go to the homepage and navigate to Data lifecycle management > Import.
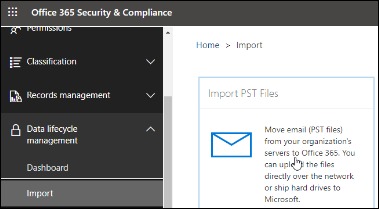
- Tap on Import PST Files.
- Click on the option + New import job and type up the job name.
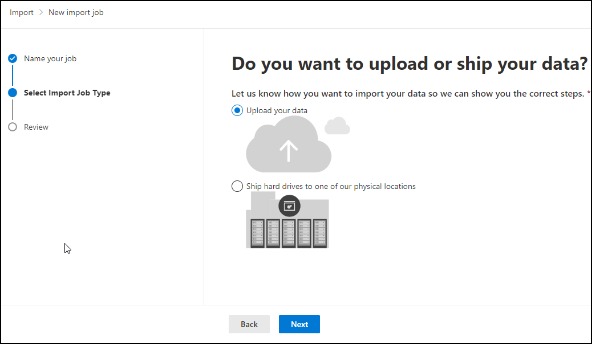
- Hit Next and choose Upload your data in SelectImport Job Type. Tap on Next again.
- Click on Show network upload SAS URL.
- Tap on Copy to clipboard and then click on Download Azure AzCopy for downloading the tool.
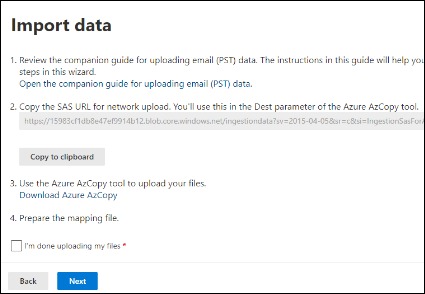


To upload the Outlook PST file to Office 365 Azure Storage, read below.:
- As your download is complete, open the tool and copy all the folders with the PST files on the Desktop.
- Access Command Prompt and go to the extracted folder where the azcopy.exe data file is present using the ‘cd’ command.
- Execute the below command for uploading the PST files to the Azure Storage.
Azcopy copy “pathToFolder/ContainingPST” “SAS URL” –recursive=true

Go through the steps below for verifying that the PST files are uploaded successfully on the Azure Storage.
- Launch the Azure Storage Explorer and choose the Blob container. In the Blob container SAS URL field, paste the SAS URL.
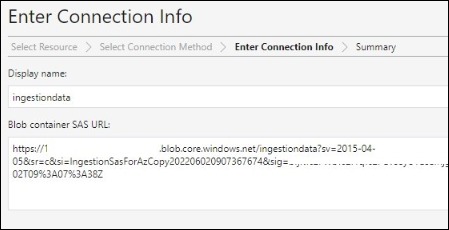
- Tap on Next and Connect.
- Within File Shares, the PST folder will be available now.

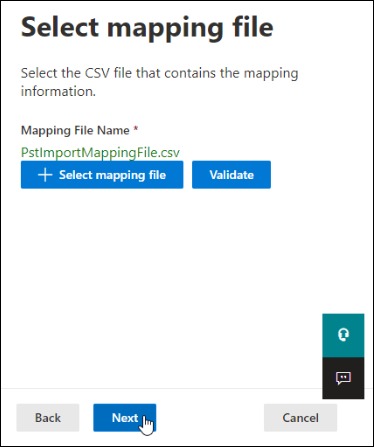
It is now necessary to map the PST files to the user mailboxes. You must ensure PSTs are properly imported into Microsoft 365 mailboxes. The PstImportMappingFile.csv sample can help you with this.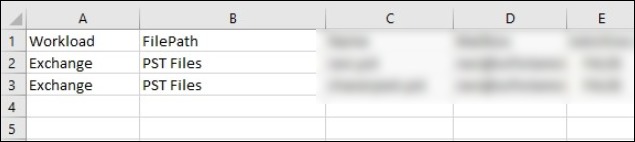

For starting the PST Import job, you must follow these below steps.
- Check mark on I’m done uploading my files and I have access to the mapping file check boxes and hit Next.
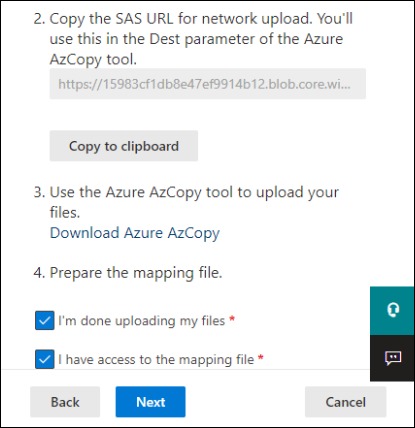
- Tap on + Select mapping file and then hit the option Validate. Tap on Next to proceed.
- Click on Submit > Done.
- After a successful import, the message will be ‘Import completed’.


Some shortcomings of this method-
- This method allows you to export one PST file at a time; if you want to export more PST files to Microsoft 365, then you will have to repeat the same process or use a CSV file.
- The process is complex and time-taking when moving multiple PSTs to the cloud destination.
- This needs a decent amount of technical knowledge otherwise chances of PST files getting corrupt are high.
Drive Shipping is another way to import PST data to Microsoft 365, which works by using a Secure storage key and PST Import Tool. However, this method is to be carried out only by the administrators and the organization whose data is being migrated. In this method, you will have to copy your PST data to a hard drive and then ship it to one of the physical locations of Microsoft 365. The steps involved in the Drive Shipping method are:

- Download the secure storage key and PST Import tool.
- Copy PST data to the hard drive.
- Create a PST Import mapping file.
- Create a PST Import job in Microsoft 365.
- Ship the hard drive to Microsoft.
- Filter the data and start with the import job.
The drawbacks of this method are-
- Needs to send the PST data to Microsoft in a hard disk drive
- It takes 1-2 weeks to import the PST data to Microsoft 365, and every organization cannot wait for such a long period.
- It is not convenient when there is an urgency to upload PST to Microsoft 365.
- Also, the method is not free and costs money per GB of data which can be expensive for small organizations.
If organizations have to import PST files to multiple Microsoft 365 mailboxes, it would be a pain for Office 365 administrators.
Both Network Upload and Drive Shipping methods are highly technical in nature and can be easily mishandled by users leading to incomplete migration or data loss, or corruption.
All these shortcomings in the manual procedures are a wake-up call for the users, and then they may use automated tools to import PST files to one or more Microsoft 365 mailboxes.
How to migrate Outlook mailbox(es) to Microsoft 365 automatically?
For simplifying the lengthy and time-consuming manual PST importing task, using a professional tool would be the right option. Kernel Import PST to Office 365 is one amazing tool available to migrate data from Outlook to Office 365. Using this, you can migrate all or selective data without putting any limitations. The software offers an easy way to import PST files to one or more Microsoft 365 mailboxes:
Here is how you can import Outlook PST files to Office 365 using a professional tool:
- Launch the PST to Microsoft 365 Import tool.
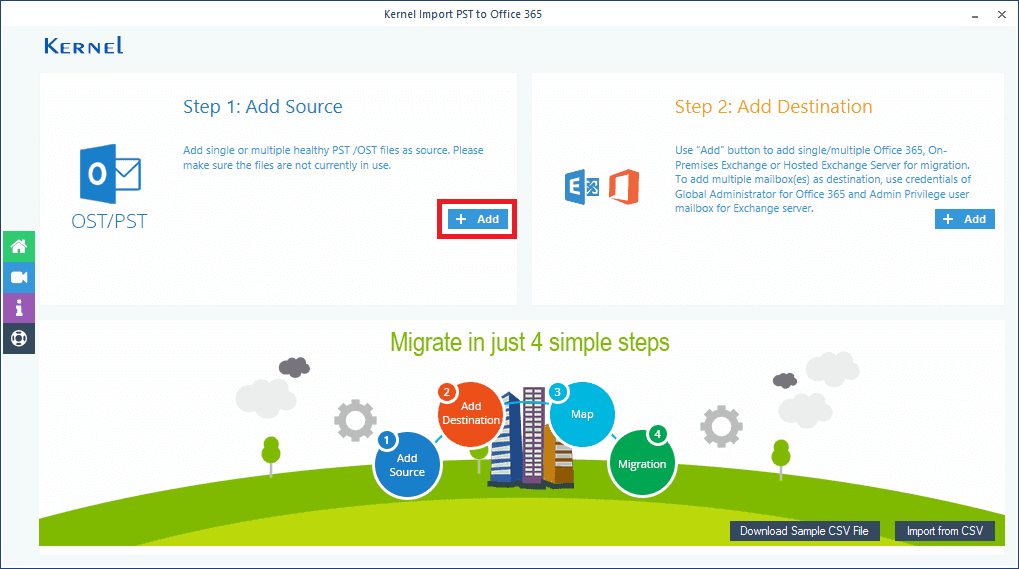
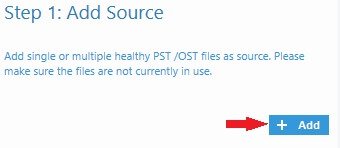
Note: The main screen is divided and marked in three (3) sections. Section 1 is where you would add the source PST file. You can add the Microsoft 365 mailboxes in Section 2. Upon completion of the steps in sections 1 & 2, you can set filters and migrate your PST file data in Section 3. - Click Add under Add Source section, browse for the PST file, and click Open.
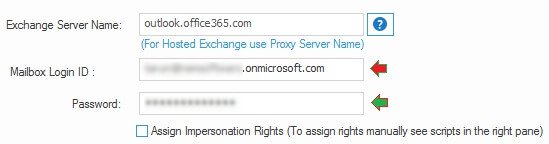
- Click Add under Add Destination Section (Section 2); Microsoft 365/Exchange Login windows will pop up.
Note: Before moving any further, have a look at the new window with multiple options.
Section 1 is where you would have to key in Microsoft 365/Exchange account login details. You can assign rights manually, but in this article, we’ll go with the option unchecked. You can provide a mail id different from Mailbox Login ID by selecting the checkbox below the Single Mailbox/Microsoft 365 Group radio option. Section 2 would come in handy if you want to import to multiple mailboxes using an administrator account.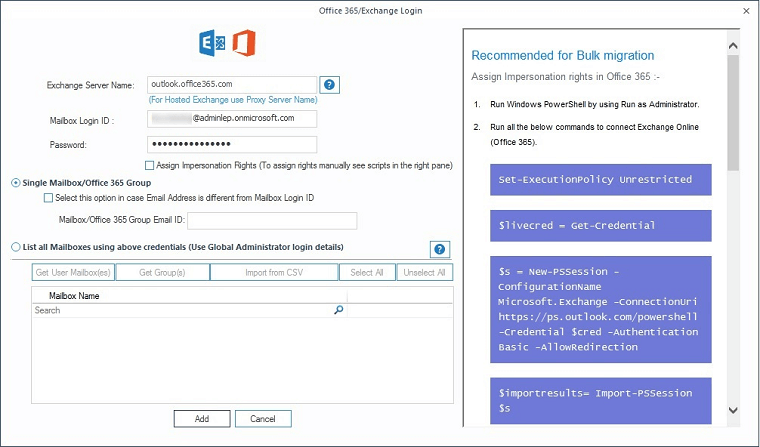
Once you’re done with steps 2 & 3, Source Files and Destination Mailbox sections will look below,

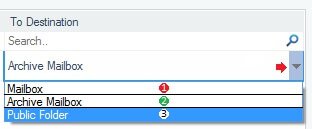
- At the bottom, under the Destination account section, click the drop-down and select the mailbox account.

Note: In the case of the Global Administrator account, the dropdown will list all the mailboxes. You can select an account from the list. - Click Set Filter and Migrate.

Note: You can export the mapped list to a CSV file or import one at this stage. - Select where you want the PST file data to be moved (migrated) from the given options.
- Click Migrate.

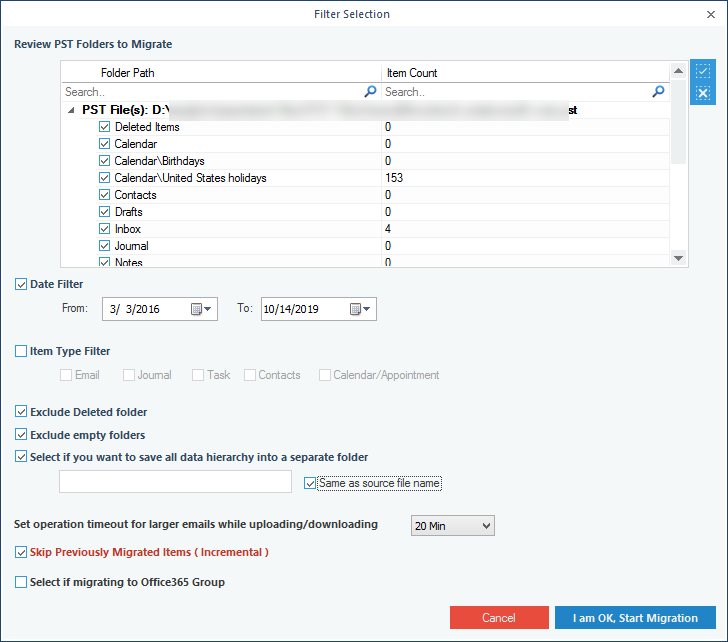
- At this stage, you can apply filters as per the need. In Section 1, you can select/deselect the folders, and apply other filters such as Data, Item type, etc. In Section 2, you can check/uncheck Previously Migrated Items (Incremental), select Same as Source file name to save PST to a folder with the same name or select if migrating to Office 365 Group. Upon ensuring everything is fine, click “I am OK, Start Migration.”
- Click OK.
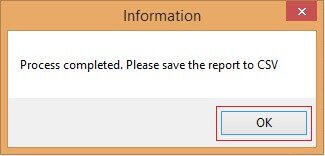
- Hence, the smart and easiest process to migrate Outlook emails to Office 365 mailbox is successfully completed. The software also provide option to perform OST to Office 365 migration as well.


Conclusion
Migration of emails from Outlook PST to Microsoft 365 mailbox could be tricky and lengthy. It can be carried out through the Network upload and Drive Shipping methods. Although migrating the PST file data in the same order of hierarchy is essential to avoid the break in the workflow. This is difficult to achieve using manual methods since there are some chances of data loss or missing data. However, the right tool at the right moment can become a big savior for both individuals and businesses.