

MS Outlook is one of the most widely used communication managers for personal and corporate use because of its rich functionalities for scheduling and coordination. It uses PST format to store all the essential emails and other data of its users.
While Gmail is very well-known email service provided by Google. It offers easy accessibility across different devices, be it a mobile phone or a computer. Moreover, unlike Outlook, you can easily search for specific emails based on keywords, names, and others quickly. While the two platforms vary from each other, there are situations where users need to import PST file to Gmail without Outlook.
Step 1. Download, install, and launch Kernel Import PST to Gmail.
Step 2. Click Add under Add Source to upload required PST file.
Step 3. Click Add under Add Destination to connect Gmail account.
Step 4. Review PST folder, apply filters, and import PST file to Gmail with all necessary data.
![]()
![]()
Why do users need to import PST to File Gmail without Outlook?
Importing PST files to Gmail has its own perks. The benefits of this conversion are enumerated in the following points:
- Google provides a generous amount of free storage, which can be expanded. On the other hand, PST also tends to have a large size but they are prone to corruption.
- The interface and folder structure are much simpler and more intuitive, which makes it ideal for all users.
- The data is synced instantly across all devices and OS, including Windows and Mac.
- One can easily download contacts and set regular archiving.
- The recovery procedure is quick by using the phone number or choosing another simple method.
The reasons for importing PST to Gmail were described above, now it is the time to see how you can import PST file into Gmail without Outlook.
Can we import PST file to Gmail without Outlook?
Technically, we can’t import PST file to Gmail without Outlook using manual methods. All the free methods require Outlook to be installed on the system and then importing the PST file using the application itself. Thus, to import PST without Outlook, you need to use an expert-recommended Import PST to Gmail tool.
Before moving to the automated solution, first let’s learn the steps to import PST to Gmail with Outlook.
Import PST files using Outlook?
PST files can be imported into Gmail without any complications using Outlook and GWMMO. Steps for both methods are listed below in detail.
Method 1. Import PST to Gmail using Outlook
Users can import PST file to Gmail by configuring their account in Outlook, and then importing the PST file in Gmail. Here are the steps to execute the procedure correctly:
Step 1: Configuring Gmail in Outlook
By following the below mentioned simple steps, you can configure Gmail in Outlook easily:
- Launch Outlook, then go to File, and click on Add Account.
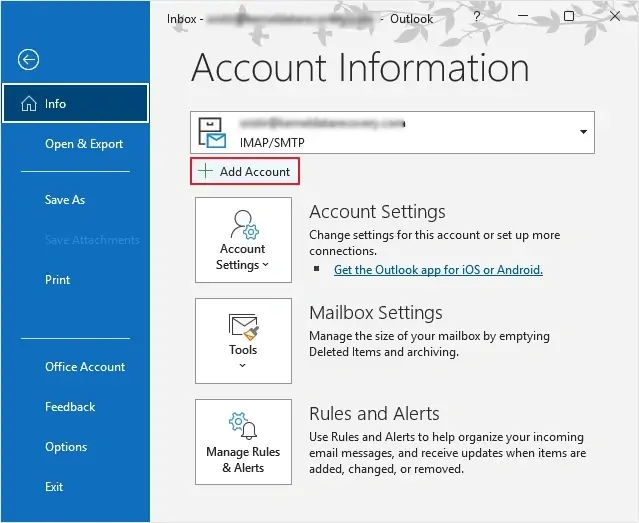
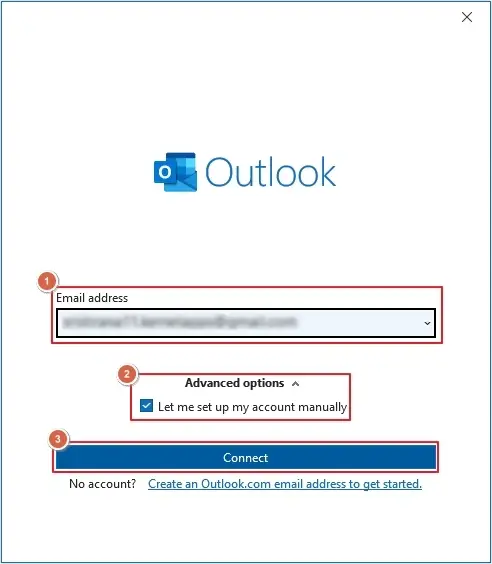
- Enter your Email ID, then select Let me set up my account manually and click Connect.
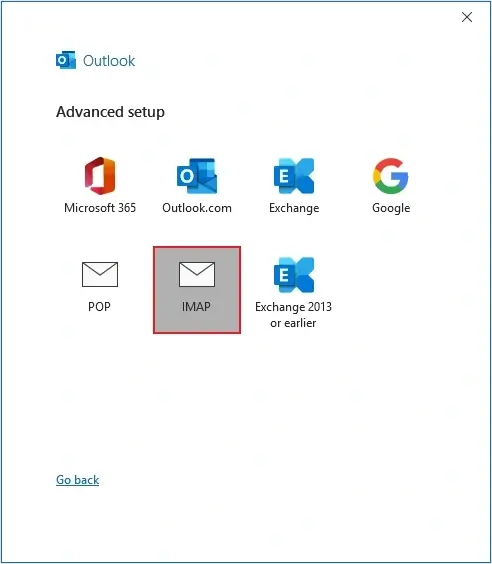
- Select IMAP, then provide your email address, password, and other necessary permissions to connect Gmail.
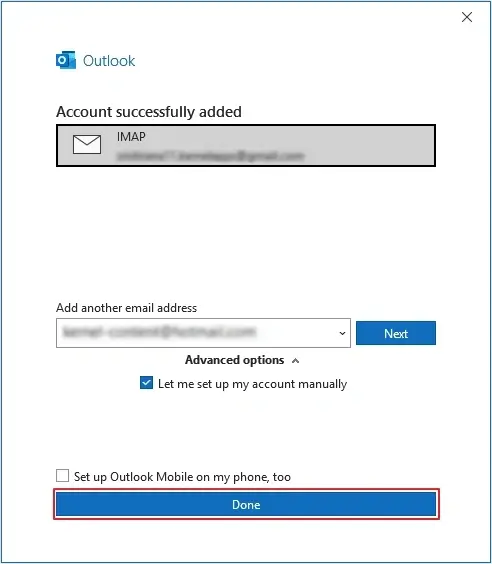
- You will receive a success message saying Account successfully added, click Done.
Step 2. Import PST file to Gmail
Once you have successfully configured your Gmail account in Outlook, you need to import the PST file into Gmail. Here is how you can do it:
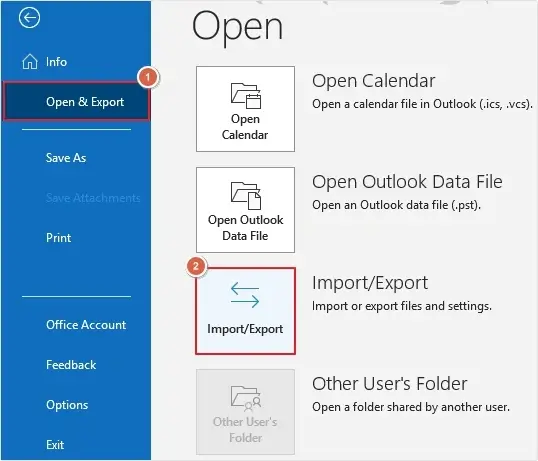
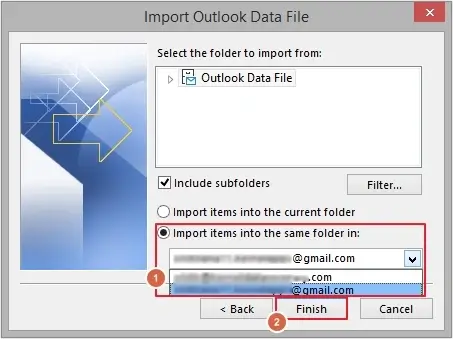
- Click File > Open & Export > Import/Export.
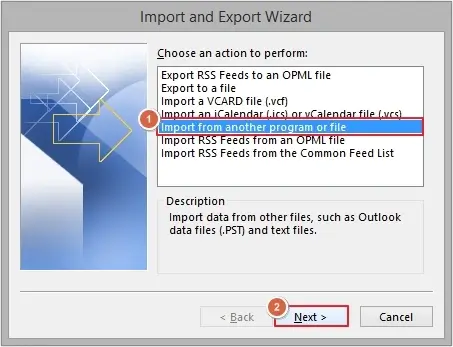
- Select Import from another program or file and click Next.
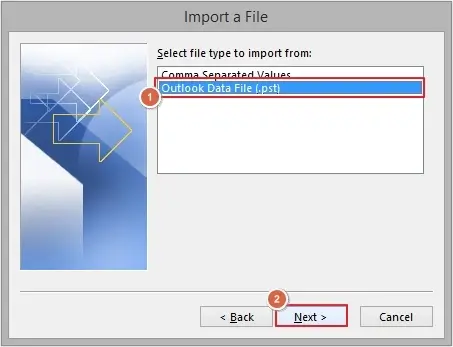
- Select Outlook Data File (.pst) and click Next.
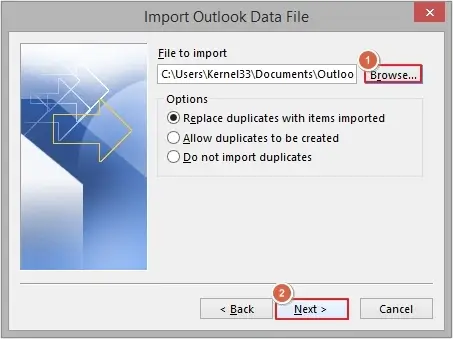
- Click Browse to add PST file, then click Next.
- In Import items into the same folder in, select your Gmail email address, then click Finish.
Method 2. Using Google Workspace migration for Outlook
To import Outlook PST to Gmail via Google Workspace Migration for Outlook, follow these steps:
- Download & install Google Workspace Migration tool verifying the version of Outlook used to save the PST archive - 32-bit or 64-bit.
- Access the application & enter the email address of the Google account where you want to import the PST archive.
- A new browser window opens with a login screen for "Google Workspace Migration for Microsoft Outlook" already displaying the chosen account.
- Click on "Allow" to grant Microsoft Outlook the necessary permissions.
- In the import wizard select "From PST File(s)..." & choose the desired PST folder using the following window. Press "Next."
- Choose "Migrate" after selecting the desired files.
- Once the migration is complete, check your Gmail account on your browser or Gmail app. If the PST folder selected earlier is present, the Gmail import from PST was successful.
Though the manual method to transfer PST to Gmail has its own perks, these methods might at times be unresponsive or might not produce the desired effects. Moreover, users need the Outlook application installed on their system to perform these methods. It might seem a bit complicated to some users who aren’t that familiar with the Outlook application. This necessitates the usage of a tool to help you import PST to Gmail without Outlook professionally.
How to import PST file to Gmail without Outlook?
The best approach, which I personally tried and recommend to everyone, to import from PST to Gmail without Outlook, is using the Kernel Import PST to Gmail software. The utility is designed to import all the data of a PST file to a Gmail account while maintaining the accuracy of data and its original hierarchy. Using professional software always has its benefits, some of them are:
- Import single or multiple PST files to Gmail in simple steps.
- Easily handles large sized PST files at one go.
- Capable to recover and then import deleted PST emails to Gmail without errors.
- Imports selective PST files emails using intelligent filters and
- It does not require Outlook email application installed on your device.
- Saves PST emails to other Webmail like IMAP enabled Servers like Outlook.com, Yahoo, AOL, etc.
- Allows you to skip previously migrated data with Incremental migration feature.
![]()
Steps to import PST files to Gmail without Outlook:
Step 1. Open the tool and click Add to add the PST file.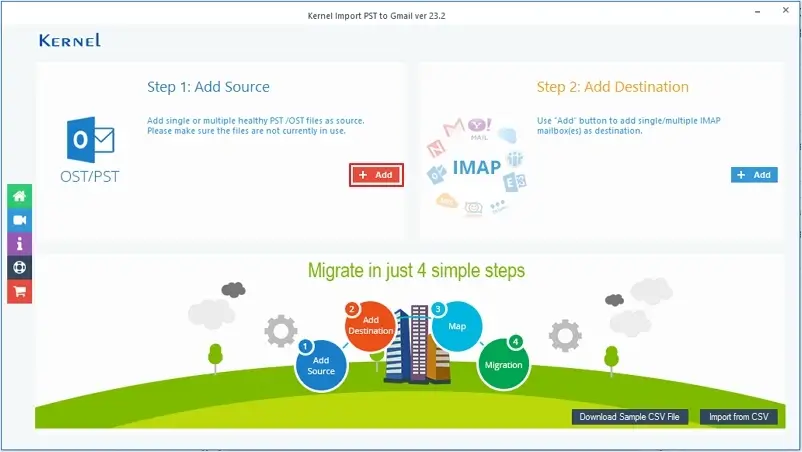
Step 2. Browse the PST file from the system drive and click Open to add it.
Note: You can add as many PST files as you want for import.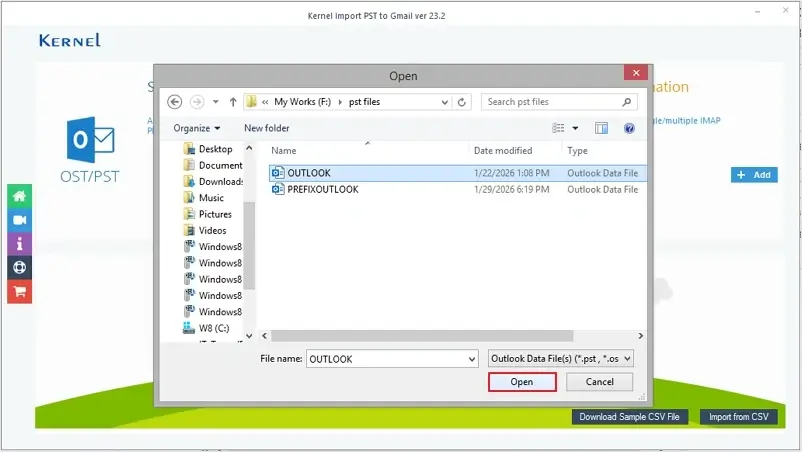
Step 3. Click Add under Add Destination section to add the Gmail account.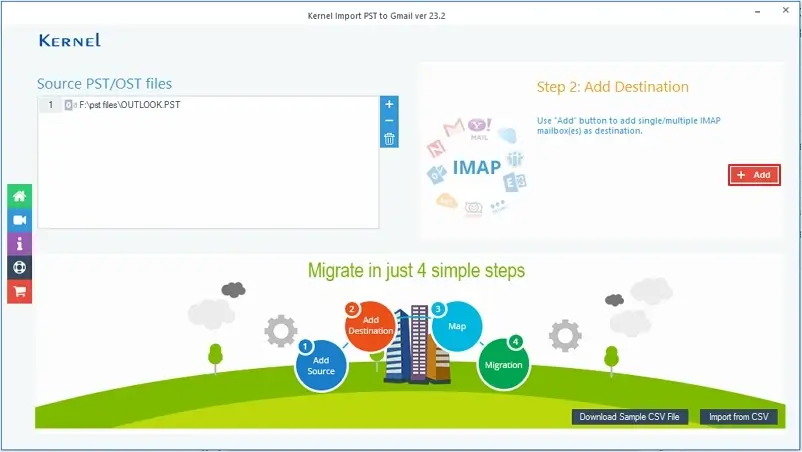
Step 4. Provide your Gmail account Server name (imap.gmail.com), username, password, etc. Click Add to add it. The port number is automatically selected.
Note: If you are unable to login to Gmail with your password, then you need to enable 2-step verification and create an App password for this Gmail ID from the Google account for logging in to the software.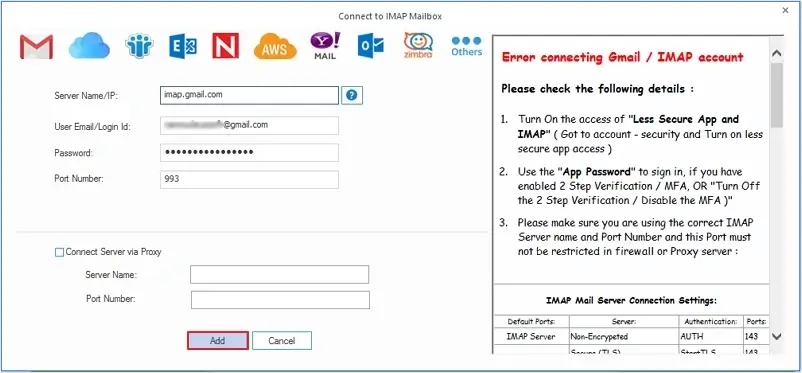
Step 5. Now, map the added Gmail account against the source PST file. Click the Set Filter and Migrate option to continue.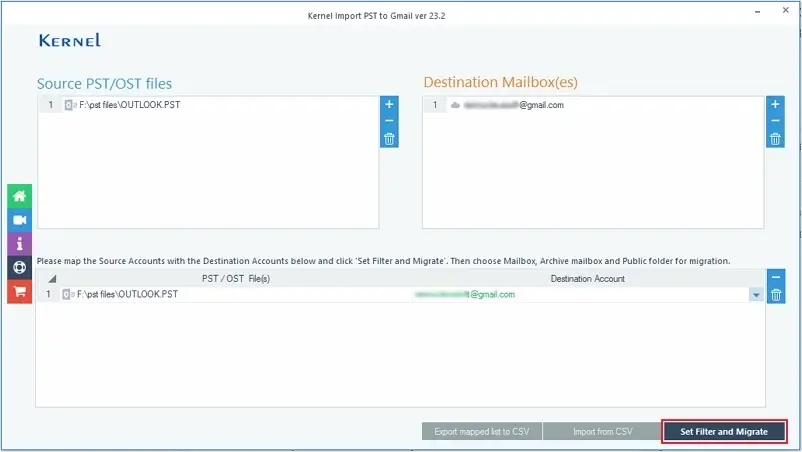
Step 6. Apply desired filters to save specific data from your PST. Then, click on I am OK, Start Migration option.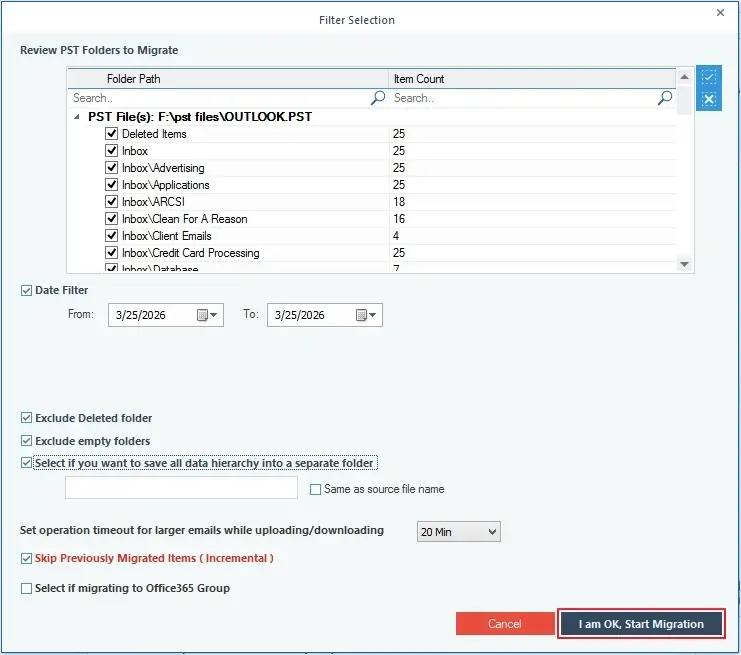
Step 7. The import process will get started. You can view the live progress of the PST data migration to your Gmail account. Wait until it gets completed.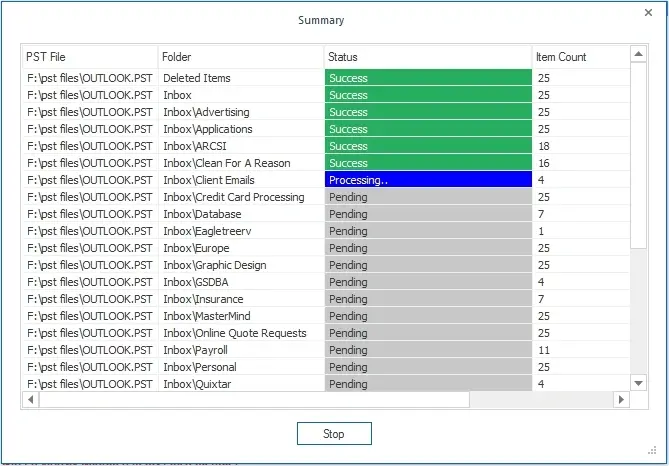
Step 8. The import PST to Gmail without Outlook process will be completed and displays a completion message. Click OK.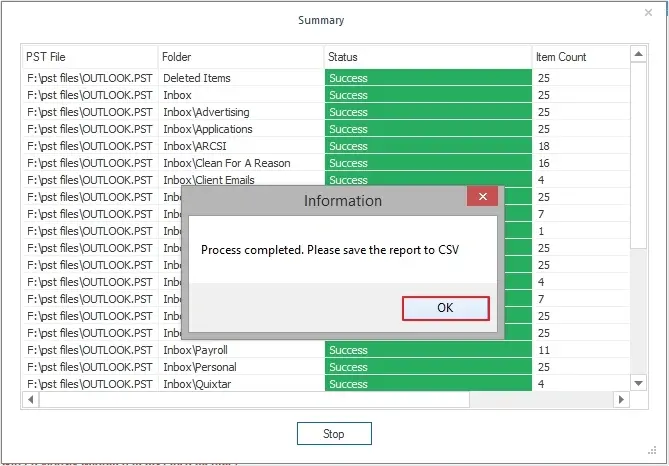
Step 9. You can save the import report to the CSV file using Save report to CSV option. Provide destination and click Save.
Final Thoughts
Importing your Outlook PST files to Gmail will help in many ways. Although manual methods to import PST to Gmail are easy, you can’t perform them without Outlook. The best solution to import PST file to Gmail without Outlook for you is to use the recommended automated tool. The best part is that the tool also allows importing PST files to many other IMAP mail server platforms.
![]()
Frequently Asked Questions
Check out some of the most common user queries about importing PST files to Gmail.
Q. Will my attachments also be imported to Gmail?
A. With manual methods, there is no 100% guarantee that your attachments will be imported to Gmail. However, the professional tool makes sure that all your data gets imported, including attachments.
Q. Can I import PST file to Gmail without Outlook directly?
A. No, Gmail doesn’t support PST files natively. You need Outlook to open and import PST to Gmail.
Q. Can I import multiple PST files to Gmail at once?
A. Manually importing multiple PST files to Gmail isn’t possible. But withe recommended software, you can easily transfer multiple PST files into Gmail at once.
.webp)