

Read time 10 minutes
OST is a file format used by Outlook; OST is an offline folder file that allows you to access emails even if you are not online. If you are looking to migrate OST files to a new computer, then this blog is going to help you. There is no doubt how important an OST file is. If you want to move an OST file to a new computer, there are some indirect ways to do that. Let’s see what they are.
If you are the owner of the Exchange profile, you can configure your account in Outlook on the new computer and simply download the mailbox data from the Exchange Server. But if you want to transfer OST file data to another user, you can convert OST and then transfer it to the new computer. The new user can import the PST file to his mailbox.


Try automated tool Kernel for OST to PST Converter to export OST mailbox data to PST, EML, MSG, Office 365, and Exchange.
Here we are going to try the second method, where you first convert OST files and then migrate PST to a new Computer. So, you need to start with OST conversion. Let’s start the process:
Know the name and location of your OST file on your system
Before you proceed to transfer your OST file to some other computer, you first should know where to find it. So, if you are wondering where these files are located on your system, then here we are going to mention it all. If you want to know the name and location of your OST file on your system, then do as mentioned below. The process is the same for almost every version of Windows.
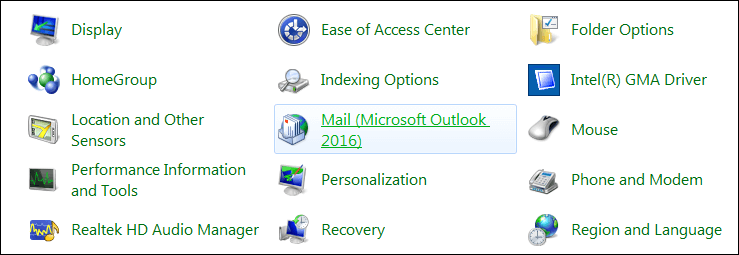
- Click on the Start menu or the Windows icon on your system and look for the Control Panel. Once found, open the Control Panel on your system.
- Now, make sure that the category customization is set to Small Icons.
- Now, locate the Mail option in Control Panel and click on it.
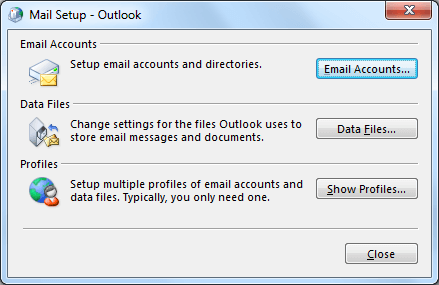
- Now, a small Mail Setup dialogue box will open. There you need to click on the Data Files button.
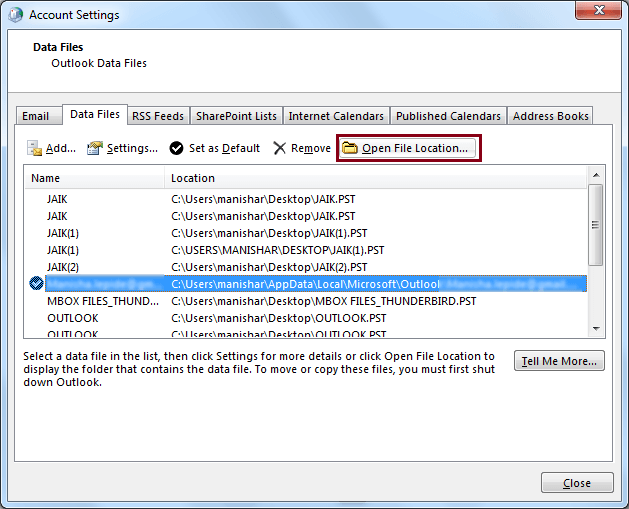
- Once done, an Account Settings window will open. There make sure you are on the Data Files tab, this should be the default though; if you are not on that page, make sure you do click on it.
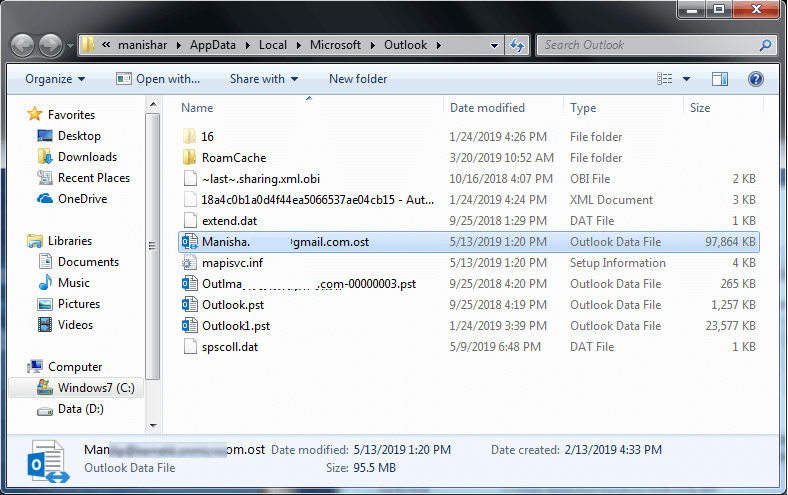
- Now, select the account for which you want to know the OST file location. You will notice that a location is mentioned. That is what you were looking for. Trace the location and get your OST files. You can also click on the Open File Location tab to go to the folder directly.
or
If you are using Outlook at the moment, go to the File tab. Select Account Settings from the File menu and then select the Account Settings option again.


Locate the OST in your system with the help of the above-mentioned steps.
In this step, you need to convert OST files. Though you can export OST mailbox data to PST using the Export feature of Outlook, here we are using Kernel for OST to PST Converter tool. Follow below-mentioned steps to convert an OST file.
- Install and run the software and click on the Browse button to select the OST file. Click on the Next button to proceed.
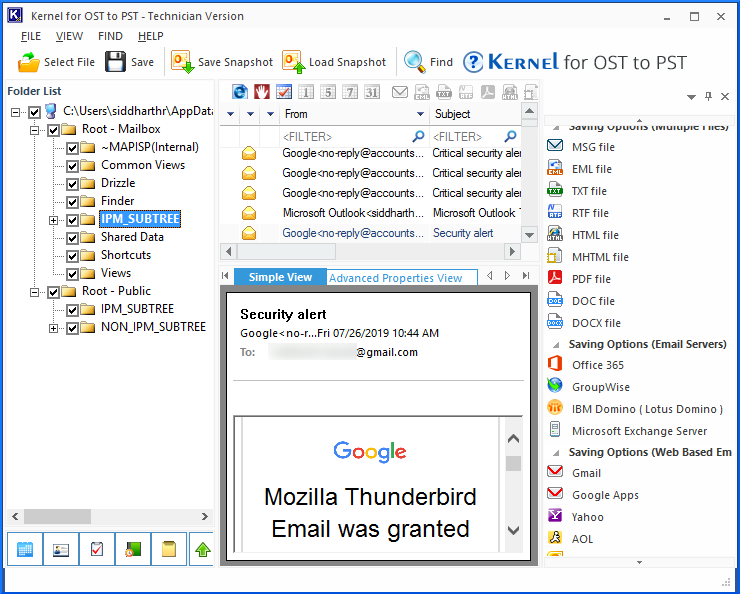
- Here you can have the preview of the items in the OST file. Click Save.
- Select PST file (MS Outlook) and click on Next.
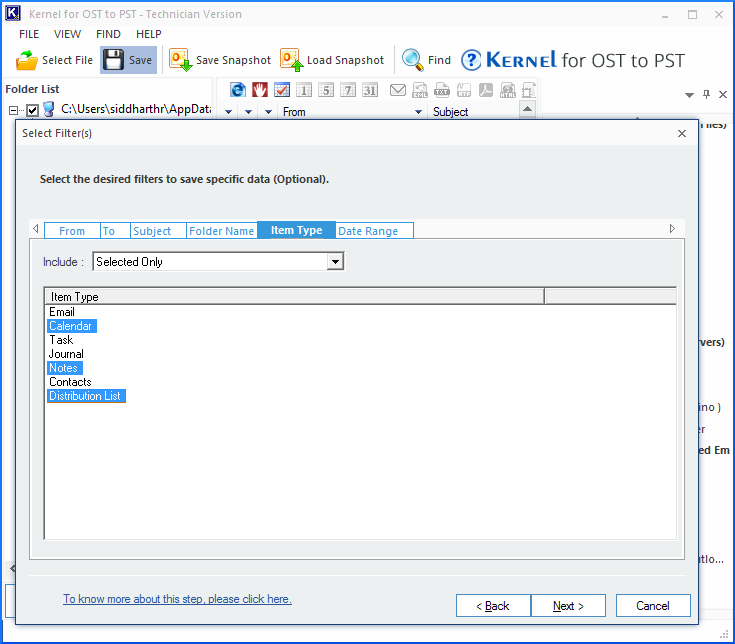
- Apply mailbox data filters as per your requirements. Click on Next.
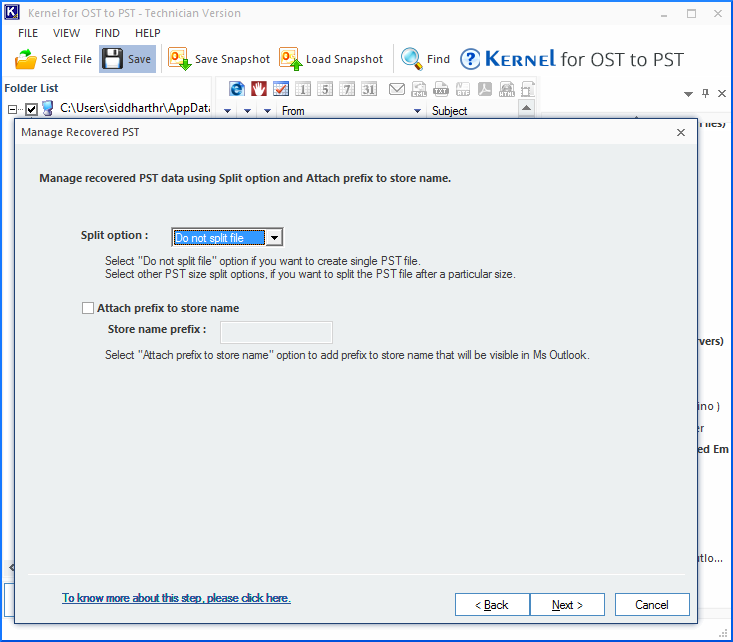
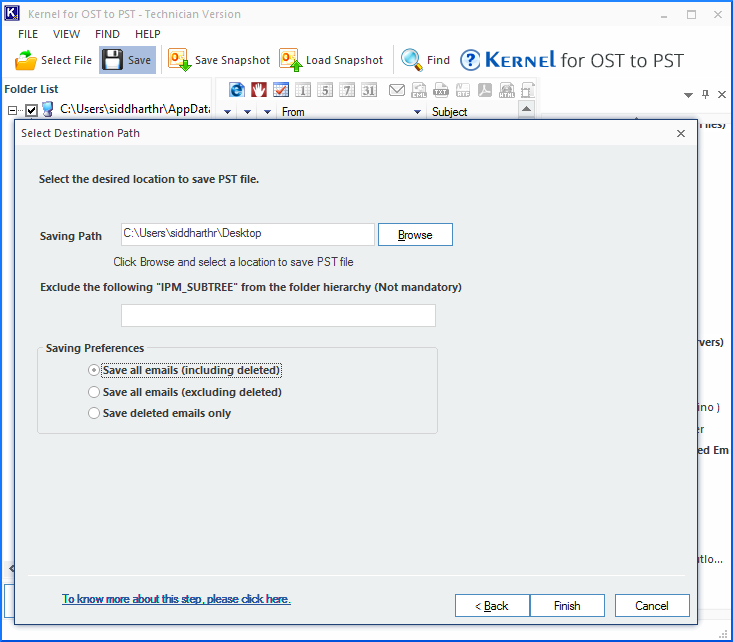
- Manage PST file by deciding whether to split it or attach a prefix. Click Next.
- Provide a destination to the new file and decide on the conversion of deleted items. Click on Finish to start the saving process.
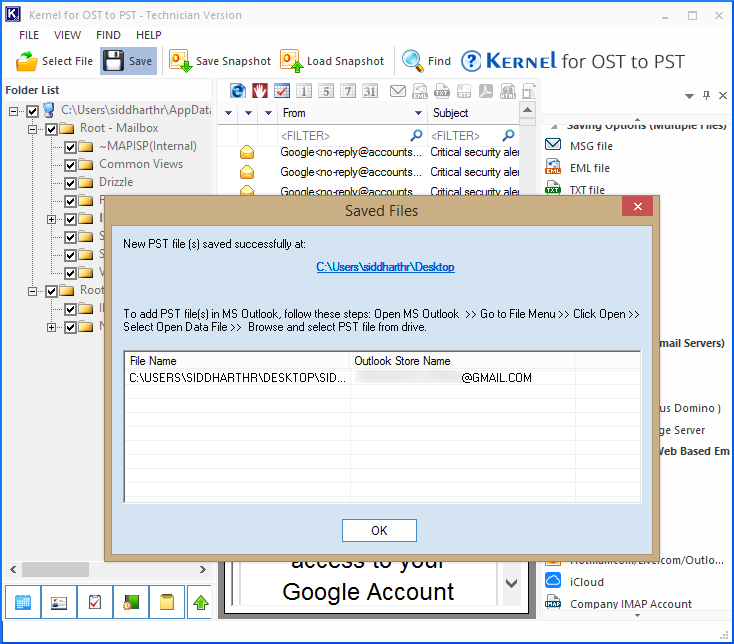
- After saving the data, click on OK.
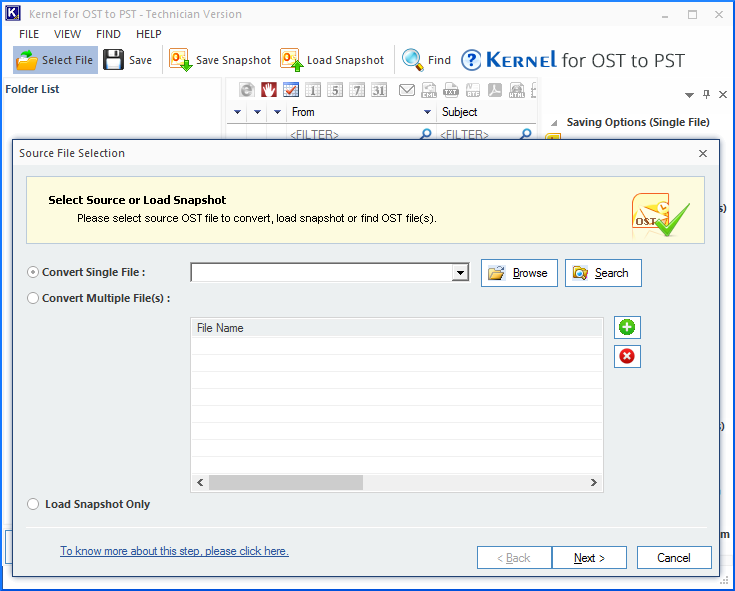
NOTE: Using the tool, you can search for OST files too (use the Search button).


Now, attach a hard disk or any other external drive to the system and copy the newly created PST to it. You can use this device to transfer your mailbox data to another PC.
Once you are done with creating and copying the PST on the new system, open Outlook. If you have not already configured an Outlook profile, you have to configure a new profile to proceed. Once the profile is configured, proceed to the next step.
Finally, import the PST file to Outlook by following the below-mentioned steps:
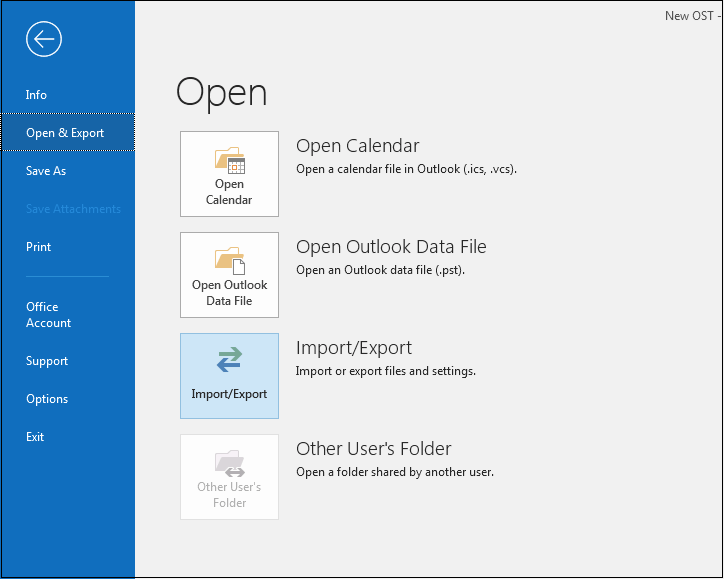
- Open Outlook and click on the File button on the top left corner of the screen. In the Open & Export category, select Import/Export.
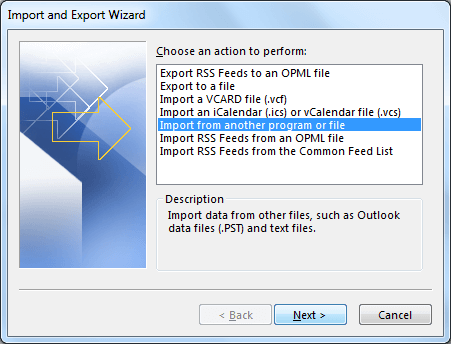
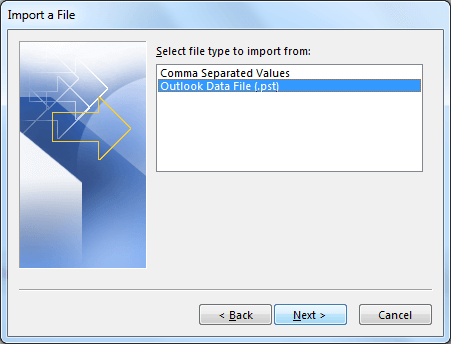
- Use the option Import from another program or file (in Import and Export Wizard) and click on Next.
- Here, select Outlook Data File (.pst); click Next.
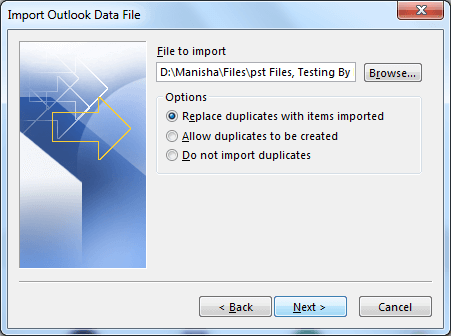
- Browse the file to import, select an option from the available options and click on Next.
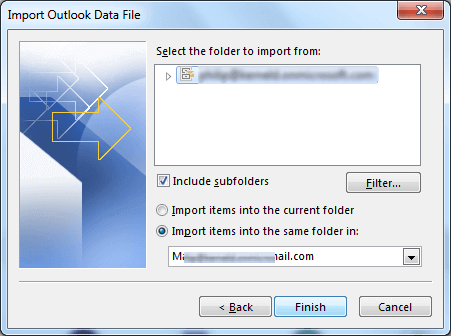
- Here, select the various folder options as required. Click Next.


So, this is how you transfer an OST to a new computer with the help of OST conversion. But as you can see, we have used an automated tool to convert OST files, as there are many limitations to the manual method to convert OST files. So, the safest way is to use a third-party tool to convert an OST files in PST formats safely.
The software can convert an OST file to PST and many other formats safely and quickly. This tool ensures the integrity of files and also keeps the original hierarchy and structure of the file and items. It is powerful enough to convert all OST items along with their attachments. There are many exciting features of the tool you would like to explore while using it, like retrieving data from orphaned files, export contacts from Outlook, recovering deleted items, etc. So, go for the trial version now and experience it yourself.
CNET Review

Softpedia Review


Conclusion:
It is not necessary to move OST files to another computer as you can create an Outlook profile there also. But if you don’t have a profile over there, you can convert OST files and move data manually to the new system.