

Read time 10 minutes
Ever noticed email duplication in your mailbox of Outlook 2016 or the 2019 version? If you have, you’ll know what we’re talking about! Duplicate emails can be a headache, and hence you’d want to get rid of them, wouldn’t you? Don’t worry, in this blog. We are going to discuss and work on the same. Let’s start with knowing the reasons for having duplicate emails in your Outlook.
How can you end up having duplicate emails?
Yes, duplicate emails are a pain, and it can cause a lot of trouble, but how do they end up in your Outlook? What causes this misery? Ever wondered? Here are the causes of duplicate email messages in your Outlook 2016 & 2019:
- Incorrect Outlook Rules: Mistakes cause the rules to be improperly configured. This, in turn, causes data duplication in the Outlook mailbox.
- The Send/Receive Intervals are Short: Due to the short frequency of the Inbox updates, the email messages, as well as the mailbox components, cannot synchronize properly. And this, again, leads to data duplication.
- The Account Setup is Incorrect: The configuration of the same email account multiple-times can be a cause of repeated synchronization of incoming data, which can cause duplication in the mailbox.
- Mailbox is Improperly Set: If you have incorrectly set the mailbox while creating an account, you might receive the same email message, calendar entries and contacts several times.
- Usage of Third-Party Antivirus: In case an anti-virus program is set on the machine in which Outlook runs, there is a good possibility that the Send/Receive process gets intercepted.


Try an automated tool Kernel for Outlook Duplicates Remover to remove, copy, flag or move duplicate items from Outlook mailbox.
Now, let us see what impacts these duplicate emails might have on daily work. The following should well-explain these issues:
- The duplicity of emails has the potentiality of harming your productivity.
- Duplicate emails can create confusion and cause errors. Can you imagine having to reply more than once to the same mail? I mean, seriously, I’d be like “Yikes”!
- This duplicity can potentially impact your Outlook client’s loading performance. The more the messages get stored on your computer, the slower is its performance.
- Another hazard is that the duplicates fill up your Inbox. You will need to delete email in order that you comply with the allocated email storage capacity.
Having said the above, we should proceed to the next part where we learn how to do away with this duplicity issue.
To remove duplicate emails, you need to understand the cause of the problem. Once you know what the cause is, use a suitable workaround. Listed below are the tips that you can use to get rid of duplicate emails:
- Check if the Outlook Rules are configured correctly.
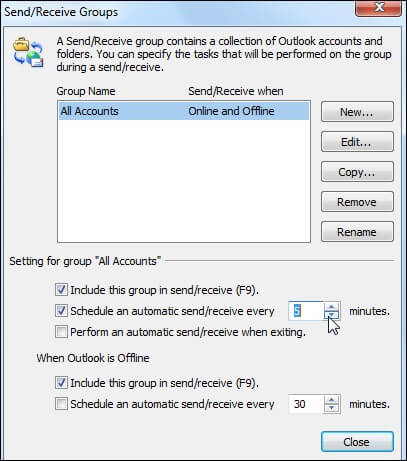
- Since the short frequency of mail server updates causes duplicity in emails, change the frequency level to 15 to 30 minutes, that’ll prevent the duplicity of emails.
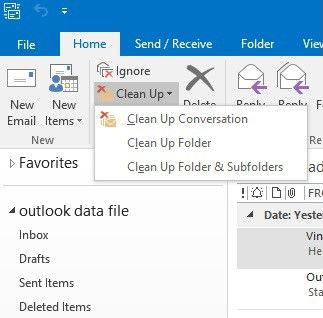
- Microsoft Outlook has plenty of utilities and add-ins that can clean up the duplicate emails. The Clean-up tool is one such an inbuilt feature within the application.
- If you’re facing duplicity of emails due to the anti-virus, disable the email-protection.
- Remove duplicate emails using a third-party Outlook duplicates remover tool. Well, if the above methods don’t work out for good, don’t despair. And why should you? Kernel presents you with Kernel for Outlook Duplicates Remover to help you with the issue of Outlook duplicates.
- Performs an all-embracing search to find duplicate items in PST folders
- Removes, flags, moves, or copies duplicate email items as per need
- Finds out duplicates by date and time, sender or receiver name, etc.
- Permits you to save duplicate item(s) report in an HTML format
- Supports all versions of Outlook which include Outlook 2019/2016/2013


To counter duplicate removal issues, you can increase the Inbox update frequency with the below steps.
- Access Outlook & tap on Send/Receive.
- From the Send/Receive Groups setting, you can set the option “Schedule an automatic send/receive every” to 15 mins and click on Close.

Note: Users need to also check the Outlook Rules so that they are correctly configured as this can cause confusion among the different email folders.
Looking for a tool to remove duplicate emails in Outlook 2016? Kernel for Outlook Duplicates Remover is your all-time aide when it comes to eliminating duplicate emails. Make sure you have Kernel for Outlook Duplicates Remover installed before the duplicity of the email becomes a nightmare!
Follow the below steps to Remove Duplicate Email Messages in Outlook 2016 & Outlook 2019:
- Run Kernel for Outlook Duplicates tool
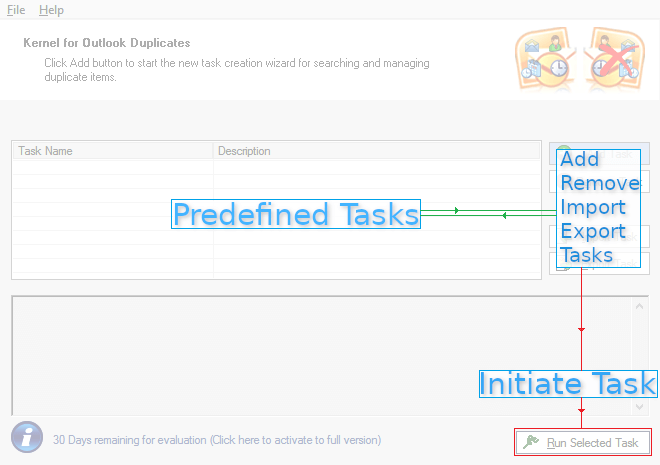
The tool’s UI (user-interface) is quite minimal; it has three (3) specific sections as below:
- Predefined Tasks: You can select/deselect tasks from this section.
- Add/Remove Tasks: You can create a new task or delete an old one via this section, you can also Export created tasks, and further Import them.
- Initiate Tasks: Once you select a task, you may initiate the task.
- Assign the new task with a name,
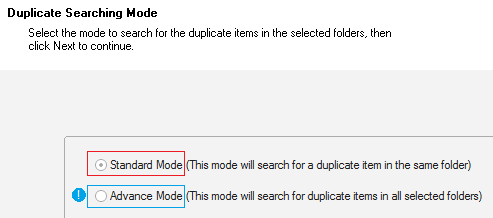
- Set Standard Mode – for searching duplicate email messages > click Next,
- A window would pop on-screen,
- In the left, select single or all Outlook accounts,
- In the right, place mailbox folders as per your search preference > click Next,
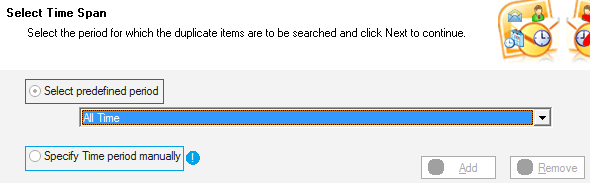
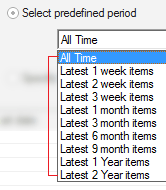
- Set the time-period to look for email duplicates in a specific time span,
- Select Move to Deleted Folder > click Next,
- In this step, select an action for the task you’re creating.
- Even if you’ve given the name Delete to your task, it is not necessary to delete the duplicate emails and other mailbox items; you may select other options available.
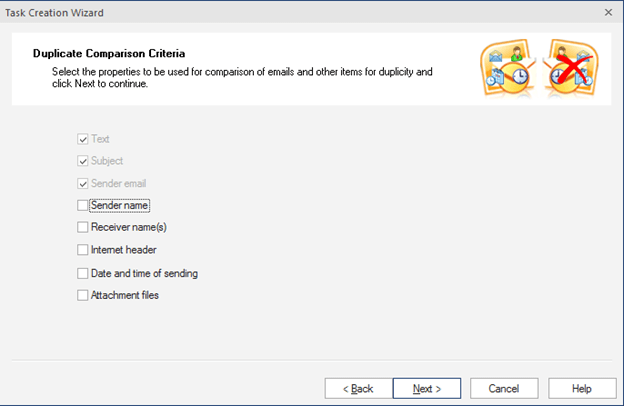
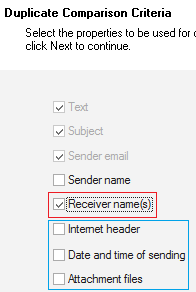
- Select a criterion (filter) for comparison of duplicates,
- Confirm the task configuration > click Finish,
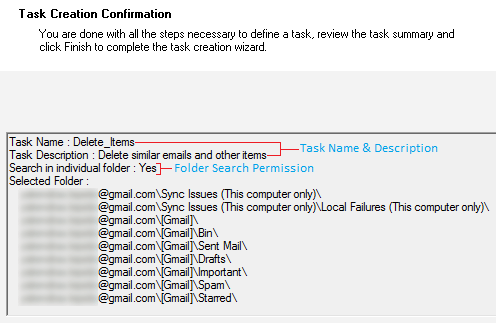
- You’ve created the Delete task successfully, click OK,

- Now that the task is created and loaded select Delete_ITEMS task (1),
Click Run Selected Task (2), Kernel for Outlook Duplicates will start looking for duplicates in the mailbox,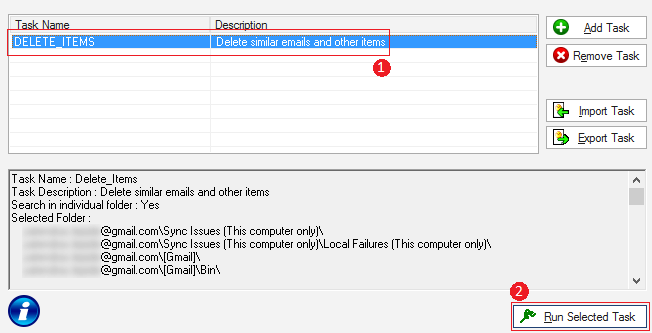
- Wait for scanning to complete,
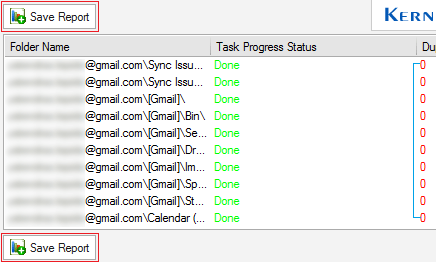
- Duplicate mailbox item count is marked with red – as shown above.
- You can select Save Report for future references.
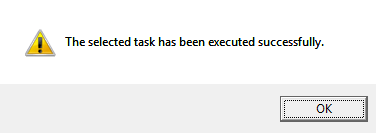
- Click Ok > Finish.

Note: A “Task,” is a set of settings which when initiated will search and address duplicate email messages in all the marked – selected, folder(s) and will either remove or perform the end command specified.
Give a relevant task description > click Next,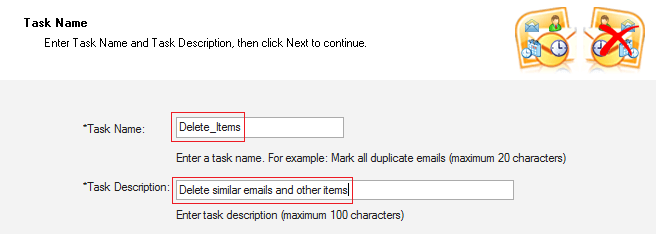


Note: Usually, Standard Mode is the one recommended, but in case if you need deep search for finding duplicate items inside your mailbox folders then, you may select Advance Mode.

Note: Kernel for Outlook Duplicates will search folders as per the precedence is chosen.

Note: You can select from the predefined time intervals by clicking on the dropdown.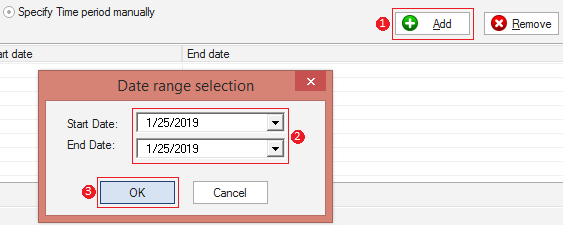
Note: Select Predefined Period is the default one, for more precise search, use Select Time Period Manually, click on Add button, specify Start & End date, click OK.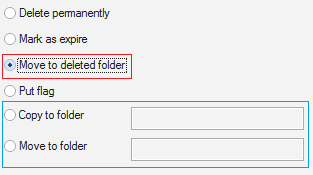


Note:
Select Receiver name(s) or other criteria as you like > click Next,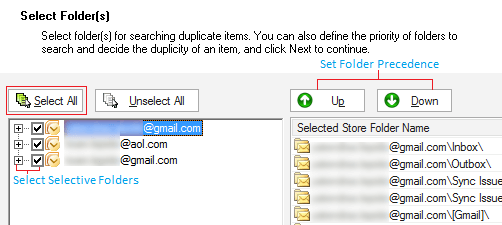

Note: Duplicates comparison criteria can be considered as filters applied for identification of item copies in the mailbox.

Note: If you note something is not right, you may step back and apply corrections, and then proceed.


Note: You can create tasks with different action assigned and select a peculiar task from the same window – as above.

Note:

Conclusion:
In this blog, we discussed the situation where a user may end up with duplicate emails in their Outlook. This may occur due to various reasons, and we mentioned them. Hope you have a clear idea now and will avoid those practices to get rid of the chances of having duplicate emails. Why it is essential to remove duplicates is also a very important thing to know, and hence we mentioned it too for better awareness. We then moved to the solutions and started providing the best solutions and methods to remove duplicate emails from Outlook. Kernel for Outlook Duplicates Remover is the one method we suggested as the best approach. Hope this blog helped you find the right solution.