

Read time 6 minutes
The organization’s Exchange calendars are conveniently accessible to users through OWA or the Outlook application. However, there are instances where it becomes imperative to share upcoming meetings and events with individuals outside the organization. Failing to do so can result in cumbersome tasks such as sending individual invitations or mass emails, which not only consume valuable time but can also lead to oversights in inviting clients or communicating crucial meeting details effectively.
Publish Calendar in on-premises Exchange Server
In its latest iterations of on-premises Exchange Server, Microsoft introduces the “Publish Calendar” feature, empowering users to effortlessly share their calendars with external recipients in a view-only format. This functionality streamlines the process of calendar sharing, generating convenient links that users can personally distribute to selected or all external recipients.
Before delving into the process of publishing a calendar from an On-premise Exchange 2016 server, it’s essential to familiarize ourselves with key aspects and considerations pertaining to this feature.
- Publish Calendar feature is available in Exchange Server 2013 and newer versions (Exchange 2016 and Exchange 2019).
- Does not support publishing Exchange Public Folder calendar.
- Three Publishing Options – Availability Only (default selection), Limited Details, and Full Details. Users can choose anyone.
- Editor permission level is not allowed. It means recipient cannot edit the published Calendar but only view and subscribe its details.
- Can modify the publishing calendar settings and also can stop publishing it further.
- Needs Outlook Web Access (OWA) and Outlook application login credentials.
To publish a calendar via OWA (Outlook Web App) on your on-premise Exchange 2016 server, please follow these steps:
First and foremost, please verify that your on-premises Exchange account has been successfully configured within your Microsoft Outlook application. Additionally, ensure that you have your Outlook account login credentials readily available.
Here are the following steps:
- Launch your Microsoft Outlook application.
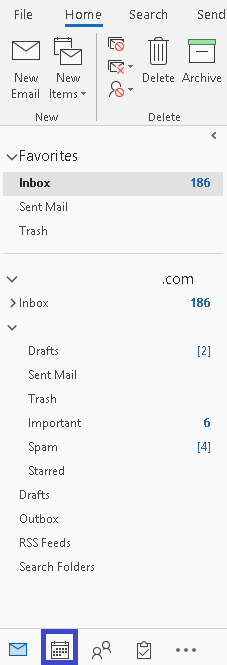
- Click on Calendar icon at the bottom.
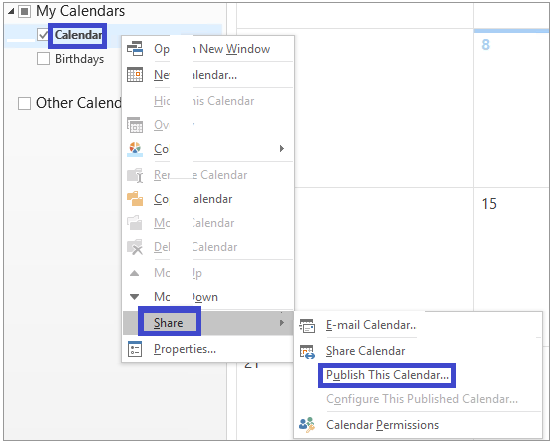
- Now, under My Calendars section, choose the calendar which you want to publish, right-click on it and then click Share>Publish This Calendar.
- Next, you need to specify the Outlook/OWA account email address and password. Click on Sign in then.
- Users can select the calendar name and specify the permission level on the calendar to be published. Under Select a calendar section, choose the calendar and under Select permissions section, choose from the Permission Levels –
- Availability Only (showing status as free, tentative, away or busy)
- Limited details (showing status and meetings subjects)
- Full details (showing all the above details)
Note: Availability Only is set as the default Permission Level. For alternative Permission Levels, please reach out to our support team for assistance.
- Now, you have two links generated for the Calendar: HTML and ICS.
Users are advised to copy and use the HTML link if they want the recipients to view the Calendar in a web browser.
ICS links are recommended to users who want to subscribe to this Calendar.
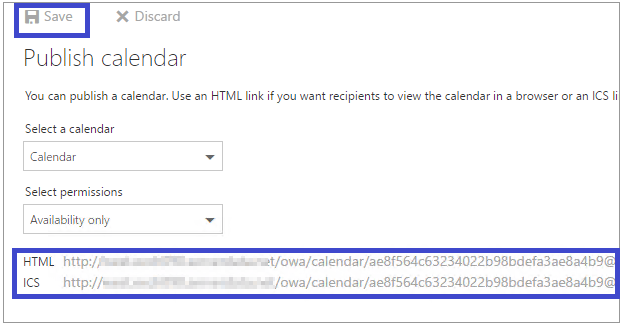
Click on Save to save the settings. Now, users can share these links to external users via email or other mediums.


You can modify settings of the published calendar and stop it from being published. See how to do it.
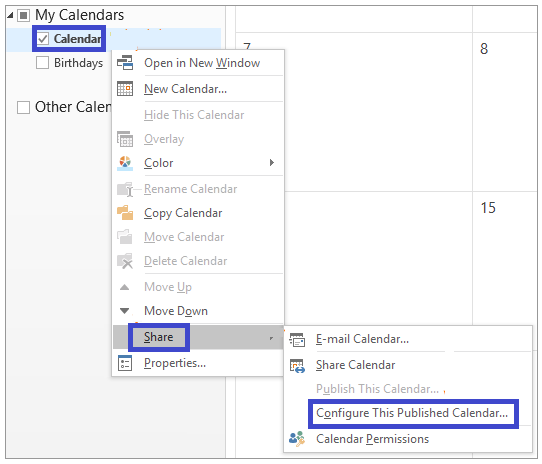
- On your Microsoft Outlook application, move to Calendars, select your published calendar, right-click on it and then click Share>Configure This Published Calendar.
- Provide the account sign in details and click Sign in.
- Modify the settings like – calendar, permission level, etc. and click on Save. To stop the publishing of the calendar, select Not shared option under the Select permissions section and then click on Save.

Once you have published the calendar to the public, you can change the permission for certain users too.
- Go to the Calendar page and choose the calendar to change the permission. Right-click and select Sharing and Permissions.
- Select the user account whose permission you want to change and pick a new level of permission for them.
Discover the simplicity of sharing calendar details with users or clients beyond your Exchange organization using the Publish Calendar feature. Moreover, we’ve also gained insights into adjusting permission levels and discontinuing calendar publishing.
As we’re aware, the “Publish Calendar” feature is exclusively available in the latest iterations of the Exchange Server. Consequently, numerous long-time Exchange users are missing out on these valuable enhancements. The newer versions of Exchange, such as Exchange 2016 and Exchange 2019, have introduced a plethora of other cutting-edge features and updates. This expanding array of capabilities has prompted users of older Exchange versions, including those on Exchange 2010, to contemplate migrating Exchange 2010 to 2016. It’s important to acknowledge that the manual migration process is arduous, time-consuming, and prone to inconsistencies and errors.
Introducing the Kernel Migration for Exchange tool, your ultimate solution for seamless migration between various Exchange versions. This powerful Exchange Migration tool facilitates direct transitions between any pair of Exchange Server versions, effortlessly handles Microsoft 365 migrations, and extends support to all Exchange Server iterations.
Summing Up
The article delves into a valuable functionality known as the ‘Publish Calendar’ feature, designed to facilitate Exchange Server users in sharing their calendar information with external users. If you are in the process of upgrading your Exchange Server to a newer version or migrating to a different mailbox, it’s crucial to ensure that the ‘Publish Calendar’ feature seamlessly transitions as well. This is where Kernel Migration for Exchange software comes to the rescue, as it efficiently migrates all contents, including every feature and its associated information. To achieve a seamless transition, it’s recommended to utilize this software and migrate your calendar after applying the necessary filters.