Overview
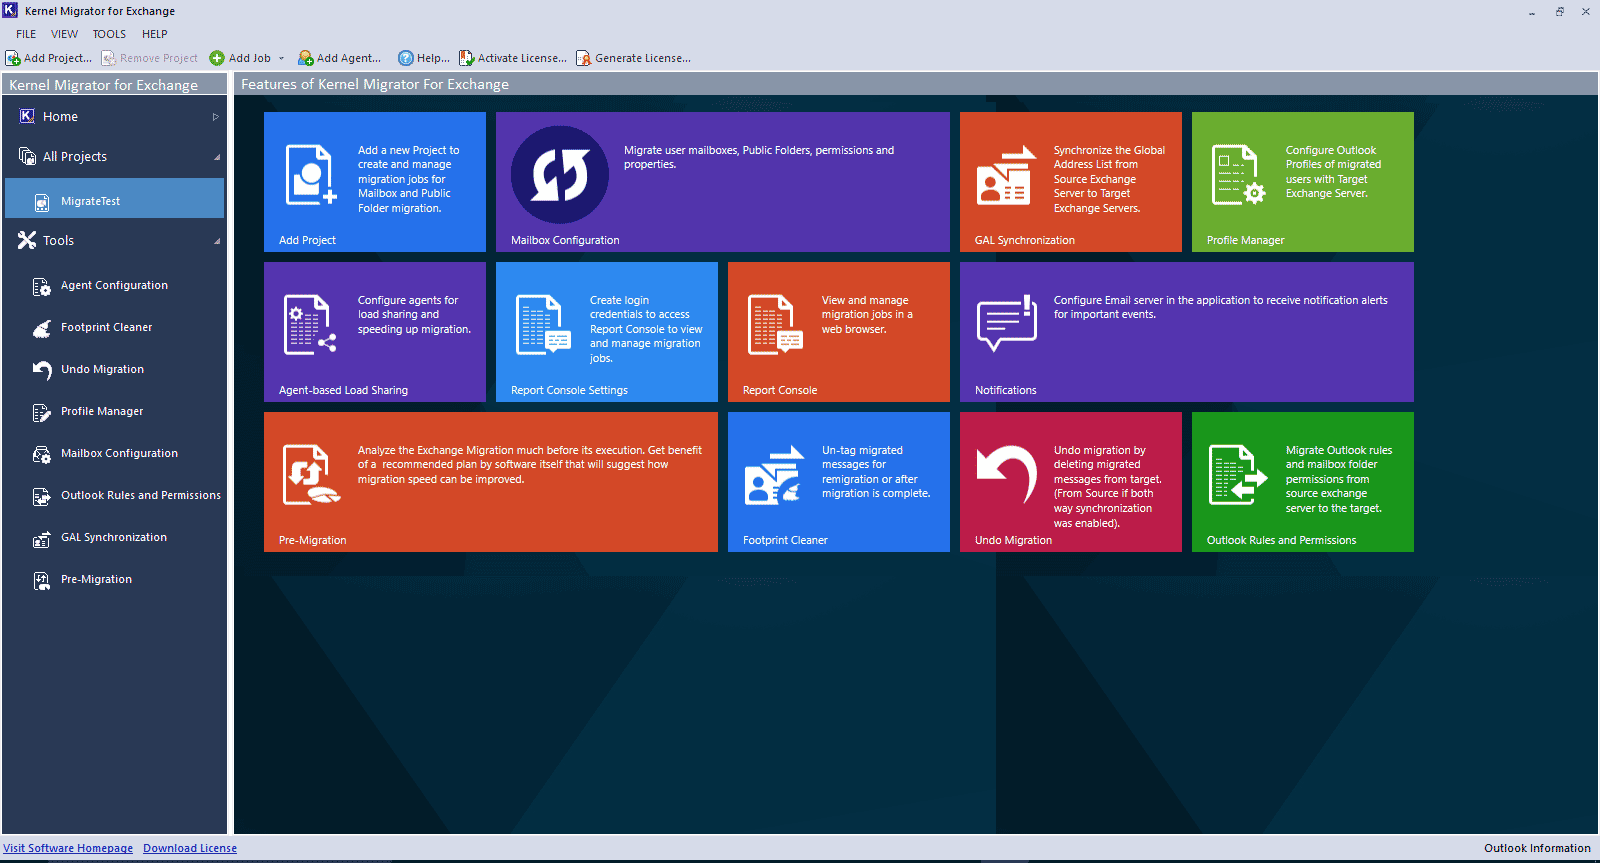
Kernel Migrator for Exchange
Perform Exchange/Office 365 migrations in any environment. This software helps you do pre-migration analysis and post-migration tasks. Also, it supports Exchange 2007, 2010, 2013, 2016, 2019, Office 365, and Hosted Exchange for migration.
- Migrates on-premises Exchange, hosted Exchange, and Exchange Online (Office 365)
- Performs all types of migrations – intra-forest, cross-forest, & hybrid
- Migrates user/archive mailboxes, shared mailboxes, public folders, groups, etc
System Requirements
Before you start installing Kernel Migrator for Exchange, make sure that your computer meets the following requirements:
Installation Requirements
Processor
- Dual Core or higher Processor
Memory
- Minimum 2 GB RAM
Hard Disk
- Minimum 500 MB free disk space
Any of the following 32-bit or 64-bit Windows Operating Systems
- Windows 7
- Windows 8
- Windows 8.1
- Windows 10
- Windows 11
- Windows Server 2003
- Windows Server 2003 R2
- Windows Server 2008
- Windows Server 2008 R2
- Windows Server 2012
- Windows Server 2012 R2
- Windows Server 2016
Microsoft Outlook (Its version depends upon the version of Exchange Server).
Application Pre-Requisites
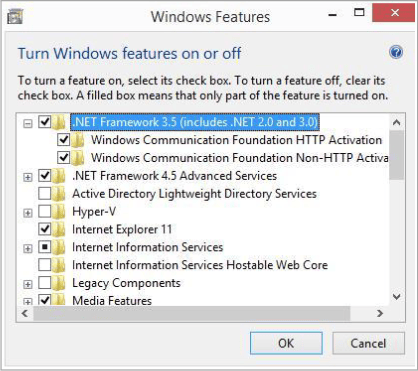
Prerequisites for Windows 8 / 8.1
If you are using the Kernel Migrator for Exchange on Windows 8 and 8.1, this feature should be installedbefore starting any migration job.
To install this feature:
- Go to “Control Panel” → “Programs and Features”
- Go to “Turn Windows features on or off”
- Check the boxes of ".NET Framework 3.5 (includes .NET 2.0 and 3.0)"
- Click “OK”
Supported Virtual Environments
- Hyper-V Server 2008
- Hyper-V Server 2008 R2
- Hyper-V Server 2012
- Hyper-V Server 2012 R2
- VMware ESX Server
- VMware ESXi Server
- Microsoft Virtual PC
Supported Exchange Servers
- Exchange Server 2000
- Exchange Server 2003
- Exchange Server 2007
- Exchange Server 2010
- Exchange Server 2013
- Exchange Server 2016
Prerequisites for Exchange Server
| Exchange Server | Supported Outlook Versions |
|---|---|
| Exchange Server 2000 |
|
| Exchange Server 2003 |
|
| Exchange Server 2007 |
|
| Exchange Server 2010 |
|
| Exchange Server 2013 |
|
| Exchange Server 2016 |
|
| Office 365 |
Note: Connecting to Office 365 requires you to select a Global AdministratorUser Mailbox, which has full access to all mailboxes |
Prerequisites for Report Console
- .NET Framework 4.0
- Internet Explorer 8.0 or later
- IIS 5.1 or later
Prerequisites for Profile Manager
- It is mandatory to have GPMC (Group Policy Management Console) installed on the computer where thesoftware is installed.
Prerequisites for Agents
- Dual Core orHigher Processor
- RAM
- Minimum 2 GB
- Recommended4 GB
- Free space on hard disk
- Minimum 1 GB
- Recommended2 GB
- Any of the following 32-bit or 64-bit Windows Operating Systems
- Windows 7
- Windows 8
- Windows 8.1
- Windows 10
- Windows 11
- Windows Server 2003
- Windows Server 2008
- Windows server 2008 R2
- Windows Server 2012
- Windows Server 2012 R2
- Any of the following 32-bit or64-bit Microsoft Outlook versions
- Outlook 2000 or later for Exchange Server 2000
- Outlook 2003 or later for Exchange Server 2003
- Outlook 2003, Outlook 2007, or Outlook 2010 for Exchange Server 2007
- Outlook 2003, Outlook 2007, Outlook 2010 or Outlook 2013 for Exchange Server 2010
- Any of the following Outlook versions for Exchange Server 2013 and Exchange Server 2016
- Microsoft Outlook 2013
- Outlook 2007 Service Pack 3 with the Outlook 2007 November 2012 update(12.0.6665.5000)
- Outlook 2010 Service Pack 1 with the Outlook 2010 November 2012 update(14.0.6126.5000)
- Any of the following Outlook versions for Office 365 and Hosted Exchange Server
- Outlook 2007 SP2
- Outlook 2010 SP1 for 64-bit
- Outlook 2010 14.0.7106.5003 for 32-bit
- Outlook 2013
- Other Prerequisites forAgent
- The user selected to add agent and to logon at the selected computer should have domainadministrative privileges.
- The computer that you are adding as agent should be turned on and connected to the computerrunning the software.
- Use the credentials of the same user who have currently logged on the selected computer. If thatcomputer is not logged on with the selected user, the agent will not be installed.
- The computer should be a member of any domain.
- The Outlook profiles of both Source and Target Exchange Server could be configured.
Note
- Agent program will not be installed ifthe selected computer is not turned on, or not connected, or notlogged on with the selected user.The software may add the computer even if any or all of theseprerequisites are not met.
You have to reinstall the agent when that computer is turned on and reachable.
- The mailboxes selected in a migration job will be migrated on the agent only when that computer isturned on, connected to the computer running software, and logged on with the same user with whichagent was added.
Prerequisites to Migrate Limits and Permissions of Public Folders
If you want to migrate Limits and Permissions of the Public Folders to Exchange Server 2010, 2013 and 2016,then following settings are required
- Steps for the Target Exchange Server 2010, 2013 and 2016: You must perform the following stepsat the domain controller where the Target Exchange Server is installed.
- Uncheck SSL using the following steps.
- Go to "Start Menu" → "Administrative Tools" → "Internet Information Services (IIS)Manager".
- In the left panel, browse the nodes to go to "IIS" → "Sites" → "PowerShell". It lists thedifferent options in the right panel.
- In the right panel, double click "SSL Settings" in "IIS" section to view its options.
- Please make sure "Require SSL" checkbox is unchecked. If not, then please uncheck"Require SSL" checkbox.
- Enable Basic Authentication using the following steps.
- Go to "Start Menu" → "Administrative Tools" → "Internet Information Services (IIS)Manager".
- In the left panel, browse the nodes to go to "IIS" → "Sites" → "PowerShell" → It lists thedifferent options in the right panel.
- In the right panel, double click "Authentication" in "IIS Section" to view its options.
- "Basic Authentication" should be enabled. If not enabled, you can right-clickon it andselect "Enable"
- Uncheck SSL using the following steps.
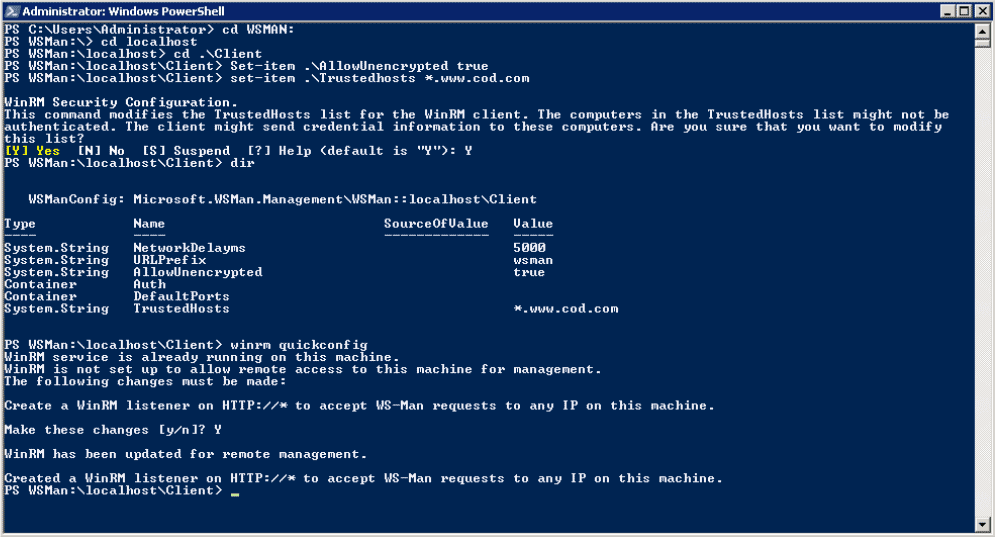
- Configure Web-Services Management using PowerShell: Configure Web-Services Management (WS-Management or WSMan) on the computer where the softwareis installed using Windows PowerShell. Youcan do this by executing the certain commands on Windows PowerShell.Open PowerShell withAdministrative Rights and executethe following commands one by one.
- Execute the following commands to switch to WSM directory and then to its internalfolders.
CD\
CD WSMAN:
cd localhost
cd .\Client
- Run the following command to set the value of "AllowUncrypted" attribute to "True".
Set-item .\AllowUnencrypted true
- Run the following command to add Target Exchange Server in the listof Trusted Hosts.
set-item .\Trustedhosts *.www.cod.com
Type "Y" and press "Enter" key, when the confirmation is required to make the required change.
- Run the following command to configure WinRM Listener.
winrm quickconfig
Type "Y" and press "Enter" key,when the confirmation is required to make the required change.
Following is a screenshot of these commands.
- Execute the following commands to switch to WSM directory and then to its internalfolders.
Prerequisites to Migrate SID History
If you want to migrate SID history on both the Exchange Servers (source and target domains) then following settings are required:
- A validated Trust (Two-way transitive trust) between both domains should be available.
- Once the trust is createdsuccessfully, you have to perform the following steps one-by-one first on thedomain controllers where the Source Exchange Serveris installed and secondly on the domain controllerwhere Target Exchange Server is installed.
- Perform the following Group Policy Settings on both computers running Exchange Servers one-by-one:
- Go to "Start Menu" → "Administrative Tools" → "Group Policy Management" to accessGroup Policy Management Console.
- You can also type "GPMC.MSC" in "Run" box or at the commandprompt and press "Enter"key to access the same window.
- In the left panel, browse the nodes to go to "Forest" → “Domains” → "www.domain.com" → "Domain Controllers" → "Default Domain Controller Policy". You can also create a newcustom Domain Controller Policy and use it.
- Right-click on "Default Domain Controller Policy" or another domain controller level policyand click"Edit" to access "Group Policy Management Editor" to edit this policy.
- In the left panel oftheeditor, go to “User Configuration” → "Policies" → "WindowsSettings" → "Security Settings" → "Local Policies" → "Audit Policy" to view its sub-policiesin the right panel
- Double-click "Audit Account Management" in the right panel to access its properties.
- Check "Define these policy settings" checkbox.
- Select both "Success and Failure" checkboxes.
- Click "Apply" and "OK".
- Similarly,if you are using Windows server 2008 and above, you have to select "Success"in the properties of "Audit directory service access" policy.
- Perform the following steps for Active Directory on both computers running Exchange Servers one-by-one.
- Go to "Start Menu" → "Administrative Tools" → "Active Directory Users and Computers" to access its window.
- Perform the following steps to create a custom object at both the domains -first at sourcedomain and secondlyat target domain.
- In the left pane, click "Builtin" Organizational Unit. It lists its objects and groups inthe right panel.
- Create local security groups named asadomainname, on both domains, in capitalletters. For Example, you have to create "SOURCE$$$" at "www.source.com" SourceDomain and "TARGET$$$" at "www.target.com" Target Domain.The word source inSOURCE$$$and the word target in TARGET$$$ will be replacedwith the domainname.
- Perform the following steps to add Target Domain Administrator in Source DomainAdministrators group, and to add Source Domain Administrator in Target DomainAdministrators group.
- Now in "Builtin",double click "Administrators" group to access its properties.
- Go "Members" tab and click "Add".It shows "Select Users,Contacts,.." dialog box.
- Click "Locations" to access its dialog box.
- Now if you are doing this configuration in the source domain, select Target Domain.If you are doing this configurationofthe target domain, select source domain.
- Click "OK".
- Type "Administrator" in "Enter the object names to select" text box.
- Click "Check Names" to verify the name.
- Click "OK" to select this user.
- Perform the following Group Policy Settings on both computers running Exchange Servers one-by-one:
Supported Migration Types
| Cross-forest Migration (Different Domains) | Intra-forest Migration (In Same Domain) | Hosted/Hybrid Migration |
|---|---|---|
| Perform Exchange Migration (On-premises) to/from Exchange 2003/ 2007/ 2010/ 2013 /2016 /2019. |
|
|
Install Kernel Migrator for Exchange
To install Kernel Migrator for Exchange, you can download the installer file from https://www.nucleustechnologies.com/exchange-migration/.
Note
- Please make sure your computer meets the system requirements and the logged on user has the required rights as discussed in the above section.
- It is recommended to install software on a client machine of source or target Exchange Server forhassle-free migration.
- The user with which you are running the setup should have the required user rights to install thesoftware.
- It is recommended to have a two-way trust between Source and Target Exchange Servers for hassle-free migration.
Download “setup.exe” and run it to start the installation. You have to follow the onscreen instructions to install the software. The installation procedure is same as you follow to install other applications on Windows OS; still, the common steps are listed herein below for your ready reference.
- At the first step, you have to click "Next".
- The next step shows the license agreement.It is recommended to read the license agreement carefully before installing the software.
- If you agree to the license agreement and want to continue the installation, then check "I accept theagreement" and click "Next".
- It displays the installation location and lets you modify it.
Note: The default destination is“%ProgramFiles%\Kernel Migrator for Exchange”for 32-bit and“%ProgramFiles(x86)%\Kernel Migrator for Exchange”for 64-bit Windows OS. - If you want to modifythe installation location, thenclick "Browse" and select the desired location.
- Click "Next" once you are done. At the next step, you can customize the locationof the shortcuts folder inthe Start Menu.
- Click "Browse" and select a different location to modify the location of the shortcuts folder in the StartMenu.
- Click "Next" to use the default or customized shortcuts folder. It takes you to the next step, where you canperform the additional tasks like creating a desktop and quick launch icon.
- Check the boxes titled "Create a desktop icon", or "Create a Quick Launch icon", or both, if required.
- Click "Next”. Now, the software is ready to install.
- Click "Install" to begin the installation. When the installation process is completed, a messagefor successfulinstallation appears inthe wizard.
- Click “Finish”to complete the process. It closes the installationwizard and launchesthe softwareif youhave kept the option "Launch Kernel Migrator for Exchange" checked.
Uninstall Kernel Migrator for Exchange
You may find yourself in a situation where you have to uninstall Kernel Migrator for Exchange. Please make sure to close the software before uninstalling. Follow the steps below to complete the uninstallation:
There are two ways to start the uninstallation.
- Go to Start → “All Programs” → "Kernel Migrator for Exchange", click "Uninstall Kernel Migratorfor Exchange".
- Click Start → Control Panel. Its window appears. Launch "Programs and Features".Select "KernelMigrator for Exchange" and click "Uninstall".
- Following any of the above methods displays a warning message.
- Click “Yes” to start the uninstallation process.
- Once uninstalled, the message box confirming the successful uninstallation appears onscreen.
- Click “OK” to completethe process.
After following the above steps, Kernel Migrator for Exchange will haveuninstalled successfully from your computer. By default, the software is configured to retain the license fileand other settings in the program installation folder.
To remove the remaining elements, delete its program installation folder manually and then empty the Recycle Bin as well.
- %ProgramFiles%\Kernel Migrator for Exchange–for 32-bit OS
- %ProgramFiles(x86)%\Kernel Migrator for Exchange–for 64-bit OS
Kindly do not delete this folder if you want to retain the license file, orhave to reinstall the same/upgraded version of the software.
Video
Kernel Exchange Migration
Download Trial Version
Kernel Migrator for Exchange
Perform Exchange/Office 365 migrations in any environment. This software helps you do pre-migration analysis and post-migration tasks. Also, it supports Exchange 2007, 2010, 2013, 2016, 2019, Office 365, and Hosted Exchange for migration.
- Download free version & migrate 2 mailboxes free
- Migrates on-premises Exchange, hosted Exchange, and Exchange Online (Office 365)
- Performs all types of migrations – intra-forest, cross-forest, & hybrid
- Migrates user/archive mailboxes, shared mailboxes, public folders, groups, etc.
Demo Request - Kernel Migrator for Exchange
Exchange Migration to 2007, 2010, 2013, 2016, 2019, Office 365 and Hosted Exchange (Any provider).
- Supports cross-forest, intra-forest, hosted, hybrid Exchange migrations
- Performs migrations between Office 365/Exchange and Exchange/Office 365
- Free live session to demonstrate the software working (upon request)
Request a Quote: Kernel Migrator for Exchange
Exchange Migration to 2007, 2010, 2013, 2016, 2019, Office 365 and Hosted Exchange (Any provider).
- Supports cross-forest, intra-forest, hosted, hybrid Exchange migrations
- Performs migrations between Office 365/Exchange and Exchange/Office 365
- Free live session to demonstrate the software working (upon request)
Online Support
Customer support is not a service, it’s an attitude.
Our dedicated team is available 24x7 to provide fast responses to all of your queries. For any technical support you can register or submit a ticket here.
- Register
Register a new account to submit tickets. click here. - Submit a ticket
Submit a new ticket for your query. Our support team will contact you. click here. - Knowledgebase
Search support helpful articles and find answers to frequently asked questions. click here.