


Read time 10 minutes
Introduction
Outlook by Microsoft stands as the most reliable email client compatible with both Windows and Mac OS platforms. It seamlessly adapts its user interface to match the respective operating system environment, along with utilizing distinct data file formats. Specifically, Windows employs PST (Personal Storage Table), while Mac OS employs OLM (Outlook for Mac). In cases where users transition from Apple products to Windows, a crucial step involves converting their data files from OLM Emails to Outlook PST, as Microsoft Outlook does not support OLM files. This article will provide a guide on importing Outlook for Mac OLM emails into Outlook versions 2019, 2016, and 2013.
If you’re in search of potential methods to import OLM files into the Windows Outlook environment, you’ve landed in the correct spot.
We’re all familiar with the fact that Microsoft Outlook stands as the premier email client globally, catering to both Windows and Mac OS users. Consequently, those who depend on OLM emails frequently find themselves in the position of needing to transfer their OLM data to Outlook.
In Microsoft Outlook versions 2019, 2016, and 2013, as well as Outlook 2016 for Mac, archiving mailbox items is a straightforward process. The mailbox information is stored in PST file format in Microsoft Outlook and OLM file format in Outlook for Mac. Additionally, it’s possible to import these OLM data files into various versions of MS Outlook.
Reason for importing Mac Outlook files to Windows Outlook
In order to view Mac Outlook emails in Windows Outlook, it is necessary to convert the OLM file to an Outlook PST format since direct access is not possible. There are various compelling reasons for transferring data from Mac Outlook to the Windows Outlook environment, including:
- It is necessary to share OLM emails with colleagues who utilize Windows systems.
- There are no straightforward methods to make Outlook for Mac emails accessible in Windows Outlook.
- Consider upgrading or transitioning your operating system from Mac to Windows.
- Contemplating a migration from a Mac-centric organization to a Windows-centric one.
- Employees operate on both Windows and Mac systems across various locations.

A simple way to import OLM files to Windows Outlook
Here is a straightforward, step-by-step tutorial to assist you in importing Outlook for Mac OLM emails into Outlook versions 2019, 2016, and 2013.
- Section 1: Export Outlook for Mac data (OLM file)
- Section 2: Converting OLM Files to Outlook PST (By Using automated tool)
- Section 3: Import PST Files to Windows Outlook
- Section 4: Convert OLM Emails to Outlook PST via IMAP Email Server
Section 1: Export Outlook for Mac Data (OLM File)
- Click on the Tools tab, select the Export option to export Outlook data to OLM file format.
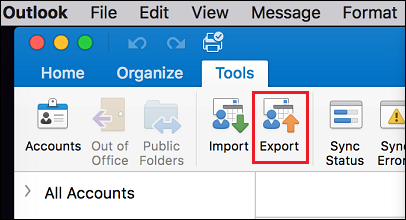
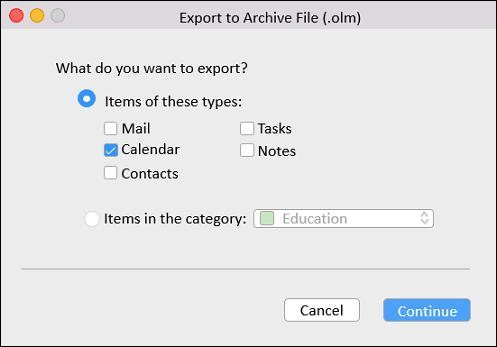
Please Note: Don’t see the Export button? Make sure you have the latest version of Outlook. - In the dialog box Export to Archive File (.olm), select the items you want to export (from Mail, Tasks, Calendar, Notes, and Contacts), and click Continue.
- Now, from the Save Archive File (.olm) as dialog box, look for Favorites in the left pane, choose Downloads folder, and click Save.
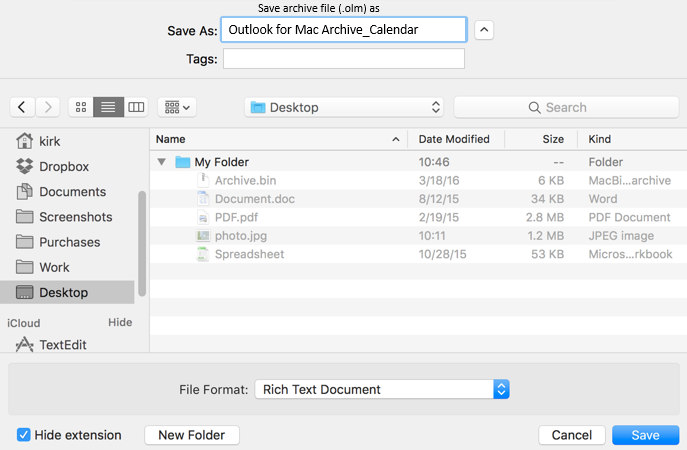
- Finally, your data will be exported to the specified location, and you’ll get a notification. Click Finish to complete the final step.
- Move this exported OLM file to the Windows system with the help of an external storage device such as a pen drive.
Section 2: Converting OLM files to Outlook PST
To transfer data from an OLM file to Windows Outlook, the initial step involves converting the OLM file into the Outlook PST format. Subsequently, the converted PST file can be seamlessly imported into Windows Outlook. Opting for an automated third-party tool is the most efficient approach for this task. Therefore, it is advisable to utilize the Kernel for OLM to PST Converter tool.
- Launch the Converter tool and then select Browse to select a single or multiple OLM files that are to be converted to PST file.

Note: If you wish to convert multiple OLM files at one time, select Convert Multiple Files.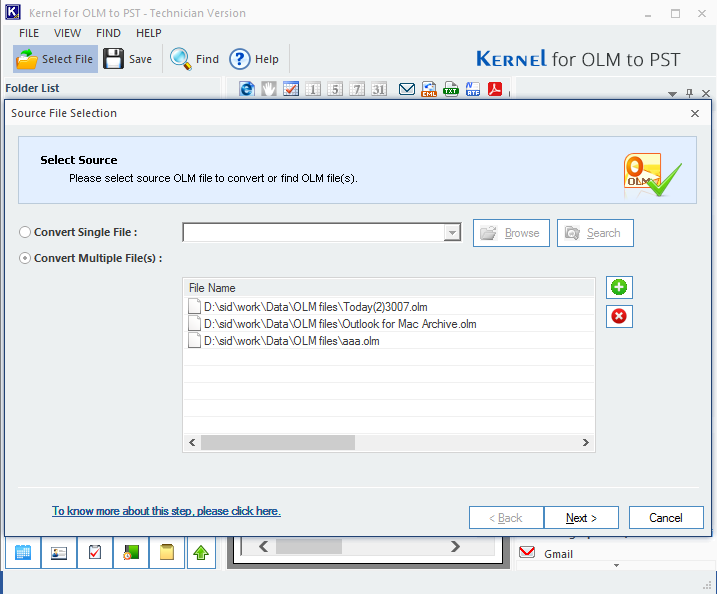
- To be satisfied with the mailbox items, you can preview that before conversion. Now, click PST file (MS Outlook) from the right panel of the software.
Note: You can save individual items by selecting the required format from the right-click menu.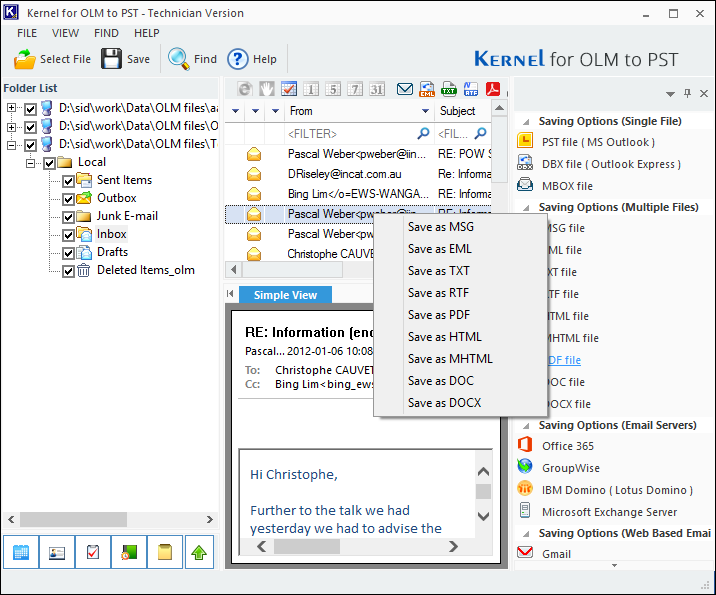
Note: To find specific messages, click the Find button on the toolbar. Now, search for specific items in the Find Message(s) window.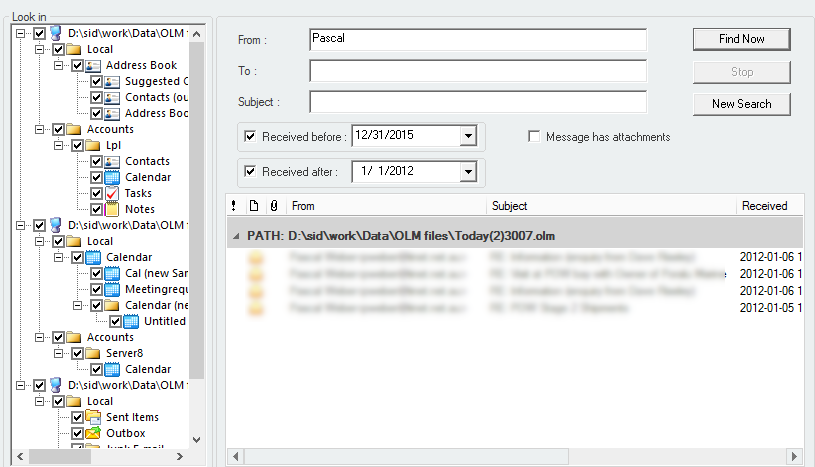
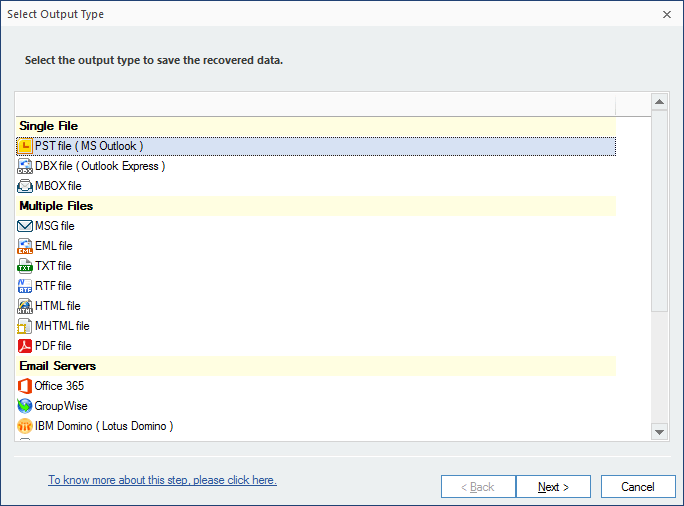
- Now, select the Output type as PST file (MS Outlook) and click Next to proceed with the conversion process.
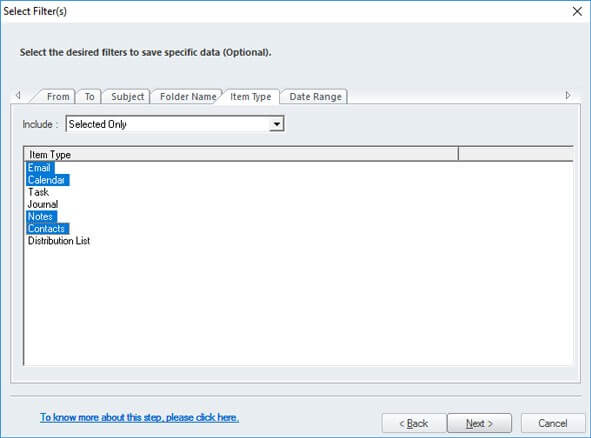
- Opt for smart filters just in case you want to save specific items. This is an optional filter. However, you can simply skip this step.
- Save the converted PST file into multiple PST file if you realize that it is very large. Otherwise, simply select Do not split file option to save the entire data to a single file.

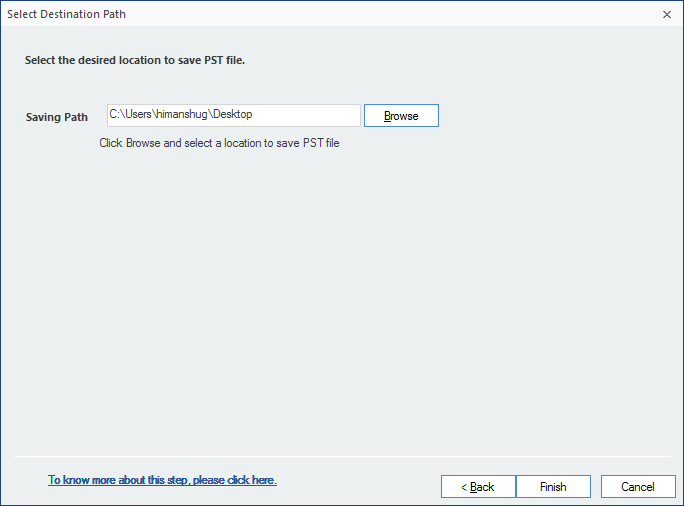
- Finally, select the destination to save the converted file using the Browse button and click Finish.
Section 3: Import PST files to Windows Outlook
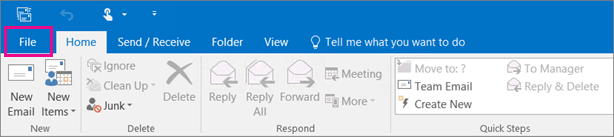
- Open MS Outlook and select File.
- Select Open & Export >> Import/Export.

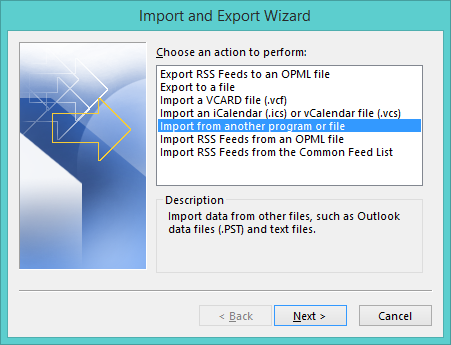
- In the Import and Export wizard, select Import from another program or file, and then click Next.
- Now, select Outlook Data File (.pst) and click Next.
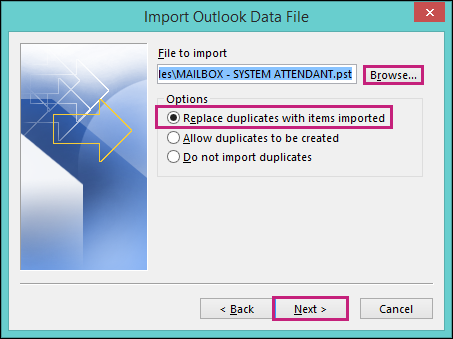
- Select the file to import by clicking on the Browse button; under Options select the suitable option and click Next.
- At last, select Import Items into the current folder and click Finish.
Section 4: Access OLM data in Outlook via IMAP email server
You can access OLM files using the same IMAP Server setup in both Outlook for Mac and Microsoft Outlook. Assuming you already have a Gmail account set up in Outlook for Mac, and that the OLM data is syncing with its IMAP server, make sure you’ve also exported or copied the OLM data to the IMAP account folder. Please note that it’s essential to enable IMAP access settings for the IMAP Server account (Gmail) beforehand, in order to configure it with Outlook for Mac or Microsoft Outlook. Additionally, when configuring the IMAP Server with Outlook for Mac, you’ll need to create a new Gmail Label. Follow the steps below for a clearer understanding of the process.
- Launch Outlook 2016 on your Windows operating system.
- Set up your Gmail IMAP email account within MS Outlook using the Account Settings option.
- Once the account setup is complete, migrate your Outlook for Mac data to the IMAP mailbox by employing the Copy & Move or Drag and Drop functions.
- As soon as the data from the OLM file has been successfully transferred to your IMAP account, it will seamlessly integrate into your Outlook environment.
This represents the most straightforward method for accessing OLM data using MS Outlook 2016 on a Windows platform. Manual procedures can be laborious, demanding extensive configuration, and may not always yield favorable results. Therefore, it’s advisable to select one of the two methods outlined above to efficiently access OLM data within Microsoft Outlook.
Conclusion
In this comprehensive guide, we will walk you through the entire process of importing Outlook for Mac OLM emails into Outlook 2019, 2016, and 2013 PST files. By following these steps, you can seamlessly transfer your emails, contacts, and calendars from Outlook for Mac to Windows Outlook. Additionally, if you’re interested in exporting OLM to Office 365 manually, you can find detailed instructions in this Export OLM to Office 365 Manually.
The location of OLM file is not accessible easily. Thanks for mentioning the software process because it can search of OLM file from a whole drive.
I checked the software to import OLM files from two version of Outlook for Mac and it imported both version of files. The filters worked file and I moved some useful folders again.
Thanks for sharing such a wonderful information, you help me a lot, because I successfully exported OLM Emails to Outlook.
I appreciate the performance of the software and customer support team. It really works for me.
Thanks to support me during migration of OLM files to Outlook 2016.
Excellent email migration tool for Outlook for Mac to MS Outlook migration. It really helps us to move complete data without any error.