Summary: The article discusses how to share Microsoft 365 Calendars using Outlook, allowing multiple users to stay updated on events and meetings. It outlines steps for sharing and provides permissions options. Additionally, it covers considerations to avoid errors and an alternative method for publishing calendars to a web page. It mentions Kernel Office 365 Backup & Restore as a solution for Office 365 data backup and restoration.
Organizations and businesses frequently organize events and meetings as part of their corporate governance and branding efforts. Email clients like Microsoft Outlook include a dedicated Calendar feature designed for scheduling these events. Users can create calendar events, providing details such as event title, description, venue, and more. These calendar events can then be effortlessly shared within the organization using the “Share Calendar” option.
Calendar sharing is a useful feature within email client applications that enables seamless updates for multiple users. In this article, we will explore the process of sharing Microsoft 365 Calendars using Outlook. Outlook, a versatile email client, supports the configuration of various email servers, IMAP servers, and platforms, including Microsoft 365. To begin, we will configure a Microsoft 365 account in the Outlook email application and then proceed to share calendars.
With the Microsoft 365 account configuration successfully completed in the Outlook application, we can now shift our focus to sharing the Microsoft Calendar with other Outlook users.
Steps for Sharing Office 365 Calendar Using Outlook
Start the Microsoft Outlook application.
Click on the Calendar icon (bottom left of the page).
Go to the Home menu and click on the Share Calendar option.
From the drop-down list, select the Calendar that you want to share.
Click the Add option on the Calendar Properties dialog box.
On the Add Users dialog box, you can either search for the particular Outlook user from the address box or type the email address in the provided space and then click OK.
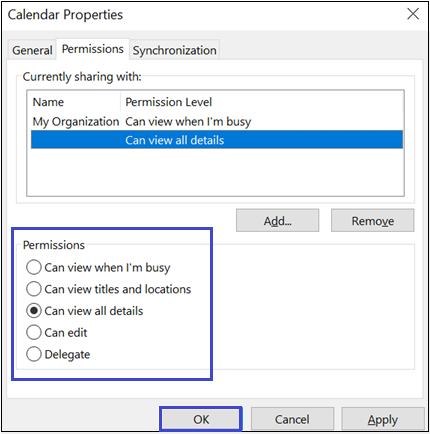
Now, move to the Permissions tab and select the added username or email address that you want to share the respective Calendar. From the Permissions section, select one of the permissions as per the requirement and then click OK. Available Permissions
Can view when I’m busy – Allows to view availability
Can view titles and locations – Allows to view subject, availability, locations of events/ meetings
Can view all details – Allows to view complete details
Can edit – Allows to edit the Calendar details
Delegate – Allows delegating the Calendar permissions to another user
Once the above step is performed, an email with the Calendar sharing invitation is sent to the Outlook user selected in the 6th step.
The recipient user must click on the Accept link from the received email to view the Calendar event on his Calendar list.
Note: If a user does not want to continue sharing the Calendar, then he can easily stop sharing by selecting the shared calendar name from the Calendar Permissions property and clicking on the Remove option from there.
Important Considerations to Avoid “This calendar can’t be shared” Error in Outlook
Check the validity of the email address
Check if the email address is from Microsoft 365 Group (it must not be)
Another method for sharing the Microsoft 365 Calendar with Outlook users is by publishing it to a web page. To publish a Calendar this way, users need a web server that supports the WebDAV protocol (World Wide Web Distributed Authoring and Versioning). For guidance on this, users can consult their Internet Service Provider or Server Administrator.
How to Publish a Microsoft 365 Calendar?
Follow the process to publish a calendar to a web page.
Launch the Microsoft Outlook application.
Go to the Calendars and then from the Home menu, click on Publish Online and then select Publish to WebDAV Server option.
Provide the WebDAV Server path location in the Location box, use provided publishing options, and click OK.
Now Microsoft 365 Calendar is published to a Web page with all details to be viewed by the Outlook and other users. Note: Publishing a Calendar would not allow sharing updates to the Calendar once it is published.
So, these are the possible manual ways to share Microsoft 365 Calendar to Outlook users.
However, many Office 365 users require a permanent backup of their data, including calendars. To address this need, we recommend using the Kernel Office 365 Backup & Restore solution, which offers robust and secure Microsoft 365 data backup to Outlook PST files. Additionally, it provides the capability to restore PST files back to Office 365, ensuring data continuity and security.
This blog explores the feature of sharing Office 365 Calendars through the Outlook application, offering detailed explanations. Furthermore, it suggests a reliable solution for backing up Microsoft 365 data, including Calendars.