Read time 6 minutes
Once you’ve configured Office 365 and are ready to transfer your data to it, it’s essential to ensure you have a suitable domain name in place. In this guide, we will walk you through the comprehensive steps for adding a new domain name to Office 365, while also highlighting key considerations along the way.
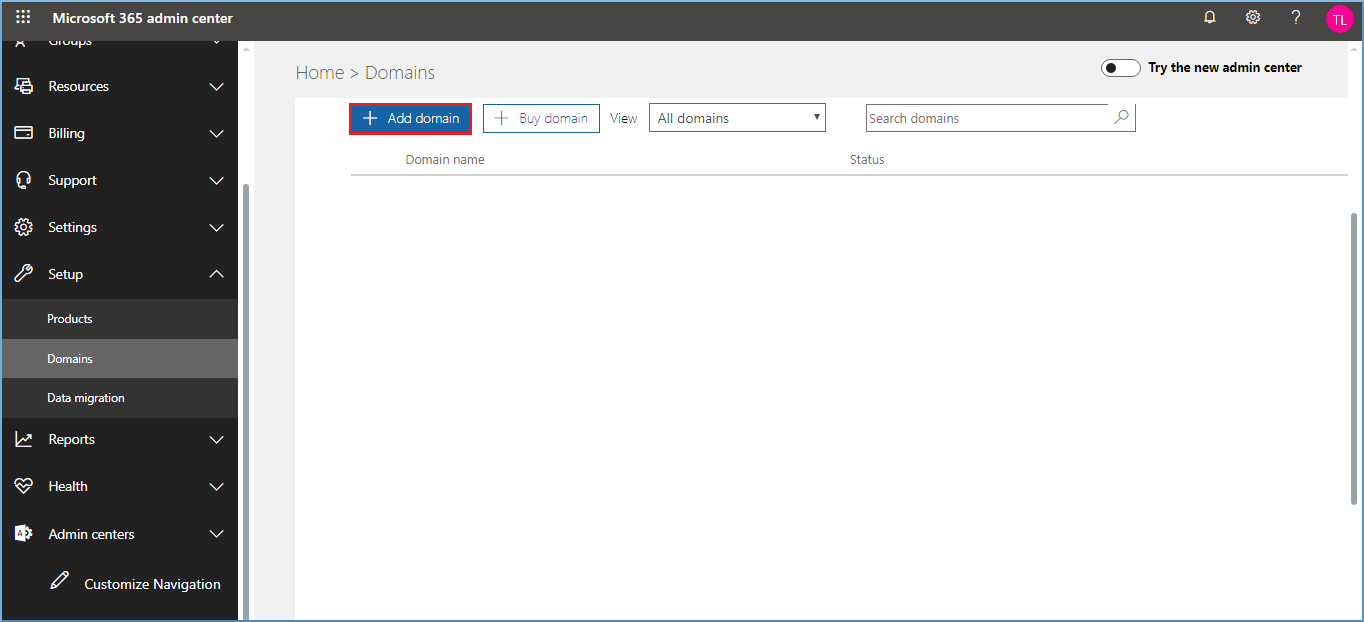
Here is the process to add a domain in Office 365
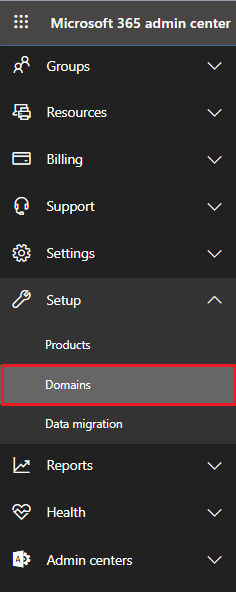
- Log in to Exchange Admin Center. Then follow Setup >> Domains.
- Click Add Domain button.
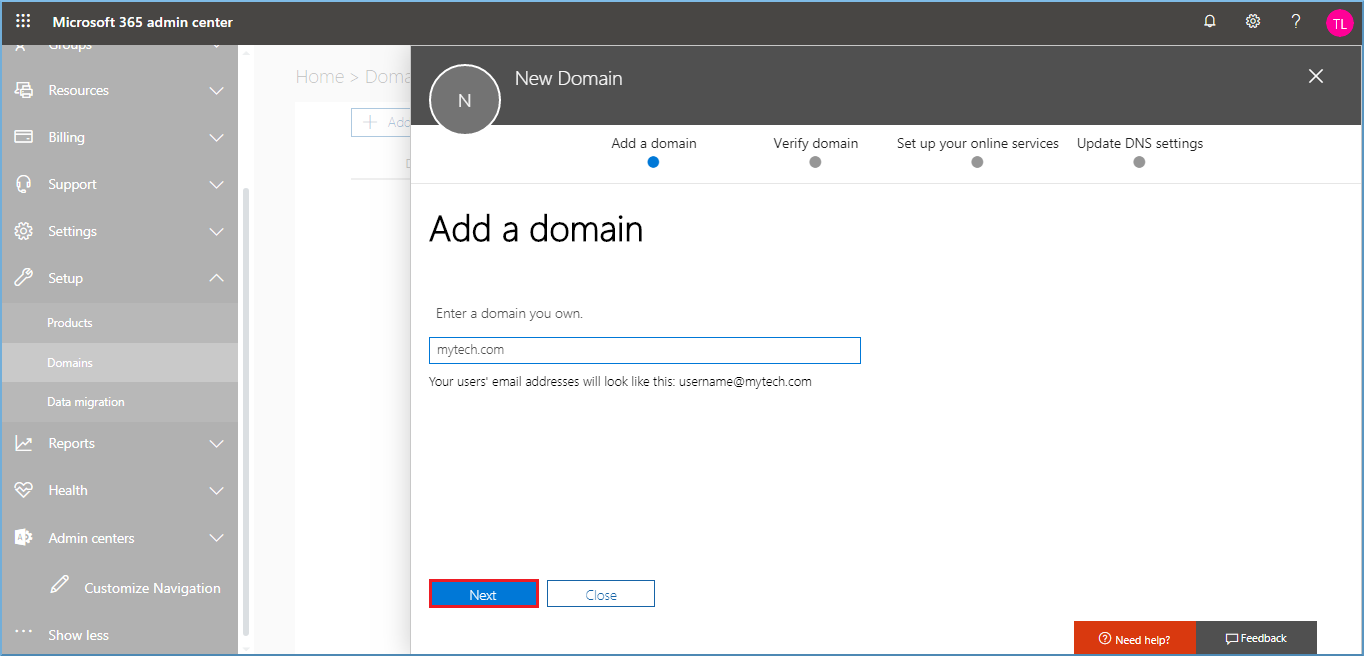
- Provide a domain name you own. Click the Next button.
- Select your preferred domain verification method. By default, the TXT record option is preselected. However, you also have the option to sign in using your GoDaddy credentials for domain verification (provided the domain is registered with GoDaddy). Alternatively, you can opt for verification via email, which will be sent to the registered contact associated with the new domain. The verification process typically concludes within 30 minutes.
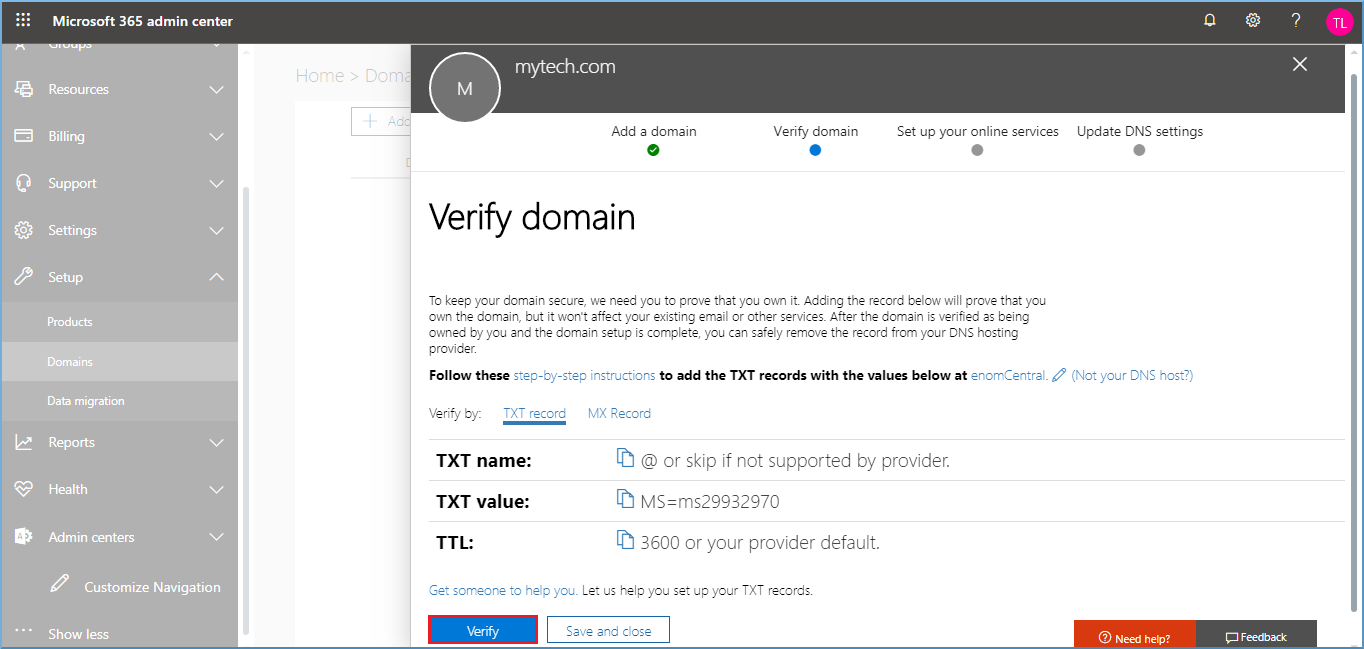
- After verifying the domain name, the next step involves making changes in the DNS.
- Choose the first option ‘Add the DNS records for me’ if you want the Office 365 to configure the DNS automatically.

- If you’re going to make the changes in the DNS yourself, then choose the second option ‘I’ll add the DNS record myself.’

- Choose the first option ‘Add the DNS records for me’ if you want the Office 365 to configure the DNS automatically.
If you choose the second option to manually add DNS records, you will be directed to the CNAME records page. Here, you will find a list of several records that you must add to your registrar’s website.
If you want to insert the records yourself, then you need to add various records yourself.
Add a TXT or MX Record
TXT and MX records serve the purpose of verifying domain ownership, and you are typically required to create just one of these records. While most domain registrars prefer the use of TXT records for verification, some may request the use of an MX record instead.
- Sign into the domain registrar’s website and choose your domain.
- Choose to edit the domain name records.
- Select the option to create the record.
- If you select the TXT record, then you need to input the value:
- Records Type – TXT.
- Alias or Hostname – either type your domain name or leave the field empty.
- Value – MS=ms XXXXXXXX.
- TTL – Set the value to one hour.
If you select the MX record, then you need to input the following values: - Record Type – MX.
- Alias or Hostname – either type or domain name or leave the field empty.
- Value – MS=ms XXXXXXXX
- Priority – Input a lower priority than the other MX records.
- TTL – set the value to one hour.
- Save the record.
- After saving the record, go back to Office 365 and request to verify the domain.
- Login to Office 365 and follow Setup >> Domains.
- Choose the domain which you want to verify.
- Click the Start Setup page (on the Setup page).
- Click the verify button.
It will take approximately 15 minutes to verify the domain.
Add MX Record to Route Email at Office 365
After configuring Office 365, you’ll want your emails to be directed to Office 365. To achieve this, you need to update the MX record by following these steps:
- Sign into the domain hosting provider’s website and go to your domain.
- Choose the option to edit the DNS records of the domain.
- Click on the ‘Add MX record’ option. The necessary information to create the new MX record can be found within your Office 365 account. Navigate to your domain settings and copy the ‘Points to address’ value.
- In the MX record at registrar’s website, check all the entries are input like following –
- Record Type: MX.
- Priority: Input the highest priority, which is 0.
- Hostname: either type your domain name or leave the field empty.
- Points to address: paste the value of Points to address (which is copied from Office 365).
- TTL: Set the value to one hour.
Save the MX records
If there is any other MX record which sends to emails to any other platform, then delete it.
Add CNAME Records
CNAME records are crucial for Office 365, and it’s necessary to add a minimum of three CNAME records. If you have more than three CNAME records to configure, make sure to add all of them accordingly.
You can create the CNAME records at the domain registrar website one at a time. To create each record, type, or copy the following values.
| Record Type | Host | Points to | TTL |
|---|---|---|---|
| CNAME (Alias) | autodiscover | autodiscover.outlook.com | 1 hour |
| CNAME (Alias) | lyncdiscover | webdir.online.lync.com | 1 hour |
| CNAME (Alias) | sip | sipdir.online.lync.com | 1 hour |
Finally, Save the records.
Conclusion
Once you’ve successfully added a new domain name to Office 365, your next task is to migrate your older emails from previous platforms to Office 365. If you’re currently using Exchange Server to manage your emails, one method is to export your data from Outlook to a PST file and then import PST file into Office 365. However, for a more direct and secure migration option, consider using Kernel Office 365 Migration. This tool facilitates a safe and efficient migration from Exchange to Office 365. It can access entire mailboxes and offers various filters for conducting selective migrations.